Verify IPv6 reachability for Lightsail instances
You can verify IPv6 connectivity from your local computer to an Amazon Lightsail instance using the ping tool. Ping is a network diagnostic utility that’s used to troubleshoot connectivity issues between two or more networked devices. If ping succeeds, you should be able to connect to your instance over IPv6. If a network setting or device isn't configured to allow IPv6, the ping command fails. For more information, see IPv6-only considerations
Contents
Enable IPv6 for dual-stack instances
Enable IPv6 for your dual-stack instance before you begin testing. IPv6 is always on for IPv6-only instances.
Complete the following procedure to enable IPv6 on your dual-stack instance if it's not enabled.
-
Sign in to the Lightsail console
. -
Choose the name of the instance for which you want to enable IPv6. Make sure that your instance is running.
-
Choose the Networking tab from the instance management page.
-
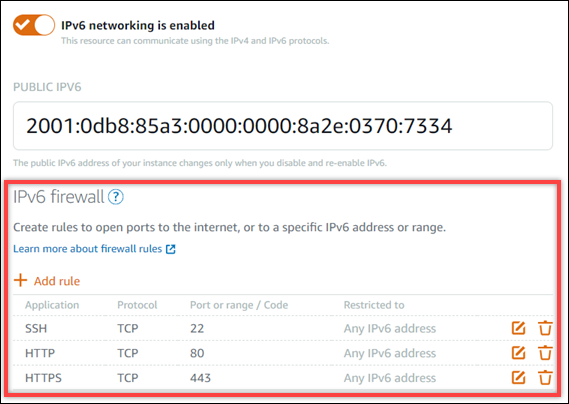
Enable IPv6 on the IPv6 Networking section of the page.
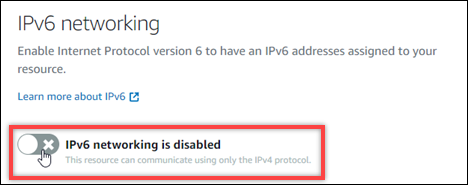
After you enable IPv6, a public IPv6 address is assigned to your instance, and the IPv6 firewall becomes available.
-
Take note of the instance's Public IPv4 and Public IPv6 addresses at the top of the page. You will use them in the following sections.
Configure the instance's firewall
The firewall in the Lightsail console acts as a virtual firewall. Meaning it controls which traffic is allowed to connect to your instance through its public IP address. Each dual-stack instance that you create in Lightsail has an individual firewall for IPv4 addresses and another for IPv6 addresses. Each firewall contains a set of rules that filter traffic coming into the instance. Both firewalls are independent of each other—you must configure firewall rules separately for IPv4 and IPv6. Instances with an IPv6-only instance plan don't have an IPv4 firewall that you can configure.
Complete the following procedure to configure your instance’s firewall for Internet Control Message Protocol (ICMP) traffic. The ping utility uses the ICMP protocol to communicate with your instance. For more information, see Control instance traffic with firewalls in Lightsail.
Important
Windows and Linux contain an operating system (OS) level firewall that can block ping commands. Verify that the instance’s OS firewall can accept ICMP traffic over IPv4 and IPv6 before you continue. For more information, see the following documentation:
-
Sign in to the Lightsail console
. -
Choose the name of the instance for which you want to configure the firewall.
-
Choose the Networking tab from the instance management page, then complete the remaining steps in the appropriate section for the type of firewall that you want to use. For IPv4, complete the steps in the IPv4 Firewall section. For IPv6, complete the steps in the IPv6 Firewall section.
-
From the Application dropdown menu, choose Ping (ICMP).
-
Select the Restrict to IP address box to allow a connection from your local source IP address or range, then enter your source IP address. (Optional) You can leave the box unselected to allow a connection from any IP address. We recommend that you use this option in a test environment only.
-
Choose Create to apply the new rule to your instance.
-
Test reachability to your instance
Complete the following procedure to test IPv4 or IPv6 reachability from your local computer or network to your Lightsail instance. You need the instance's public IPv4 and IPv6 addresses that you noted in Step 5.
-
Open a terminal window on your local device.
-
Enter one of the following commands to ping your Lightsail instance. Replace the example
IP addressthat's in the command with the public IPv4 or IPv6 address of your instance.To test over IPv4
ping192.0.2.0To test over IPv6
ping62001:db8:: -
After the command returns a few replies, enter
ctrl+zon your device's keyboard to stop the command.
The ping command returns successful replies from your instance’s IPv4 address if it’s successful. The result should look like the following example.
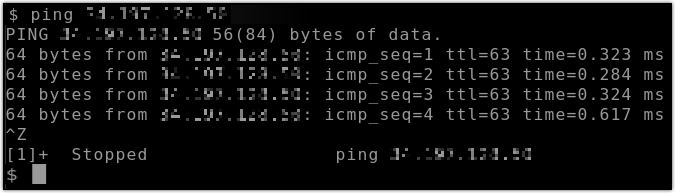
The ping6 command returns successful replies from your instance’s IPv6 address if it’s successful. The result should look like the following example.

Both commands return Request timeout if your instance can't be reached.
-
Open a command prompt.
-
Enter one of the following commands to ping your Lightsail instance. Replace the example
IP addressthat's in the command with the public IPv4 or IPv6 address of your instance.To test over IPv4
ping192.0.2.0To test over IPv6
ping2001:db8:: -
After the command returns a few replies, enter
ctrl+zon your device's keyboard to stop the command.
The ping command returns successful replies from your instance’s IPv4 address if it’s successful. The result should look like the following example.

The ping command returns successful replies from your instance’s IPv6 address if it’s successful. The result should look like the following example.

Both commands return Request timeout if your instance can't be reached.
