Add Amazon Location search to your application
The last step for your application is to add searching on the map. In this case, you will add a reverse geocoding search, where you find the items at a location.
Note
Amazon Location Service also provides the ability to search by name or address to find the locations of places on the map.
To add search functionality to your application
-
Open the
main.jsfile that you created in the previous section. -
Modify the
mainfunction, as shown. The changes you need to make are shown ingreen.async function main() {// Create an authentication helper instance using an API key const authHelper = await amazonLocationAuthHelper.withAPIKey(apiKey);// Initialize map and Amazon Location SDK client: const map = await initializeMap();const client = new amazonLocationClient.LocationClient({ region, ...authHelper.getLocationClientConfig(), // Provides configuration required to make requests to Amazon Location }); // On mouse click, display marker and get results: map.on("click", async function (e) { // Set up parameters for search call let params = { IndexName: placesName, Position: [e.lngLat.lng, e.lngLat.lat], Language: "en", MaxResults: "5", }; // Set up command to search for results around clicked point const searchCommand = new amazonLocationClient.SearchPlaceIndexForPositionCommand(params); try { // Make request to search for results around clicked point const data = await client.send(searchCommand); // Write JSON response data to HTML document.querySelector("#response").textContent = JSON.stringify(data, undefined, 2); // Display place label in an alert box alert(data.Results[0].Place.Label); } catch (error) { // Write JSON response error to HTML document.querySelector("#response").textContent = JSON.stringify(error, undefined, 2); // Display error in an alert box alert("There was an error searching."); } });}This code starts by setting up the Amazon Location authentication helper to use your API key.
const authHelper = await amazonLocationAuthHelper.withAPIKey(apiKey);Then it uses that authentication helper, and the region you are using to create a new Amazon Location client.
const client = new amazonLocationClient.LocationClient({
    region,
    ...authHelper.getLocationClientConfig(),
  });
Next, the code responds to the user choosing a spot on the map control. It does this by catching a MapLibre provided event for
click.map.on("click", async function(e) { ... });The MapLibre
clickevent provides parameters that include the latitude and longitude that the user chose (e.lngLat). Within theclickevent, the code creates thesearchPlaceIndexForPositionCommandto find the entities at the given latitude and longitude.// Set up parameters for search call let params = { IndexName: placesName, Position: [e.lngLat.lng, e.lngLat.lat], Language: "en", MaxResults: "5" }; // Set up command to search for results around clicked point const searchCommand = new amazonLocationClient.SearchPlaceIndexForPositionCommand(params); try { // Make request to search for results around clicked point const data = await client.send(searchCommand); ... });Here, the
IndexNameis the name of the Place Index resource that you created earlier, thePositionis the latitude and longitude to search for,Languageis the preferred language for results, andMaxResultstells Amazon Location to return only a maximum of five results.The remaining code checks for an error, and then displays the results of the search in the
<pre>element calledresponse, and shows the top result in an alert box. -
(Optional) If you save and open the
quickstart.htmlfile in a browser now, choosing a location on the map will show you the name or address of the place that you chose. -
The final step in the application is to use the MapLibre functionality to add a marker on the spot that the user selected. Modify the
mainfunction as follows. The changes you need to make are shown ingreen.async function main() { // Create an authentication helper instance using an API key const authHelper = await amazonLocationAuthHelper.withAPIKey(apiKey); // Initialize map and Amazon Location SDK client const map = await initializeMap(); const client = new amazonLocationClient.LocationClient({ region, ...authHelper.getLocationClientConfig(), // Provides configuration required to make requests to Amazon Location });// Variable to hold marker that will be rendered on click let marker;// On mouse click, display marker and get results: map.on("click", async function (e) {// Remove any existing marker if (marker) { marker.remove(); } // Render a marker on clicked point marker = new maplibregl.Marker().setLngLat([e.lngLat.lng, e.lngLat.lat]).addTo(map);// Set up parameters for search call let params = { IndexName: placesName, Position: [e.lngLat.lng, e.lngLat.lat], Language: "en", MaxResults: "5", }; // Set up command to search for results around clicked point const searchCommand = new amazonLocationClient.SearchPlaceIndexForPositionCommand(params); ...This code declares a
markervariable, that is populated each time the user selects a location, showing where they selected. The marker is automatically rendered by the map control, once it's added to the map with.addTo(map);. The code also checks for a previous marker, and removes it, so that there is only 1 marker on the screen at a time. -
Save the
main.jsfile, and open thequickstart.htmlfile in a browser. You can pan and zoom on the map, as before, but now if you choose a location, you will see details about the location that you chose.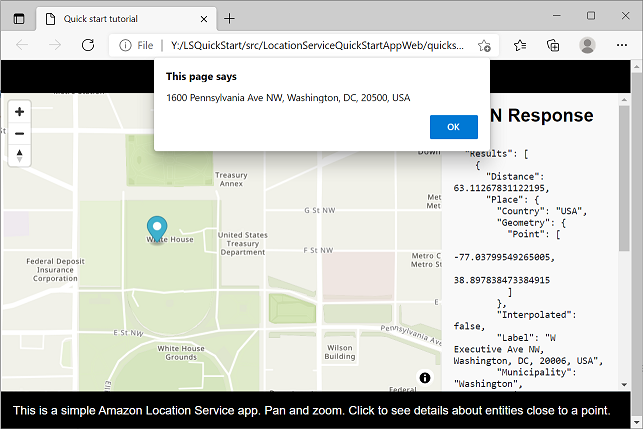
Your quick start application is complete. This tutorial has shown you how to create a static HTML application that:
-
Creates a map that users can interact with.
-
Handles a map event (
click). -
Calls an Amazon Location Service API, specifically to search the map at a location, using
searchPlaceIndexForPosition. -
Uses the MapLibre map control to add a marker.
