NEW - You can now accelerate your migration and modernization with AWS Transform. Read Getting Started in the AWS Transform User Guide.
Tutorial: Set up Enterprise Analyzer on AppStream 2.0
This tutorial describes how to set up Rocket Enterprise Analyzer (formerly Micro Focus Enterprise Analyzer) to analyze one or more mainframe applications. The Enterprise Analyzer tool provides several reports based on its analysis of the application source code and system definitions.
This setup is designed to foster team collaboration. Installation uses an Amazon S3 bucket to
share the source code with virtual disks. Doing this makes use of Rclone
Team members can also mount the virtual Amazon S3 backed disk on their personal machines. and update the source bucket from their workstations. They can potentially use scripts or any other form of automation on their machines if they are connected to other on-premises internal systems.
The setup is based on the AppStream 2.0 Windows images that AWS Mainframe Modernization shares with the customer . Setup is also based on the creation of AppStream 2.0 fleets and stacks as described in Tutorial: Set up AppStream 2.0 for use with Rocket Enterprise Analyzer and Rocket Enterprise Developer.
Important
The steps in this tutorial assume that you set up AppStream 2.0 with the downloadable AWS CloudFormation
template cfn-m2-appstream-fleet-ea-ed.yml
To perform the steps in this tutorial, you must have set up your Enterprise Analyzer fleet and stack and they must be running.
For a complete description of Enterprise Analyzer features and deliverables, see the Enterprise Analyzer
Documentation
Image contents
In addition to Enterprise Analyzer application itself, the image contains the following tools and libraries.
Third-party tools
Libraries in C:\Users\Public
-
BankDemo source code and project definition for Enterprise Developer:
m2-bankdemo-template.zip. -
MFA install package for the mainframe:
mfa.zip. For more information, see Mainframe Access Overviewin the Micro Focus Enterprise Developer documentation. -
Command and config files for Rclone (instructions for their use in the tutorials):
m2-rclone.cmdandm2-rclone.conf.
Topics
Prerequisites
-
Upload the source code and system definitions for the customer application that you want to analyze to an S3 bucket. The system definitions include CICS CSD, DB2 object definitions, and so on. You can create a folder structure within the bucket that makes sense for how you want to organize the application artifacts. For example, when you unzip the BankDemo sample, it has the following structure:
demo |--> jcl |--> RDEF |--> transaction |--> xa -
Create and start an Amazon RDS instance running PostgreSQL. This instance will store the data and results produced by Enterprise Analyzer. You can share this instance with all members of the application team. In addition, create an empty schema called
m2_ea(or any other suitable name) in the database. Define credentials for authorized users that allow them to create, insert, update, and delete items in this schema. You can obtain the database name, its server endpoint URL, and TCP port from the Amazon RDS console or from the account administrator. -
Make sure you have set up programmatic access to your AWS account. For more information, see Programmatic access in the Amazon Web Services General Reference.
Step 1: Setup
-
Start a session with AppStream 2.0 with the URL that you received in the welcome email message from AppStream 2.0.
-
Use your email as your user ID, and define your permanent password.
-
Select the Enterprise Analyzer stack.
-
On the AppStream 2.0 menu page, choose Desktop to reach the Windows desktop that the fleet is streaming.
Step 2: Create the Amazon S3 based virtual folder on Windows
Note
If you already used Rclone during the AWS Mainframe Modernization preview, you must update
m2-rclone.cmd to the newer version located in
C:\Users\Public.
-
Copy the
m2-rclone.confandm2-rclone.cmdfiles provided inC:\Users\Publicto your home folderC:\Users\PhotonUser\My Files\Home Folderusing File Explorer. -
Update the
m2-rclone.confconfig parameters with your AWS access key and corresponding secret, as well as your AWS Region.[m2-s3] type = s3 provider = AWS access_key_id = YOUR-ACCESS-KEY secret_access_key = YOUR-SECRET-KEY region = YOUR-REGION acl = private server_side_encryption = AES256 -
In
m2-rclone.cmd, make the following changes:-
Change
amzn-s3-demo-bucketto your Amazon S3 bucket name. For example,m2-s3-mybucket. -
Change
your-s3-folder-keyto your Amazon S3 bucket key. For example,myProject. -
Change
your-local-folder-pathto the path of the directory where you want the application files synced from the Amazon S3 bucket that contains them. For example,D:\PhotonUser\My Files\Home Folder\m2-new. This synced directory must be a subdirectory of the Home Folder in order for AppStream 2.0 to properly back up and restore it on session start and end.
:loop timeout /T 10 "C:\Program Files\rclone\rclone.exe" sync m2-s3:amzn-s3-demo-bucket/your-s3-folder-key"D:\PhotonUser\My Files\Home Folder\your-local-folder-path" --config "D:\PhotonUser\My Files\Home Folder\m2-rclone.conf" goto :loop -
-
Open a Windows command prompt, cd to
C:\Users\PhotonUser\My Files\Home
      Folder
if needed and runm2-rclone.cmd. This command script runs a continuous loop, syncing your Amazon S3 bucket and key to the local folder every 10 seconds. You can adjust the time out as needed. You should see the source code of the application located in the Amazon S3 bucket in Windows File Explorer.
To add new files to the set that you are working on or to update existing ones, upload the
files to the Amazon S3 bucket and they will be synced to your directory at the next iteration defined
in m2-rclone.cmd. Similarly, if you want to delete some files, delete them
from the Amazon S3 bucket. The next sync operation will delete them from your local directory.
Step 3: Create an ODBC source for the Amazon RDS instance
-
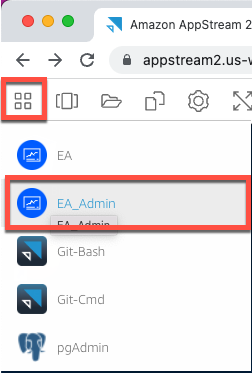
To start the EA_Admin tool, navigate to the application selector menu in the top left corner of the browser window and choose MF EA_Admin.
-
From the Administer menu, choose ODBC Data Sources, and choose Add from the User DSN tab.
-
In the Create New Data Source dialog box, choose the PostgreSQL Unicode driver, and then choose Finish.
-
In the PostgreSQL Unicode ODBC Driver (psqlODBC) Setup dialog box, define and take note of the data source name that you want. Complete the following parameters with the values from the RDS instance that you previously created:
- Description
-
Optional description to help you identify this database connection quickly.
- Database
-
The Amazon RDS database you created previously.
- Server
-
The Amazon RDS endpoint.
- Port
-
The Amazon RDS port.
- User Name
-
As defined in the Amazon RDS instance.
- Password
-
As defined in the Amazon RDS instance.
-
Choose Test to validate that the connection to Amazon RDS is successful, and then choose Save to save your new User DSN.
-
Wait until you see the message that confirms creation of the proper workspace, and then choose OK to finish with ODBC Data Sources and close the EA_Admin tool.
-
Navigate again to the application selector menu, and choose Enterprise Analyzer to start the tool. Choose Create New.
-
In the Workspace configuration window, enter your workspace name and define its location. The workspace can be the Amazon S3 based disk if you work under this config, or your home folder if you prefer.
-
Choose Choose Other Database to connect to your Amazon RDS instance.
-
Choose the Postgre icon from the options, and then choose OK.
-
For the Windows settings under Options – Define Connection Parameters, enter the name of the data source that you created. Also enter the database name, the schema name, the user name, and password. Choose OK.
-
Wait for Enterprise Analyzer to create all the tables, indexes, and so on that it needs to store results. This process might take a couple of minutes. Enterprise Analyzer confirms when the database and workspace are ready for use.
-
Navigate again to the application selector menu and choose Enterprise Analyzer to start the tool.
-
The Enterprise Analyzer startup window appears in the new, selected workspace location. Choose OK.
-
Navigate to your repository in the left pane, select the repository name, and choose Add files / folders to your workspace.Select the folder where your application code is stored to add it to the workspace. You can use the previous BankDemo example code if you want. When Enterprise Analyzer prompts you to verify those files, choose Verify to start the initial Enterprise Analyzer verification report. It might take some minutes to complete, depending on the size of your application.
-
Expand your workspace to see the files and folders that you’ve added to the workspace. The object types and cyclomatic complexity reports are also visible in the top quadrant of the Chart Viewer pane.
You can now use Enterprise Analyzer for all needed tasks.
Subsequent sessions
-
Start a session with AppStream 2.0 with the URL that you received in the welcome email message from AppStream 2.0.
-
Log in with your email and permanent password.
-
Select the Enterprise Analyzer stack.
-
Launch
Rcloneto connect to the Amazon S3 backed disk if you use this option to share the workspace files. -
Launch Enterprise Analyzer to do your tasks.
Troubleshooting workspace connection
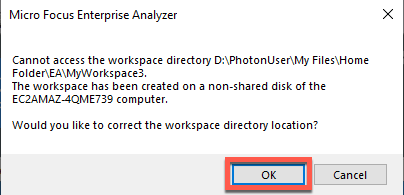
When you try to reconnect to your Enterprise Analyzer workspace, you might see an error like this:
Cannot access the workspace directory D:\PhotonUser\My Files\Home Folder\EA_BankDemo. The workspace has been created on a non-shared disk of the EC2AMAZ-E6LC33H computer. Would you like to correct the workspace directory location?
To resolve this issue, choose OK to clear the message, and then complete the following steps.
-
In AppStream 2.0, choose the Launch Application icon on the toolbar, and then choose EA_Admin to start the Enterprise Analyzer Administration tool.
-
From the Administer menu, choose Refresh Workspace Path....

-
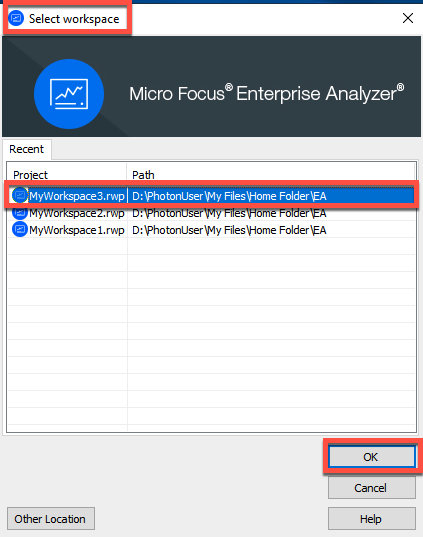
Under Select workspace, choose the workspace that you want, and then choose OK.
-
Choose OK to confirm the error message.
-
Under Workspace directory network path, enter the correct path to your workspace, for example,
D:\PhotonUser\My Files\Home
      Folder\EA\MyWorkspace3
.
-
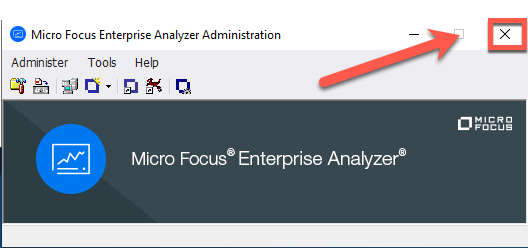
Close the Micro Focus Enterprise Analyzer Administration tool.
-
In AppStream 2.0, choose the Launch Application icon on the toolbar, and then choose EA to start Micro Focus Enterprise Analyzer.

-
Repeat steps 3 - 5.
Micro Focus Enterprise Analyzer should now open with the existing workspace.
Clean up resources
If you no longer need the resources that you created for this tutorial, delete them so that you don't incur further charges. Complete the following steps:
-
Use the EA_Admin tool to delete the workspace.
-
Delete the S3 buckets that you created for this tutorial. For more information, see Deleting a bucket in the Amazon S3 User Guide.
-
Delete the database that you created for this tutorial. For more information, see Deleting a DB instance.
