Develop Hyperledger Fabric Chaincode Using Java on Amazon Managed Blockchain (AMB)
Hyperledger Fabric 2.2 networks on Amazon Managed Blockchain (AMB) are based on the following components:
AMB Access Dependency on Javaenv Docker Image
AMB Access uses the fabric-chaincode-java package to build the hyperledger/fabric-javaenv Docker image. This image is the base layer of the Java chaincode container. It has built-in support to build the Java chaincode using Gradle or Maven at the following versions:
gradle@5.6.2
maven@3.8.1
You can verify this by examining the Docker file in the fabric-chaincode-java package
The default settings support Gradle or Maven for building Java chaincode. Once the javaenv Docker image is deployed, it is used to provision all new peer nodes and
install Java chaincode in those peer nodes. You cannot modify these settings or update versions on the javaenv Docker image because AMB Access manages these.
Installing and Running Java Chaincode
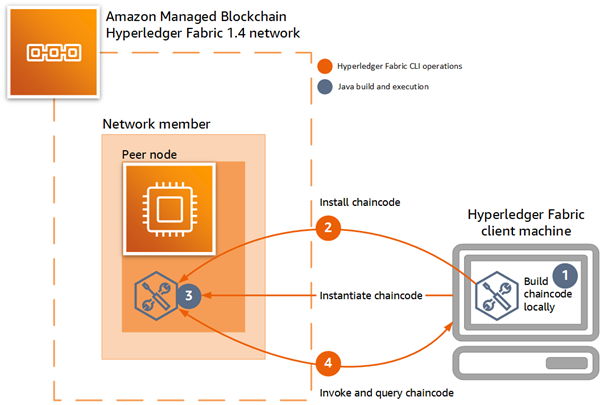
The following is a high-level summary of the steps to install and run Java Chaincode using AMB Access with Hyperledger Fabric 2.2
Marshall dependencies locally – This step uses Gradle and the Gradle shadow plugin to download dependencies to the client machine and package them for installation to the peer node.
Install the chaincode – This step packages the Java chaincode project and copies it to the Hyperledger Fabric peer node.
Invoke and query the chaincode – After, you can send query transactions or invoke transactions to modify the ledger.
Building Java Chaincode with AMB Access: Step-by-step
In a traditional installation of Hyperledger Fabric chaincode built with Java, Gradle automatically resolves dependencies by loading them locally in addition to downloading them from remote repositories. AMB Access does not allow downloaded dependencies to help ensure the security and reliability of the network. For this reason, to run Java chaincode, or any chaincode, in a Hyperledger Fabric network on AMB Access, you manually download dependencies to the client machine and add them into the chaincode project.
The steps in this section demonstrate how to use Gradle to build and deploy a sample Java chaincode
Prerequisites and Assumptions
The steps below require that you have the following:
A Hyperledger Fabric client machine with access to the internet and access to a member's peer node, ordering service, and CA on an AMB Access network running Hyperledger Fabric v2.2 or later. For more information, see the following:
Create a Hyperledger Fabric Blockchain Network on Amazon Managed Blockchain (AMB)
Create an Interface VPC Endpoint for Amazon Managed Blockchain (AMB) Hyperledger Fabric
Step 4: Create an Amazon EC2 Instance and Set Up the Hyperledger Fabric Client. Optionally, modify step 4.4 when launching the Docker container to establish CLI variables demonstrated in the install steps below.
You must be a Hyperledger Fabric admin to install chaincode. For more information, see Register and Enroll a Hyperledger Fabric Admin.
Step 1: Download the Gradle Shadow plugin and add it to the chaincode project
Because AMB Access peer nodes don't have internet access, the Gradle Shadow plugin
Create a sub-directory in the Java chaincode working directory on the Hyperledger Fabric client machine where you want to download the plugin, and then switch to that directory. The example below uses a directory named
plugin.mkdir plugin cd pluginDownload the plugin.
wget https://plugins.gradle.org/m2/com/github/jengelman/gradle/plugins/shadow/5.1.0/shadow-5.1.0.jarVerify that the plugin was downloaded as expected.
lsshadow-5.1.0.jarAfter downloading the shadow plugin jar file, use an editor to modify the
build.gradlefile so that it references the local directory and plugin.Make sure to remove the
id 'com.github.johnrengelman.shadow' version '5.1.0'entry from thepluginssection.The following example shows an excerpt from an edited
build.gradlefile, withrelevant sections emphasized:buildscript { dependencies { classpath fileTree(dir: 'plugin', include:['*.jar']) } }plugins { id 'java' } group 'org.hyperledger.fabric-chaincode-java' version '1.0-SNAPSHOT' sourceCompatibility = 1.8 repositories { mavenLocal() mavenCentral() } dependencies { implementation 'org.hyperledger.fabric-chaincode-java:fabric-chaincode-shim:2.+' }apply plugin: 'com.github.johnrengelman.shadow'shadowJar { baseName = 'chaincode' version = null classifier = null manifest { attributes 'Main-Class': 'org.hyperledger.fabric_samples.ABstore' } }
Step 2: Add fabric-chaincode-shim and the getDeps task to the chaincode project
Update build.gradle to add fabric-chaincode-shimdependencies
section. In addition, reference the task getDeps to download
dependencies to the libs sub-directory on the client machine. The
following example shows an excerpt from a build.gradle file with
relevant sections emphasized.
buildscript { dependencies { classpath fileTree(dir: 'plugin', include:['*.jar']) } } plugins { id 'java' } group 'org.hyperledger.fabric-chaincode-java' version '1.0-SNAPSHOT' sourceCompatibility = 1.8 repositories { mavenLocal() mavenCentral() maven { url "https://hyperledger.jfrog.io/hyperledger/fabric-maven" } maven { url 'https://jitpack.io' } } dependencies {compile group: 'org.hyperledger.fabric-chaincode-java', name: 'fabric-chaincode-shim', version: '2.2.1'testCompile group: 'junit', name: 'junit', version: '4.12' } apply plugin: 'com.github.johnrengelman.shadow' shadowJar { baseName = 'chaincode' version = null classifier = null manifest { attributes 'Main-Class': 'org.hyperledger.fabric_samples.ABstore' } }task getDeps(type: Copy) { from sourceSets.main.compileClasspath into 'libs/' }
Step 3: Download dependencies and build the project locally
Run gradle build and gradle getDeps as shown in the following
examples to build the chaincode locally and download dependencies. When the
gradle getDeps task runs, Gradle creates the lib
sub-directory on the client machine and downloads dependencies to it.
-
Download chaincode project dependencies locally.
gradle getDepsThe command creates output similar to the following example.
Deprecated Gradle features were used in this build, making it incompatible with Gradle 7.0.
Use '--warning-mode all' to show the individual deprecation warnings.
See https://docs.gradle.org/6.5/userguide/command_line_interface.html#sec:command_line_warnings

BUILD SUCCESSFUL in 1s
1 actionable task: 1 executed
Verify that dependencies were downloaded to the libs sub-directory.
ls libs/bcpkix-jdk15on-1.62.jar error_prone_annotations-2.3.4.jar grpc-protobuf-lite-1.31.1.jar jsr305-3.0.2.jar bcprov-jdk15on-1.62.jar fabric-chaincode-protos-2.2.1.jar grpc-stub-1.31.1.jar listenablefuture-9999.0-empty-to-avoid-conflict-with-guava.jar checker-compat-qual-2.5.5.jar fabric-chaincode-shim-2.2.1.jar gson-2.8.6.jar org.everit.json.schema-1.12.1.jar classgraph-4.8.47.jar failureaccess-1.0.1.jar guava-29.0-android.jar protobuf-java-3.12.0.jar commons-cli-1.4.jar grpc-api-1.31.1.jar handy-uri-templates-2.1.8.jar protobuf-java-util-3.11.1.jar commons-collections-3.2.2.jar grpc-context-1.31.1.jar j2objc-annotations-1.3.jar proto-google-common-protos-1.17.0.jar commons-digester-1.8.1.jar grpc-core-1.31.1.jar javax.annotation-api-1.3.2.jar re2j-1.3.jar commons-logging-1.2.jar grpc-netty-shaded-1.31.1.jar joda-time-2.10.2.jar commons-validator-1.6.jar grpc-protobuf-1.31.1.jar json-20190722.jarBuild the project using Gradle.
gradle buildThe command creates output similar to the following example.
> Task :compileJava
Note: /home/ec2-user/fabric-samples/chaincode/abstore/java/src/main/java/org/hyperledger/fabric-samples/ABstore.java uses or overrides a deprecated API.
Note: Recompile with -Xlint:deprecation for details.

BUILD SUCCESSFUL in 5s
Step 4: Add dependencies downloaded in the previous step to the project
Use a text editor to update the build.gradle file again so that it reference the dependencies in the libs sub-directory. This adds the dependencies that you downloaded in the previous step to the project.
The following example shows an excerpt from a build.gradle file with
relevant sections emphasized.
buildscript { dependencies { classpath fileTree(dir: 'plugin', include:['*.jar']) } } plugins { id 'java' } group 'org.hyperledger.fabric-chaincode-java' version '1.0-SNAPSHOT' sourceCompatibility = 1.8 repositories { mavenLocal() mavenCentral() } dependencies {compile fileTree(dir:'libs',includes:['*.jar'])testCompile group: 'junit', name: 'junit', version: '4.12' } apply plugin: 'com.github.johnrengelman.shadow' shadowJar { baseName = 'chaincode' version = null classifier = null manifest { attributes 'Main-Class': 'org.hyperledger.fabric_samples.ABstore' } } task getDeps(type: Copy) { from sourceSets.main.compileClasspath into 'libs/' }
Step 5: Use the Hyperledger Fabric CLI to install the chaincode on the peer node
Use the Hyperledger Fabric CLI to package the Java chaincode project and copy it to the peer node. The -l java option is required for the package command to specify that the chaincode is Java-based. The path to the Java chaincode working directory is an absolute path, which is different from chaincode written in golang.
Before running the following chaincode commands, establish variables for the Hyperledger Fabric CLI Docker container as shown in the following example. Alternatively, you can configure a Docker compose file to establish these variables. For more information, see Step 4.4: Configure and Run Docker Compose to Start the Hyperledger Fabric CLI in the getting started tutorial. Replace the values with those appropriate for your network. Set
CORE_PEER_ADDRESSto the endpoint of the peer node for which you want to install the chaincode, setCORE_PEER_LOCALMSPIDto the ID of the member that owns the peer node, and setCORE_PEER_MSPCONFIGPATHas shown, which is the location of the membership service provider directory on the peer node.docker exec -e "CORE_PEER_TLS_ENABLED=true" \ -e "CORE_PEER_TLS_ROOTCERT_FILE=/opt/home/managedblockchain-tls-chain.pem " \ -e "CORE_PEER_ADDRESS=nd-6EAJ5VA43JGGNPXOUZP7Y47E4Y.m-K46ICRRXJRCGRNNS4ES4XUUS5A.n-MWY63ZJZU5HGNCMBQER7IN6OIU.managedblockchain.us-east-1.amazonaws.com:30003" \ -e "CORE_PEER_LOCALMSPID=m-K46ICRRXJRCGRNNS4ES4XUUS5A" \ -e "CORE_PEER_MSPCONFIGPATH=/opt/home/admin-msp"Running the Hyperledger Fabric CLI
packagecommand on the client packages the chaincode and writes the package to a file. The following example demonstrates apackagecommand using the following flags:The
-pflag specifies the location of the chaincode on the client machine. When installing Java chaincode, this must be an absolute path.The
-lflag specifies that the chaincode language isjava.The
--labelflag specifies the package label, which is a human-readable description of the package.
For more information about options, see peer lifecycle chaincode package
in Hyperledger Fabric documentation. cli peer lifecycle chaincode package./abstorejava.tar.gz\ -p /opt/home/fabric-samples/chaincode/abstore/java/\ -l java \ --labelMyLabelThe following example installs the chaincode package on the peer node.
cli peer lifecycle chaincode installabstorejava.tar.gzThe following example queries the installed chaincodes on the peer node.
cli peer lifecycle chaincode queryinstalledRunning the Hyperledger Fabric CLI
approveformyorgcommand on the client approves the chaincode definition for your organization. The following example demonstrates anapproveformyorgcommand.The
-oflag specifies the ordering service endpoint for the member.The
--tlsflag specifies that communication with the ordering service uses TLS.The
--cafileflag specifies the location of the certificate for the ordering service that you copied when you set up the Hyperledger Fabric admin. For more information, see step 5.1 in the Getting Started tutorial.The
-Cflag specifies the channel on which to approve the chaincode.The
-nand-voptions establish the name and version of the chaincode.The
--sequenceflag specifies the sequence number of the chaincode definition for the channel.The
--package-idflag specifies the identifier of the chaincode install package. This value is returned by thequeryinstalledcommand in the previous step.
For more information about options, see peer lifecycle chaincode approveformyorg
in Hyperledger Fabric documentation. cli peer lifecycle chaincode approveformyorg \ -o orderer.n-MWY63ZJZU5HGNCMBQER7IN6OIU.managedblockchain.MyRegion.amazonaws.com:30001\ --tls --cafile /opt/home/managedblockchain-tls-chain.pem \ -CMyHLFChannelID-nMyJavaChaincodeName-vMyCCVerNumber--sequenceMySeqNumber--package-idMyPackageIDThe following example checks whether the chaincode definition is ready to be committed on the channel.
cli peer lifecycle chaincode checkcommitreadiness \ -o orderer.n-MWY63ZJZU5HGNCMBQER7IN6OIU.managedblockchain.MyRegion.amazonaws.com:30001\ --tls --cafile /opt/home/managedblockchain-tls-chain.pem \ -CMyHLFChannelID-nMyJavaChaincodeName-vMyCCVerNumber--sequenceMySeqNumberThe following example commits the chaincode definition on the channel.
cli peer lifecycle chaincode commit \ -o orderer.n-MWY63ZJZU5HGNCMBQER7IN6OIU.managedblockchain.MyRegion.amazonaws.com:30001\ --tls --cafile /opt/home/managedblockchain-tls-chain.pem \ -CMyHLFChannelID-nMyJavaChaincodeName-vMyCCVerNumber--sequenceMySeqNumberThe following example queries the committed chaincode definitions by channel on the peer node.
cli peer lifecycle chaincode querycommitted \ -CMyHLFChannelID
Step 6: Invoke the sample chaincode to perform a transaction
Precede the following example command with the variable overrides for the CLI container as shown in the previous example.
The following example invokes the sample chaincode.
The parameters are the same as the previous example, except for the JSON constructor. This constructor invokes the the sample chaincodea to b.
cli peer chaincode invoke \ -o orderer.n-MWY63ZJZU5HGNCMBQER7IN6OIU.managedblockchain.MyRegion.amazonaws.com:30001\ --cafile /opt/home/managedblockchain-tls-chain.pem --tls \ -C one-org-channel-java \ -c '{"Args":["invoke","a", "b", "10"]}' -n javacc
The command should print output similar to the following.
2020-06-26 23:49:43.895 UTC [chaincodeCmd] chaincodeInvokeOrQuery -> INFO 003 Chaincode invoke successful. result: status:200 message:"invoke finished successfully" payload:"a: 90 b: 210
Step 7: Invoke the sample chaincode to query
Precede the following command with the variable overrides for the CLI container as shown in the previous example.
The following example queries the ledger for the value attributed to a. The query should print 90 as output.
cli peer chaincode query \ -o orderer.n-MWY63ZJZU5HGNCMBQER7IN6OIU.managedblockchain.MyRegion.amazonaws.com:30001\ --cafile /opt/home/managedblockchain-tls-chain.pem --tls \ -C one-org-channel-java \ -c '{"Args":["query","a"]}' -n javacc
