Creating the instance role
To use MediaLive Anywhere, you must create a trusted entity configuration that lets AWS Systems Manager perform actions on the on-premises node hardware where MediaLive is running. You must create a role, attach some policies with specific content, and specify AWS Systems Manager (Systems Manager) as trusted entities for that role.
In this diagram, the role is in a pink box, each policy is in a yellow box, and each trusted entity is in a blue box.
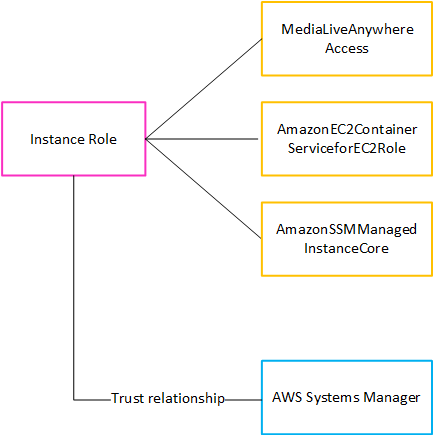
After this role is created, the MediaLive user who is deploying MediaLive Anywhere attaches this role to each cluster that they create. They attach the same role to every cluster. This role and its trusted entities make this statement:
"For any node in this cluster, Systems Manager is allowed to assume this role in order to perform operations on the resources specified in the policies that are attached to the role."
Create the policy
You must create the MediaLiveAnywhereAccess policy. This is the top yellow box in the diagram. (You don't need to create the other two policies because they are managed policies that already exist in IAM.)
Sign in to the AWS Management Console and open the IAM console at https://console.aws.amazon.com/iam/
. -
In the navigation pane on the left, choose Policies. Then choose Create policy. On the page that appears, choose the JSON view (instead of the Visual view).
-
Erase all of the sample and copy the following text. Edit the text to change both instances of
111122223333to your AWS account number. Paste the revised text into the Policy editor.In the first statement, the Resource line identifies any cluster in the specified account in any AWS Region (as specified by the * wildcard before the account).
In the second statement, the Resource line identifies the MediaLiveAccessRole in the specified account in any AWS Region (note that there is no wildcard required).
-
Choose Next. Give the policy a name. We recommend the name
MediaLiveAnywhereAccess. -
Choose Create policy.
Create the role
You must create the Instance role. This is the pink box in the diagram.
-
On the IAM console, in the navigation pane on the left, choose Roles, then Create Role. The Create role wizard appears. This wizard walks you through the steps of setting up a trusted entity, and adding permissions (by adding a policy).
-
On the Select trusted entity page, choose the Custom trust policy card. The Custom trust policy section appears, with a sample statement.
-
Erase all of the sample, copy the following text, and paste the text in the Custom trust policy section. Choose Next.
-
On the Add Permissions page, find the following polices and select the checkbox for each policy:
-
The policy that you created.If you followed the recommendation, this policy has the name
MediaLiveAnywhereAccess) -
The
AmazonEC2ContainerServiceforEC2Rolepolicy -
The
AmazonSSMManagedInstanceCorepolicy
On the console, the counter beside the Permissions policies title shows 3/xxx to indicate that you have selected three policies.
-
-
Choose Next.
-
On the review page, enter a name for the role. We recommend the name
MediaLiveAnywhereInstanceRole. -
Choose Create role.
-
On the Summary page for the role, make a note of the value in Role ARN. It looks like this:
arn:aws:iam::111122223333:role/MediaLiveAnywhereInstanceRoleIn the example,
111122223333is your AWS account number.
