Access transit gateway network dashboards using AWS Network Manager
he AWS Network Manager console provides a group of dashboards for AWS Global Networks for Transit Gateways, allowing you to view and monitor your network of transit gateways. Dashboards include information about network resources, their geographic locations, the network topology, and the logical network associations. If you want to view the dashboards for a specific transit gateway, see Access transit gateway dashboards using AWS Network Manager.
Overview
The Overview page displays details about your transit gateway network, the VPN status, the Connect peer status, and any network events affecting your transit gateways.
To access transit gateway network details
Access the Network Manager console at https://console.aws.amazon.com/networkmanager/home/
. -
Under Connectivity, choose Global Networks.
-
On the Global networks page, choose the global network ID.
In the navigation pane, choose Transit Gateway network.
The Overview page opens by default, showing information about your transit gateways.
On the Overview page you contains the following information:
-
Your transit gateway network Inventory:
Icon Description 
Transit gateways The total number of registered transit gateways in your global network. Choose the link to open the Transit gateways page to view more information about your transit gateways.

Sites The total number of sites associated with your transit gateways. Choose the link to open the Sites page to view more information about your transit gateway sites.

Devices The total number of devices associated with your transit gateways. Choose the link to open the Devices page to view more information about your transit gateway devices.
-
The Transit gateways VPN status. The following is displayed:
-
ID – The ID of the transit gateway. Choose the link to open details about the transit gateway.
-
Name – Name of the transit gateway.
-
Region – Region where the transit gateway is located
-
Down VPN – The percentage of your total transit gateway VPNs that are down.
-
Impaired VPN –The percentage of your total VPNs that are impaired.
-
Up VPN – The percentage of your total VPNs that are up.
-
-
The Transit gateways connect peer status. The following is displayed:
-
ID – The ID of the transit gateway.
-
Name – Name of the transit gateway.
-
Region – Region where the transit peer is located
-
Down Connect peer – The percentage of your total transit gateway Connect peers that are down.
-
Impaired Connect peer – The percentage of your total transit gateway Connect peers that are impaired.
-
Up VPN – The percentage of your total transit gateway Connect peers that are up.
-
-
The Network events summary displays CloudWatch Events number of core network attachments per edge, shown as a stacked column chart.
(Optional) Metrics and events use the default time set up in the CloudWatch Events event. To set a custom time frame, choose Custom and then choose a Relative or Absolute time, and then choose if you want to see that date range in UTC or the edge location's Local time zone.
Choose Add to dashboard to add this metric to your CloudWatch dashboard. For more information about using CloudWatch dashboards, see Using Amazon CloudWatch Dashboards in the Amazon CloudWatch User Guide.
Note
The Add to dashboard option only works if your registered transit gateway is in the US West (Oregon) Region.
-
Geography
The Geography page displays a world map showing the locations of your transit gateway network.
To access a geographic map of your transit gateways
Access the Network Manager console at https://console.aws.amazon.com/networkmanager/home/
. -
Under Connectivity, choose Global Networks.
-
On the Global networks page, choose the global network ID.
In the navigation pane, choose Transit Gateway network.
The Overview page opens by default, showing information about your transit gateways.
-
Choose the Geography tab.
A world map displays, showing you the locations of the following:
-
AWS TGWs and VPCs.
-
The Connectivity of VPNs, Direct Connects, and Connect peers.
-
On-premises Sites and Devices.
-
Not associated Sites and Devices.
-
-
In the following example, there are four AWS Regions, us-west-1 us-west-2, us-east-1, and us-east-2. Each Region is labeled and represented by a number, indicating the number of transit gateways in that Region. For example, us-east-2 is represented by the number
3, indicating that there are three network resources associated with the us-west-2 Region.
-
If your account is a delegated administrator in a multi-account environment, you can view details about the transit gateways for different accounts.
-
Choose the number representing a Region. For example, choose
3. The following information displays:-
The right pane shows the AWS Region, us-east-2.
-
A bottom panel shows with a Transit Gateways dropdown list option, displaying each transit gateway in that Region. In this example, there are
3transit gateways in us-east-2. Choose a transit gateway from the dropdown list to view details about that transit gateway. In this example, you can see that the Resource Account ID for this transit gateway is another account in the multi-account environment,98765432101.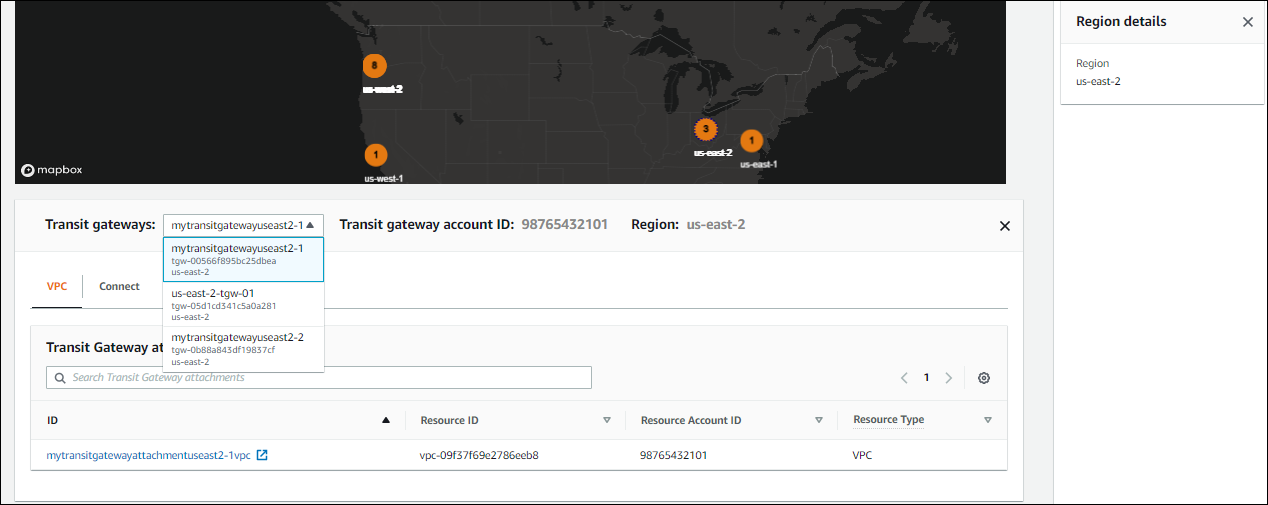
-
-
To view more details about the transit gateway, choose the ID link to open the Transit gateway details page for the gateway.
If your global network is part of a multi-account environment, you can choose an ID from a member account and view details about that attachment. The Resource Account ID column displays the account ID that the transit gateway belongs to.
Viewing details about a member's resources prompts you to use the Network Manager console to switch roles to the member account where the resource is located.
Note
Switching roles logs you out of the current account and into the member account associated with the attachment.
To view resource details in a member account
-
When choosing a link to a member account, you're prompted to switch console roles:

-
The following values populate the Switch Role screen. Keep the following values:
-
Account — The account ID for the member account that the resource is associated with.
-
Role —
IAMRoleForAWSNetworkManagerCrossAccountResourceAccessis the required IAM role for accessing resources across multiple accounts.
-
-
Choose Switch Role.
You're logged out of your current account and into that member account. A new tab opens showing the details of the resource. For example, if you choose a VPC resource, the VPC resource page opens for the member account that owns the resource.
-
Depending on the delegated permission level assigned to the delegated administrators and the management account when trusted access was enabled, you can either view information (read-only permission) about the resource or add/modify (administrator permission) the resource.
-
To return to the original member account, choose one of the following:
-
On your current tab, choose the browser Back button. On the Switch Role login screen, enter the Account ID of the account you want, and then choose Switch Role.
-
If you haven't closed it, choose the tab for the account you've just logged out of, and then choose Reload.
-
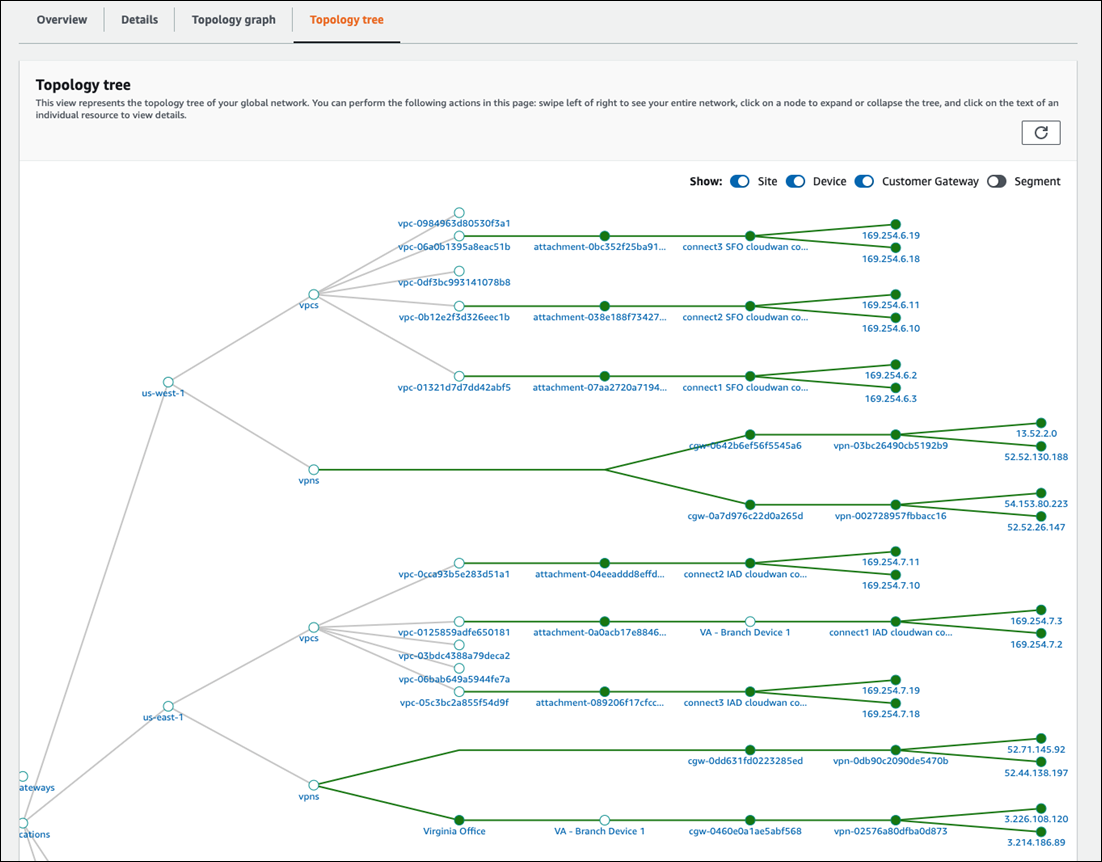
Topology tree
The Topology tree page shows a logical diagram of your transit gateway network.
To access the topology tree for a transit gateway network
Access the Network Manager console at https://console.aws.amazon.com/networkmanager/home/
. -
Under Connectivity, choose Global Networks.
-
On the Global networks page, choose the global network ID.
In the navigation pane, choose Transit Gateway network.
The Overview page opens by default, showing information about your transit gateways.
-
Choose the Topology tree tab.
-
By default, the Topology tree page displays all Sites, Devices, and Customer Gateways of your transit gateway and the logical relationships between them. You can filter the network tree to show specific resources types only to view information about the specific resource it represents. The line colors represent the state of the relationships between AWS and the on-premises resources.
The following example shows the topology tree for two edge locations, us-west-1 and us-east-1.
-
In the Topology tree, choose an attachment. The attachment details display in the left pane.
-
If your global network is part of a multi-account environment, you can choose a Resource ID from a member account and view details about that attachment.
Viewing details about a member's resources prompts you to switch Network Manager console roles to the member account where the resource is located.
Note
Switching roles logs you out of the current account and into the delegated administrator account associated with the attachment.
To view resource details in a member account
-
When choosing a link to a member account, you're prompted to switch console roles:
-
The following values populate the Switch Role screen. Keep the following values:
-
Account — The account ID for the member account that the resource is associated with.
-
Role —
IAMRoleForAWSNetworkManagerCrossAccountResourceAccessis the required IAM role for accessing resources across multiple accounts.
-
-
Choose Switch Role.
You're logged out of your current account and into that member account. A new tab opens showing the details of the resource. For example, if you choose a VPC resource, the VPC resource page opens for the member account that owns the resource.
-
Depending on the delegated permission level assigned to the delegated administrators and the management account when trusted access was enabled, you can either view information (read-only permission) about the resource or add/modify (administrator permission) the resource.
-
To return to the original member account, choose one of the following:
-
On your current tab, choose the browser Back button. On the Switch Role login screen, enter the Account ID of the account you want, and then choose Switch Role.
-
If you haven't closed it, choose the tab for the account you've just logged out of, and then choose Reload.
-
Events
Track your transit gateway events using Amazon EventBridge that delivers a near-real-time stream of system events that describe changes in your resources. Using simple rules that you can quickly set up, you can match events and route them to one or more target functions or streams. For more information, see the Amazon EventBridge User Guide.
To access transit gateway network events
Access the Network Manager console at https://console.aws.amazon.com/networkmanager/home/
. -
Under Connectivity, choose Global Networks.
-
On the Global networks page, choose the global network ID.
In the navigation pane, choose Transit Gateway network.
The Overview page opens by default, showing information about your transit gateways.
-
Choose the Events tab.
The Events section updates with the events that occurred during the time frame.
(Optional) Metrics and events use the default time set up in the CloudWatch Events event. To set a custom time frame, choose Custom and then choose a Relative or Absolute time, and then choose if you want to see that date range in UTC or the edge location's Local time zone.
Choose Add to dashboard to add this metric to your CloudWatch dashboard. For more information about using CloudWatch dashboards, see Using Amazon CloudWatch Dashboards in the Amazon CloudWatch User Guide.
Note
The Add to dashboard option only works if your registered transit gateway is in the US West (Oregon) Region.
Monitoring
You can monitor your transit gateways using Amazon CloudWatch which collects raw data and processes it into readable, near-real-time metrics. These statistics are kept for 15 months, so that you can access historical information and gain a better perspective on how your network is performing. You can also set alarms that watch for certain thresholds, and send notifications or take actions when those thresholds are met. For more information, see the Amazon CloudWatch User Guide.
On the monitoring page you can view usage metrics for your transit gateways, filtering by specific transit gateways.
To access transit gateway network monitoring details
Access the Network Manager console at https://console.aws.amazon.com/networkmanager/home/
. -
Under Connectivity, choose Global Networks.
-
On the Global networks page, choose the global network ID.
In the navigation pane, choose Transit Gateway network.
The Overview page opens by default, showing information about your transit gateways.
-
Choose the Monitoring tab.
-
Choose a transit gateway that you want to monitor.
If you're using an account that's set up as a delegated administrator between accounts, you can choose a transit gateway from one of those other accounts. The transit gateway list displays the ID, the Region, and the account ID.
-
(Optional) Metrics and events use the default time set up in the CloudWatch Events event. To set a custom time frame, choose Custom and then choose a Relative or Absolute time, and then choose if you want to see that date range in UTC or the edge location's Local time zone.
Choose Add to dashboard to add this metric to your CloudWatch dashboard. For more information about using CloudWatch dashboards, see Using Amazon CloudWatch Dashboards in the Amazon CloudWatch User Guide.
Note
The Add to dashboard option only works if your registered transit gateway is in the US West (Oregon) Region.
-
The page updates the following transit gateway monitors:
-
Bytes in
-
Bytes out
-
Bytes dropped – black hole
-
Bytes dropped – no route
-
Packets in
-
Packets out
-
Packets dropped – black hole
-
Packets dropped – no route
-
-
(Optional) Choose Add to dashboard to add this metric to your CloudWatch dashboard. For more information about using CloudWatch dashboards, see Using Amazon CloudWatch Dashboards in the Amazon CloudWatchUser Guide.
Note
The Add to dashboard option only works if your registered transit gateway is in the US West (Oregon) Region.
Route analyzer
The Route Analyzer analyzes the routing path between a specified source and destination.
Note
Route Analyzer checks the routes on Transit Gateway route tables only
To analyze transit gateway routes
Access the Network Manager console at https://console.aws.amazon.com/networkmanager/home/
. -
Under Connectivity, choose Global Networks.
-
On the Global networks page, choose the global network ID.
In the navigation pane, choose Transit Gateway network.
The Overview page opens by default, showing information about your transit gateways.
-
Choose the Route Analyzer tab.
-
In the Source section,
-
Choose the source Transit Gateway for the route that you want to analyze.
If you're logged on to an account that's set up as a delegated administrator between accounts, you can choose a transit gateway from one of those other accounts. The transit gateway list displays the ID, the Region, and the account ID.
-
Choose the source Transit Gateway attachment for the route.
-
Enter either the IPv4 or IPv6 IP address.
-
Clear the Include return path in results check box if you don't want . This is chosen by default.
-
Choose if this is a Middlebox appliance. For more information on middlebox configurations, see Route analysis with a middlebox configuration.
-
-
In the Destination section,
-
Choose the destination Transit Gateway.
If you're logged on to an account that's set up as a delegated administrator between accounts, you can choose a transit gateway from one of those other accounts. The transit gateway list displays the ID, the Region, and the account ID.
-
Choose the destination Transit Gateway attachment for the route.
-
Enter either the IPv4 or IPv6 IP address.
-
-
Choose Run route analysis.
-
The Results of route analysis return the Source and Destination transit gateways and the current Status. An error message is returned if no information is found in the transit gateway route table. For more information on route tables, see Transit gateway route tables.
