SAML authentication for Amazon OpenSearch Serverless
With SAML authentication for Amazon OpenSearch Serverless, you can use your existing identity provider to offer single sign-on (SSO) for the OpenSearch Dashboards endpoints of serverless collections.
SAML authentication lets you use third-party identity providers to sign in to OpenSearch Dashboards to index and search data. OpenSearch Serverless supports providers that use the SAML 2.0 standard, such as IAM Identity Center, Okta, Keycloak, Active Directory Federation Services (AD FS), and Auth0. You can configure IAM Identity Center to synchronize users and groups from other identity sources like Okta, OneLogin, and Microsoft Entra ID. For a list of identity sources supported by IAM Identity Center and steps to configure them, see Getting started tutorials in the IAM Identity Center User Guide.
Note
SAML authentication is only for accessing OpenSearch Dashboards through a web browser. Authenticated users can only make requests to the OpenSearch API operations through Dev Tools in OpenSearch Dashboards. Your SAML credentials do not let you make direct HTTP requests to the OpenSearch API operations.
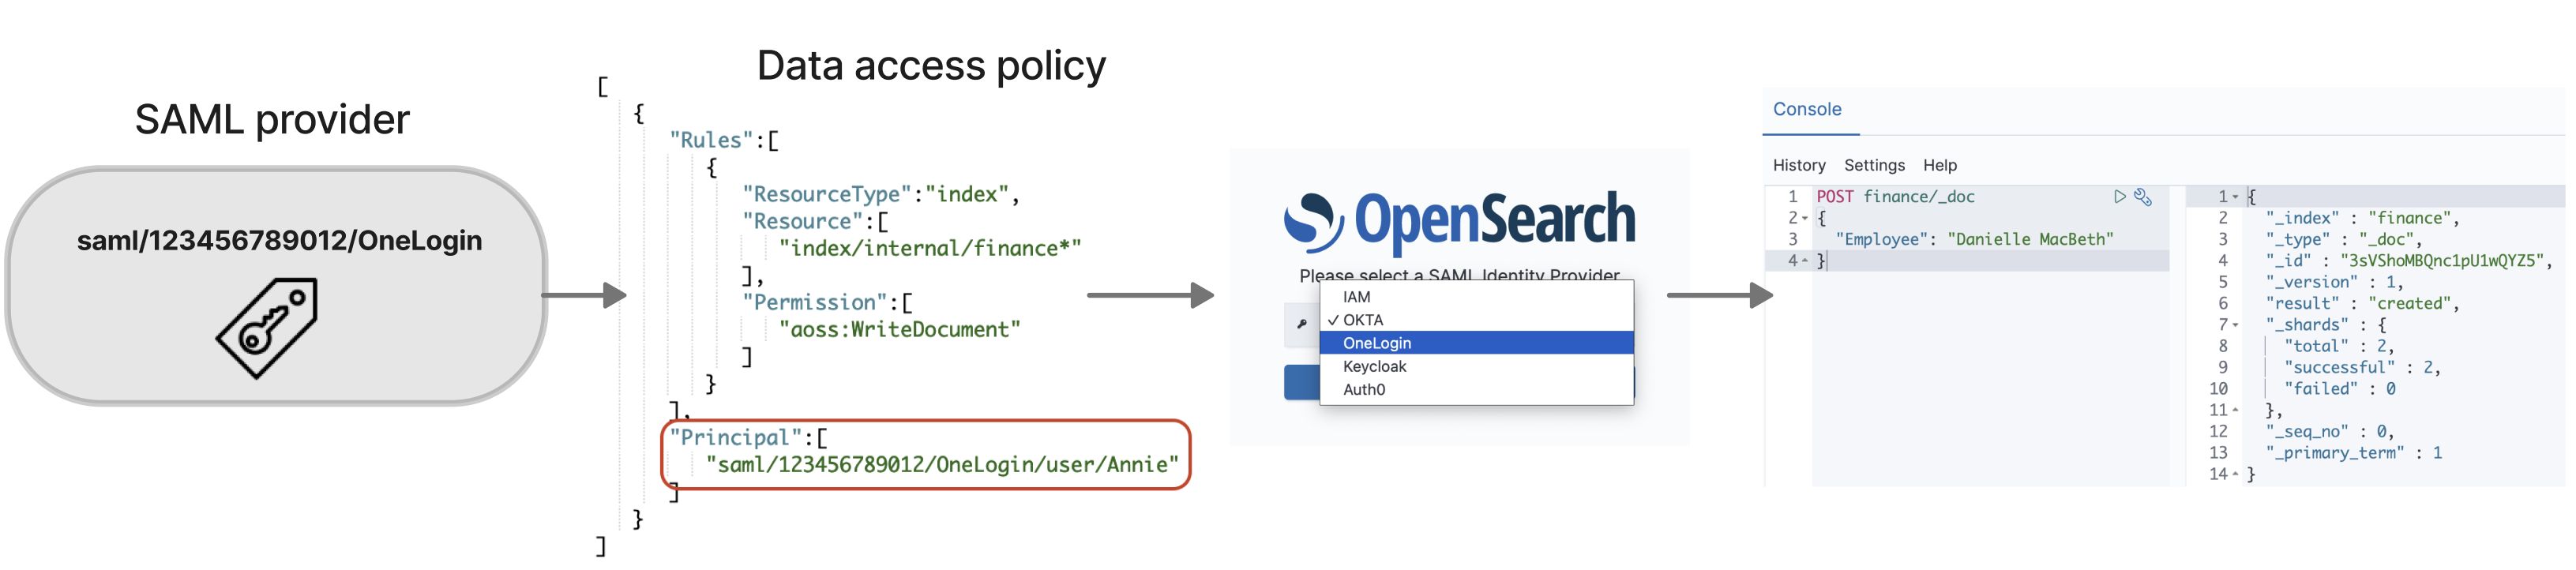
To set up SAML authentication, you first configure a SAML identity provider (IdP). You then include one or more users from that IdP in a data access policy. This policy grants it certain permissions to collections and/or indexes. A user can then sign in to OpenSearch Dashboards and perform the actions that are allowed in the data access policy.
Topics
Considerations
Consider the following when configuring SAML authentication:
-
Signed and encrypted requests are not supported.
-
Encrypted assertions are not supported.
-
IdP-initiated authentication and sign-out are not supported.
-
Service Control Policies (SCP) will not be applicable or evaluated in the case of non-IAM identities (like SAML in Amazon OpenSearch Serverless & SAML and basic internal user authorization for Amazon OpenSearch Service).
Permissions required
SAML authentication for OpenSearch Serverless uses the following AWS Identity and Access Management (IAM) permissions:
-
aoss:CreateSecurityConfig– Create a SAML provider. -
aoss:ListSecurityConfig– List all SAML providers in the current account. -
aoss:GetSecurityConfig– View SAML provider information. -
aoss:UpdateSecurityConfig– Modify a given SAML provider configuration, including the XML metadata. -
aoss:DeleteSecurityConfig– Delete a SAML provider.
The following identity-based access policy allows a user to manage all IdP configurations:
Note that the Resource element must be a wildcard.
Creating SAML providers (console)
These steps explain how to create SAML providers. This enables SAML authentication with service provider (SP)-initiated authentication for OpenSearch Dashboards. IdP-initiated authentication is not supported.
To enable SAML authentication for OpenSearch Dashboards
-
Sign in to the Amazon OpenSearch Service console at https://console.aws.amazon.com/aos/home
. -
On the left navigation panel, expand Serverless and choose SAML authentication.
-
Choose Add SAML provider.
-
Provide a name and description for the provider.
Note
The name that you specify is publicly accessible and will appear in a dropdown menu when users sign in to OpenSearch Dashboards. Make sure that the name is easily recognizable and doesn't reveal sensitive information about your identity provider.
-
Under Configure your IdP, copy the assertion consumer service (ACS) URL.
-
Use the ACS URL that you just copied to configure your identity provider. Terminology and steps vary by provider. Consult your provider's documentation.
In Okta, for example, you create a "SAML 2.0 web application" and specify the ACS URL as the Single Sign On URL, Recipient URL, and Destination URL. For Auth0, you specify it in Allowed Callback URLs.
-
Provide the audience restriction if your IdP has a field for it. The audience restriction is a value within the SAML assertion that specifies who the assertion is intended for. With OpenSearch Serverless, you can do the following. Make sure to replace the
contentin the following code example with your own AWS account ID:-
Use the default audience restriction
:opensearch:.111122223333 -
(Optional) configure a custom audience restriction using the AWS CLI. For more information, see Creating SAML providers (AWS CLI).
The name of the audience restriction field varies by provider. For Okta it's Audience URI (SP Entity ID). For IAM Identity Center it's Application SAML audience.
-
-
If you're using IAM Identity Center, you also need to specify the following attribute mapping:
Subject=${user:name}, with a format ofunspecified. -
After you configure your identity provider, it generates an IdP metadata file. This XML file contains information about the provider, such as a TLS certificate, single sign-on endpoints, and the identity provider's entity ID.
Copy the text in the IdP metadata file and paste it under Provide metadata from your IdP field. Alternately, choose Import from XML file and upload the file. The metadata file should look something like this:
<?xml version="1.0" encoding="UTF-8"?> <md:EntityDescriptor entityID="entity-id" xmlns:md="urn:oasis:names:tc:SAML:2.0:metadata"> <md:IDPSSODescriptor WantAuthnRequestsSigned="false" protocolSupportEnumeration="urn:oasis:names:tc:SAML:2.0:protocol"> <md:KeyDescriptor use="signing"> <ds:KeyInfo xmlns:ds="http://www.w3.org/2000/09/xmldsig#"> <ds:X509Data> <ds:X509Certificate>tls-certificate</ds:X509Certificate> </ds:X509Data> </ds:KeyInfo>s </md:KeyDescriptor> <md:NameIDFormat>urn:oasis:names:tc:SAML:1.1:nameid-format:unspecified</md:NameIDFormat> <md:NameIDFormat>urn:oasis:names:tc:SAML:1.1:nameid-format:emailAddress</md:NameIDFormat> <md:SingleSignOnService Binding="urn:oasis:names:tc:SAML:2.0:bindings:HTTP-POST" Location="idp-sso-url"/> <md:SingleSignOnService Binding="urn:oasis:names:tc:SAML:2.0:bindings:HTTP-Redirect" Location="idp-sso-url"/> </md:IDPSSODescriptor> </md:EntityDescriptor> -
Keep the Custom user ID attribute field empty to use the
NameIDelement of the SAML assertion for the username. If your assertion doesn't use this standard element and instead includes the username as a custom attribute, specify that attribute here. Attributes are case-sensitive. Only a single user attribute is supported.The following example shows an override attribute for
NameIDin the SAML assertion:<saml2:Attribute Name="UserId" NameFormat="urn:oasis:names:tc:SAML:2.0:attrname-format:basic"> <saml2:AttributeValue xmlns:xs="http://www.w3.org/2001/XMLSchema" xmlns:xsi="http://www.w3.org/2001/XMLSchema-instance" xsi:type="xs:string">annie</saml2:AttributeValue> </saml2:Attribute> -
(Optional) Specify a custom attribute in the Group attribute field, such as
roleorgroup. Only a single group attribute is supported. There's no default group attribute. If you don't specify one, your data access policies can only contain user principals.The following example shows a group attribute in the SAML assertion:
<saml2:Attribute Name="department" NameFormat="urn:oasis:names:tc:SAML:2.0:attrname-format:basic"> <saml2:AttributeValue xmlns:xs="http://www.w3.org/2001/XMLSchema" xmlns:xsi="http://www.w3.org/2001/XMLSchema-instance" xsi:type="xs:string">finance</saml2:AttributeValue> </saml2:Attribute> -
By default, OpenSearch Dashboards signs users out after 24 hours. You can configure this value to any number between 1 and 12 hours (15 and 720 minutes) by specifying the OpenSearch Dashboards timeout. If you try to set the timeout equal to or less than 15 minutes, your session will be reset to one hour.
-
Choose Create SAML provider.
Accessing OpenSearch Dashboards
After you configure a SAML provider, all users and groups associated with that
provider can navigate to the OpenSearch Dashboards endpoint. The Dashboards URL has the
format collection-endpoint/_dashboards/
If you have SAML enabled, selecting the link in the AWS Management Console directs you to the IdP selection page, where you can sign in using your SAML credentials. First, use the dropdown to select an identity provider:
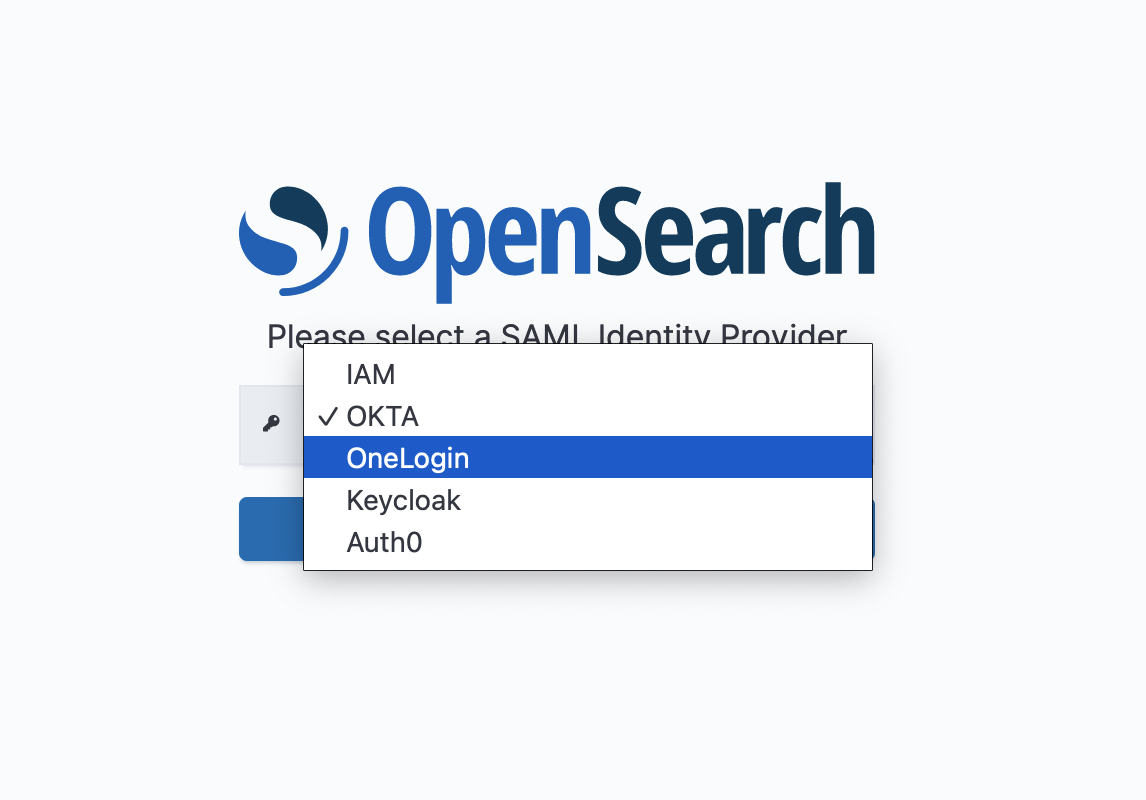
Then sign in using your IdP credentials.
If you don't have SAML enabled, selecting the link in the AWS Management Console directs you to log in as an IAM user or role, with no option for SAML.
Granting SAML identities access to collection data
After you create a SAML provider, you still need to grant the underlying users and groups access to the data within your collections. You grant access through data access policies. Until you provide users access, they won't be able to read, write, or delete any data within your collections.
To grant access, create a data access policy and specify your SAML user and/or group
IDs in the Principal statement:
[
   {
      "Rules":[
       ...
      ],
      "Principal":[
         "saml/987654321098/myprovider/user/Shaheen",
         "saml/987654321098/myprovider/group/finance"
      ]
   }
]
You can grant access to collections, indexes, or both. If you want different users to have different permissions, create multiple rules. For a list of available permissions, see Supported policy permissions. For information about how to format an access policy, see Policy syntax.
Creating SAML providers (AWS CLI)
To create a SAML provider using the OpenSearch Serverless API, send a CreateSecurityConfig request:
aws opensearchserverless create-security-config \ --namemyprovider\ --type saml \ --saml-options file://saml-auth0.json
Specify saml-options, including the metadata XML, as a key-value map
within a .json file. The metadata XML must be encoded as a JSON escaped
string
{
   "sessionTimeout": 70,
   "groupAttribute": "department",
   "userAttribute": "userid",
   "openSearchServerlessEntityId": "aws:opensearch:111122223333:app1",
   "metadata": "EntityDescriptor xmlns=\"urn:oasis:names:tc:SAML:2.0:metadata\" ... ... ... IDPSSODescriptor\r\n\/EntityDescriptor"
}
Note
(Optional) configure a custom audience restriction using the AWS CLI. For more information, see Creating SAML providers (AWS CLI).
Viewing SAML providers
The following ListSecurityConfigs request lists all SAML providers in your account:
aws opensearchserverless list-security-configs --type saml
The request returns information about all existing SAML providers, including the full IdP metadata that your identity provider generates:
{
   "securityConfigDetails": [
      {
         "configVersion": "MTY2NDA1MjY4NDQ5M18x",
         "createdDate": 1664054180858,
         "description": "Example SAML provider",
         "id": "saml/111122223333/myprovider",
         "lastModifiedDate": 1664054180858,
         "samlOptions": {
            "groupAttribute": "department",
            "metadata": "EntityDescriptorxmlns=\"urn:oasis:names:tc:SAML:2.0:metadata\" ...... ...IDPSSODescriptor\r\n/EntityDescriptor",
            "sessionTimeout": 120,
            "openSearchServerlessEntityId": "aws:opensearch:111122223333:app1",
            "userAttribute": "userid"
         }
      }
   ]
}
To view details about a specific provider, including the configVersion
for future updates, send a GetSecurityConfig request.
Updating SAML providers
To update a SAML provider using the OpenSearch Serverless console, choose SAML authentication, select your identity provider, and choose Edit. You can modify all fields, including the metadata and custom attributes.
To update a provider through the OpenSearch Serverless API, send an UpdateSecurityConfig request and include the identifier of the policy to be
updated. You must also include a configuration version, which you can retrieve using the
ListSecurityConfigs or GetSecurityConfig commands.
Including the most recent version ensures that you don't inadvertently override a change
made by someone else.
The following request updates the SAML options for a provider:
aws opensearchserverless update-security-config \ --id saml/123456789012/myprovider\ --type saml \ --saml-options file://saml-auth0.json \ --config-versionMTY2NDA1MjY4NDQ5M18x
Specify your SAML configuration options as a key-value map within a .json file.
Important
Updates to SAML options are not incremental. If you don't specify a value for a
parameter in the SAMLOptions object when you make an update, the
existing values will be overridden with empty values. For example, if the current
configuration contains a value for userAttribute, and then you make an
update and don't include this value, the value is removed from the configuration.
Make sure you know what the existing values are before you make an update by calling
the GetSecurityConfig operation.
Deleting SAML providers
When you delete a SAML provider, any references to associated users and groups in your data access policies are no longer functional. To avoid confusion, we suggest that you remove all references to the endpoint in your access policies before you delete the endpoint.
To delete a SAML provider using the OpenSearch Serverless console, choose Authentication, select the provider, and choose Delete.
To delete a provider through the OpenSearch Serverless API, send a DeleteSecurityConfig request:
aws opensearchserverless delete-security-config --id saml/123456789012/myprovider
