Creating Your First Node.js Stack
Important
The AWS OpsWorks Stacks service reached end of life on May 26, 2024 and has been disabled for both new and existing customers.
We strongly recommend customers migrate their workloads to other solutions as soon as possible. If you have questions about migration, reach out to the AWS Support Team on AWS re:Post
This example describes how to create a Linux stack that supports a Node.js application server and how to deploy a simple application. The stack consists of the following components:
-
A Node.js App Server layer with two instances
-
An Elastic Load Balancing load balancer to distribute traffic to the application server instances
-
An Amazon Relational Database Service (Amazon RDS) service layer that provides a backend database
Topics
Prerequisites
This walkthrough assumes the following:
-
You have an AWS account and a basic understanding of how to use OpsWorks Stacks.
If you are new to OpsWorks Stacks or to AWS, learn the basics by completing the introductory tutorial in Getting Started with Chef 11 Linux Stacks.
-
You have a basic understanding of how to implement a Node.js application.
If you are new to Node.js, learn the basics by completing an introductory tutorial, such as Node: Up and Running
. -
You have already created at least one stack in the AWS region that you plan to use for this example.
When you create the first stack in a region, OpsWorks Stacks creates an Amazon Elastic Compute Cloud (Amazon EC2) security group for each layer type. You need these security groups to create the Amazon RDS database (DB) instance. If you are new to OpsWorks Stacks, we recommend that you use the same region for this example that you did when you followed the tutorial in Getting Started with Chef 11 Linux Stacks. If you want to use a new region, create a new stack in the region; the stack does not need to have layers or instances. As soon as you create the stack, OpsWorks Stacks automatically adds a set of security groups to the region.
-
You will create your stack in a default VPC.
You can use EC2-Classic for this walkthrough, but some of the details will differ slightly. For example, with EC2-Classic, you specify an instance's Availability Zone (AZ) instead of its subnet.
-
Your IAM user has full-access permissions for OpsWorks Stacks.
For security reasons, we strongly recommend that you do not use your account's root credentials for this walkthrough. Instead, create a user with OpsWorks Stacks full-access permissions and use those credentials with OpsWorks Stacks. For more information, see Creating an Administrative User.
Implementing the Application
This walkthrough uses a simple Express
To implement the application, create a directory named nodedb in a
convenient location on your workstation and add the following three files to it.
The Package Descriptor
To create the application's package descriptor, add a file named
package.json with the following contents to the
nodedb directory. package.json is required for
Express applications and must be located in the application's root directory.
{
  "name": "Nodejs-DB",
  "description": "Node.js example application",
  "version": "0.0.1",
  "dependencies": {
    "express": "*",
    "ejs": "*",
    "mysql": "*"
  }
}
This package.json example is fairly minimal. It defines the
required name and version attributes and lists the dependent
packages:
-
expressreferences the Expresspackage. -
ejsreferences the EJSpackage, which the application uses to insert text into an HTML layout file. -
mysqlreferences the node-mysqlpackage, which the application uses to connect to the RDS instance.
For more information on package descriptor files, see package.json
The Layout File
To create the application's layout file, add a views directory to
the nodedb directory, and then add a file to views
named index.html with the following contents:
<!DOCTYPE html>
<html>
<head>
  <title>AWS Opsworks Node.js Example</title>
</head>
<body>
  <h1>AWS OpsWorks Node.js Example</h1>
    <p>Amazon RDS Endpoint: <i><%= hostname %></i></p>
    <p>User: <i><%= username %></i></p>
    <p>Password: <i><%= password %></i></p>
    <p>Port: <i><%= port %></i></p>
    <p>Database: <i><%= database %></i></p>

    <p>Connection: <%= connectionerror %></p>
    <p>Databases: <%= databases %></p>
</body>
</html>
For this example, the layout file is a simple HTML document that displays some data from
Amazon RDS. Each <%= ... => element represents the value of a variable that is
defined in the application's code file, which we create next.
The Code File
To create the application's code file, add a server.js file to the
nodedb directory with the following contents.
Important
With OpsWorks Stacks, a Node.js application's main code file must be named
server.js and be located in the application's root folder.
var express = require('express');
var mysql = require('mysql');
var dbconfig = require('opsworks'); //[1] Include database connection data
var app = express();
var outputString = "";

app.engine('html', require('ejs').renderFile);

//[2] Get database connection data
app.locals.hostname = dbconfig.db['host'];
app.locals.username = dbconfig.db['username'];
app.locals.password = dbconfig.db['password'];
app.locals.port = dbconfig.db['port'];
app.locals.database = dbconfig.db['database'];
app.locals.connectionerror = 'successful';
app.locals.databases = '';

//[3] Connect to the Amazon RDS instance
var connection = mysql.createConnection({
    host: dbconfig.db['host'],
    user: dbconfig.db['username'],
    password: dbconfig.db['password'],
    port: dbconfig.db['port'],
    database: dbconfig.db['database']
});

connection.connect(function(err)
{
    if (err) {
        app.locals.connectionerror = err.stack;
        return;
    }
});

// [4] Query the database
connection.query('SHOW DATABASES', function (err, results) {
    if (err) {
        app.locals.databases = err.stack;
    }

    if (results) {
        for (var i in results) {
            outputString = outputString + results[i].Database + ', ';
        }
        app.locals.databases = outputString.slice(0, outputString.length-2);
    }
});

connection.end();

app.get('/', function(req, res) {
    res.render('./index.html');
});

app.use(express.static('public'));

//[5] Listen for incoming requests
app.listen(process.env.PORT);
The example displays the database connection information and also queries the database server and displays the server's databases. You can easily generalize it to interact with the database as needed. The following notes refer to the numbered comments in the preceding code.
- [1] Include database connection data
-
This
requirestatement includes the database connection data. As described later, when you attach a database instance to an app, OpsWorks Stacks puts the connection data in a file namedopsworks.js, which looks similar to the following:exports.db = { "host":"nodeexample.cdlqlk5uwd0k.us-west-2.rds.amazonaws.com", "database":"nodeexampledb", "port":3306, "username":"opsworksuser", "password":"your_pwd", "reconnect":true, "data_source_provider":"rds", "type":"mysql"}opsworks.jsis in the application'sshared/configdirectory,/srv/www/. However, OpsWorks Stacks puts a symlink toapp_shortname/shared/configopsworks.jsin the application's root directory, so you can include the object by using justrequire 'opsworks'. - [2] Get database connection data
-
This set of statements displays the connection data from
opsworks.jsby assigning the values from thedbobject to a set ofapp.localsproperties, each of which maps to one of the <%= ... %> elements in theindex.htmlfile. The rendered document replaces the <%= ... %> elements with the corresponding property values. - [3] Connect to the Amazon RDS instance
-
The example uses
node-mysqlto access the database. To connect to the database, the example creates aconnectionobject by passing the connection data tocreateConnection, and then callsconnection.connectto establish the connection. - [4] Query the database
-
After establishing a connection, the example calls
connection.queryto query the database. This example simply queries for the server's database names.queryreturns an array ofresultsobjects, one for each database, with the database name assigned to theDatabaseproperty. The example concatenates the names and assigns them toapp.locals.databases,which displays the list in the rendered HTML page.For this example, there are five databases, the
nodeexampledbdatabase that you specified when you created the RDS instance and four others that are automatically created by Amazon RDS. - [5] Listen for incoming requests
-
The final statement listens for incoming requests on a specified port. You don't have to specify an explicit port value. When you add the app to your stack, you specify whether the application supports HTTP or HTTPS requests. OpsWorks Stacks then sets the
PORTenvironment variable to 80 (HTTP) or 443 (HTTPS), and you can use that variable in your application.It is possible to listen on other ports, but the Node.js App Server layer's built-in security group, AWS-OpsWorks-nodejs-App-Server, allows inbound user traffic only to ports 80, 443, and 22 (SSH). To allow inbound user traffic to other ports, create a security group with appropriate inbound rules and assign it to the Node.js App Server layer. Do not modify inbound rules by editing the built-in security group. Each time you create a stack, OpsWorks Stacks overwrites the built-in security groups with the standard settings, so any changes that you make will be lost.
Note
You can associate custom environment variables with your application when you create or update the associated app. You can also pass data to your application by using custom JSON and a custom recipe. For more information, see Passing Data to Applications.
Creating the Database Server and Load Balancer
This example uses Amazon RDS database server and Elastic Load Balancing load balancer instances. You must create each instance separately and then incorporate it into your stack. This section describes how to create new database and load balancer instances. You instead can use existing instances, but we recommend that you read through the procedure to ensure that those instances are correctly configured.
The following describes how to create a minimally configured RDS DB instance that is sufficient for this example. For more information, see the Amazon RDS User Guide.
To create the RDS DB instance
-
Open the console.
Open the Amazon RDS console,
and set the region to US West (Oregon). In the navigation pane, choose RDS Dashboard, and then choose Launch DB Instance. -
Specify the database engine.
Choose MySQL Community Edition as the database engine.
-
Decline multi-AZ deployment.
Choose No, this instance..., and then choose Next. You don't need multi-AZ deployment for this example.
-
Configure the basic settings.
On the DB Instance Details page, specify the following settings:
-
DB Instance Class: db.t2.micro
-
Multi-AZ Deployment: No
-
Allocated Storage:
5GB -
DB Instance Identifier:
nodeexample -
Master Username:
opsworksuser -
Master Password: A password of your choice
Record the instance identifier, user name, and password for later use, accept the default settings for the other options, and then choose Next.
-
-
Configure the advanced settings.
On the Configure Advanced Settings page, specify the following settings:
-
Database Name:
nodeexampledb -
DB Security Group(s): AWS-OpsWorks-DB-Master-Server
Note
The AWS-OpsWorks-DB-Master-Server security group allows only your stack's instances to access the database. If you want to access the database directly, attach an additional security group to the RDS DB instance with appropriate inbound rules. For more information, see Amazon RDS Security Groups. You also can control access by putting the instance in a VPC. For more information, see Running a Stack in a VPC.
Record the database name for later use, accept the default values for the other settings, and then choose Launch DB Instance.
-
The following procedure describes how to create an Elastic Load Balancing load balancer for this example. For more information, see the Elastic Load Balancing User Guide.
To create the load balancer
-
Open the Amazon EC2 console.
Open the Amazon EC2 console
and ensure that the region is set to US West (Oregon). In the navigation pane, choose Load Balancers, and then choose Create Load Balancer. -
Define the load balancer.
On the Define Load Balancer page, specify the following settings.
-
Name –
Node-LB -
Create LB Inside – My Default VPC
Accept the default settings for the other options, and choose then Next.
-
-
Assign security groups.
On the Assign Security Groups page, specify the following groups:
-
default VPC security group
-
AWS-OpsWorks-nodejs-App-Server
Choose Next. On the Configure Security Settings page, choose Next. You don't need a secure listener for this example.
-
-
Configure the health check.
On the Configure Health Check page, set Ping Path to
/and accept the default values for the other settings. Choose Next. On the Add EC2 Instances page, choose Next. On the Add Tags page, choose Review and Create. OpsWorks Stacks handles the task of adding EC2 instances to the load balancer, and you won't need tags for this example. -
Create the load balancer.
On the Review page, choose Create to create the load balancer.
Creating the Stack
You now have all the components needed to create the stack.
To create the stack
-
Sign in to the OpsWorks Stacks console.
Sign into the OpsWorks Stacks console
, and choose Add Stack. -
Create the stack.
To create a new stack, choose Chef 11 stack, and then specify the following settings.
-
–
NodeStack -
Region – US West (Oregon)
You can create a stack in any AWS region, but we recommend US West (Oregon) for tutorials.
Choose Add Stack. For more information on stack configuration settings, see Create a New Stack.
-
-
Add a Node.js App Server layer with an attached load balancer.
On the NodeStack page, choose Add a layer, and then specify the following settings:
-
Layer type – Node.js App Server
-
Elastic Load Balancer – Node-LB
Accept the default values for the other settings, and then choose Add Layer.
-
-
Add instances to the layer and start them.
In the navigation pane, choose Instances, and then add two instances to the Rails App Server layer, as follows.
-
Under Node.js App Server, choose Add instance.
Set Size to t2.micro, accept the default values for the other settings, and then choose Add Instance.
-
Choose +Instance, and then add a second t2.micro instance to the layer in a different subnet.
This places the instance in a different Availability Zone (AZ).
-
Choose Add instance.
-
To start both instances, choose Start All Instances.
You have assigned an Elastic Load Balancing load balancer to this layer. When an instance enters or leaves the online state, OpsWorks Stacks automatically registers or deregisters the instance with the load balancer.
Note
For a production stack, we recommend that you distribute your application server instances across multiple AZs. If users can't connect to an AZ, the load balancer routes incoming traffic to instances in the remaining zones, and your site will continue to function.
-
-
Register the RDS DB instance with the stack.
In the navigation pane, choose Resources and register the RDS DB instance with the stack, as follows.
-
Choose the RDS tab, and then choose Show Unregistered RDS DB instances.
-
Choose the nodeexampledb instance, and then specify the following settings:
-
User – The master user name that you specified when you created the instance; for this example.
opsworksuser. -
Password – The master password that you specified when you created the instance.
-
-
Choose Register with Stack to add the RDS DB instance to the stack as an Amazon RDS service layer.
Warning
OpsWorks Stacks does not validate the User or Password values, it simply passes them to the application. If you enter them incorrectly, your application cannot connect to the database.
To add the RDS DB instance to the stack as an Amazon RDS service layer, choose Register with Stack.
-
Deploying the Application
You must store the application in a remote repository. When you deploy it, OpsWorks Stacks deploys the code and related files from the repository to the application server instances. For convenience, this example uses a public Amazon Simple Storage Service (Amazon S3) archive as the repository, but you also can use several other repository types, including Git and Subversion. For more information, see Application Source.
To deploy the application
-
Package the application in an archive file.
Create a
.ziparchive of thenodedbdirectory and subdirectories named nodedb.zip. You also can use other types of archive file, including gzip, bzip2, and tarball. Note that OpsWorks Stacks does not support uncompressed tarballs. For more information, see Application Source. -
Upload the archive file to Amazon S3.
Upload
nodedb.zipto an Amazon S3 bucket, make the file public, and copy the file's URL for later use. For more information on how to create buckets and upload files, go to Get Started With Amazon Simple Storage Service.Note
OpsWorks Stacks can also deploy private files from an Amazon S3 bucket, but for simplicity, this example uses a public file. For more information, see Application Source.
-
Create an OpsWorks Stacks app.
Return to the OpsWorks Stacks console, in the navigation pane, choose Apps, and then choose Add an app. Specify the following settings:
-
Name –
NodeDB.This string is the app's display name. For most purposes, you need the app's short name, which OpsWorks Stacks generates from the display name by transforming all characters to lower case and removing punctuation. For this example, the short name is
nodedb. To verify an app's short name, after creating the app, choose the app on the Apps page to display its details page. -
Type –
Node.js. -
Data source type –
RDS. -
Database instance – Choose the Amazon RDS DB instance that you registered earlier.
-
Database name – Specify the database name that you created earlier,
nodeexampledbfor this example. -
Repository type –
Http Archive.You must use this repository type for public Amazon S3 files. The
S3 Archivetype is used only for private archives. -
Repository URL – The archive file's Amazon S3 URL.
Use the default values for the remaining settings, and then click Add App to create the app.
-
-
Deploy the app.
Go to the Apps page, and in the NodeDB app's Actions column, choose deploy. Then choose Deploy to deploy the app to the server instances. OpsWorks Stacks runs the Deploy recipes on each instance, which downloads the application from the repository and restarts the server. When each instance has a green check mark and the Status is successful, deployment is complete and the application is ready to start handling requests.
Note
If the deployment fails, choose show in the Log column to display the deployment's Chef log. The error information is near the bottom.
-
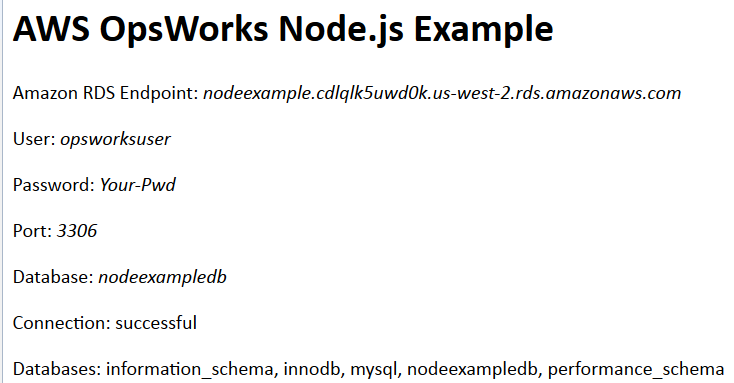
Open the application.
To open the application, choose Layers, choose the load balancer, and then choose the load balancer's DNS name, which sends an HTTP request to the load balancer. You should see something like the following.
Note
OpsWorks Stacks automatically deploys apps to new instances during setup. Manual deployment is required only for online instances. For more information, see Deploying Apps. For a general discussion of deployment, including some more sophisticated deployment strategies, see Managing and Deploying Apps and Cookbooks.
What Next?
Important
The AWS OpsWorks Stacks service reached end of life on May 26, 2024 and has been disabled for both new and existing customers.
We strongly recommend customers migrate their workloads to other solutions as soon as possible. If you have questions about migration, reach out to the AWS Support Team on AWS re:Post
This walkthrough took you through the basics of setting up a simple Node.js application server stack. Here are some suggestions for what to do next.
- Examine the Node.js built-in cookbooks
-
If you want to know how the instances are configured in detail, see the layer's built-in cookbook, opsworks_nodejs
, which contains the recipes and related files that OpsWorks Stacks uses to install and configure the software, and the built-in deploy cookbook , which contains the recipes that OpsWorks Stacks uses to deploy the apps. - Customize the server configuration
-
The example stack is fairly basic. For production use, you will probably want to customize the stack. For more information, see Customizing OpsWorks Stacks.
- Add SSL support
-
You can enable SSL support for your app and provide OpsWorks Stacks with the appropriate certificates when you create the app. OpsWorks Stacks then installs the certificates in the appropriate directory. For more information, see Using SSL.
- Add in-memory data caching
-
Production-level sites often improve performance by caching data in an in-memory key-value store, such as Redis or Memcache. You can use either with an OpsWorks Stacks stack. For more information, see ElastiCache Redis and Memcached.
- Use a more sophisticated deployment strategy
-
The example used a simple app deployment strategy, which deploys the update to every instance concurrently. This approach is simple and fast, but there is no margin for error. If the deployment fails or the update has any issues, every instance in your production stack could be affected, potentially disrupting or disabling your site until you can fix the problem. For more information on deployment strategies, see Managing and Deploying Apps and Cookbooks.
- Extend the Node.js App Server layer
-
You can extend the layer in a variety of ways. For example, you can implement recipes to run scripts on the instances or implement Chef deployment hooks to customize app deployment. For more information, see Extending a Layer.
- Define environment variables
-
You can pass data to your application by defining environment variables for the associated app. When you deploy the app, OpsWorks Stacks exports those variables so you can access them from your app. For more information, see Using Environment Variables.
