Compliance Scans in AWS OpsWorks for Chef Automate
Important
AWS OpsWorks for Chef Automate reached end of life on May 5, 2024 and has been disabled for both new and existing customers. We recommend that existing customers migrate to Chef SaaS or an alternative solution. If you have questions,
you can reach out to the AWS Support Team on AWS re:Post
Compliance scans let you track the compliance of managed nodes in your infrastructure based
on predefined policies, also called rules. Compliance views let you
regularly audit your applications for vulnerabilities and noncompliant configurations. Chef
offers over 100 predefined compliance profiles—collections of rules that
apply to specific node configurations—that you can use in your compliance scans. You can also
use the Chef InSpec language
If your server is not yet running Chef Automate 2.0, you can set up Chef Compliance
Note
The minimum supported version of the Chef Infra client agent software
(chef-client) on nodes associated with an AWS OpsWorks for Chef Automate server is
13.x. We recommend running the most current, stable
chef-client version, or at least 14.10.9.
Topics
Compliance in Chef Automate 2.0
If your AWS OpsWorks for Chef Automate server is running Chef Automate 2.0, set up Chef Compliance by using procedures in this section.
Running Compliance Scan Jobs with Chef Automate 2.0
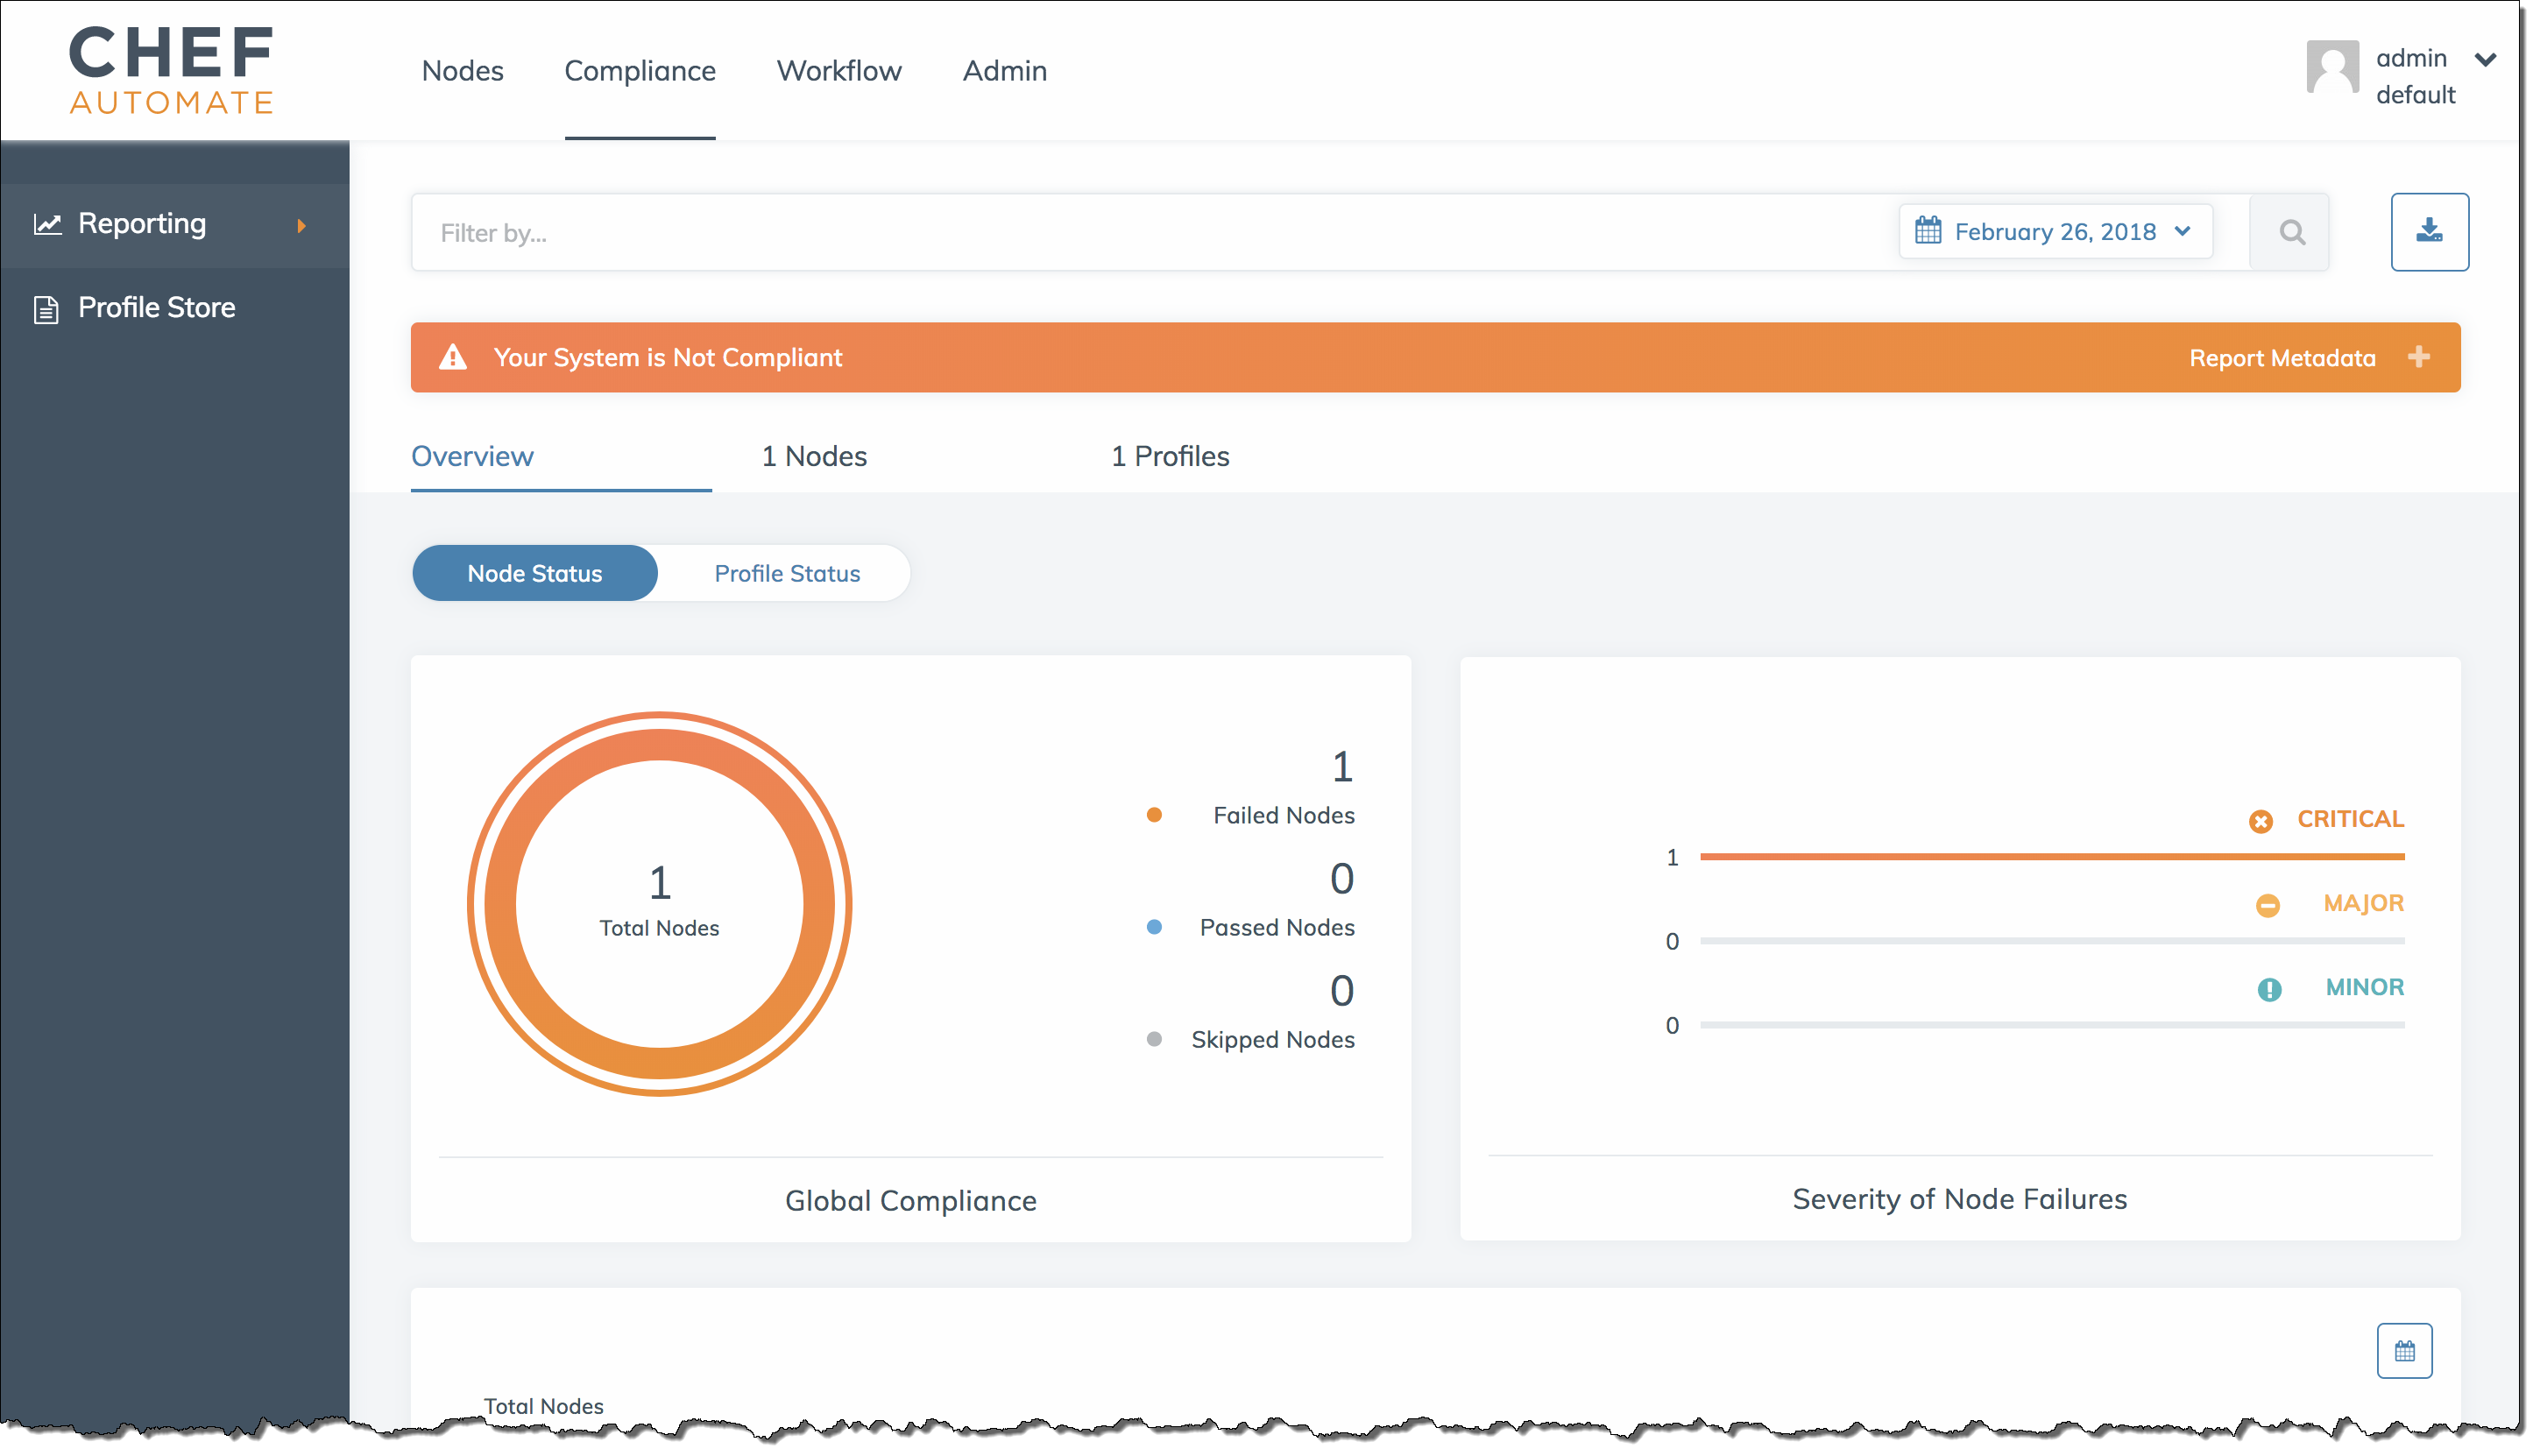
Chef Automate 2.0 includes Chef InSpec compliance-scanning capability that formerly required manual setup and cookbook configuration. You can run scan jobs on an AWS OpsWorks for Chef Automate server that is running Chef Automate 2.0. Jobs can be run immediately (one time), scheduled for a later time, or scheduled to run at specified intervals, such as daily or every two hours. The results of a scan job are sent to compliance reporting. You can view and take actions on compliance scan results in the Chef Automate dashboard. To open the Compliance tab and view reports, on the Scan Jobs tab in the Chef Automate dashboard, choose Report at the right of a managed node row.
To run scan jobs on managed nodes, you must have the following.
-
At least one compliance profile installed in your namespace.
-
At least one target node, either manually-added, or an EC2 instance added automatically.
In AWS OpsWorks for Chef Automate, scan jobs are supported on the following targets.
-
Manually-added nodes
-
aws-ec2instances -
AWS Regions
For detailed instructions about how to run scan jobs, see Chef Automate Scan Jobs
(Optional, Chef Automate 2.0) Setting Up Compliance with the Audit Cookbook
You can configure compliance on any AWS OpsWorks for Chef Automate server. After you launch an AWS OpsWorks for Chef Automate
server, you can install profiles from the Chef Automate dashboard, or add desired
profiles to Audit cookbook attributes in the Policyfile.rb policy
file. A prefilled Policyfile.rb file is included in the starter
kit.
After you edit Policyfile.rb with profiles as attributes of the
Audit cookbook, run chef push commands to upload the Audit cookbookPolicyfile.rb to your Chef Automate server.
Installing the Audit cookbook also installs the gem for Chef InSpec
Instructions in this section show you how to implement the
opsworks-audit cookbook. The Audit cookbook downloads specified
profiles from the Chef Automate server, assesses nodes against the DevSec SSH
Baseline profile, and reports the result of compliance scans on every
chef-client run.
To install compliance profiles
-
If you have not already done so, sign in to the Chef Automate web-based dashboard. Use the credentials you received when you downloaded the Starter Kit as you created your AWS OpsWorks for Chef Automate server.
-
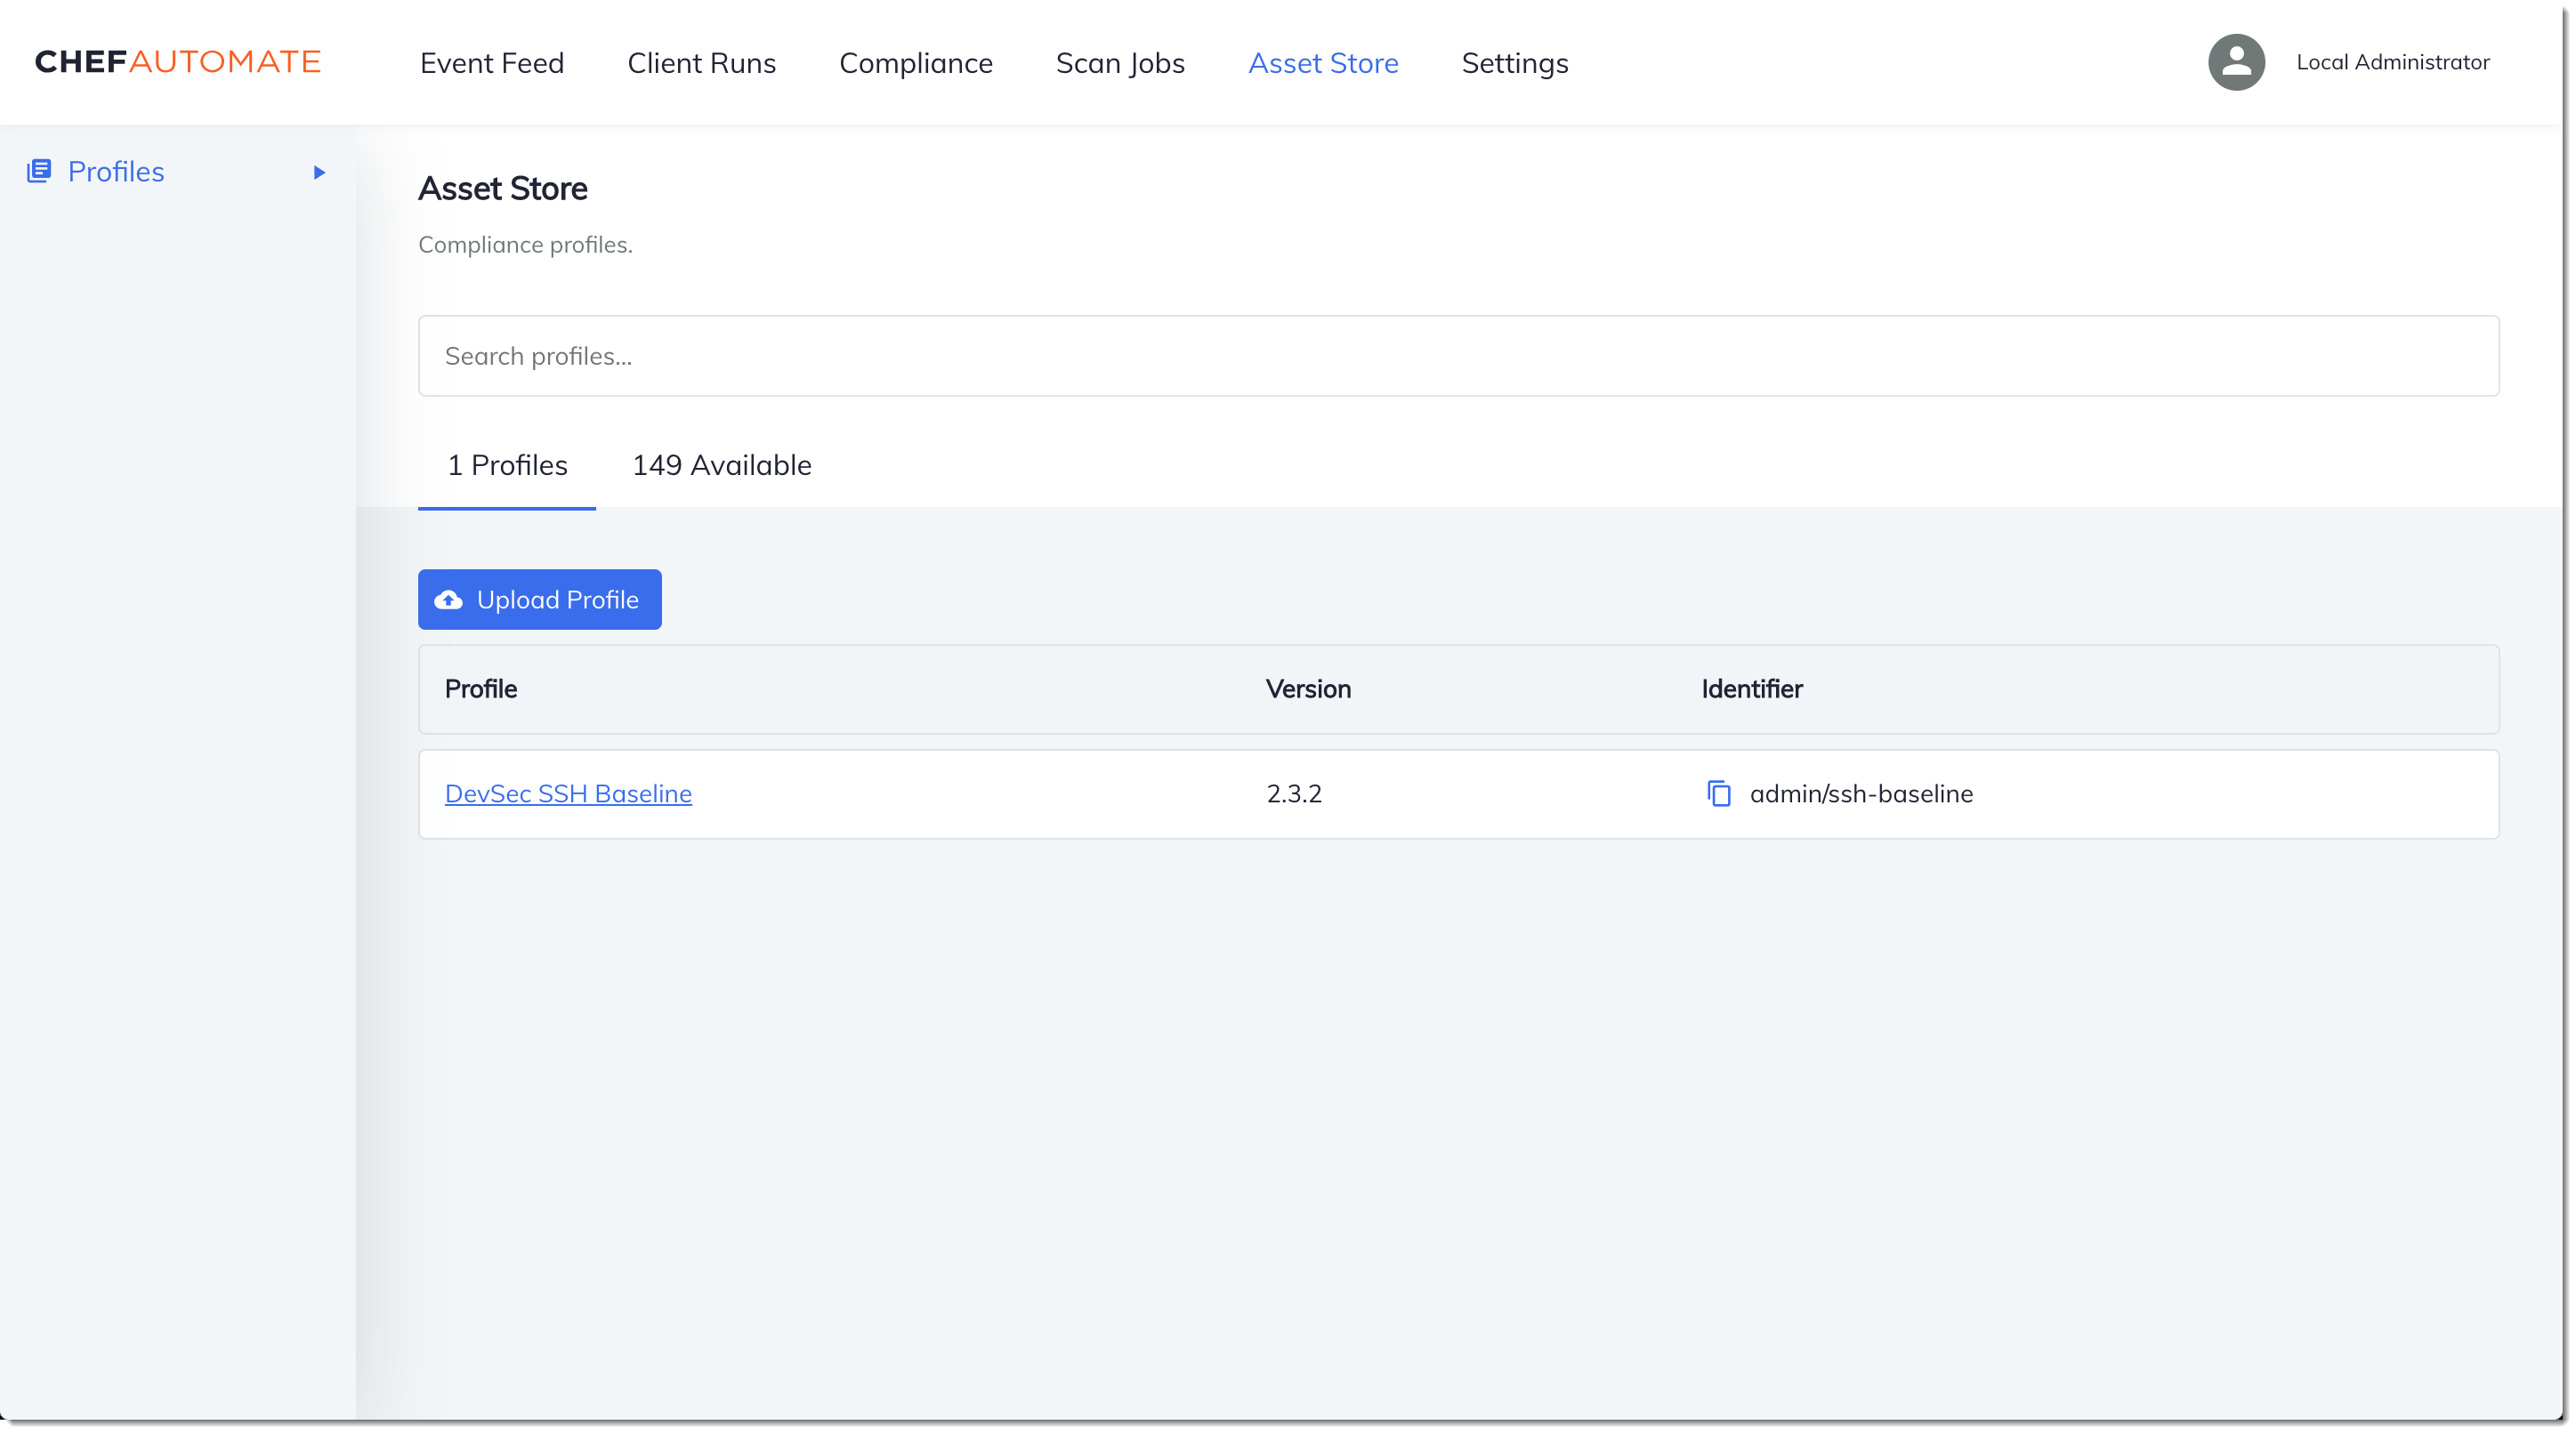
In the Chef Automate dashboard, choose the Asset Store tab.

-
Choose the Available tab to see predefined profiles.
-
Browse the list of profiles. Choose a profile that matches the operating system and configuration of at least one of your managed nodes. To view details about the profile, including a description of the profile's targeted violations and underlying rule code, choose > at the right of the profile entry. You can choose multiple profiles. If you are setting up the example in the Starter Kit, choose DevSec SSH Baseline.
-
To install the selected profiles on your Chef Automate server, choose Get.
-
After you install profiles, they are shown in the Profiles tab of the Chef Automate dashboard.
To install cookbooks with
Policyfile.rb
-
View
Policyfile.rbin your Starter Kit to see that the attributes for the Audit cookbook specify thessh-baselineprofile in['profiles'].# Define audit cookbook attributes default["opsworks-demo"]["audit"]["reporter"] = "chef-server-automate" default["opsworks-demo"]["audit"]["profiles"] = [ { "name": "DevSec SSH Baseline", "compliance": "admin/ssh-baseline" } ] -
Download and install the cookbooks defined in
Policyfile.rb.chef installAll cookbooks are versioned in the cookbook's
metadata.rbfile. Each time you change a cookbook, you must raise the version of the cookbook that is in itsmetadata.rb. -
Push the policy
opsworks-demo, defined inPolicyfile.rb, to your server.chef push opsworks-demo -
Verify the installation of your policy. Run the following command.
chef show-policyThe results should resemble the following:
opsworks-demo-webserver ======================= * opsworks-demo: ec0fe46314 -
Add nodes to your server to manage, if you have not already done so. To connect your first node to the AWS OpsWorks for Chef Automate server, use the
userdata.shscript that is included in this Starter Kit. It uses the AWS OpsWorksAssociateNodeAPI to connect a node to your server.You can automate the association of nodes by following steps in Add nodes automatically in AWS OpsWorks for Chef Automate, or add nodes one at a time by following steps in Add nodes individually.
-
After you update the run list for your nodes, the
chef-clientagent runs your specified recipes on its next run. By default, this occurs every 1800 seconds (30 minutes). After the run, you can view and take actions on compliance results from the Compliance tab in the Chef Automate dashboard.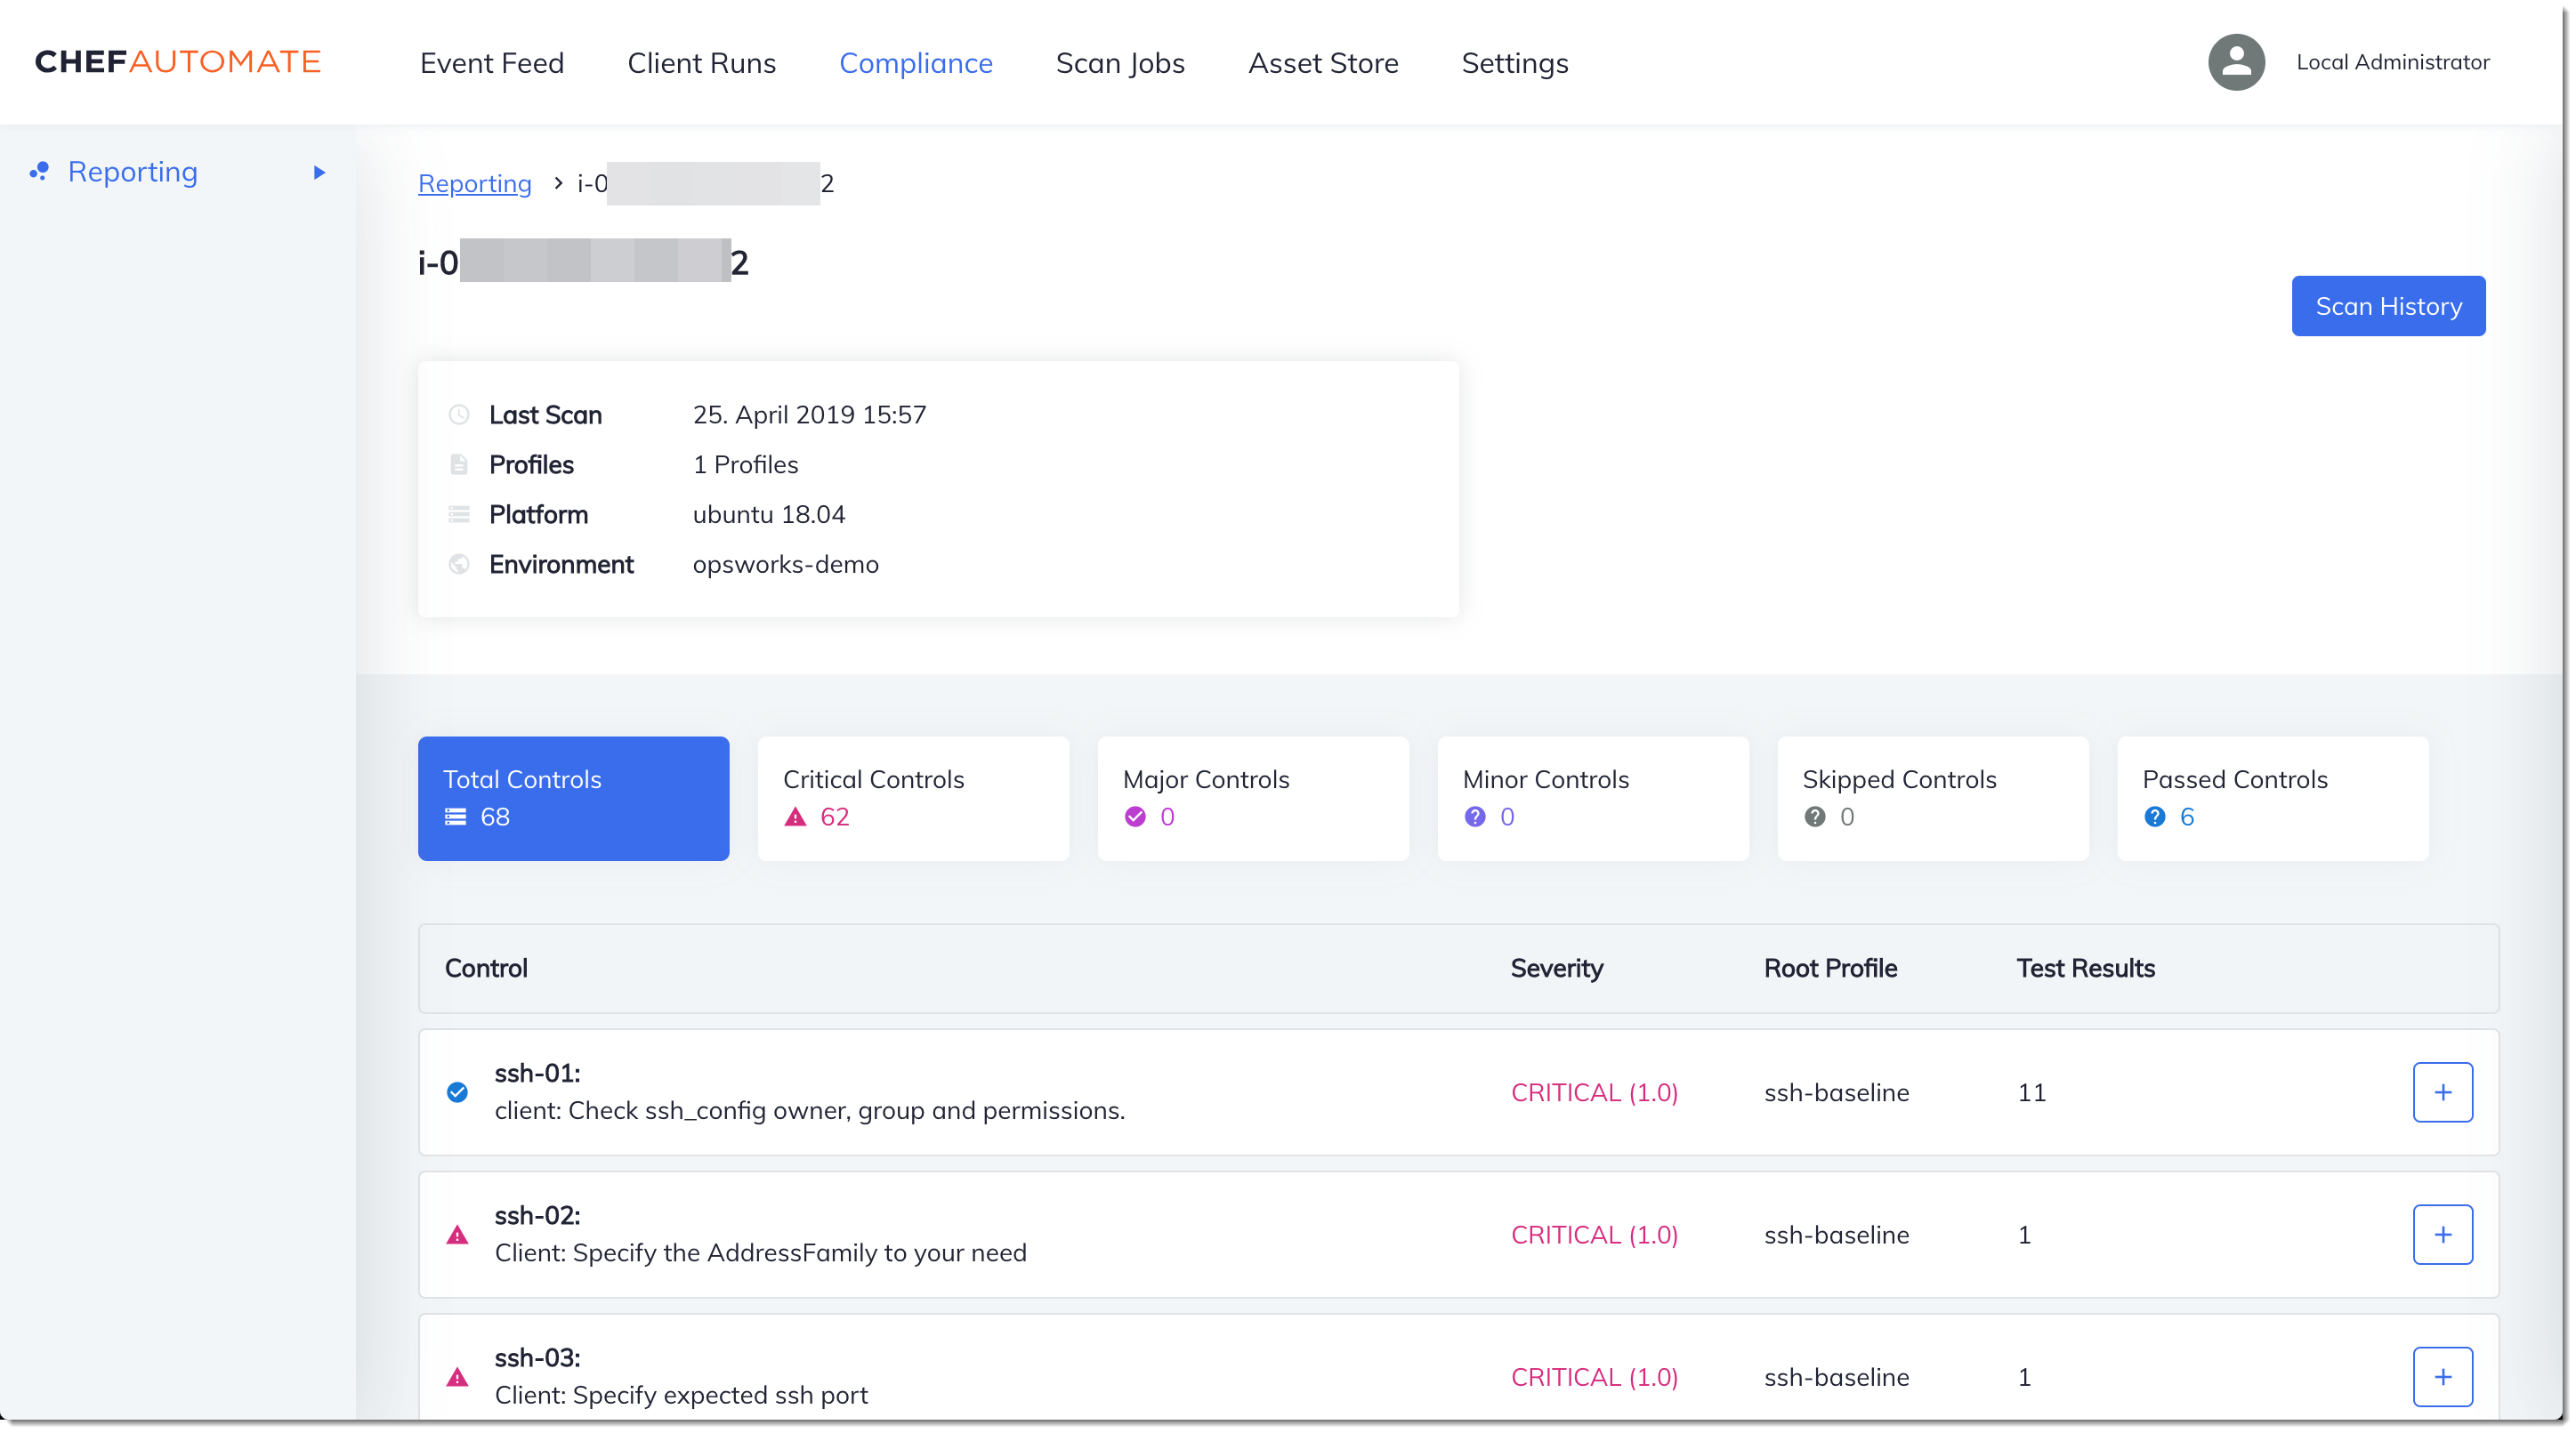
Running a Compliance Scan
You should see compliance scan results in the Chef Automate dashboard shortly after the first run of the agent that occurs after you configure node run lists.

In the Chef Automate dashboard, choose the Compliance tab. In the left navigation pane, choose Reporting. Choose the Profiles tab, choose Scan Results, and then choose a node with scan failures to learn more about the rules against which a node failed.
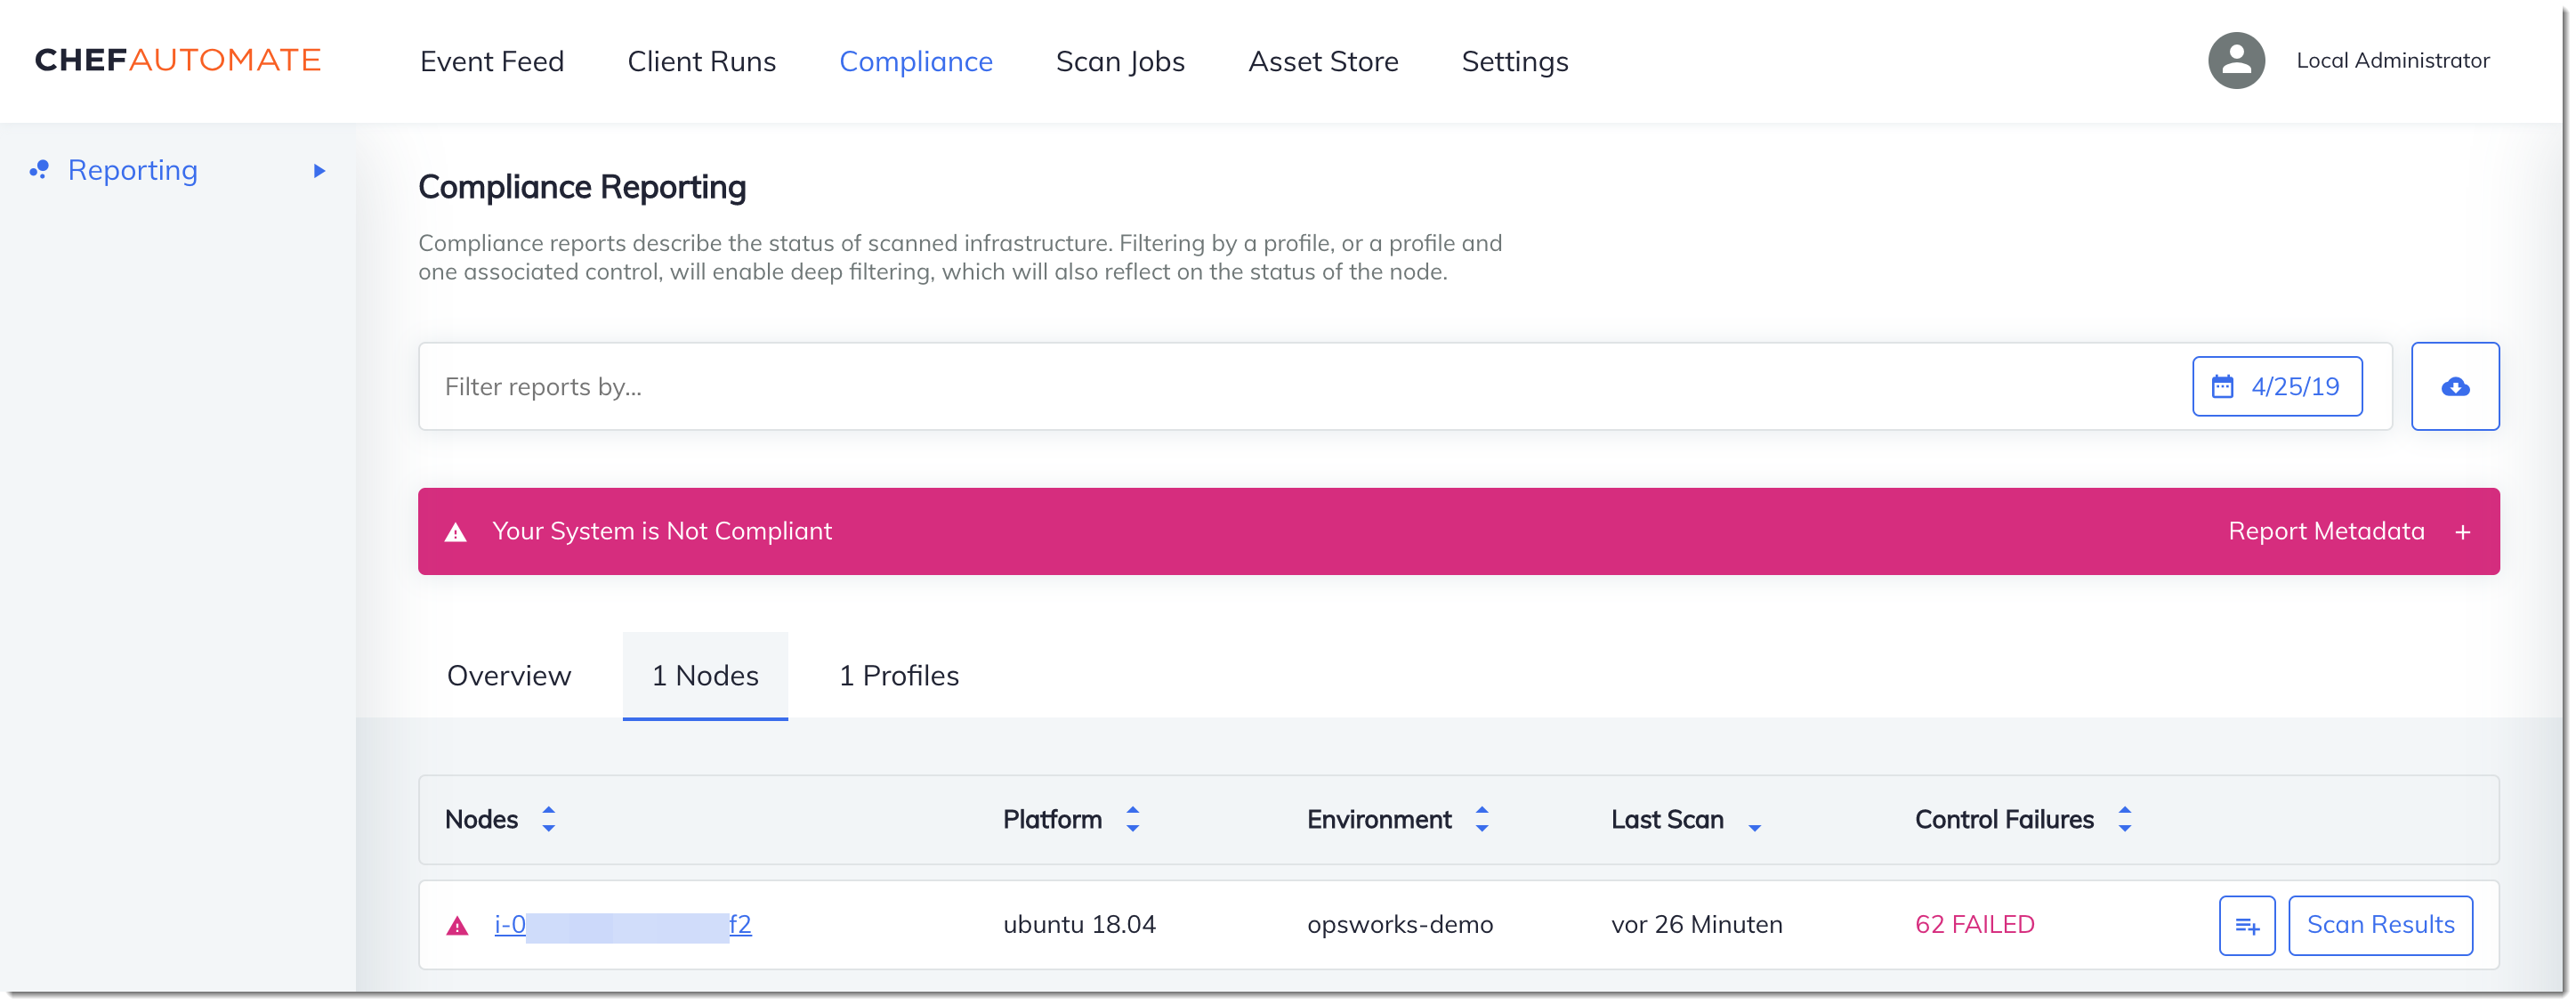
Typically, you see noncompliant scan results, because new nodes do not yet satisfy
all rules in the DevSec SSH Baseline profile. The DevSec Hardening Framework
(Optional) Resolving Noncompliant Results
The starter kit includes an open-source cookbook, ssh-hardening,
that you can run to fix noncompliant results from runs against the DevSec SSH
Baseline profile.
Note
The ssh-hardening cookbook makes changes to your nodes to
comply with DevSec SSH Baseline rules. Before running this
cookbook on any production nodes, review details about the DevSec SSH
Baseline profile in the Chef Automate console to understand the rule
violations that the cookbook targets. Review information about the open-source ssh-hardening
To run the ssh-hardening cookbook
-
In a text editor, append the
ssh-hardeningcookbook to the run list ofPolicyfile.rb. ThePolicyfile.rbrun list should match the following.run_list 'chef-client', 'opsworks-webserver', 'audit', 'ssh-hardening' -
Update
Policyfile.rb, and push it to your AWS OpsWorks for Chef Automate server.chef update Policyfile.rb chef push opsworks-demo -
Nodes that are associated with the
opsworks-demopolicy update the run list automatically, and apply thessh-hardeningcookbook on the nextchef-clientrun.Because you are using the
chef-clientcookbook, your node checks in at regular intervals (by default, every 30 minutes). On the next check-in, thessh-hardeningcookbook runs, and helps improve node security to meet the DevSec SSH Baseline profile's rules. -
After the initial run of the
ssh-hardeningcookbook, wait 30 minutes for a compliance scan to run again. View the results in the Chef Automate dashboard. The noncompliant results that occurred in the initial run of the DevSec SSH Baseline scan should be resolved.
Compliance in Chef Automate 1.x
If your AWS OpsWorks for Chef Automate server is running Chef Automate 1.x, set up Chef Compliance by using procedures in this section.
(Optional, Chef Automate 1.x) Setting Up Chef Compliance
You can configure Chef Compliance on any AWS OpsWorks for Chef Automate server. After you launch an AWS OpsWorks for Chef Automate
server, choose profiles that you want to run from the profiles in the Chef Automate
dashboard. After you install profiles, run berks commands to upload the
Audit cookbook
The AWS OpsWorks for Chef Automate starter kit includes a wrapper cookbook,
opsworks-audit, that downloads and installs the right version of
Chef's Audit cookbook for you. The opsworks-audit cookbook also
instructs the chef-client agent to assess nodes against the DevSec
SSH Baseline profile that you install from Chef's Compliance console later in
this topic. You can set up Compliance by using either cookbook to suit your preference.
Instructions in this section show you how to implement the
opsworks-audit cookbook.
To install Compliance profiles
-
If you have not already done so, sign in to the Chef Automate web-based dashboard. Use the credentials you received when you downloaded the Starter Kit as you created your AWS OpsWorks for Chef Automate server.
-
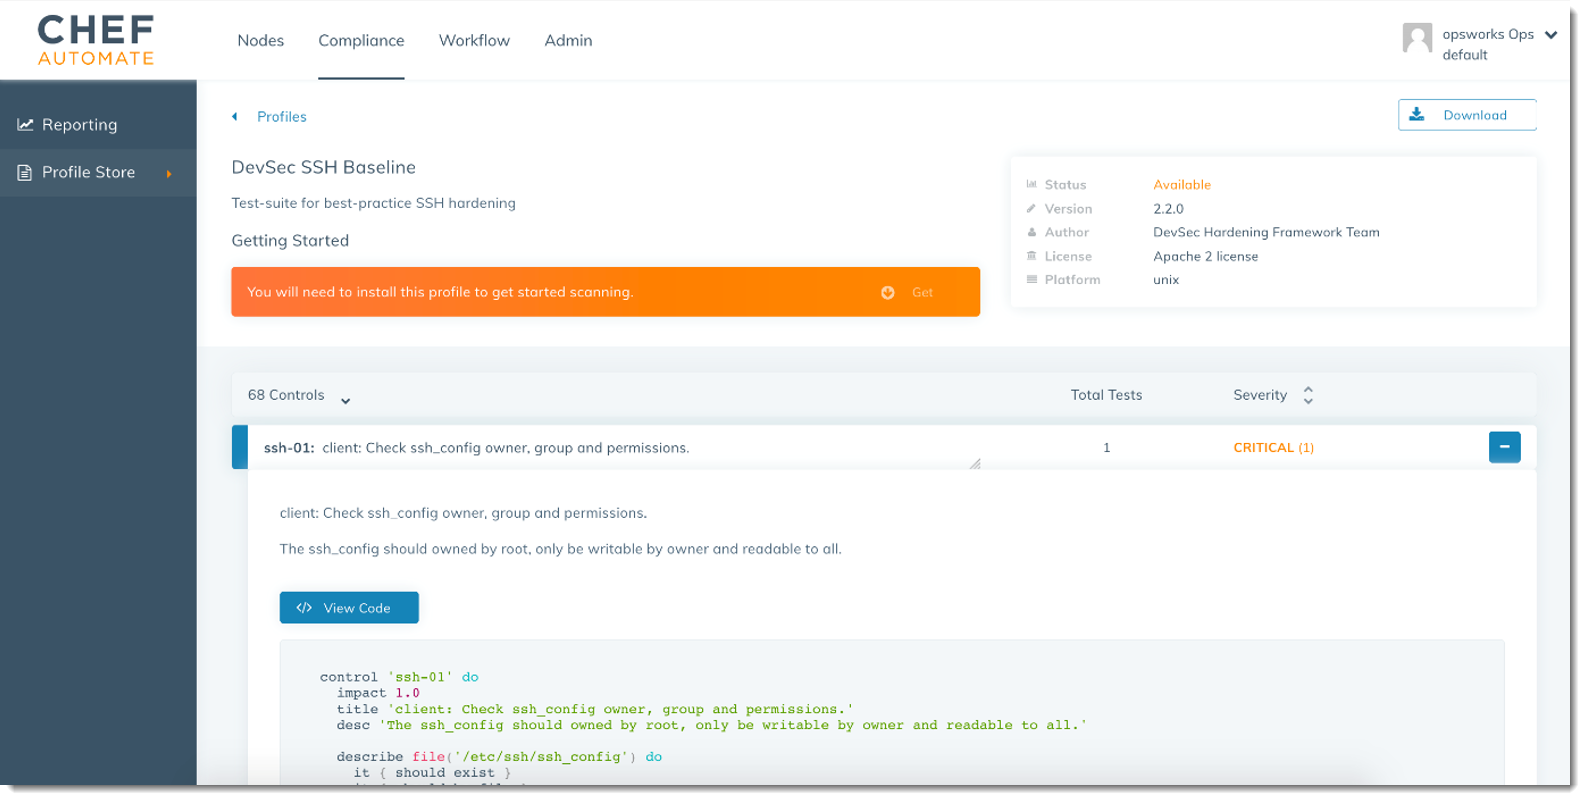
In the Chef Automate dashboard, choose the Compliance tab.

-
In the left navigation bar, choose Profile Store, and then choose the Available tab to see predefined profiles.
-
Browse the list of profiles. Choose a profile that matches the operating system and configuration of at least one of your managed nodes. To view details about the profile, including a description of the profile's targeted violations and underlying rule code, choose > at the right of the profile entry. You can choose multiple profiles.
-
To install the selected profiles on your Chef Automate server, choose Get.
-
When the download is complete, go to the next procedure.
To install and set up the
opsworks-audit cookbook
-
This step is optional, but it saves time in Step 6, when you are adding recipes to node run lists. Edit the
roles/opsworks-example-role.rbfile that is included in the starter kit you downloaded during the creation of your AWS OpsWorks for Chef Automate server. Add the following lines. The last line is commented out, because adding thessh-hardeningcookbook and recipe to resolve noncompliant nodes after your Compliance scan runs is optional.run_list( "recipe[chef-client]", "recipe[apache2]", "recipe[opsworks-audit]" # "recipe[ssh-hardening]" ) -
Use a text editor to specify your desired cookbooks in your Berksfile. A sample Berksfile is provided for you in the starter kit. In this example, we install the Chef Infra client (
chef-client) cookbook, theapache2cookbook, and theopsworks-auditcookbook. Your Berksfile should resemble the following.source 'https://supermarket.chef.io cookbook 'chef-client' cookbook 'apache2', '~> 5.0.1' cookbook 'opsworks-audit', path: 'cookbooks/opsworks-audit', '~> 1.0.0'All cookbooks are versioned in the cookbook's
metadata.rbfile. Each time you change a cookbook, you must raise the version of the cookbook that is in itsmetadata.rb. -
Run the following command to download and install the cookbooks to the
cookbooksfolder on your local or working computer.berks vendor cookbooks -
Run the following command to upload the vendored cookbooks to your AWS OpsWorks for Chef Automate server.
knife upload . -
Run the following command to verify the installation of the
opsworks-auditcookbook by showing a list of cookbooks that are currently available on the server.knife cookbook list -
Add nodes to your server to manage, if you have not already done so. You can automate the association of nodes by following steps in Add nodes automatically in AWS OpsWorks for Chef Automate, or add nodes one at a time by following steps in Add nodes individually. Edit the run list of your nodes to add the role you specified in Step 1,
opsworks-example-role. In this example, we edit theRUN_LISTattribute in theuserdatascript that you use to automate the association of nodes.RUN_LIST="role[opsworks-example-role]"If you skipped Step 1, and did not set up the role, add the names of the individual recipes to the run list. Save your changes, and follow steps in Step 3: Create Instances by Using an Unattended Association Script to apply your userdata script to Amazon EC2 instances.
RUN_LIST="recipe[chef-client],recipe[apache2],recipe[opworks-audit]" -
After you update the run list for your nodes, the
chef-clientagent runs your specified recipes on its next run. By default, this occurs every 1800 seconds (30 minutes). After the run, your Compliance results are visible in the Chef Automate dashboard.
Running a Compliance Scan
You should see compliance scan results in the Chef Automate dashboard shortly after the first run of the agent daemon that occurs after you configure node run lists.
In the Chef Automate dashboard, choose the Compliance tab. In the left navigation pane, choose Reporting. Choose the Profiles tab, choose Scan Results, and then choose a node with scan failures to learn more about the rules against which a node failed.

Typically, you see noncompliant scan results, because new nodes do not yet satisfy all
rules in the DevSec SSH Baseline profile. The DevSec Hardening Framework
(Optional) Resolving Noncompliant Results
The starter kit includes an open-source cookbook, ssh-hardening,
that you can run to fix noncompliant results from runs against the DevSec SSH
Baseline profile.
Note
The ssh-hardening cookbook makes changes to your nodes to comply
with DevSec SSH Baseline rules. Before running this cookbook on any
production nodes, review details about the DevSec SSH Baseline
profile in the Chef Automate console to understand the rule violations that the cookbook
targets. Review information about the open-source ssh-hardening
To run the ssh-hardening cookbook
-
In a text editor, append the
ssh-hardeningcookbook to your Berksfile. Your Berksfile should resemble the following.source 'https://supermarket.chef.io' cookbook 'chef-client' cookbook 'apache2', '~> 5.0.1' cookbook 'opsworks-audit', path: 'cookbooks/opsworks-audit', '~> 1.0.0' # optional cookbook 'ssh-hardening' -
Run the following commands to download the
ssh-hardeningcookbook to your local cookbooks folder, and then upload it to your AWS OpsWorks for Chef Automate server.berks vendor cookbooks knife upload . -
Add the
ssh-hardeningrecipe to your node run list as described in Steps 1 and 6 of To install and set up the opsworks-audit cookbook.If you update the
opsworks-example-role.rbfile, upload your changes to your server by running the following command.knife upload .If you update the run list directly, upload changes by running the following command. The node name is typically the instance ID.
knife node run_list add<node name>'recipe[ssh-hardening]' -
Because you are using the
chef-clientcookbook, your node checks in at regular intervals (by default, every 30 minutes). On the next check-in, thessh-hardeningcookbook runs, and helps improve node security to meet the DevSec SSH Baseline profile's rules. -
After the initial run of the
ssh-hardeningcookbook, wait 30 minutes for a Compliance scan to run again. View the results in the Chef Automate dashboard. The noncompliant results that occurred in the initial run of the DevSec SSH Baseline scan should be resolved.
Updates to Compliance
On an AWS OpsWorks for Chef Automate server, compliance functionality is updated automatically by your scheduled system maintenance. As updated releases of Chef Automate, Chef Infra Server, and Chef InSpec become available for your AWS OpsWorks for Chef Automate server, you might need to check and update the supported versions of the Audit cookbook and Chef InSpec gem that are running on your server. Profiles that you have already installed on your AWS OpsWorks for Chef Automate server are not updated as part of maintenance.
Community and Custom Compliance Profiles
Chef currently includes over 100 compliance scan profiles. You can add community and
custom profiles to the list, and then download and run compliance scans based on those
profiles, just as you would for included profiles. Community-based compliance profiles are available from the Chef
Supermarket
See Also
