Optional: Use AWS CodeCommit as a Puppet r10k Remote Control Repository
Important
The AWS OpsWorks for Puppet Enterprise service reached end of life on March 31, 2024 and has been disabled for both new and existing customers. We strongly recommend customers migrate
their workloads to other solutions as soon as possible. If you have questions about migration, reach out to the AWS Support Team on AWS re:Post
You can create a new repository by using AWS CodeCommit, and use it as your r10k remote control repository. To complete steps in this section, and work with a CodeCommit repository, you need a user that has the permissions provided by the AWSCodeCommitReadOnly managed policy.
Topics
Step 1: Use CodeCommit as a Repository with an HTTPS connection type
-
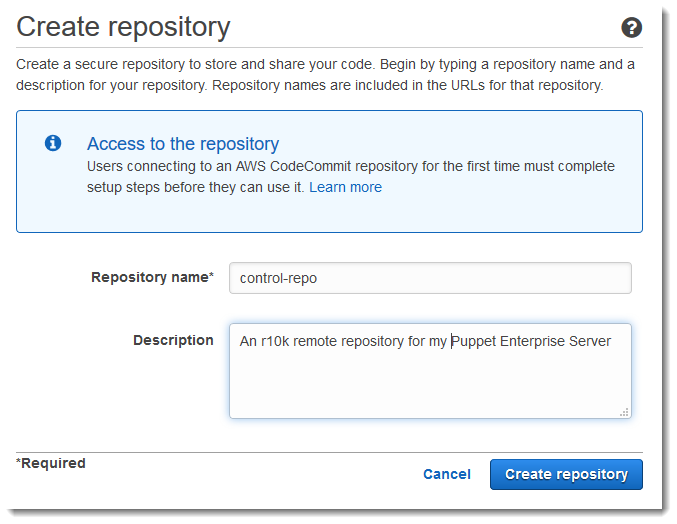
In the CodeCommit console, create a new repository.
-
Choose Skip to skip setting up an Amazon SNS topic.
-
On the Code page, choose Connect to your repository.
-
On the Connect to your repository page, choose HTTPS as the Connection type, and choose your operating system.
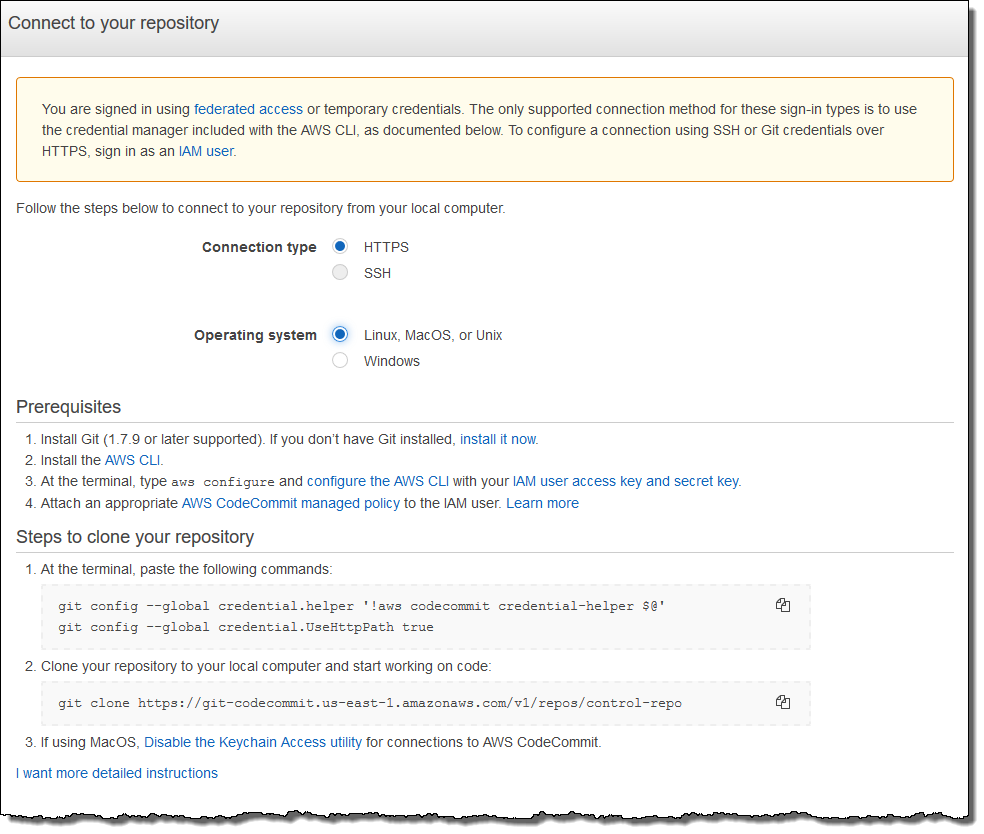
In the Steps to clone your repository area, your
git
                     clone
URL should resemble the following:https://git-codecommit.. Copy this URL to a convenient place for use in Puppet server setup.region.amazonaws.com/v1/repos/control-repo -
Close the Connect to your repository page, and return to the OpsWorks for Puppet Enterprise server setup.
-
Paste the URL that you copied in Step 4 in the r10k remote string box in the Configure credentials page of the Puppet master setup wizard. Leave the r10k private key box empty. Finish creating and launching your Puppet master.
-
In the IAM console, attach the AWSCodeCommitReadOnly policy to the instance profile role of your Puppet master. For more information about how to add a permissions policy to an IAM role, see Adding IAM identity permissions (console) in the IAM User Guide.
-
Follow the steps in Setup for HTTPS users using Git credentials in the AWS CodeCommit User Guide to push your existing
control-repocontent to the new CodeCommit repository. -
Now, you can continue by following the instructions in Configure the Puppet Master Using the Starter Kit, and use the Starter Kit to deploy code to your Puppet master. The following command is an example.
puppet-code deploy --all --wait --config-file .config/puppet-code.conf
Step 2: (Optional) Use CodeCommit as a Repository with an SSH connection type
You can configure an AWS CodeCommit r10k remote control repository to use SSH key pair authentication. The following prerequisites must be completed before you start this procedure.
-
You must have launched your OpsWorks for Puppet Enterprise server with an HTTPS control repository as described in the preceding section, Step 1: Use CodeCommit as a Repository with an HTTPS connection type. This must be completed first so you can upload the required configuration to the Puppet master.
-
Be sure you have an user with the AWSCodeCommitReadOnly managed policy attached. For more information about how to create a user, see Creating an IAM user in your AWS account in the IAM User Guide.
-
Create and associate an SSH key with your user. Follow instructions for creating a public/private key pair with
ssh-keygenin Step 3: Configure credentials on Linux, macOS, or Unix in the AWS CodeCommit User Guide.
-
In an AWS CLI session, run the following command to upload the private key file contents to AWS Systems Manager Parameter Store. Your OpsWorks for Puppet Enterprise server queries this parameter to get a required certificate file. Replace
private_key_filewith the path to your SSH private key file.aws ssm put-parameter --name puppet_user_pk --type String --value "`catprivate_key_file`" -
Add Systems Manager Parameter Store permissions to your Puppet master.
Open the IAM console at https://console.aws.amazon.com/iam/
. -
In the left navigation pane, choose Roles.
-
Choose aws-opsworks-cm-ec2-role.
-
On the Permissions tab, choose Attach policies.
-
In the Search bar, enter
AmazonSSMManagedInstanceCore. -
In the search results, choose AmazonSSMManagedInstanceCore.
-
Choose Attach policy.
-
Create the configuration file manifest. If you are using the
control-repo-examplerepository provided in the starter kit, create the following files in the locations shown in the example repository. Otherwise, create them according to your own control repository structure. Replace theIAM_USER_SSH_KEYvalue with the SSH key ID you created in the prerequisites for this procedure.control-repo-example/site/profile/manifests/codecommit.ppclass profile::codecommit { $configfile = @(CONFIGFILE) Host git-codecommit.*.amazonaws.com UserIAM_USER_SSH_KEYIdentityFile /etc/puppetlabs/puppetserver/ssh/codecommit.rsa StrictHostKeyChecking=no | CONFIGFILE # ReplaceREGIONwith the correct region for your server. $command = @(COMMAND) aws ssm get-parameters \ --regionREGION\ --names puppet_user_pk \ --query "Parameters[0].Value" \ --output text >| /etc/puppetlabs/puppetserver/ssh/codecommit.rsa | COMMAND $dirs = [ '/opt/puppetlabs/server/data/puppetserver/.ssh', '/etc/puppetlabs/puppetserver/ssh', ] file { $dirs: ensure => 'directory', group => 'pe-puppet', owner => 'pe-puppet', mode => '0750', } file { 'ssh-config': path => '/opt/puppetlabs/server/data/puppetserver/.ssh/config', require => File[$dirs], content => $configfile, group => 'pe-puppet', owner => 'pe-puppet', mode => '0600', } exec { 'download-codecommit-certificate': command => $command, require => File[$dirs], creates => '/etc/puppetlabs/puppetserver/ssh/codecommit.rsa', path => '/bin', cwd => '/etc/puppetlabs', } file { 'private-key-permissions': subscribe => Exec['download-codecommit-certificate'], path => '/etc/puppetlabs/puppetserver/ssh/codecommit.rsa', group => 'pe-puppet', owner => 'pe-puppet', mode => '0600', } } -
Push your control repository to CodeCommit. Run the following commands to push the new manifest file to your repository.
git add ./site/profile/manifests/codecommit.pp git commit -m 'Configuring for SSH connection to CodeCommit' git push origin production -
Deploy the manifest files. Run the following commands to deploy the updated configuration to your OpsWorks for Puppet Enterprise server. Replace
STARTER_KIT_DIRECTORYwith the path to your Puppet configuration files.cdSTARTER_KIT_DIRECTORYpuppet-access login --config-file .config/puppetlabs/client-tools/puppet-access.conf puppet-code deploy --all --wait \ --config-file .config/puppet-code.conf \ --token-file .config/puppetlabs/token -
Update the OpsWorks for Puppet Enterprise server's classification. By default, the Puppet agent runs on nodes (including the master) every 30 minutes. To avoid waiting, you can manually run the agent on the Puppet master. Running the agent picks up the new manifest file.
-
Sign in to the Puppet Enterprise console.
-
Choose Classification.
-
Expand PE Infrastructure.
-
Choose PE Master.
-
On the Configuration tab, enter
profile::codecommitin Add new class.The new class,
profile::codecommit, might not appear immediately after runningpuppet-code deploy. Choose Refresh on this page if it does not appear. -
Choose Add class, and then choose Commit 1 change.
-
Manually run the Puppet agent on the OpsWorks for Puppet Enterprise server. Choose Nodes, choose your server in the list, choose Run Puppet, and then choose Run.
-
-
In the Puppet Enterprise console, change the repository URL to use SSH instead of HTTPS. The configuration you perform in these steps is saved during the OpsWorks for Puppet Enterprise backup and restoration process, so you do not need to manually change the repository configuration after maintenance activities.
-
Choose Classification.
-
Expand PE Infrastructure.
-
Choose PE Master.
-
On the Configuration tab, find the
puppet_enterprise::profile::masterclass. -
Choose Edit next to the
r10k_remoteparameter. -
Replace the HTTPS URL with the SSH URL for your repository, and then choose Commit 1 change.
-
Manually run the Puppet agent on the OpsWorks for Puppet Enterprise server. Choose Nodes, choose your server in the list, choose Run Puppet, and then choose Run.
-
