Step 3: Create and Deploy a Custom Cookbook
Important
The AWS OpsWorks Stacks service reached end of life on May 26, 2024 and has been disabled for both new and existing customers.
We strongly recommend customers migrate their workloads to other solutions as soon as possible. If you have questions about migration, reach out to the AWS Support Team on AWS re:Post
As it stands, the stack is not quite functional yet; you need to enable your
application to access the Redis server. The most flexible approach is to put a YAML file
with the access information in the application's config subfolder.
The application can then get the information from the file. Using this approach, you can
change the connection information without rewriting and redeploying the application. For
this example, the file should be named redis.yml and contain the
ElastiCache cluster's host name and port, as follows:
host:cache-cluster-hostnameport:cache-cluster-port
You could manually copy this file to your servers, but a better approach is to implement a Chef recipe to generate the file, and have OpsWorks Stacks run the recipe on every server. Chef recipes are specialized Ruby applications that OpsWorks Stacks uses to perform tasks on instances such as installing packages or creating configuration files. Recipes are packaged in a cookbook, which can contain multiple recipes and related files such as templates for configuration files. The cookbook is placed in a repository, such as GitHub, and must have a standard directory structure. If you don't yet have a custom cookbook repository, see Cookbook Repositories for information on how to set one up.
For this example, add a cookbook named redis-config to your
cookbook repository with the following contents:
my_cookbook_repositoryredis-configrecipesgenerate.rb templates defaultredis.yml.erb
The recipes folder contains a recipe named
generate.rb, which generates the application's configuration
file from redis.yml.erb, as follows:
node[:deploy].each do |app_name, deploy_config|
  # determine root folder of new app deployment
  app_root = "#{deploy_config[:deploy_to]}/current"

  # use template 'redis.yml.erb' to generate 'config/redis.yml'
  template "#{app_root}/config/redis.yml" do
    source "redis.yml.erb"
    cookbook "redis-config"

    # set mode, group and owner of generated file
    mode "0660"
    group deploy_config[:group]
    owner deploy_config[:user]

    # define variable “@redis” to be used in the ERB template
    variables(
      :redis => deploy_config[:redis] || {}
    )

    # only generate a file if there is Redis configuration
    not_if do
      deploy_config[:redis].blank?
    end
  end
end
The recipe depends on data from the OpsWorks Stacks stack configuration and deployment JSON
object, which is installed on each instance and contains detailed information about the
stack and any deployed apps. The object's deploy node has the following
structure:
{
   ...
  "deploy": {
    "app1": {
      "application" : "short_name",
      ...
    }
    "app2": {
      ...
    }
    ...
  }
}
The deploy node contains a set of embedded JSON objects, one for each deployed app,
that is named with the app's short name. Each app object contains a set of attributes
that define the app's configuration, such as the document root and application type. For
a list of the deploy attributes, see deploy Attributes. Recipes can use Chef attribute syntax to
represent stack configuration and deployment JSON values. For
example,[:deploy][:app1][:application] represents the app1
application's short name.
For each app in [:deploy], the recipe executes the associated code block,
where deploy_config represents the app attribute. The recipe first sets
app_root to the app's root directory,
[:deploy][:.
It then uses a Chef template resourceapp_name][:deploy_to]/currentredis.yml.erb and place it in the
app_root/config
Configuration files are typically created from templates, with many if not most of
the settings defined by Chef attributes. With
attributes you can change settings using custom JSON, as described later, instead of
rewriting the template file.The redis.yml.erb template contains the
following:
host: <%= @redis[:host] %>
port: <%= @redis[:port] || 6379 %>
The <%... %> elements are placeholders that represent an attribute value.
-
<%= @redis[:host] %>represents the value ofredis[:host], which is the cache cluster's host name. -
<%= @redis[:port] || 6379 %>represents the value of theredis[:port]or, if that attribute is not defined, the default port value, 6379.
The template resource works as follows:
-
sourceandcookbookspecify the template and cookbook names, respectively. -
mode,group, andownergive the configuration file the same access rights as the application. -
The
variablessection sets the@redisvariable used in the template, to the application's[:redis]attribute value.The
[:redis]attribute's values are set by using custom JSON, as described later; it is not one of the standard app attributes. -
The
not_ifdirective ensures that the recipe does not generate a configuration file if one already exists.
After you author the cookbook, you must deploy it to each instance's cookbook cache. This operation does not run the recipe; it simply installs the new cookbook on the stack's instances. You typically run a recipe by assigning it to a layer's lifecycle event, as described later.
To deploy your custom cookbook
-
On the OpsWorks Stacks Stack page, click Stack Settings and then Edit.
-
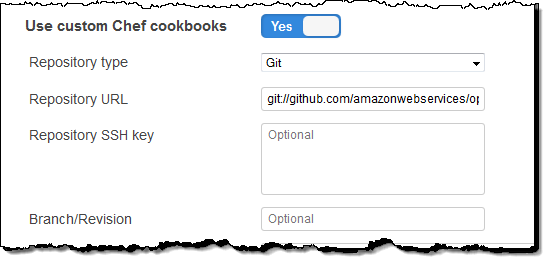
In the Configuration Management section, set Use custom Chef cookbooks to Yes, enter the cookbook repository information, and click Save to update the stack configuration.
-
On the Stack page, click Run Command, select the Update Custom Cookbooks stack command, and click Update Custom Cookbooks to install the new cookbook in the instances' cookbook caches.

If you modify your cookbook, just run Update Custom Cookbooks again to install the updated version. For more information on this procedure, see Installing Custom Cookbooks.
