Registering Resources with a Stack
Important
The AWS OpsWorks Stacks service reached end of life on May 26, 2024 and has been disabled for both new and existing customers.
We strongly recommend customers migrate their workloads to other solutions as soon as possible. If you have questions about migration, reach out to the AWS Support Team on AWS re:Post
Amazon EBS volumes or Elastic IP addresses must be registered with a stack before you can attach them to instances. When OpsWorks Stacks creates resources for a stack, they are automatically registered with that stack. If you want to use externally-created resources, you must explicitly register them. Note the following:
-
You can register a resource with only one stack at a time.
-
When you delete a stack, OpsWorks Stacks deregisters all resources.
Topics
Registering Amazon EBS Volumes with a Stack
Note
This resource can be used only with Linux stacks. Although you can register an Amazon EBS volume with a Windows stack, you cannot attach it to an instance.
You can use the Resources page to register an Amazon EBS volume with a stack, subject to the following constraints:
-
Attached, non-root Amazon EBS volumes must be standard, Throughput Optimized HDD, Cold HDD, PIOPS, or General Purpose (SSD), but not a RAID array. For information about maximum and minimum volume sizes, see EBS Volumes in this guide.
-
Volumes must be XFS formatted.
-
OpsWorks Stacks does not support other file formats, such as fourth extended file system (ext4), for non-root Amazon EBS volumes. For more information about preparing Amazon EBS volumes, see Making an Amazon EBS Volume Available for Use. Note that the example in that topic describes how to create an ext4-based volume, but you can follow the same steps for XFS based volumes.
To register an Amazon EBS volume
-
Open the desired stack and click Resources in the navigation pane.
-
Click Volumes to display the available Amazon EBS volumes. Initially, the stack has no registered volumes, as shown in the following illustration.

-
Click Show Unregistered Volumes to display the Amazon EBS volumes in your account that are in the stack's region and if applicable, the stack's VPC. The Status column indicates whether the volumes are available for use. Volume Type indicates whether the volume is standard (
standard), General Purpose SSD (gp2), PIOPS (io1, followed by the IOPS per disk value in parentheses), Throughput Optimized HDD (st1), or Cold HDD (sc1).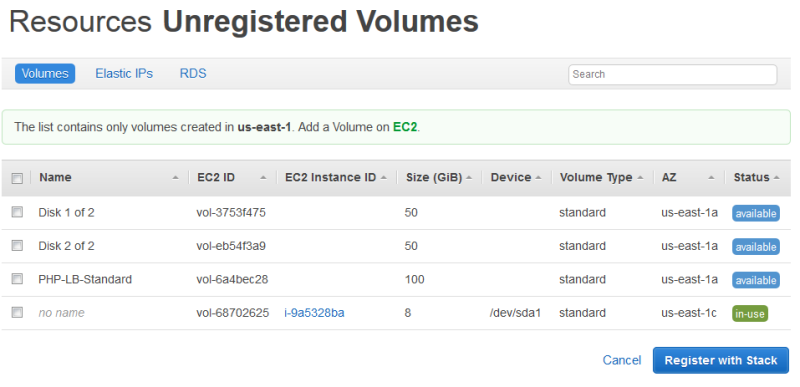
-
Select the appropriate volumes and click Register to Stack. The Resources page now lists the newly registered volumes.

To register additional volumes, click Show Unregistered Volumes or + Unregistered Volumes and repeat this procedure.
Registering Elastic IP Addresses with a Stack
Use the following procedure to register Elastic IP addresses.
To register an Elastic IP address
-
Open the stack's Resources page and click Elastic IPs to display the available Elastic IP addresses. Initially, the stack has no registered addresses, as shown in the following illustration.

-
Click Show Unregistered Elastic IPs to display the available Elastic IP addresses in your account that are in the stack's region.

-
Select the appropriate addresses and click Register to Stack. This returns you to the Resources page, which now lists the newly registered addresses.

To register additional addresses, click Show Unregistered Elastic IPs or + Unregistered Elastic IPs and repeat this procedure.
Registering Amazon RDS Instances with a Stack
Use the following procedure to register Amazon RDS instances.
To register an Amazon RDS instance
-
Open the stack's Resources page and click RDS to display the available Amazon RDS instances. Initially, the stack has no registered instances, as shown in the following illustration.

-
Click Show Unregistered RDS DB instances to display the available Amazon RDS instances in your account that are in the stack's region.

-
Select the appropriate instance, enter its master user and master password values for User and Password, and click Register to Stack. This returns you to the Resources page, which now lists the newly registered instance.

Important
You must ensure that the user and password that you use to register the Amazon RDS instance correspond to a valid user and password. If they do not, your applications will not be able connect to the instance.
To register additional addresses, click Show Unregistered RDS DB instances or + Unregistered RDS DB instances and repeat this procedure. For more information about how to use Amazon RDS instances with OpsWorks Stacks, see Amazon RDS Service Layer.
Note
You can also register Amazon RDS instances through the Layers page. For more information, see Amazon RDS Service Layer.
