End of support notice: On October 30, 2026, AWS will end support for Amazon Pinpoint. After October 30, 2026, you will no longer be able to access the Amazon Pinpoint console or Amazon Pinpoint resources (endpoints, segments, campaigns, journeys, and analytics). For more information, see Amazon Pinpoint end of support. Note: APIs related to SMS, voice, mobile push, OTP, and phone number validate are not impacted by this change and are supported by AWS End User Messaging.
Building segments
After you integrate your apps with Amazon Pinpoint, you can create dynamic segments that are based on the data your apps provide to Amazon Pinpoint. When you create a dynamic segment, you choose the type of segment you want to create, create a segment group, and then refine that segment group by choosing the segments and the criteria that define those segments. For example, you could create a dynamic segment group, and then choose an audience segment and criteria of all customers who use version 2.0 of your app on an Android device and who have used your app within the past 30 days. Amazon Pinpoint continuously re-evaluates your segments as your app records new customer interactions. As a result, the size and membership of each segment changes over time. For information about integrating your apps with Amazon Pinpoint, see Integrating Amazon Pinpoint with your application in the Amazon Pinpoint Developer Guide.
Segment groups
When you create a dynamic segment, you create one or more segment groups. A segment group consists of these components:
-
Base segments – The segments that define the initial user population. You can specify a single base segment, several base segments, or all of the segments in your Amazon Pinpoint project.
-
Criteria – Categories of audience information that you apply on top of the base segments. You can add multiple groups of criteria and then create relationships between those criteria.
-
Filters – Filters reduce the audience number that belong to the segment. You can add as many filters as you want in order to tailor the segment to your needs.
You have to create at least one segment group, but you can optionally create a second segment group, and then create a relationship between the two groups.
Creating a dynamic segment
The following steps describe creating and configuring a segment:
Step 1: Build a new segment or import an existing segment
To build a segment
Sign in to the AWS Management Console and open the Amazon Pinpoint console at https://console.aws.amazon.com/pinpoint/
. -
On the All projects page, choose the project to which you want to add the segment.
-
In the navigation pane, choose Segments. The Segments page opens and displays segments that you previously defined.
-
Choose Create a segment.
-
Under Create a segment, choose Build a segment.

-
For Segment name, enter a name for the segment.
Step 2: Configure segment group 1
You will first choose how you want to define the audience segments for the segment group.
To configure segment group 1
-
Under Segment group 1, for Base segments, choose one of the following options:
-
Include any audiences – If you use more than one segment as a base segment, your new segment contains endpoints that are in at least one of the segments you choose. For example, you might have two dynamic segments,
Older than 18andLives in New York City. Your target audience when choosing this option is any audience older than 18 or who live in New York City. -
Include all audiences – If you use more than one segment as a base segment, your new segment only contains endpoints common to all of the selected segments. For example, you might have two dynamic segments,
Older than 18andLives in New York City. Your target audience when choosing this option is all audiences older than 18 and who live in New York City.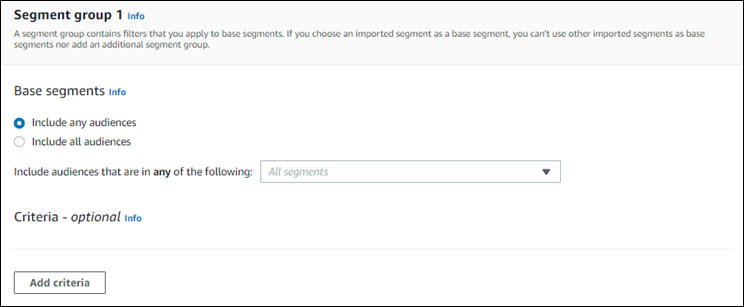
-
Step 3: Choose the segments to include in the group
The next step is to choose which segments you will include in the group. These segments are composed of the audience that you want to target in the segment group.
-
For the dropdown list, select one or more segments to include in the segment group. Each segment that you add displays in the section.
Note
The segments dropdown list doesn't close when you choose a segment. It remains open, with a check mark by each segment you're including in the group. You can clear the checkbox by any segment that you want to remove. When you're done choosing segments, choose an area outside of the dropdown list to close it.

As you add or remove segments, the Segment estimate section updates to display the eligible and total endpoints set to receive the campaign. Eligible endpoints are those endpoints determined by the any/and relationship for the segment group, while the total is the sum of all endpoints regardless of the relationship connector.

Step 4: Choose and configure the segment criteria
After you've chosen your segments, you can further refine the target audience by applying attributes, operators, and values to those segments.
To choose and configure the segment criteria
-
For Attribute, you can choose from the following types:
-
Standard attributes – Filter the audience based on one of its default attributes.
-
Channel Types – Filter the audience based on the recipient's endpoint type: EMAIL, SMS, PUSH, or CUSTOM.
-
Activity – Filters the audience on whether they've been Active or Inactive.
-
Custom Endpoint Attributes – Filter the audience based on an endpoint-specific attribute. For example, this might be a list of your customers who have opted out of a distribution list or a list of customers who signed up for a distribution list.
-
Customer User Attributes – Filter the audience based on a user-specific attribute. For example, this might be
LastNameorFirstName. -
Metrics – Filter the audience based on a quantitative evaluation. For example, you might have a metric,
Visits, that you can choose if you want to target an audience who have visited a specific locationxnumber of times.
-
-
Choose the Operator and enter a Value. Operators determine the relationship of the attribute to a value that you enter. Values can be no longer than 100 characters and you can have no more than 100 total values between all groups, criteria, and filters. The following describes the available operators. Each attribute has its own set of supported operators.
Note
The Channel Types attributes don't use operators or values.
-
After – Filters the audience after a specific date.
-
Before – Filters the audience before a specific date.
-
Between – Filters the audience based on a date range.
-
Contains – Use this to filter the audience based on a substring within a string. For example, if you have a city metric, you could pass the
ewto returnNew York Cityor Newcastle. The passed value is case-sensitive, soewreturns different results thanEW. -
During – Only used for the Activity attribute. Filters the audience by one of the following time frames: the last day, the last 7 days, the last 14 days, or the last 30 days.
-
Equals – Used for the Metrics attributes only, this operator filters the results by a numerical value. For example, you might have a metric,
Visits, that you can use to filter results by only those customers who visited a location3times. -
Greater than – Used for the Metrics attributes only, this operator filters results that are greater than the number passed. For example, you might have a metric,
Visits, that you can use to filter results by only those customers who visited a location greater than3times. -
Greater than or equal – Used for the Metrics attributes only, this operator filters results that are greater than or equal to the number passed. For example, if you have a metric,
Visits, you might use this operator to filter results by only those customers who visited a location3or more times. -
Is – Use this option to filter by endpoint-specific attributes. When you select this option, you specify how recently the endpoint was active, or how long it's been inactive. After that, you can optionally specify additional attributes associated with that endpoint.
-
Is not – Use this option if you want to filter out results that match the passed value. For example, you might have a
citycustomer user endpoint that you can use to filter out results that include a specific city. Use this operator andNew York Cityfor the value to ignore any results that include this city. -
Less than – Used for the Metrics attributes only, this operator filters results that are less than the number passed. For example, you might have a metric,
Visits, that you can use to filter results by only those customers who visited a location less than3times. -
Less than or equal – Used for the Metrics attributes only, this operator filters results that are less than or equal to the number passed. For example, you might have a metric,
Visits, that you can use to filter results by only those customers who visited a location3times or less. -
On – Use this metric for filtering results. For example, you might have a metric,
OptOut, that you can use to filter results by only those customers who opted out of a distribution list on2020/11/09.
Note
The Amazon Pinpoint console uses a default time of 00:00:00 UTC for all time-based filters. You can filter on dates but times are recorded as the same value. If you enter a date of
2020-12-31, the console passes the time as2020-12-31T12:00:00Z. Therefore, if you have multiple segments that pass the date, 2020-20-12 with different times, the Amazon Pinpoint console records the date and time for any of those segments as2020-12-31T12:00:00Z. -
-
(Optional) To apply additional attributes to this criteria, choose Add filter. To create another group of segment criteria, choose Add criteria. To create a second segment group, choose Add another segment group. For information about adding a second segment group, see Step 6: Add segment group 2.
-
If you're finished setting up this segment, choose Create segment.
Step 5: Add a second criteria group
Optionally add criteria groups to further refine your results. You will create a relationship between this group of criteria and the group before it.
To add a second criteria group
-
Choose Add criteria.
-
Create the relationship between this group and the group previous to it by choosing one of the following:
-
AND – The segment contains only that audiences who meet the criteria for both criteria groups.
-
OR – The segment contains audiences who meet the criteria in either one of the criteria groups.
-
NOR – The segment excludes the audiences that fits the criteria from the results.

-
-
(Optional) To add another group of criteria, choose Add criteria or, to add a second segment group, choose Add another segment group. For more information, see Step 6: Add segment group 2.
-
If you're finished setting up the segment group, choose Create segment.
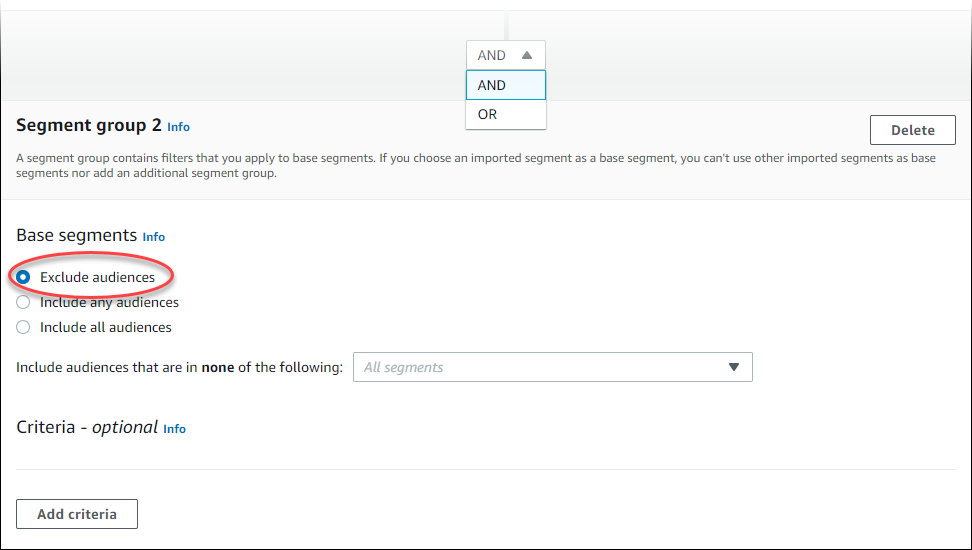
Step 6: Add segment group 2
You can optionally create a second segment group and create a relationship with segment group 1. When you create a segment by using the Amazon Pinpoint console, you can have a maximum of two segment groups per segment. If you add a second segment group to your segment, you can choose one of two ways to specify how the two segment groups are connected:
-
By using AND logic – If you use AND logic to connect two segment groups, your segment contains all endpoints who meet all of the criteria in both of the segment groups.
-
By using OR logic – If you use OR logic to connect two segment groups, your segment contains all endpoints who meet all of the criteria in either one of the segment groups.
Note
If you use an imported segment as the base segment for your first segment group, you can't create a second segment group.
To configure second segment group
-
Choose Add another segment group.
-
Create the relationship with the first segment group. If you choose AND, the segment contains only those customers who meet the criteria for both segment groups. If you choose OR, the segment contains those customers who meet the criteria in either one of the segment groups. Within segment group 2, you have a third option to Exclude audiences. Segments that are excluded will not be included in the results. You can only exclude audiences in segment group 2.
-
Choose the segments that you want to include in segment group 2. See Step 3: Choose the segments to include in the group.
-
(Optional) Choose the criteria by which you want to filter your segments. See Step 4: Choose and configure the segment criteria.
-
(Optional) Add additional groups of criteria. See Step 5: Add a second criteria group.
-
When you finish setting up the segment, choose Create segment.
