# Migrate from Couchbase Server to Couchbase Capella on AWS
*Battulga Purevragchaa and Saurabh Shanbhag, Amazon Web Services*
*Mark Gamble, None*
## Summary
Couchbase Capella is a fully managed, NoSQL database as a service (DBaaS) for mission-critical applications (for example, user profiles or online catalogs and inventory management). Couchbase Capella manages your DBaaS workload in a Couchbase-managed Amazon Web Services (AWS) account. Capella makes it easy to run and manage multiple-cluster, multiple–AWS Region, multicloud, and hybrid-cloud replication within a single interface.
Couchbase Capella helps you instantly scale your Couchbase Server applications, helping you create multi-node clusters in minutes. Couchbase Capella supports all Couchbase Server features, including [SQL\+\+](https://www.couchbase.com/products/n1ql), [Full Text Search](https://www.couchbase.com/products/full-text-search), [Eventing Service](https://docs.couchbase.com/server/current/eventing/eventing-overview.html), and [Analytics Service](https://www.couchbase.com/products/analytics). It also removes the need to manage installations, upgrades, backups, and general database maintenance.
This pattern describes the steps and best practices for migrating a self-managed [Couchbase Server](https://www.couchbase.com/products/server) environment to the AWS Cloud. The pattern provides a repeatable process for migrating data and indexes from Couchbase Server clusters, running either on premises or in the cloud, to Couchbase Capella. Using these steps helps you avoid issues during your migration and speeds up your overall migration process.
This pattern provides the following two migration options:
+ **Option 1** is appropriate if you have fewer than 50 indexes to migrate.
+ **Option 2** is appropriate if you have more than 50 indexes to migrate.
You can also [set up sample data](https://docs.couchbase.com/server/current/manage/manage-settings/install-sample-buckets.html) on your self-managed Couchbase Server to follow along with the migration guide.
If you choose migration **option 2**, or if you are using scopes or collections other than the default value, you must use the example configuration file, which is in the *Additional information* section.
## Prerequisites and limitations
**Prerequisites **
+ An existing Couchbase Capella paid account. You can also create a [Couchbase Capella account on AWS](https://aws.amazon.com/marketplace/pp/prodview-xrhx5zgue5c26) and use the Couchbase Capella free trial, and then upgrade to a paid account to configure your cluster for the migration.. To start with the trial version, follow the instructions in [Getting Started with Couchbase Capella](https://docs.couchbase.com/cloud/get-started/create-account.html).
+ An existing self-managed Couchbase Server environment either on premises or deployed on a cloud service provider.
+ For migration option 2, Couchbase Shell and a configuration file. To create the configuration file, you can use the example file that’s in the *Additional information* section.
+ Familiarity with administering Couchbase Server and Couchbase Capella.
+ Familiarity with opening TCP ports and running commands in a command line interface (CLI).
The migration process also requires the roles and expertise described in the following table.
|
|
| Role | Expertise | Responsibilities |
| --- |--- |--- |
| Couchbase administrator | + Familiarity with Couchbase Server and Couchbase Capella + Basic command line knowledge is helpful but not required | + Couchbase Server and Capella–specific tasks |
| Systems administrator, IT administrator | + Familiarity with the self-managed Couchbase Server system environment and administration | + Opening ports and determining IP addresses on self-managed Couchbase Server cluster nodes |
**Limitations **
+ This pattern is used to migrate data, indexes, and [Couchbase Full Text Search](https://docs.couchbase.com/server/current/fts/full-text-intro.html) indexes from Couchbase Server to Couchbase Capella on AWS. The pattern doesn’t apply to migrating [Couchbase Eventing Service](https://docs.couchbase.com/server/current/eventing/eventing-overview.html), or to [Couchbase Analytics](https://docs.couchbase.com/server/current/analytics/introduction.html).
+ Couchbase Capella is available in multiple AWS Regions. For up-to-date information on the Regions that Capella supports, see [Amazon Web Services](https://docs.couchbase.com/cloud/reference/aws.html) in the Couchbase documentation.
**Product versions**
+ [Couchbase Server (Community or Enterprise) Edition version 5.x or later](https://docs.couchbase.com/server/current/release-notes/relnotes.html)
## Architecture
**Source technology stack**
+ Couchbase Server
**Target technology stack**
+ Couchbase Capella
**Target architecture**
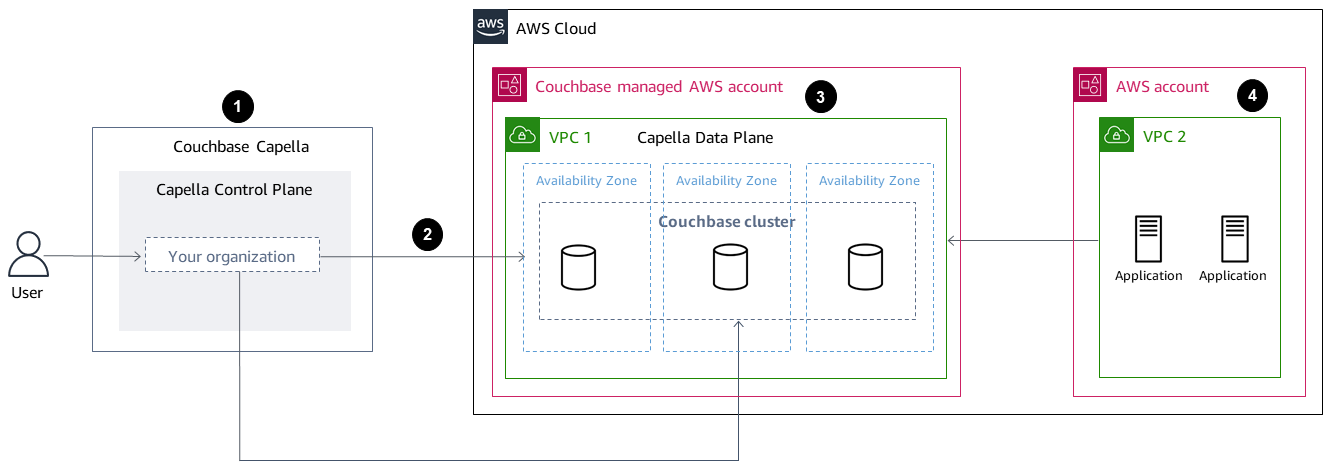
1. You access Couchbase Capella by using the **Capella Control Plane**. You can use the Capella Control Plane to do the following:
+ Control and monitor your account.
+ Manage clusters and data, indexes, users and groups, access permissions, monitoring, and events.
1. Clusters are created.
1. The **Capella Data Plane** is in the Couchbase-managed AWS account. After you create a new cluster, Couchbase Capella deploys it across multiple Availability Zones in the selected AWS Region.
1. You can develop and deploy Couchbase applications in a VPC in your AWS account. Typically, this VPC accesses the Capella Data Plane through [VPC peering](https://docs.couchbase.com/cloud/clouds/private-network.html).
## Tools
+ [Couchbase Cross Data Center Replication (XDCR)](https://docs.couchbase.com/cloud/current/clusters/xdcr/xdcr.html) helps replicate data across clusters that are located in different cloud providers and different data centers. It is used to migrate data into Couchbase Capella from self-managed Couchbase Server clusters.
**Note**
XDCR cannot be used with Couchbase Server Community Edition to migrate to Couchbase Capella. Instead, you can use [cbexport](https://docs.couchbase.com/server/current/tools/cbexport.html). For more information, see the *Migrate data from Community Edition* epic.
+ [Couchbase Shell](https://couchbase.sh/docs/) is a command line shell for Couchbase Server and Couchbase Capella to access local and remote Couchbase clusters. In this pattern, Couchbase Shell is used to migrate indexes.
+ [cbexport](https://docs.couchbase.com/server/current/tools/cbexport.html) is a Couchbase utility for exporting data from Couchbase cluster. Included in [Couchbase Server CLI tools](https://docs.couchbase.com/server/current/cli/cli-intro.html).
## Epics
### Prepare the migration
| Task | Description | Skills required |
| --- | --- | --- |
| Evaluate the size of the self-managed Couchbase Server cluster. | Log in to the [Couchbase Web Console](https://docs.couchbase.com/server/current/manage/manage-ui/manage-ui.html) for Couchbase Server, and assess your self-managed cluster’s nodes and buckets. 1. To show a list of cluster nodes, choose the **Servers** tab in the navigation bar. 2. Record the number of nodes, and then choose each node on the list to display its properties. 3. Record the memory and storage for each individual node. 4. Choose the **Buckets** tab in the navigation bar, and then choose each bucket in the list to display its properties. Record the RAM quota and conflict resolution setting for each bucket. You will use your self-managed Couchbase Server cluster configurations as a general guide for sizing and configuring the target cluster on Couchbase Capella. For help with a more detailed Couchbase Capella sizing exercise, [contact Couchbase](https://www.couchbase.com/contact). | Couchbase administrator |
| Record Couchbase Service distribution on the self-managed Couchbase Server cluster. | 1. On the Couchbase Web Console, choose the **Servers** tab to display the list of cluster nodes. 2. Choose each node to display its properties and then record the Couchbase Service distribution for each node ([Data Service](https://docs.couchbase.com/server/current/learn/services-and-indexes/services/data-service.html), [Query Service](https://docs.couchbase.com/server/current/learn/services-and-indexes/services/query-service.html), [Index Service](https://docs.couchbase.com/server/current/learn/services-and-indexes/services/index-service.html), [Search Service](https://docs.couchbase.com/server/current/learn/services-and-indexes/services/search-service.html), [Analytics Service](https://docs.couchbase.com/server/current/learn/services-and-indexes/services/analytics-service.html), and [Eventing Service](https://docs.couchbase.com/server/current/learn/services-and-indexes/services/eventing-service.html)). | Couchbase administrator |
| Record the IP addresses of the self-managed Couchbase Server cluster nodes. | (Ignore this step if you are using Community Edition.) Record the IP address for each node in your cluster. They will be added to the allow list on your Couchbase Capella cluster later. | Couchbase administrator, Systems administrator |
### Deploy and configure resources on Couchbase Capella
| Task | Description | Skills required |
| --- | --- | --- |
| Choose a template. | 1. Log in to your Couchbase Capella Control Plane, choose the **Dashboard** tab or the **Clusters** tab in the main navigation, and then choose **Create Cluster**. 2. Using the information that you recorded from the evaluation of your self-managed Couchbase Server cluster, choose the cluster template that meets the configuration’s requirements. If you don’t find an appropriate template, choose **Custom Template** in the **Cluster Sizing** editor. | Couchbase administrator |
| Choose and configure the nodes. | Choose and configure the nodes to match your self-managed Couchbase Server cluster environment, including the number of nodes, services distribution, compute or RAM, and storage. Couchbase Capella uses [multidimensional scaling](https://docs.couchbase.com/cloud/clusters/scale-cluster.html#scale-a-cluster) best practices. Services and nodes can be chosen only according to deployment best practices. This might mean that you can’t exactly match your self-managed Couchbase Server cluster’s configurations. | Couchbase administrator |
| Deploy the cluster. | Choose a support zone and support package, and then deploy the cluster. For detailed steps and instructions, see [Create a cluster](https://docs.couchbase.com/cloud/clusters/create-cluster.html) in the Couchbase documentation.If you are using the Couchbase Capella free trial, you must convert it to a paid account before beginning your migration. To convert your account, open the **Billing** section of the Couchbase Capella Control Plane, and then choose **Add Activation ID**. The Activation ID is sent to your billing contact email address after you complete a purchase agreement with Couchbase Sales, or after you make a purchase through [AWS Marketplace](https://aws.amazon.com/marketplace/pp/prodview-xrhx5zgue5c26). | Couchbase administrator |
| Create a database credential user. | A database credential user is specific to a cluster and consists of a user name, password, and a set of bucket privileges. This user is required for creating buckets and accessing bucket data. In the Couchbase Capella Control Plane, create a database credential for the new cluster by following the instructions in [Configure database credentials](https://docs.couchbase.com/cloud/clusters/manage-database-users.html) in the Couchbase Capella documentation.An organization user needs organizational role credentials assigned to them if they want to access bucket data on a particular cluster, either remotely or through the Couchbase Capella UI. This is separate from database credentials, which are typically used by apps and integrations. Creating the organizational user allows you to create and manage the target buckets on your Couchbase Capella cluster. | Couchbase administrator |
| If using migration option 2, install Couchbase Shell. | You can install Couchbase Shell on any system that has network access to both your self-managed Couchbase Server and the Couchbase Capella clusters. For more information, see [Install Couchbase Shell version 1.0.0-beta.5](https://couchbase.sh/docs/#_installation) in the Couchbase Shell documentation. Confirm that Couchbase Shell is installed by [testing a connection to your self-managed cluster](https://couchbase.sh/docs/#_connecting_to_a_cluster) in a command line terminal. | Couchbase administrator, Systems administrator |
| Allow IP addresses. | 1. In the Couchbase Capella Control Plane, choose **Clusters**, and then choose your target cluster. 2. Choose the **Connect** tab for the cluster, and record the connection endpoint for your cluster that is listed under **Manage Allowed IP**. 3. To add the IP address for the system where you installed Couchbase Shell and the IP address of your self-managed Couchbase Server cluster instances as allowed IP addresses, do the following: Under **Wide Area Network**, choose **Manage Allowed IP**. Choose **Add Allowed IP**, enter the IP address for the system where you installed Couchbase Shell, and then choose **Add IP**. Repeat the previous step to add the IP address of your self-managed Couchbase Server cluster instance. For more information about allowed IP addresses, see [Configure allowed IP addresses](https://docs.couchbase.com/cloud/get-started/configure-cluster-access.html#allow-ip-address) in the Couchbase documentation. | Couchbase administrator, Systems administrator |
| Configure certificates. | 1. To download the root certificate for your cluster, under **Root Certificate**, choose **Download**. 2. Save the root certificate using the .pem file extension in a folder on the system that will run Couchbase Shell. 3. Next, log in to your self-managed Couchbase Server Web Console, choose **Security** in the left navigation bar, and then choose the **Certificates** tab. 4. Copy the root certificate for your self-managed Couchbase Server cluster and save it as a .pem file to the same folder where you saved the root certificate file for your Couchbase Capella cluster. For more information about the root certificate, see [Root certificate in the Couchbase Server documentation](https://docs.couchbase.com/server/current/manage/manage-security/configure-server-certificates.html). | Couchbase administrator, Systems administrator |
| Create the configuration file for Couchbase Shell. | Create a configuration dotfile in the Couchbase Shell installation’s home directory (for example, `//.cbsh/config`). For more information, see [Config dotfiles](https://couchbase.sh/docs/#_the_config_dotfiles) in the Couchbase documentation. Add connection properties for the source and target clusters to the configuration file. You can use the example configuration file that’s in the *Additional information* section and edit the settings for your clusters. Save the configuration file with the updated settings to the `.cbsh` folder (for example, `//.cbsh/config`). | Couchbase administrator, Systems administrator |
| Create target buckets. | For each source bucket, create one target bucket in your Couchbase Capella cluster by following the instructions in [Create a bucket](https://docs.couchbase.com/cloud/clusters/data-service/manage-buckets.html#add-bucket) in the Couchbase documentation. Your target bucket configurations must match the bucket names, memory settings, and conflict resolution settings of the buckets in your self-managed Couchbase Server cluster. | Couchbase administrator |
| Create scopes and collections. | Every bucket contains a default scope and collection with the keyspace `_default._default`. If you are using any other keyspaces for your scope and collection, you must create identical keyspaces in the target Capella cluster.1. Open the command line terminal on the system where you installed Couchbase Shell. 2. To start Couchbase Shell, run the following command.
./cbsh
3. For each bucket that you want to migrate, create scopes and collections in the Capella cluster by running the following commands. Make sure that you replace with the name of the bucket that you want to migrate.
| Couchbase administrator |
### Migrate the data from Enterprise Edition
| Task | Description | Skills required |
| --- | --- | --- |
| Open TCP ports on the self-managed Couchbase Server cluster nodes. | Make sure that the appropriate ports are open for XDCR communication on the self-managed Couchbase Server cluster's nodes. For more information, see the [Couchbase Server ports documentation](https://docs.couchbase.com/server/current/install/install-ports.html#ports-listed-by-communication-path). | Couchbase administrator, Systems administrator |
| If you are using Couchbase Server Enterprise Edition, set up Couchbase XDCR. | 1. In the Couchbase Capella Control Plane main navigation, choose **Clusters**, and then choose the target cluster for migration. 2. Under **Root Certificate**, choose **Copy**. 3. Log in to your self-managed Couchbase Server Web Console, and in the main navigation, choose **XDCR**. Then choose **Add Remote**. 4. Enter the following settings: **Cluster Name** – A name for the Capella cluster connection**IP/Hostname** – The connection endpoint for your Couchbase Capella cluster**Username for Remote Cluster** – The database user for your Couchbase Capella cluster**Password** – The database user password for your Couchbase Capella cluster**Enable Secure Connection** – Selected**Full (TLS encrypt password and data)** – Selected 5. Paste the Capella cluster root certificate you copied earlier, and then choose **Save**. | Couchbase administrator |
| Start Couchbase XDCR. | 1. In your self-managed Couchbase Server Web Console, choose **XDCR** in the main navigation, and then choose **Add Replication**. 2. Enter the following settings:**Replicate From Bucket** – Select the source bucket for migration.**Remote Bucket** – Enter the target bucket name.**Remote Cluster** – Select the target cluster you created earlier. 3. Choose **Save Replication**. The replication process should begin within a few seconds. | Couchbase administrator |
### Migrate the indexes by using option 1
| Task | Description | Skills required |
| --- | --- | --- |
| Migrate self-managed cluster indexes to Couchbase Capella. | We recommend this process if you have fewer than 50 indexes to migrate. If you have more than 50 indexes to migrate, we recommend that you use migration option 2.1. On the Couchbase Web Console, choose **Indexes**. 2. In the list of indexes, choose the first index that you want to migrate. The index definition is then displayed. 3. Copy the index definition by using the `CREATE` statement, but don’t copy `WITH { "defer_build":true }`. For example, from the following example index definition, you would copy only `CREATE INDEX `cityindex` ON `travel-sample`(`city`)`.
CREATE INDEX `cityindex` ON `travel-sample`(`city`) WITH { "defer_build":true }
4. In the Couchbase Capella Control Plane, choose **Clusters**, and then choose the target cluster. 5. On the Tools dropdown list, choose **Query Workbench**. Paste the `CREATE` statement that you copied earlier into the **Query Editor**, and then choose **Execute**. This creates and builds the index. 6. To confirm that the index is created, choose **Indexes** from the **Tools** dropdown list. The list shows that the index was created and built. 7. Repeat this process for each index that must be migrated. | Couchbase administrator, Systems administrator |
### Migrate the indexes by using option 2
| Task | Description | Skills required |
| --- | --- | --- |
| Migrate the index definitions. | We recommend this process if you have more than 50 indexes to migrate. If you have fewer than 50 indexes to migrate, we recommend that you use migration option 1.1. Open the command line terminal on the system where you installed Couchbase Shell. 2. To start Couchbase Shell, run the following command.
./cbsh
3. To connect to the self-managed Couchbase Server cluster, run the following command.
cb-env cluster On-Prem-Cluster
4. To migrate index definitions from the self-managed Couchbase Server cluster to the Couchbase Capella cluster, run the following command for each bucket that you want to migrate. Make sure that you replace `` with the bucket name that corresponds to the indexes that you want to migrate. This migration option requires that your target bucket names are identical to the source bucket names.
query indexes --definitions | where bucket =~ | get definition | each { |it| query $it --clusters Capella-Cluster }
| Couchbase administrator, Systems administrator |
| Build the index definitions. | 1. To switch context to the Couchbase Capella cluster, run the following command:
cb-env cluster Capella-Cluster
2. To build the index definitions that were migrated to the Couchbase Capella cluster, run the following command, replacing `` with the bucket name that corresponds to the indexes that you want to build.
query 'SELECT RAW CONCAT("BUILD INDEX ON ", k , "(['", CONCAT2 ("','", inames), "']);") FROM system:indexes AS s LET bid = CONCAT("`",s.bucket_id, "`"), sid = CONCAT("`", s.scope_id, "`"), kid = CONCAT("`", s.keyspace_id, "`"), k = NVL2(bid, CONCAT2(".", bid, sid, kid), kid) WHERE s.namespace_id = "default" AND s.bucket_id = "" GROUP BY k LETTING inames = ARRAY_AGG(s.name) FILTER (WHERE s.state = 'deferred') HAVING ARRAY_LENGTH(inames) > 0;' | each { |it| query $it }
3. Repeat for each bucket. | Couchbase administrator, Systems administrator |
### Migrate full-text search indexes
| Task | Description | Skills required |
| --- | --- | --- |
| Migrate self-managed cluster full-text search indexes to Couchbase Capella. | 1. In the Couchbase Web Console, choose **Search**. 2. In the list of full-text search (FTS) indexes, choose the first FTS index that you want to migrate, choose **Show index definition JSON,** and choose **Copy to Clipboard. **Make a note of the** index name** and the **bucket** it belongs to. 3. In the Couchbase Capella Control Plane, choose **Clusters** and then choose the target cluster. 4. On the Tools dropdown list, choose **Full Text Search**. 5. Choose **Import Index**, and paste the FTS index definition. 6. Enter the **Index Name**, select the correct **Bucket**, as noted on the self-managed cluster, and then choose **Create**. 7. Repeat this process for each FTS index that must be migrated. | Couchbase administrator |
### Migrate data from Couchbase Community Edition
| Task | Description | Skills required |
| --- | --- | --- |
| Export data from self-managed Couchbase Server Community Edition. | Encrypted XDCR is not available in Couchbase Community Edition. You can export data from Couchbase Community Edition and then manually import the data into Couchbase Capella. To export data from the source bucket, use `cbexport` at the command line. The following command is provided as an example.
Note that `cbkey`, `cbscope`, `cbcoll`, and `cbexported_data.json` are arbitrary labels. They will be referenced later in the process, so if you choose to name them differently, make note of it. | Couchbase administrator |
| Import data into Couchbase Capella. | 1. In the Couchbase Capella Control Plane, choose **Clusters**, and then choose the target cluster. 2. In the **Tools** dropdown list, choose **Import**. This will open a wizard with the following six steps:**Bucket** – Choose the target bucket.**File** – Choose **JSON**, choose **Lines**, and then choose **Using your web browser**. If you have a large amount of data, you can explore the **Manually** option. Select the file created by `cbexport`. **Collections** – Choose **Custom Collection Mapping**. If your Community Edition database does not use scopes or collections, or it uses only **\_default**, you can choose the **Select Single Collection** option instead. For **Collection Mapping Expression**, enter `%cbscope%.%cbcoll%`. To verify that this expression works correctly, you can paste example data, such as the following.
**Key** – Choose **Customer Generation**. (If you don't care about preserving the keys of the data you're importing, you can select **Automatically Generated UUID** instead and proceed to step 5.) For **Key Name Generator Expression**, enter **%cbkey%**. To verify that this expression works correctly, paste some example data.**Configurations** – Choose **Ignore fields**, and enter **cbscope,cbcoll,cbkey**. These fields contain transitory information that does not need to be in the target bucket after an import. Leave the other settings at their defaults.**Import** – Review, and choose **Import** when you're ready. Wait for the upload and data import.For large files, Couchbase Capella supports command line import using cURL. You can explore Import options in more detail at [Import data](https://docs.couchbase.com/cloud/clusters/data-service/import-data-documents.html) in the Couchbase Capella documentation. | Couchbase administrator |
### Test and verify the migration
| Task | Description | Skills required |
| --- | --- | --- |
| Verify data migration. | 1. In the Couchbase Capella Control Plane, choose **Clusters**, and then choose the target cluster in your cluster list. 2. Choose the **Buckets** tab for your target cluster. Verify that the number of **Items** (documents) in the target bucket matches the number of items in the source bucket. 3. In the target cluster, in the **Tools** dropdown list, choose **Documents**. Verify that all documents were migrated. 4. (Optional) After all data is migrated, you can shut down the replication by deleting it. For more information, see [Delete a replication](https://docs.couchbase.com/cloud/clusters/xdcr/manage-xdcr-replications.html#delete-replication) in the Couchbase documentation. | Couchbase administrator |
| Verify index migration. | In the Couchbase Capella Control Plane, in the **Tools** dropdown list for your target cluster, choose **Indexes**. Verify that the indexes are migrated and built. | Couchbase administrator |
| Verify query results. | 1. In the Couchbase Capella Control Plane, in the **Tools** dropdown list for your target cluster, choose **Query Workbench**. 2. Run a sample N1QL query or a query used in your application. Make sure that you receive the same results as when you run the query in your self-managed Couchbase Server cluster. | Couchbase administrator |
| Verify full-text search results (applicable if you migrated FTS indexes). | 1. In the Couchbase Capella Control Plane, in the **Tools** dropdown list for your target cluster, choose **Full Text Search**. 2. Select an FTS index by choosing its name. 3. Choose **Search**. 4. Enter a sample search query, and choose **Search**. 5. Verify that the results are the same as when you run the search on your self-managed cluster. | Couchbase administrator |
## Related resources
**Prepare the migration**
+ [Get started with the Couchbase Capella free trial](https://cloud.couchbase.com/sign-up)
+ [Cloud provider requirements for Couchbase Capella](https://docs.couchbase.com/cloud/reference/aws.html)
+ [Couchbase Capella sizing guidelines](https://docs.couchbase.com/cloud/clusters/sizing.html)
**Migrate the data and indexes**
+ [Couchbase XDCR](https://docs.couchbase.com/cloud/clusters/xdcr/xdcr.html)
+ [Couchbase Shell documentation](https://couchbase.sh/docs/)
**Couchbase Capella SLAs and support**
+ [Couchbase Capella service-level agreements (SLAs](https://www.couchbase.com/capellasla))
+ [Couchbase Capella Service support policy](https://www.couchbase.com/support-policy/cloud)
## Additional information
The following code is an example [configuration file for Couchbase Shell](https://couchbase.sh/docs/#_the_config_dotfiles).
```
Version = 1
[[clusters]]
identifier = "On-Prem-Cluster"
hostnames = [""]
default-bucket = "travel-sample"
username = ""
password = ""
tls-cert-path = "/"
data-timeout = "2500ms"
connect-timeout = "7500ms"
query-timeout = "75s"
[[clusters]]
identifier = "Capella-Cluster"
hostnames = [""]
default-bucket = "travel-sample"
username = ""
password = ""
tls-cert-path = "/"
data-timeout = "2500ms"
connect-timeout = "7500ms"
query-timeout = "75s"
```
Before you save the configuration file, use the following table to make sure that you added your own source and target cluster information.
| | |
| --- |--- |
| | Use the IP address for your self-managed Couchbase Server cluster. |
| | Use the administrator user for your self-managed Couchbase Server cluster. |
| | Use the absolute path to the saved root certificate file for your self-managed Couchbase Server cluster. |
| | Use the connection endpoint for your Couchbase Capella cluster. |
| | Use the database user for your Couchbase Capella cluster. |
| | Use the database user password for your Couchbase Capella cluster. |
| | Use the absolute path to the saved root certificate file for your Couchbase Capella cluster. |