Modernize mainframe batch printing workloads on AWS by using Micro Focus Enterprise Server and LRS VPSX/MFI
Created by Shubham Roy (AWS), Abraham Rondon (Micro Focus), Guy Tucker (Levi, Ray and Shoup Inc), and Kevin Yung (AWS)
Environment: PoC or pilot | Source: IBM Mainframe | Target: AWS |
R Type: Replatform | Workload: IBM | Technologies: Mainframe; Modernization |
AWS services: AWS Managed Microsoft AD; Amazon EC2; Amazon S3; Amazon EBS |
Summary
This pattern shows you how to modernize your business-critical mainframe batch printing workloads on the Amazon Web Services (AWS) Cloud by using Micro Focus Enterprise Server as a runtime for a modernized mainframe application and LRS VPSX/MFI (Micro Focus Interface) as a print server. The pattern is based on the replatform
Prerequisites and limitations
Prerequisites
An active AWS account
A mainframe printing or output management workload
Basic knowledge of how to rebuild and deliver a mainframe application that runs on Micro Focus Enterprise Server (For more information, see the Enterprise Server
data sheet in the Micro Focus documentation.) Basic knowledge of LRS cloud printing solutions and concepts (For more information, see Output Modernization
in the LRS documentation.) Micro Focus Enterprise Server software and license (For more information, contact Micro Focus sales
.) LRS VPSX/MFI, LRS/Queue, and LRS/DIS software and licenses (For more information, contact LRS sales
.)
Note: For more information about configuration considerations for mainframe batch printing workloads, see Considerations in the Additional information section of this pattern.
Product versions
Micro Focus Enterprise Server
6.0 (product update 7) LRS VPSX/MFI
V1R3 or higher
Architecture
Source technology stack
Operating system – IBM z/OS
Programming language – Common Business-Oriented Language (COBOL), Job Control Language (JCL), and Customer Information Control System (CICS)
Database – IBM DB2 for z/OS and Virtual Storage Access Method (VSAM)
Security – Resource Access Control Facility (RACF), CA Top Secret for z/OS, and Access Control Facility 2 (ACF2)
Printing and output management – IBM mainframe z/OS printing products (IBM Tivoli Output Manager for z/OS, LRS, and CA View)
Target technology stack
Operating system – Microsoft Windows Server running on Amazon EC2
Compute – Amazon EC2
Programming language – COBOL, JCL, and CICS
Database – Amazon RDS
Security – AWS Managed Microsoft AD
Printing and output management – LRS printing solution on AWS
Mainframe runtime environment – Micro Focus Enterprise Server
Source architecture
The following diagram shows a typical current state architecture for a mainframe batch printing workload:

The diagram shows the following workflow:
Users perform business transactions on a system of engagement (SoE) that’s built on an IBM CICS application written in COBOL.
The SoE invokes the mainframe service, which records the business transaction data in a system-of-records (SoR) database such as IBM DB2 for z/OS.
The SoR persists the business data from the SoE.
The batch job scheduler initiates a batch job to generate print output.
The batch job extracts data from the database, formats the data according to business requirements, and then generates business output such as billing statements, ID cards, or loan statements. Finally, the batch job routes the output to printing output management for processing and output delivery, based on the business requirements.
Printing output management receives print output from the batch job, and then delivers that output to a specified destination, such as email, a file share that uses secure FTP, a physical printer that uses LRS printing solutions (as demonstrated in this pattern), or IBM Tivoli.
Target architecture
The following diagram shows an architecture for a mainframe batch printing workload that’s deployed in the AWS Cloud:

The diagram shows the following workflow:
The batch job scheduler initiates a batch job to create print output, such as billing statements, ID cards, or loan statements.
The mainframe batch job (replatformed to Amazon EC2
) uses the Micro Focus Enterprise Server runtime to extract data from the application database, apply business logic to the data, format the data, and then send the data to a print destination by using Micro Focus Print Exit (Micro Focus documentation). The application database (an SoR that runs on Amazon RDS) persists data for print output.
The LRS VPSX/MFI printing solution is deployed on Amazon EC2 and its operational data is stored in Amazon Elastic Block Store (Amazon EBS). LRS VPSX/MFI uses the TCP/IP-based LRS/Queue transmission agent to collect print data through the Micro Focus JES Print Exit API and deliver the data to a specified printer destination.
Note: The target solution typically doesn’t require application changes to accommodate mainframe formatting languages, such as IBM Advanced Function Presentation (AFP) or Xerox Line Condition Data Stream (LCDS). For more information about using Micro Focus for mainframe application migration and modernization on AWS, see Empowering Enterprise Mainframe Workloads on AWS with Micro Focus
AWS infrastructure architecture
The following diagram shows a highly available and secure AWS infrastructure architecture for a mainframe batch printing workload:
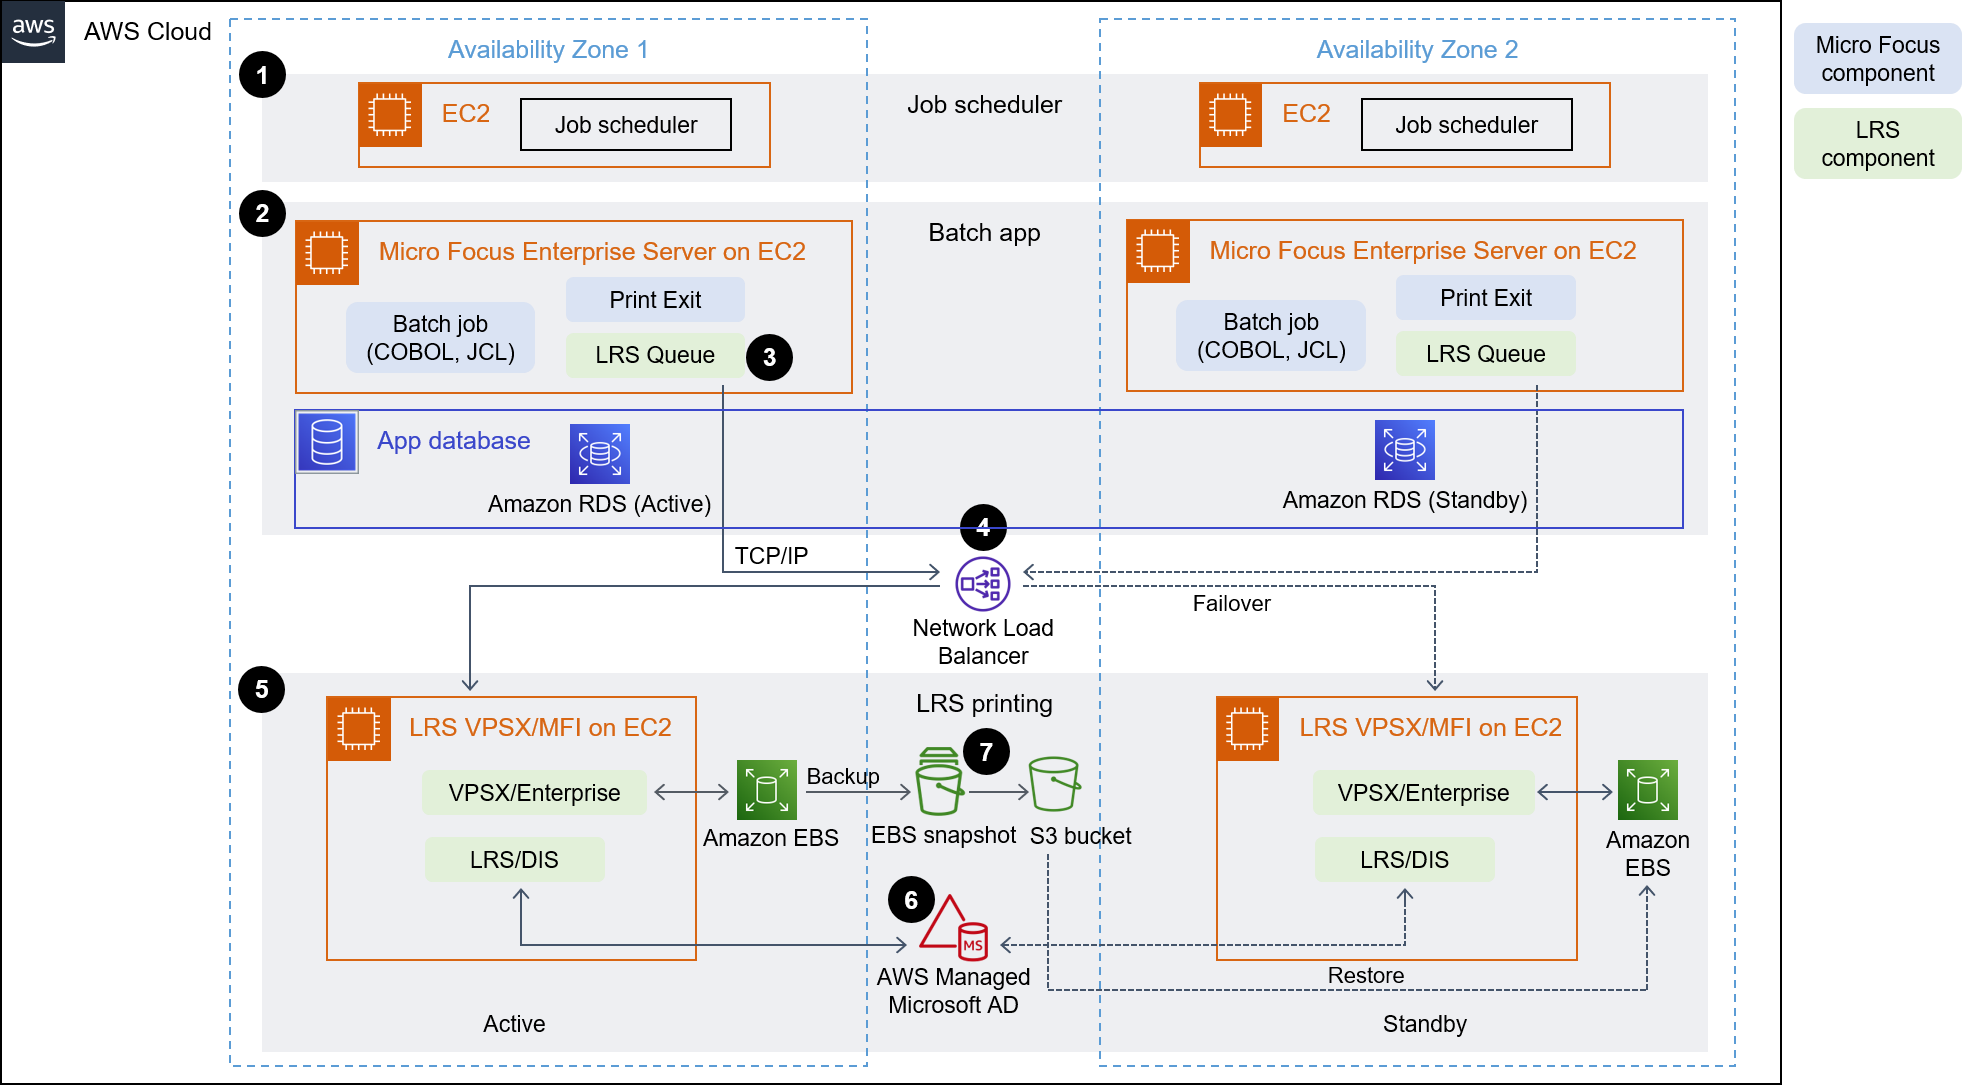
The diagram shows the following workflow:
The batch scheduler initiates the batch process and is deployed on Amazon EC2 across multiple Availability Zones
for high availability (HA). Note: This pattern doesn’t cover the implementation of the batch scheduler. For more information about implementation, see the software vendor documentation for your scheduler. The mainframe batch job (written on a programming language such as JCL or COBOL) uses core business logic to process and generate print output, such as billing statements, ID cards, and loan statements. The job is deployed on Amazon EC2 across two Availability Zones for HA and uses Micro Focus Print Exit to route print output to LRS VPSX/MFI for end-user printing.
LRS VPSX/MFI uses a TCP/IP-based LRS/Queue transmission agent to collect or capture print data from the Micro Focus JES Print Exit programming interface. Print Exit passes the necessary information to enable LRS VPSX/MFI to effectively process the spool file and dynamically build LRS/Queue commands. The commands are then run using a standard built-in function from Micro Focus. Note: For more information on print data passed from Micro Focus Print Exit to LRS/Queue and LRS VPSX/MFI supported mainframe batch mechanisms, see Print data capture in the Additional information section of this pattern.
A Network Load Balancer provides a DNS name to integrate Micro Focus Enterprise Server with LRS VPSX/MFI. Note: LRS VPSX/MFI supports a Layer 4 load balancer. The Network Load Balancer also does a basic health check on LRS VPSX/MFI and routes traffic to the registered targets that are healthy.
The LRS VPSX/MFI print server is deployed on Amazon EC2 across two Availability Zones for HA and uses Amazon EBS as an operational data store. LRS VPSX/MFI supports both the active-active and active-passive service modes. This architecture uses multiple AZs in an active-passive pair as an active and hot standby. The Network Load Balancer performs a health check on LRS VPSX/MFI EC2 instances and routes traffic to hot standby instances in the other AZ if an active instance is in an unhealthy state. The print requests are persisted in the LRS Job Queue locally in each of the EC2 instances. In the event of recovery, a failed instance has to be restarted for the LRS services to resume processing the print request. Note: LRS VPSX/MFI can also perform health checks at the printer fleet level. For more information, see Printer fleet health checks in the Additional information section of this pattern.
AWS Managed Microsoft AD integrates with LRS/DIS to perform print workflow authentication and authorization. For more information, see Print authentication and authorization in the Additional information section of this pattern.
LRS VPSX/MFI uses Amazon EBS for block storage. You can back up Amazon EBS data from active EC2 instances to Amazon S3 as point-in-time snapshots and restore them to hot standby EBS volumes. To automate the creation, retention, and deletion of Amazon EBS volume snapshots, you can use Amazon Data Lifecycle Manager
to set the frequency of automated snapshots and restore them based on your RTO/RPO requirements.
Tools
AWS services
Amazon EBS – Amazon Elastic Block Store (Amazon EBS) provides block level storage volumes for use with EC2 instances. EBS volumes behave like raw, unformatted block devices. You can mount these volumes as devices on your instances.
Amazon EC2 – Amazon Elastic Compute Cloud (Amazon EC2) provides scalable computing capacity in the AWS Cloud. You can use Amazon EC2 to launch as many or as few virtual servers as you need, and you can scale out or scale in.
Amazon RDS – Amazon Relational Database Service (Amazon RDS) is a web service that makes it easier to set up, operate, and scale a relational database in the AWS Cloud. It provides cost-efficient, resizable capacity for a relational database and manages common database administration tasks.
AWS Managed Microsoft AD
– AWS Directory Service for Microsoft Active Directory, also known as AWS Managed Microsoft Active Directory, enables your directory-aware workloads and AWS resources to use managed Active Directory in AWS.
Other tools
LRS VPSX/MFI (Micro Focus Interface)
– VPSX/MFI, co-developed by LRS and Micro Focus, captures output from a Micro Focus Enterprise Server JES spool and reliably delivers it to a specified print destination. LRS Directory Information Server (LRS/DIS) – LRS/DIS is used for authentication and authorization during the print workflow.
LRS/Queue – LRS VPSX/MFI uses a TCP/IP-based LRS/Queue transmission agent to collect or capture print data through the Micro Focus JES Print Exit programming interface.
Micro Focus Enterprise Server
– Micro Focus Enterprise Server is an application deployment environment for mainframe applications. It provides the execution environment for mainframe applications that are migrated or created by using any version of Micro Focus Enterprise Developer.
Epics
| Task | Description | Skills required |
|---|---|---|
Set up Micro Focus Enterprise Server and deploy a demo application. | Set up Micro Focus Enterprise Server on Amazon EC2, and then deploy the Micro Focus BankDemo demonstration application on Amazon EC2 by following the instructions in the Micro Focus Enterprise Server on AWS The BankDemo application is a mainframe batch application that creates and then initiates print output. | Cloud architect |
| Task | Description | Skills required |
|---|---|---|
Get an LRS product license for printing. | To get an LRS product license for LRS VPSX/MFI, LRS/Queue, and LRS/DIS, contact the LRS Output Management team | Build lead |
Create an Amazon EC2 Windows instance to install LRS VPSX/MFI. | Launch an Amazon EC2 Windows instance by following the instructions from Step 1: Launch an instance in the Amazon EC2 documentation. Your instance must meet the following hardware and software requirements for LRS VPSX/MFI:
Note: The preceding hardware and software requirements are intended for a small printer fleet (around 500–1000). To get the full requirements, consult with your LRS and AWS contacts. When you create your Windows instance, do the following:
| Cloud architect |
Install LRS VPSX/MFI on the EC2 instance. |
| Cloud architect |
Install LRS/Queue. |
| Cloud architect |
Install LRS/DIS. |
| Cloud architect |
Create a target group and register LRS VPSX/MFI EC2 as the target. | Create a target group by following the instructions from Create a target group for your Network Load Balancer in the Elastic Load Balancing documentation. When you create the target group, do the following:
| Cloud architect |
Create a Network Load Balancer. | Follow the instructions from Create a Network Load Balancer in the Elastic Load Balancing documentation. Your Network Load Balancer routes traffic from Micro Focus Enterprise Server to LRS VPSX/MFI EC2. When you create the Network Load Balancer, do the following on the Listeners and Routing page:
| Cloud architect |
| Task | Description | Skills required |
|---|---|---|
Configure Micro Focus Enterprise Server for LRS/Queue integration. |
Note: LRS currently supports a maximum character limit of 50 for DNS names, but this is subject to change in the future. If your DNS name is greater than 50, then you can use the IP address of the Network Load Balancer as an alternative. | Cloud architect |
Configure Micro Focus Enterprise Server for LRS VPSX/MFI integration. |
| Cloud architect |
| Task | Description | Skills required |
|---|---|---|
Associate the Micro Focus Print Exit module to the Micro Focus Enterprise Server batch printer Server Execution Process. |
For more information about configuration, see Using the Exit | Cloud architect |
Add a printer in LRS VPSX/MFI. |
| Cloud architect |
Create a print user in LRS VPSX/MFI. |
| Cloud architect |
| Task | Description | Skills required |
|---|---|---|
Create an AWS Managed Microsoft AD domain with users and groups. |
| Cloud architect |
Join LRS VPSX/MFI EC2 to an AWS Managed Microsoft AD domain. | Join LRS VPSX/MFI EC2 to your AWS Managed Microsoft AD domain automatically | Cloud architect |
Configure and integrate LRS/DIS with AWS Managed Microsoft AD. |
| Cloud architect |
| Task | Description | Skills required |
|---|---|---|
Initiate a batch print request from the Micro Focus BankDemo app. |
| Test engineer |
Check the print output in LRS VPSX/MFI. |
You can now see the print output of an account statement with columns for Account No., Description, Date, Amount, and Balance. For an example, see the batch_print_output attachment for this pattern. | Test engineer |
Related resources
LRS Output Modernization
(LRS documentation) ANSI and machine carriage controls
(IBM documentation) Channel command words
(IBM documentation) Empowering Enterprise Mainframe Workloads on AWS with Micro Focus
(AWS Partner Network Blog) Build a Micro Focus Enterprise Server PAC with Amazon EC2 Auto Scaling and Systems Manager (AWS Prescriptive Guidance documentation)
Advanced Function Presentation (AFP) data stream
(IBM documentation) Line Conditioned Data Stream (LCDS)
(Compart documentation) Micro Focus Enterprise Server on AWS
(AWS Quick Starts)
Additional information
Considerations
During your modernization journey, you may consider a wide variety of configurations for both mainframe batch processes and the output they generate. The mainframe platform has been customized by every customer and vendor that uses it with particular requirements that directly affect print. For example, your current platform may incorporate the IBM Advanced Function Presentation (AFP) or the Xerox Line Condition Data Stream (LCDS) into the current workflow. Additionally, mainframe carriage control characters
Print data capture
Micro Focus Print Exit passes the necessary information to enable LRS VPSX/MFI to effectively process the spool file. The information consists of fields passed in the relevant control blocks, such as:
JOBNAME
OWNER (USERID)
DESTINATION
FORM
FILENAME
WRITER
LRS VPSX/MFI supports the following mainframe batch mechanisms for capturing data from Micro Focus Enterprise Server.
BATCH COBOL print/spool processing using standard z/OS JCL SYSOUT DD/OUTPUT statements
BATCH COBOL print/spool processing using standard z/OS JCL CA-SPOOL SUBSYS DD statements
IMS/COBOL print/spool processing using the CBLTDLI interface (For a full list of supported methods and programming examples, see the LRS documentation that’s included with your product license.)
Printer fleet health checks
LRS VPSX/MFI (LRS LoadX) can perform deep dive health checks, including device management and operational optimization. Device management can detect failure in a printer device and route the print request to a healthy printer. For more information about deep dive health checks for printer fleets, see the LRS documentation that’s included with your product license.
Print authentication and authorization
LRS/DIS enables LRS applications to authenticate user IDs and passwords by using Microsoft Active Directory or an LDAP server. In addition to basic print authorization, LRS/DIS can also apply granular-level print security controls in the following use cases:
Manage who can browse the printer job.
Manage the browsing level of other user's jobs.
Manage operational tasks. For example, command-level security such as hold/release, purge, modify, copy, and reroute. Security can be set up by either the User-ID or Group (similar to AD group or LDAP group).
Attachments
To access additional content that is associated with this document, unzip the following file: attachment.zip
