Place tempdb in an instance store
When you use an Amazon EC2 instance store, use the instance store volume for tempdb. An instance store provides temporary (ephemeral) block-level storage for your instance. We recommend that you place tempdb on an instance store volume for two reasons: speed and cost. Tempdb is typically the most heavily used database, so it benefits from the fastest available drive. Another benefit of placing tempdb in an instance store is cost savings, because you’re not charged separately for the I/O against the instance store.
Tempdb is recreated whenever you restart SQL Server, so stopping or terminating an instance won’t cause data loss. However, an instance store volume is lost when the virtual machine is started on another host, because the ephemeral disk is attached locally to the machine, so plan carefully.
When you use an instance store volume:
-
Initialize the volume before the SQL Server service starts. Otherwise, the SQL Server startup procedure will fail.
-
Grant permissions (full control) on the instance store volume explicitly to the SQL Server startup account.
Moving tempdb to an instance store
To move tempdb to an instance store volume:
-
From Windows, run
diskmgmt.mscas an administrator to open the Disk Management system utility. -
Initialize a new disk.
-
Right-click the disk, and then choose New Simple Volume.
-
Complete the prompts, using these settings to format the volume:
-
File system: NTFS
-
Allocation unit size: 64K
-
Volume label: tempdb
For more information, see the Disk Management documentation
on the Microsoft website. -
-
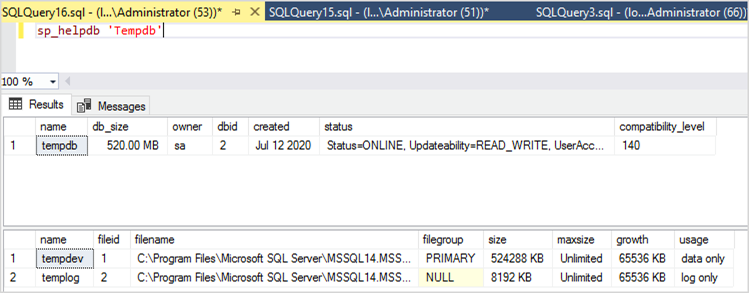
Connect to the SQL Server instance, and run the following command to note the logical and physical file name of the tempdb database:
$ sp_helpdb 'tempdb'The following screenshot shows the command and its output.
-
Move the tempdb file to the new location. Remember to set all the tempdb database files to the same initial size. The following sample SQL server script moves the tempdb files to drive T and sets the data files to the same size.
USE master GO ALTER DATABASE TempDB MODIFY FILE (NAME = tempdev, FILENAME = 'T:\tempdb.mdf',SIZE = 524288KB) GO ALTER DATABASE TempDB MODIFY FILE (NAME = temp2, FILENAME = 'T:\tempdb_mssql_2.ndf',SIZE = 524288KB) GO ALTER DATABASE TempDB MODIFY FILE (NAME = temp3, FILENAME = 'T:\tempdb_mssql_3.ndf',SIZE = 524288KB) GO ALTER DATABASE TempDB MODIFY FILE (NAME = temp4, FILENAME = 'T:\tempdb_mssql_4.ndf',SIZE = 524288KB) GO ALTER DATABASE TempDB MODIFY FILE (NAME = templog, FILENAME = 'T:\templog.ldf') GO -
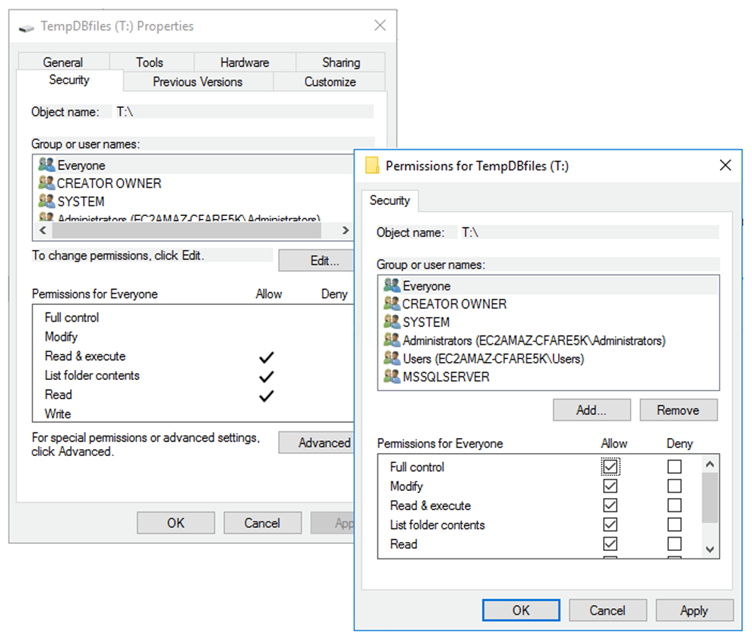
Grant the SQL Server startup account permissions to the new location of the tempdb database, so it can create the tempdb files, as shown in the following screenshot.
-
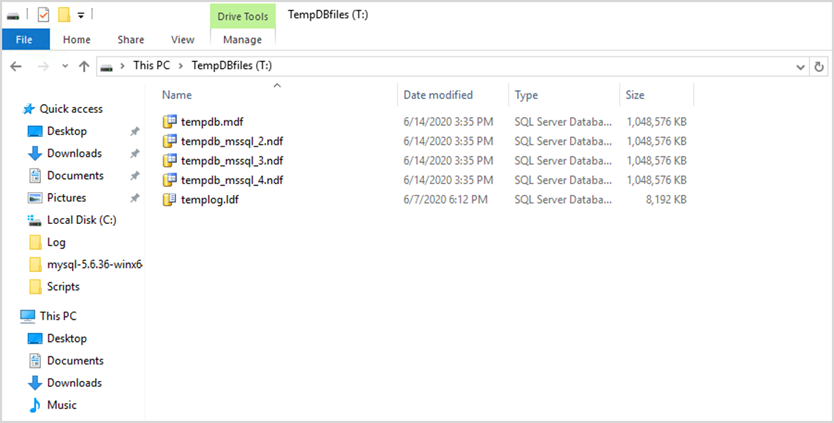
Restart SQL Server to use the new location for tempdb.
You will see the tempdb files created at the new location, as shown in the following screenshot.
-
Delete the tempdb files from the old location.
To make sure that the instance store volume is initialized before SQL Server starts in case of instance reboots or start/stop, follow the steps in the next section. Otherwise, SQL Server startup will fail because tempdb wasn’t initialized.
Initializing the instance store
To initialize the data store:
-
Open the Windows Services Manager (
services.msc), and set the SQL Server and its dependent services (for example, SQL Server Agent) to start manually. (You will use a script to start it when the instance store volume is ready.) -
Create a PowerShell script to pass to Amazon EC2 instance as user data. This script does the following:
-
Detects ephemeral storage and creates a tempdb drive for it (drive T in the example).
-
Refreshes the ephemeral disk if the EC2 instance stops and restarts.
-
Grants the SQL Server startup account full control of the newly initialized tempdb volume. The example assumes a default instance, so it uses
NT
                  SERVICE\MSSQLSERVER
. For a named instance, this will typically beNT SERVICE\MSSQL$by default.<InstanceName> -
Saves the script on a local volume (
c:\scriptsin the example) and assigns it a file name (InstanceStoreMapping.ps1). -
Creates a scheduled task using Windows Task Scheduler. This task runs the PowerShell script on startup.
-
Starts SQL Server and SQL Server Agent after the previous actions.
The following script is from the second lab of the MS-SQL Availability Group Workshop
with some changes. Copy the script to the User data field when you launch the EC2 instance, and customize it as necessary. -
<powershell>
# Create pool and virtual disk for TempDB using the local NVMe, ReFS 64K, T: Drive
    $NVMe = Get-PhysicalDisk | ? { $_.CanPool -eq $True -and $_.FriendlyName -eq "NVMe Amazon EC2 NVMe"}
    New-StoragePool -FriendlyName TempDBPool -StorageSubsystemFriendlyName "Windows Storage*" -PhysicalDisks $NVMe
    New-VirtualDisk -StoragePoolFriendlyName TempDBPool -FriendlyName TempDBDisk -ResiliencySettingName simple -ProvisioningType Fixed -UseMaximumSize
    Get-VirtualDisk -FriendlyName TempDBDisk | Get-Disk | Initialize-Disk -Passthru | New-Partition -DriveLetter T -UseMaximumSize | Format-Volume -FileSystem ReFS -AllocationUnitSize 65536 -NewFileSystemLabel TempDBfiles -Confirm:$false
    # Script to handle NVMe refresh on start/stop instance
    $InstanceStoreMapping = {
    if (!(Get-Volume -DriveLetter T)) {
        #Create pool and virtual disk for TempDB using mirroring with NVMe
        $NVMe = Get-PhysicalDisk | ? { $_.CanPool -eq $True -and $_.FriendlyName -eq "NVMe Amazon EC2 NVMe"}
        New-StoragePool -FriendlyName TempDBPool -StorageSubsystemFriendlyName "Windows Storage*" -PhysicalDisks $NVMe
        New-VirtualDisk -StoragePoolFriendlyName TempDBPool -FriendlyName TempDBDisk -ResiliencySettingName simple -ProvisioningType Fixed -UseMaximumSize
        Get-VirtualDisk -FriendlyName TempDBDisk | Get-Disk | Initialize-Disk -Passthru | New-Partition -DriveLetter T -UseMaximumSize | Format-Volume -FileSystem ReFS -AllocationUnitSize 65536 -NewFileSystemLabel TempDBfiles -Confirm:$false
         #grant SQL Server Startup account full access to the new drive
        $item = gi -literalpath "T:\"
        $acl = $item.GetAccessControl()
        $permission="NT SERVICE\MSSQLSERVER","FullControl","Allow"
        $rule = New-Object System.Security.AccessControl.FileSystemAccessRule $permission
        $acl.SetAccessRule($rule)
        $item.SetAccessControl($acl)
        #Restart SQL so it can create tempdb on new drive
        Stop-Service SQLSERVERAGENT
        Stop-Service MSSQLSERVER
        Start-Service MSSQLSERVER
        Start-Service SQLSERVERAGENT
        }
    }
    New-Item -ItemType Directory -Path c:\Scripts
    $InstanceStoreMapping | set-content c:\Scripts\InstanceStoreMapping.ps1
# Create a scheduled task on startup to run script if required (if T: is lost)
    $action = New-ScheduledTaskAction -Execute 'Powershell.exe' -Argument 'c:\scripts\InstanceStoreMapping.ps1'
    $trigger =  New-ScheduledTaskTrigger -AtStartup
    Register-ScheduledTask -Action $action -Trigger $trigger -TaskName "Rebuild TempDBPool" -Description "Rebuild TempDBPool if required" -RunLevel Highest -User System
</powershell>
Using the buffer pool extension
If you’re planning to use the buffer pool extension, you might also consider placing it on an ephemeral volume. However, we strongly recommend testing it thoroughly before implementation. Avoid using the same volume for the buffer pool extension and tempdb.
Note
Although the buffer pool extension can be useful in some cases, it isn’t a replacement
for RAM. Before you decide to use it, see the details provided on the Microsoft website
