Organizing fields into folders in Amazon QuickSight
When prepping your data in Amazon QuickSight, you can use folders to organize your fields for multiple authors across your enterprise. Arranging fields into folders and subfolders can make it easier for authors to find and understand fields in your dataset.
You can create folders while preparing your dataset, or when editing a dataset. For more information about creating a new dataset and preparing it, see Creating datasets. For more information about opening an existing dataset for data preparation, see Editing datasets.
While performing an analysis, authors can expand and collapse folders, search for specific fields within folders, and see your descriptions of folders on the folder menu. Folders appear at the top of the Fields pane in alphabetical order.
Creating a folder
Use the following procedure to create a new folder in the Fields pane.
To create a new folder
-
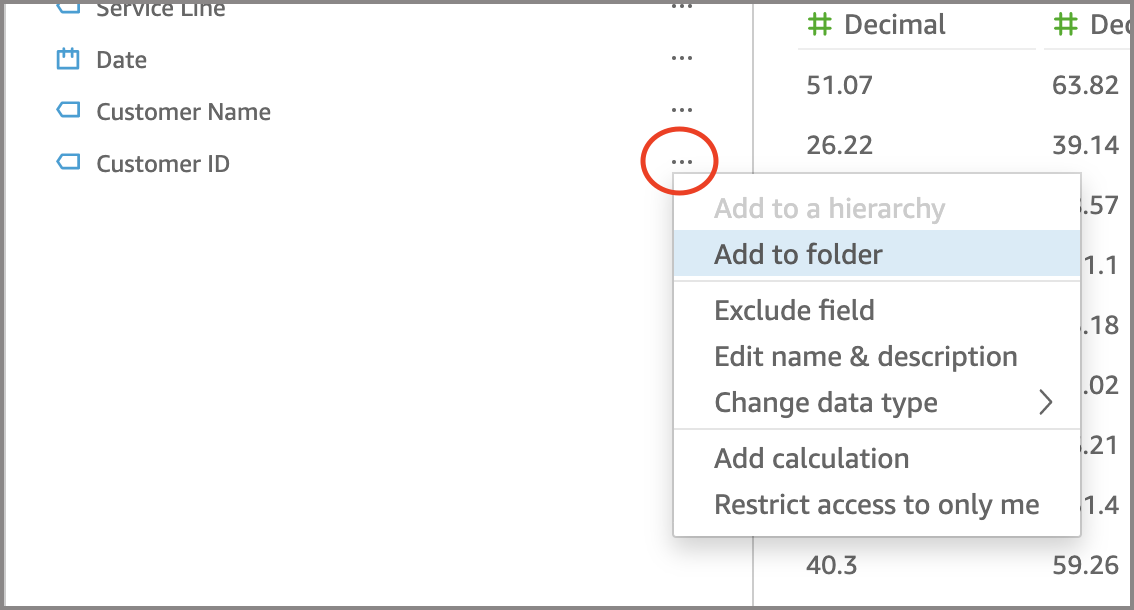
On the data preparation page, in the Fields pane, select the field menu for the fields that you want to place in a folder and choose Add to folder.
To select more than one field at a time, press the Ctrl key while you select (Command key on Mac).
-
On the Add to folder page that appears, choose Create a new folder and enter a name for the new folder.
-
Choose Apply.
The folder appears at the top of the Fields pane with the fields that you chose inside it. Fields inside folders are arranged in alphabetical order.
Creating a subfolder
To further organize your data fields in the Fields pane, you can create subfolders within parent folders.
To create a subfolder
-
On the data preparation page, in the Fields pane, select the field menu for a field already in a folder and choose Move to folder.
-
On the Move to folder page that appears, choose Create a new folder and enter a name for the new folder.
-
Choose Apply.
The subfolder appears within the parent folder at the top of the list of fields. Subfolders are arranged in alphabetical order.
Adding fields to an existing Folder
Use the following procedure to add fields to an existing folder in the Fields pane.
To add one or more fields to a folder
-
On the data preparation page, in the Fields pane, select the fields that you want to add to a folder.
To select more than one field at a time, press the Ctrl key while you select (Command key on Mac).
-
On the field menu, choose Add to folder.
-
On the Add to folder page that appears, choose a folder for Existing folder.
-
Choose Apply.
The field or fields are added to the folder.
Moving fields between folders
Use the following procedure to move fields between folders in the Fields pane.
To move fields between folders
-
On the data preparation page, in the Fields pane, select the fields that you want to move to another folder.
To select more than one field at a time, press the Ctrl key while you select (Command key on Mac).
-
On the field menu, choose Move to folder.
-
On the Move to folder page that appears, choose a folder for Existing folder.
-
Choose Apply.
Removing fields from a folder
Use the following procedure to remove fields from a folder in the Fields pane. Removing a field from a folder doesn't delete the field.
To remove fields from a folder
-
On the data preparation page, in the Fields pane, select the fields that you want to remove.
-
On the field menu, choose Remove from folder.
The fields that you selected are removed from the folder and placed back in the list of fields in alphabetical order.
Editing a folder name and adding a folder description
You can edit the name or add a description of a folder to provide context about the data fields inside it. The folder name appears in the Fields pane. While performing an analysis, authors can read your folder's description when they select the folder menu in the Fields pane.
To edit a folder name or edit or add a description for a folder
-
On the data preparation page, in the Fields pane, select the folder menu for the folder that you want to edit and choose Edit name & description.
-
On the Edit folder page that appears, do the following:
-
For Name, enter a name for the folder.
-
For Description, enter a description of the folder.
-
-
Choose Apply.
Moving folders
You can move folders and subfolders to new or existing folders in the Fields pane.
To move a folder
-
On the data preparation page, in the Fields pane, choose Move folder on the folder menu.
-
On the Move folder page that appears, do one of the following:
-
Choose Create a new folder and enter a name for the folder.
-
For Existing folder, choose a folder.
-
-
Choose Apply.
The folder appears within the folder that you chose in the Fields pane.
Removing folders from the fields pane
Use the following procedure to remove a folder from the Fields pane.
To remove a folder
-
On the data preparation page, in the Fields pane, choose Remove folder on the folder menu.
-
On the Remove folder? page that appears, choose Remove.
The folder is removed from the Fields pane. Any fields that were in the folder are placed back in the list of fields in alphabetical order. Removing folders doesn't exclude fields from view or delete fields from the dataset.
