Making Amazon QuickSight Q topics natural-language-friendly
| Applies to: Enterprise Edition |
| Intended audience: Amazon QuickSight administrators and authors |
When you create a topic, Amazon QuickSight Q creates, stores, and maintains an index with definitions for data in that topic. Q uses this index to generate correct answers, provide autocomplete suggestions when someone asks a question, and suggest mappings of terms to columns or data values. This is how Q can interpret key terms in your readers' questions and map them to your data.
To help Q interpret your data and better answer your readers' questions, provide as much information about your datasets and their associated fields as possible.
Use the following procedures to do so, making your topics more natural-language-friendly.
Tip
You can edit multiple fields at a time using bulk actions. Use the following procedure to bulk-edit fields in a topic.
To bulk-edit fields in a topic
-
Open the topic that you want to change.
-
In the topic, choose the Data tab.
-
Under Fields, select two or more fields that you want to change.
-
Choose Bulk Actions at the top of the list.
-
In the Bulk Actions page that opens, configure the fields how you want, and then choose Apply to.
The configuration options are described in the following steps.
Step 1: Give datasets friendly names and descriptions
Dataset names are often based on technical naming conventions that your readers might not naturally use to refer to them. We recommend that you give your datasets friendly names and descriptions to provide more information about the data they contain. Q uses these friendly names and descriptions to understand dataset contents and select a dataset based on the reader's question. Q also shows the dataset names to the reader to provide additional context for an answer.
For example, if your dataset is named D_CUST_DLY_ORD_DTL, you might
rename it in the topic to Customer Daily Order Details. That way, when
your readers see it listed in the Q bar for your topic, they can quickly determine
if the data is relevant to them or not.
To give a dataset a friendly name and description
-
Open the topic that you want to change.
-
On the Summary tab, under Datasets, choose the down arrow at the far right of the dataset to expand it.

-
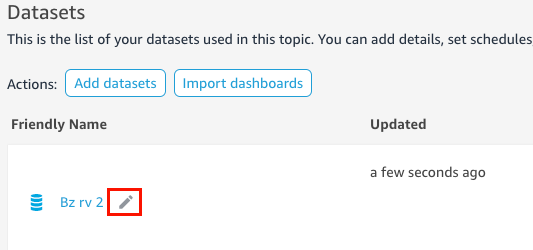
Choose the pencil icon next to the dataset name at left, and then enter a friendly name. We recommend using a name that your readers will understand.
-
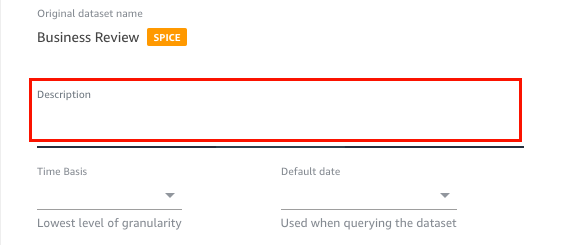
For Description, enter a description for the dataset that describes the data it contains.
Step 2: Tell Q how to use date fields in your datasets
If your dataset contains date and time information, we recommend telling Q how to use that information when answering questions. Doing this is especially important if you have multiple date time columns in a topic.
In some cases, there are multiple valid date columns in a topic, such as order date and shipped date. In these cases, you can help readers by specifying a default date for Q to use to answer their questions. Readers can choose a different date if the default date doesn't answer their question.
You can also tell Q how granular to be with your date time columns by specifying a time basis. The time basis for a dataset is the lowest level of time granularity that is supported by all measures in the dataset. This setting helps Q aggregate metrics in the dataset across different time dimensions and is applicable for datasets that support a single date time granularity. This option can be set for denormalized datasets with a large number of metrics. For example, if a dataset supports several metrics at a daily aggregation, then you can set the time basis of that dataset to Daily. Q then uses that to determine how to aggregate metrics.
To set a default date and time basis for a dataset
-
Open the topic that you want to change.
-
On the Summary tab, under Datasets, choose the down arrow at far right of the dataset to expand it.
-
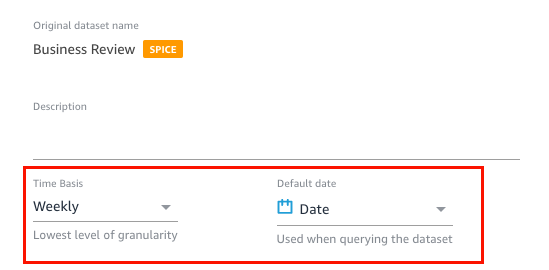
For Default date, choose a date field.
-
For Time basis choose the lowest level of granularity that you want Q to aggregate metrics in the dataset to. You can aggregate metrics in a topic at the daily, weekly, monthly, quarterly, or yearly level.
Step 3: Exclude unused fields
When you add a dataset to a topic, all columns (fields) in the dataset are added by default. If your dataset contains fields that you or your readers don't use, or that you don't want to include in answers, you can exclude them from the topic. Excluding these fields removes them from Q answers and the Q index and improves the accuracy of answers that your readers receive.
To exclude fields in a topic
-
Open the topic that you want to change.
-
In the topic, choose the Data tab.
-
In the Fields section, under Include, toggle the icon off.

Step 4: Rename fields to be natural-language-friendly
Fields in a dataset are often named based on technical naming conventions. You can make your field names more user-friendly in your topics by renaming them and adding descriptions.
Q uses field names to understand the fields and link them to terms in your readers' questions. When your field names are user-friendly, it's easier for Q to draw links between the data and a reader’s question. These friendly names are also presented to readers as part of the answer to their question to provide additional context.
To rename and add descriptions to a field
-
Open the topic that you want to change.
-
In the topic, choose the Data tab.
-
In the Fields section, choose the down arrow at far right of the field to expand it.
-
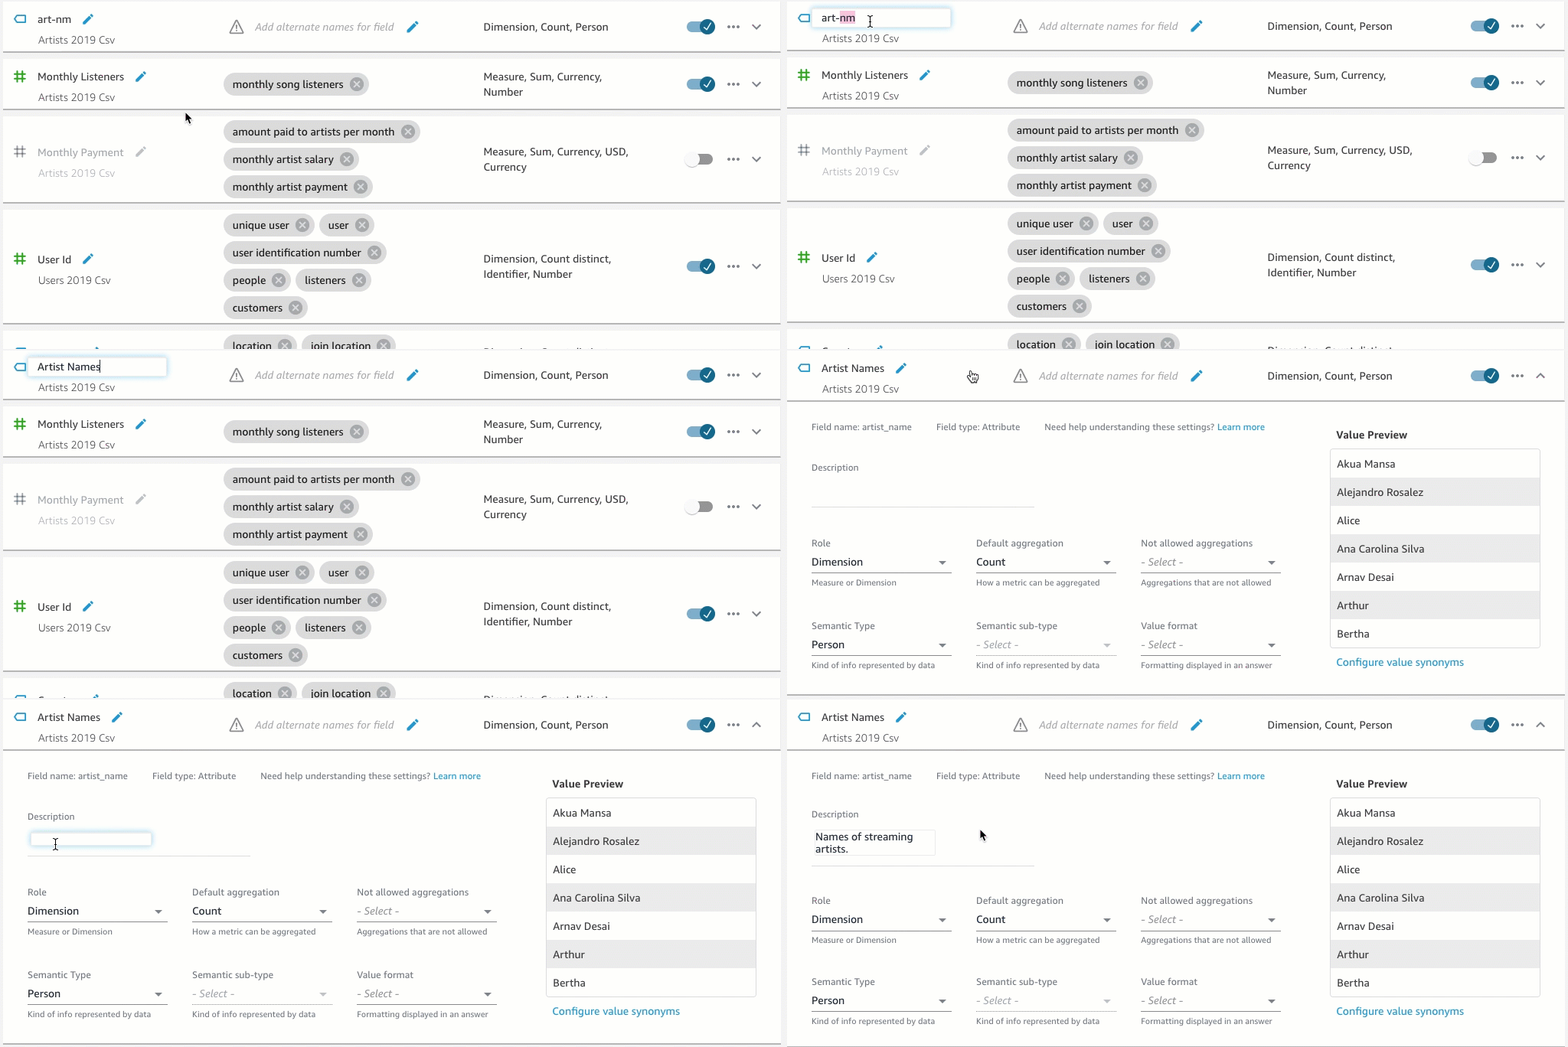
Choose the pencil icon next to the field name at left, and then enter a friendly name.
-
For Description, enter a description of the field.
Step 5: Add synonyms to fields and field values
Even if you update your field names to be user-friendly and provide a description
for them, your readers might still use different names to refer to them. For
example, a Sales field might be referred to as revenue,
rev, or spending in your reader's
questions.
To help Q make sense of these terms and map them to the correct fields, you can add one or more synonyms to your fields. Doing this improves Q's accuracy.
As with field names, your readers might use different names to refer to specific
values in your fields. For example, if you have a field that contains the values
NW, SE, NE, and SW, you can
add synonyms for those values. You can add Northwest for
NW, Southeast for SE, and so on.
To add synonyms for a field
-
Open the topic that you want to change.
-
In the topic, choose the Data tab.
-
In the Fields section, under Synonyms, choose the pencil icon for the field, enter a word or phrase, and then press Enter on your keyboard. To add another synonym, choose the + icon.

To add synonyms for a value in a field
-
Open the topic that you want to change.
-
In the topic, choose the Data tab.
-
In the Fields section, choose the down arrow at far right to expand information about the field.
-
Under Value Preview at right, choose Configure value synonyms.

-
On the Field Value Synonyms page that opens, choose Add, and then do the following:
-
For Value, choose the value that you want to add synonyms to.
-
For Synonyms, enter one or more synonyms for the value.
-
-
Choose Save.
-
To add synonyms for another value, repeat steps 5–6.
-
When you finish, choose Done.
Step 6: Tell Q more about your fields
To help Q interpret how to use your data to answer readers' questions, you can tell Q more about the fields in your datasets.
You can tell Q whether a field in your dataset is a dimension or a measure and specify how that field should be aggregated. You can also clarify how the values in a field should be formatted, and what type of data is in the field. Configuring these additional settings helps Q create accurate answers for your readers when they ask a question.
Use the following procedures to tell Q more about your fields.
Assign field roles
Every field in your dataset is either a dimension or a measure. Dimensions are categorical data, and measures are quantitative data. Knowing whether a field is a dimension or a measure determines what operations Q can and can't perform on a field.
For example, setting the fields Patient ID, Employee
ID, and Ratings helps Q interpret those fields as
integers. This setting means that Q doesn't try to aggregate them as it
does measures.
To set a field role
-
Open the topic that you want to change.
-
In the topic, choose the Data tab.
-
In the Fields section, choose the down arrow at far right to expand information about the field.
-
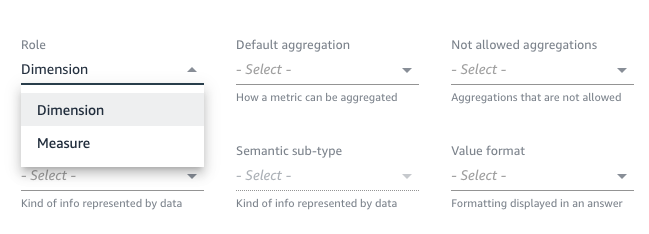
For Role, choose a role.
You can choose a measure or a dimension.
-
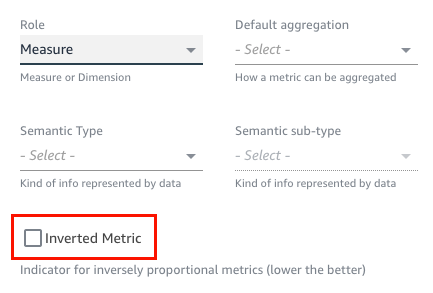
(Optional) If your measure is inversely proportional (for example, the lower the number, the better), choose Inverted measure.
This tells Q how to interpret and display the values in this field.
Set field aggregations
Setting field aggregations tells Q which function should or shouldn't be used when those fields are aggregated across multiple rows. You can set a default aggregation for a field, and a not allowed aggregation.
A default aggregation is the aggregation that's
applied when there's no explicit aggregation function mentioned or
identified in a reader's question. For example, let's say one of your
readers asks Q, "How many products were sold yesterday?" In this case, Q uses
the field Product ID, which has a default aggregation of
count distinct, to answer the question. Doing this results in a
visual showing the distinct count of Product ID.
Not allowed aggregations are aggregations that are
excluded from being used on a field to answer a question. They're excluded
even if the question specifically asks for a not allowed aggregation. For
example, let's say you specify that the Product ID field should
never be aggregated by sum. Even if one of your readers asks, "How
many total products were sold yesterday?" Q doesn't use sum to
answer the question.
If Q is incorrectly applying aggregate functions on a field, we recommend that you set not allowed aggregations for the field.
To set field aggregations
-
Open the topic that you want to change.
-
In the topic, choose the Data tab.
-
In the Fields section, choose the down arrow at far right to expand information about the field.
-
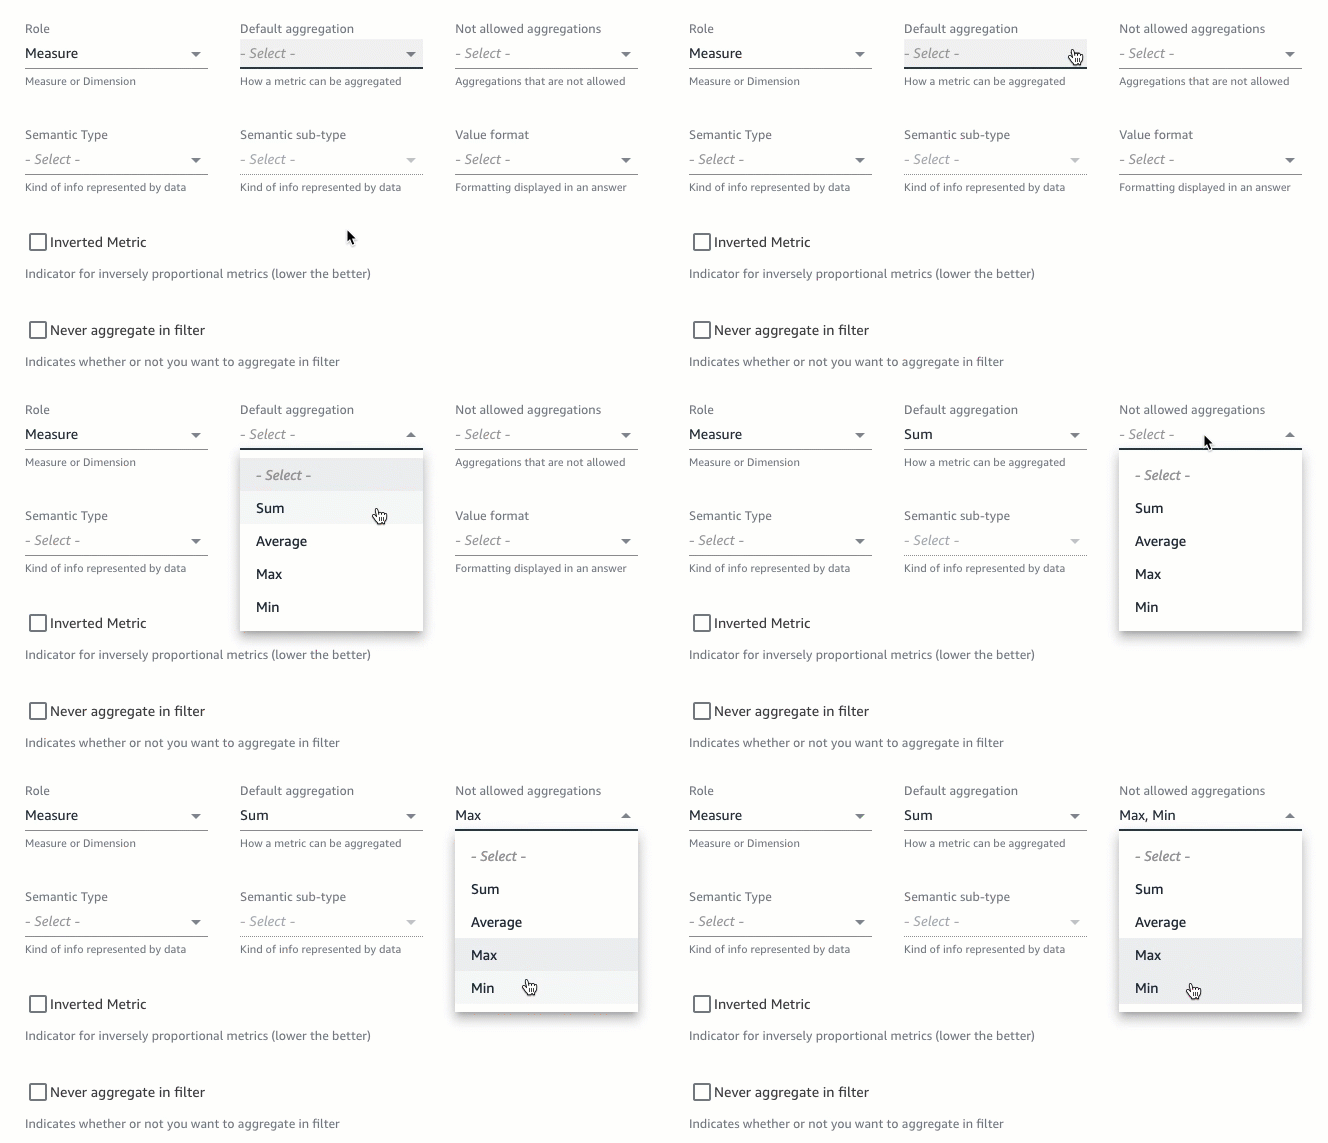
For Default aggregation, choose the aggregation that you want Q to aggregate the field by default.
You can aggregate measures by sum, average, max, and min. You can aggregate dimensions by count and count distinct.
-
(Optional) For Not allowed aggregations, choose an aggregation that you don't want Q to use.
-
(Optional) If you don't want Q to aggregate the field in a filter, choose Never aggregate in a filter.
Specify how to format field values
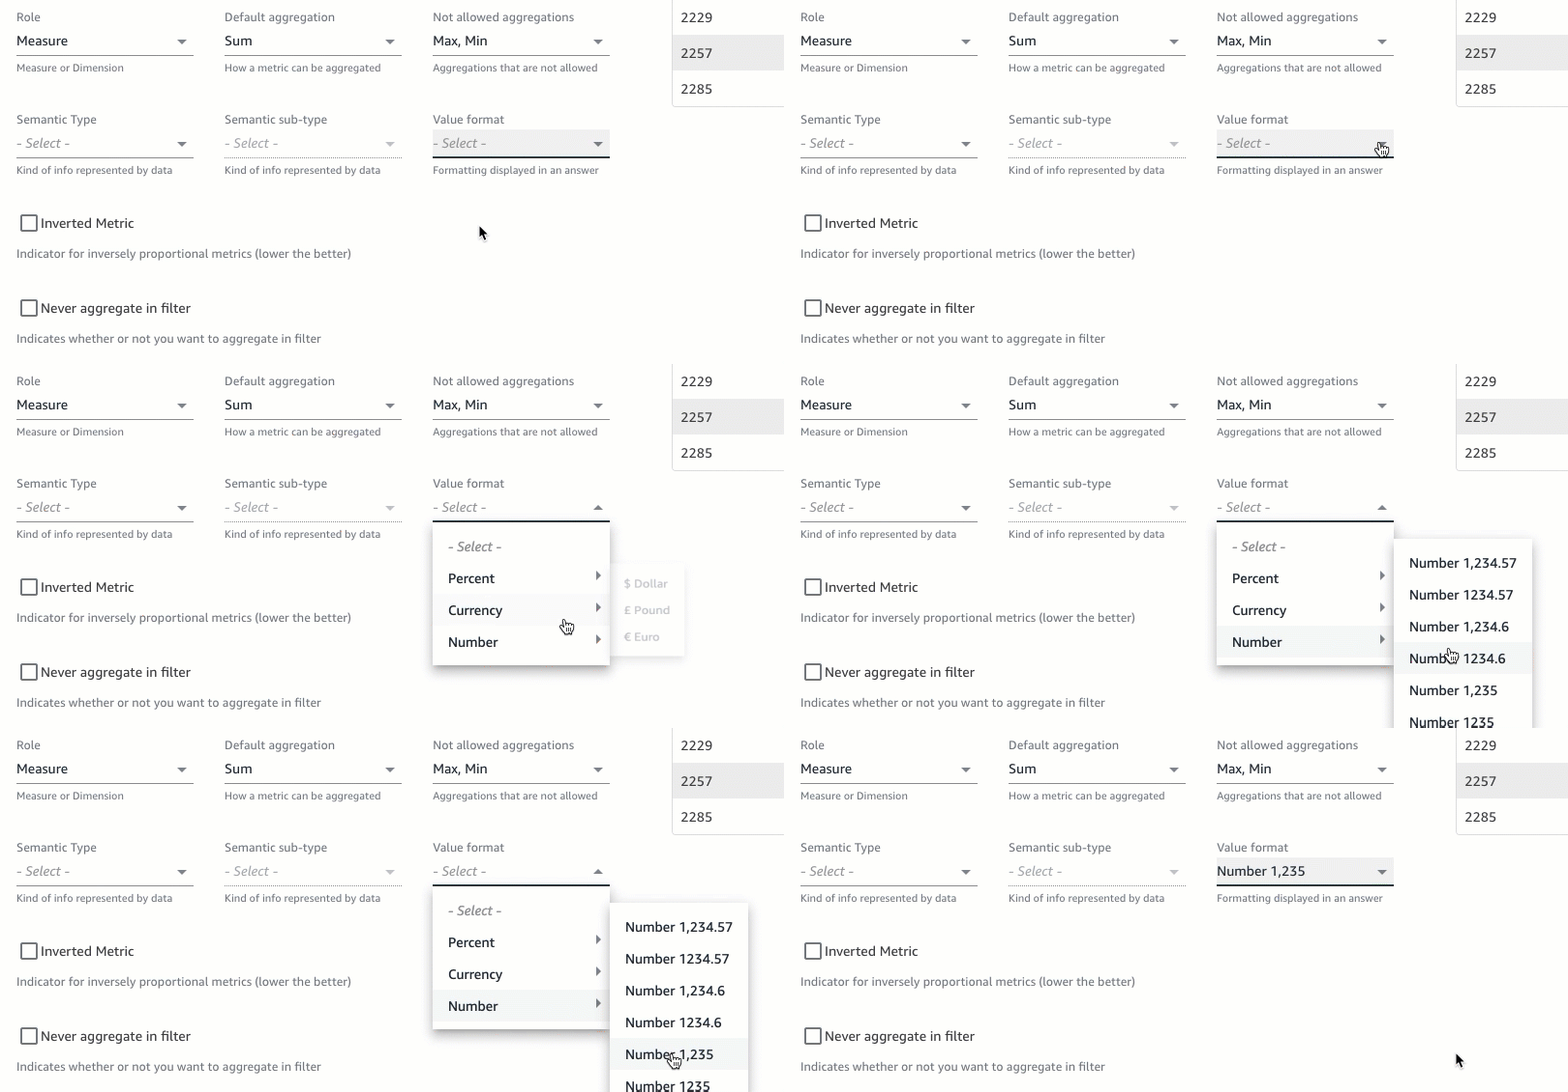
If you want to tell Q how to format the values in your fields, you can do so.
For example, suppose that you have the field Order Sales Amount,
which contains values that you want to format as U.S. dollars. In this case, you
can tell Q to format the values in the field as U.S. currency when using it in
answers.
To specify how to format field values
-
Open the topic that you want to change.
-
In the topic, choose the Data tab.
-
In the Fields section, choose the down arrow at far right to expand information about the field.
-
For Value format, choose how you want to format the values in the field.
Specify field semantic types
A field semantic type is the type of information represented by the data in a field. For example, you might have a field that contains location data, currency data, age data, or Boolean data. You can specify a semantic type and additional semantic subtype for fields. Specifying these helps Q understand the meaning of the data stored in your fields.
Use the following procedure to specify field semantic types and subtypes.
To specify field semantic types
-
Open the topic that you want to change.
-
In the topic, choose the Data tab.
-
In the Fields section, choose the down arrow at far right to expand information about the field.
-
For Semantic type, choose the kind of information the data represents.
For measures, you can select duration, date part, location, boolean, currency, percentage, age, distance, and identifier types. For dimensions, you can select date part, location, Boolean, person, organization, and identifier types.
-
For Semantic sub-type, choose an option to further specify the kind of information the data represents.
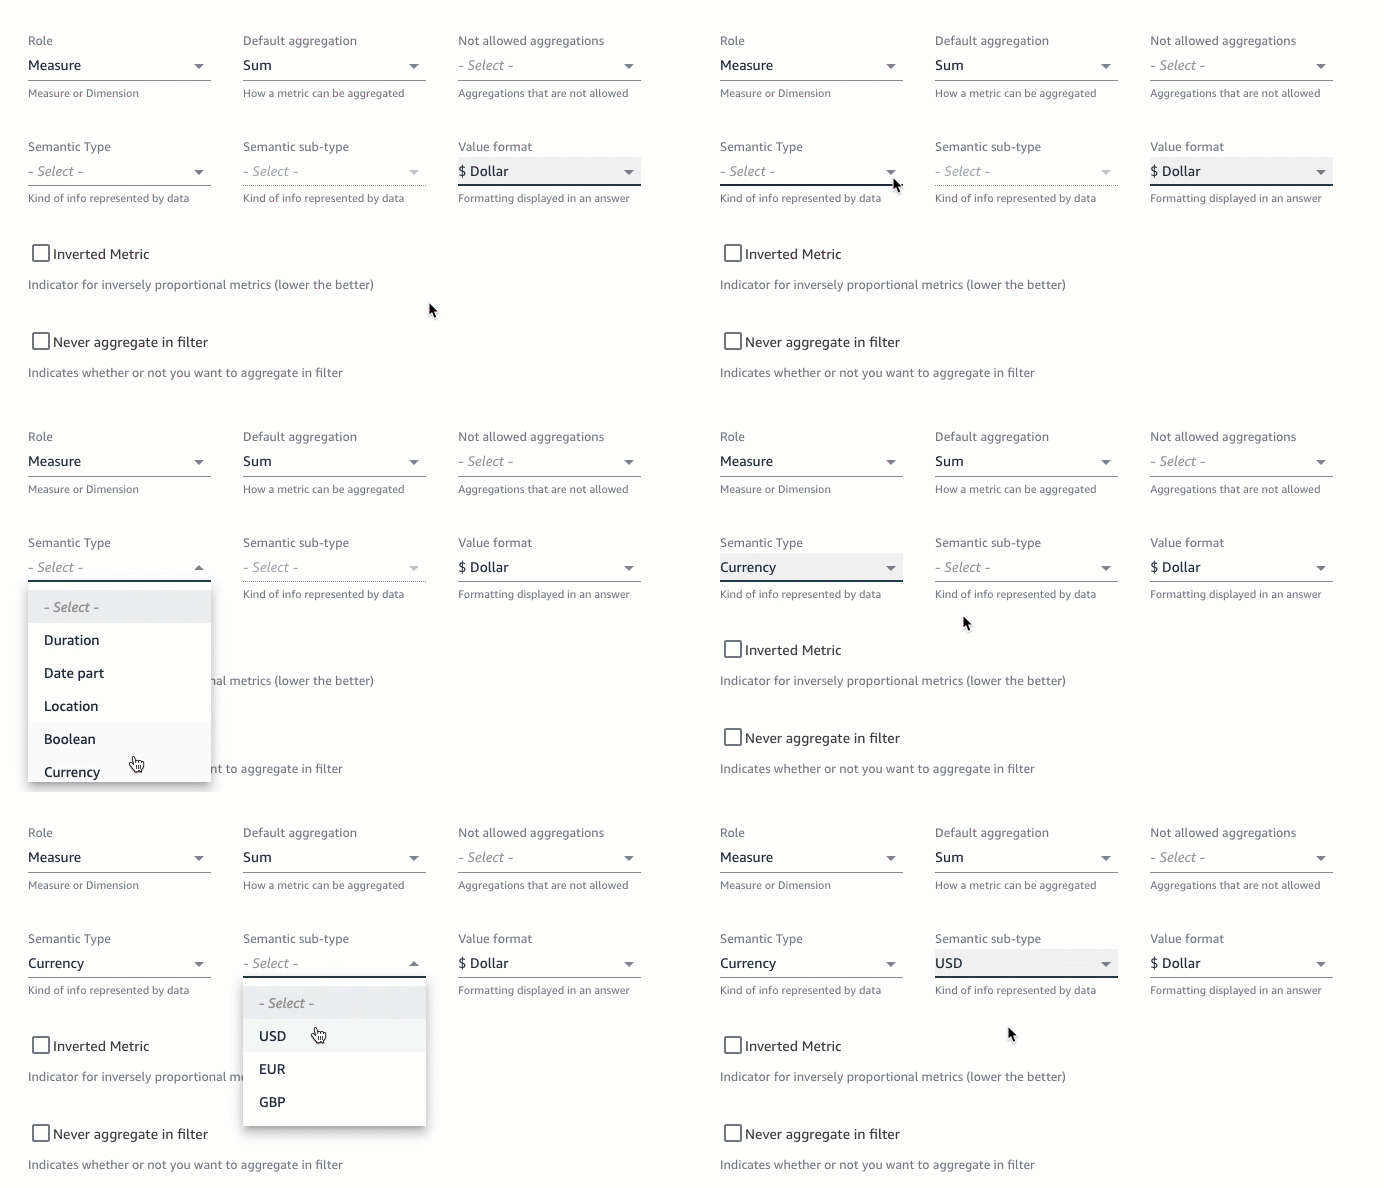
The options here depend on the semantic type that you chose and the role associated with the field. For a list of semantic types and their associated subtypes for measures and dimensions, see the following table.
| Semantic Type | Semantic Subtype | Available for the Following |
|---|---|---|
|
Age |
Measures | |
|
Boolean |
Dimensions and measures | |
|
Currency |
USD EUR GBP |
Measures |
|
Date part |
Day Week Month Year Quarter |
Dimensions and measures |
|
Distance |
Kilometer Meter Yard Foot |
Measures |
|
Duration |
Second Minute Hour Day |
Measures |
|
Identifier |
Dimensions and measures | |
|
Location |
Zip code Country State City |
Dimensions and measures |
|
Organization |
Dimensions | |
|
Percentage |
Measures | |
|
Person |
Dimensions |