Configuring the VPC connection in the QuickSight console
To create a secure private connection to the Amazon VPC service from the Amazon QuickSight console, use the following procedure.
Prerequisites
-
Sign in to QuickSight as a QuickSight admin to set up a VPC connection in QuickSight. To verify that you're a QuickSight administrator, choose your profile icon in the upper-right. If your profile menu contains the option Manage QuickSight, then you're a QuickSight administrator. Make sure your admin role in IAM includes the following permissions. The
"iam:PassRole"permission needs to be applied only to the execution role that is created in the procedures below.-
"quicksight:ListVPCConnections" -
"quicksight:CreateVPCConnection" -
"quicksight:DescribeVPCConnection" -
"quicksight:DeleteVPCConnection" -
"quicksight:UpdateVPCConnection" -
"ec2:describeSubnets" -
"ec2:describeVpcs" -
"ec2:describeSecurityGroups" -
"iam:ListRoles" -
"iam:PassRole"The following example shows an IAM policy that applies
"iam:PassRole"only to the execution role.
-
-
Before you begin, make sure that you have the following information available to copy and paste into the VPC Connection screen. For more information, see Finding information to connect to a VPC.
-
AWS Region – The AWS Region where you plan to create a connection to your data source.
-
VPC ID – The ID of the VPC that contains the data, the subnets, and the security groups that you plan to use.
-
Execution role– An IAM role that contains a trust policy that allows QuickSight to create, update, and delete network infrastructure in your account. This policy is required for all VPC connections. At minimum, the IAM policy needs the following Amazon EC2 permissions:
-
DescribeSecurityGroups -
DescribeSubnets -
CreateNetworkInterface -
DeleteNetworkInterface -
ModifyNetworkInterfaceAttribute
The following example shows an IAM policy that you can add to an existing IAM role to create, delete, or modify a VPC connection:
After you add the necessary permissions to an IAM role, attach a trust policy to allow QuickSight to configure the VPC connection to your account. The following example shows a trust policy that you can add to an existing IAM role to allow QuickSight access to the role:
-
-
Subnet IDs – The IDs of the subnets that the QuickSight network interface is using. Each VPC connection needs at least two subnets.
-
Security group IDs – The IDs of the security groups. Each VPC connection needs at least one security group.
-
To create a secure private connection to the Amazon VPC service from Amazon QuickSight Enterprise edition
-
In QuickSight, choose your profile icon in the upper-right, then choose Manage QuickSight.
Only QuickSight administrators can view the Manage QuickSight option. If you don't see this option on your profile menu, you're not an administrator. In this case, contact your QuickSight account administrators for assistance.
-
In the left navigation pane, choose Manage VPC connections.
-
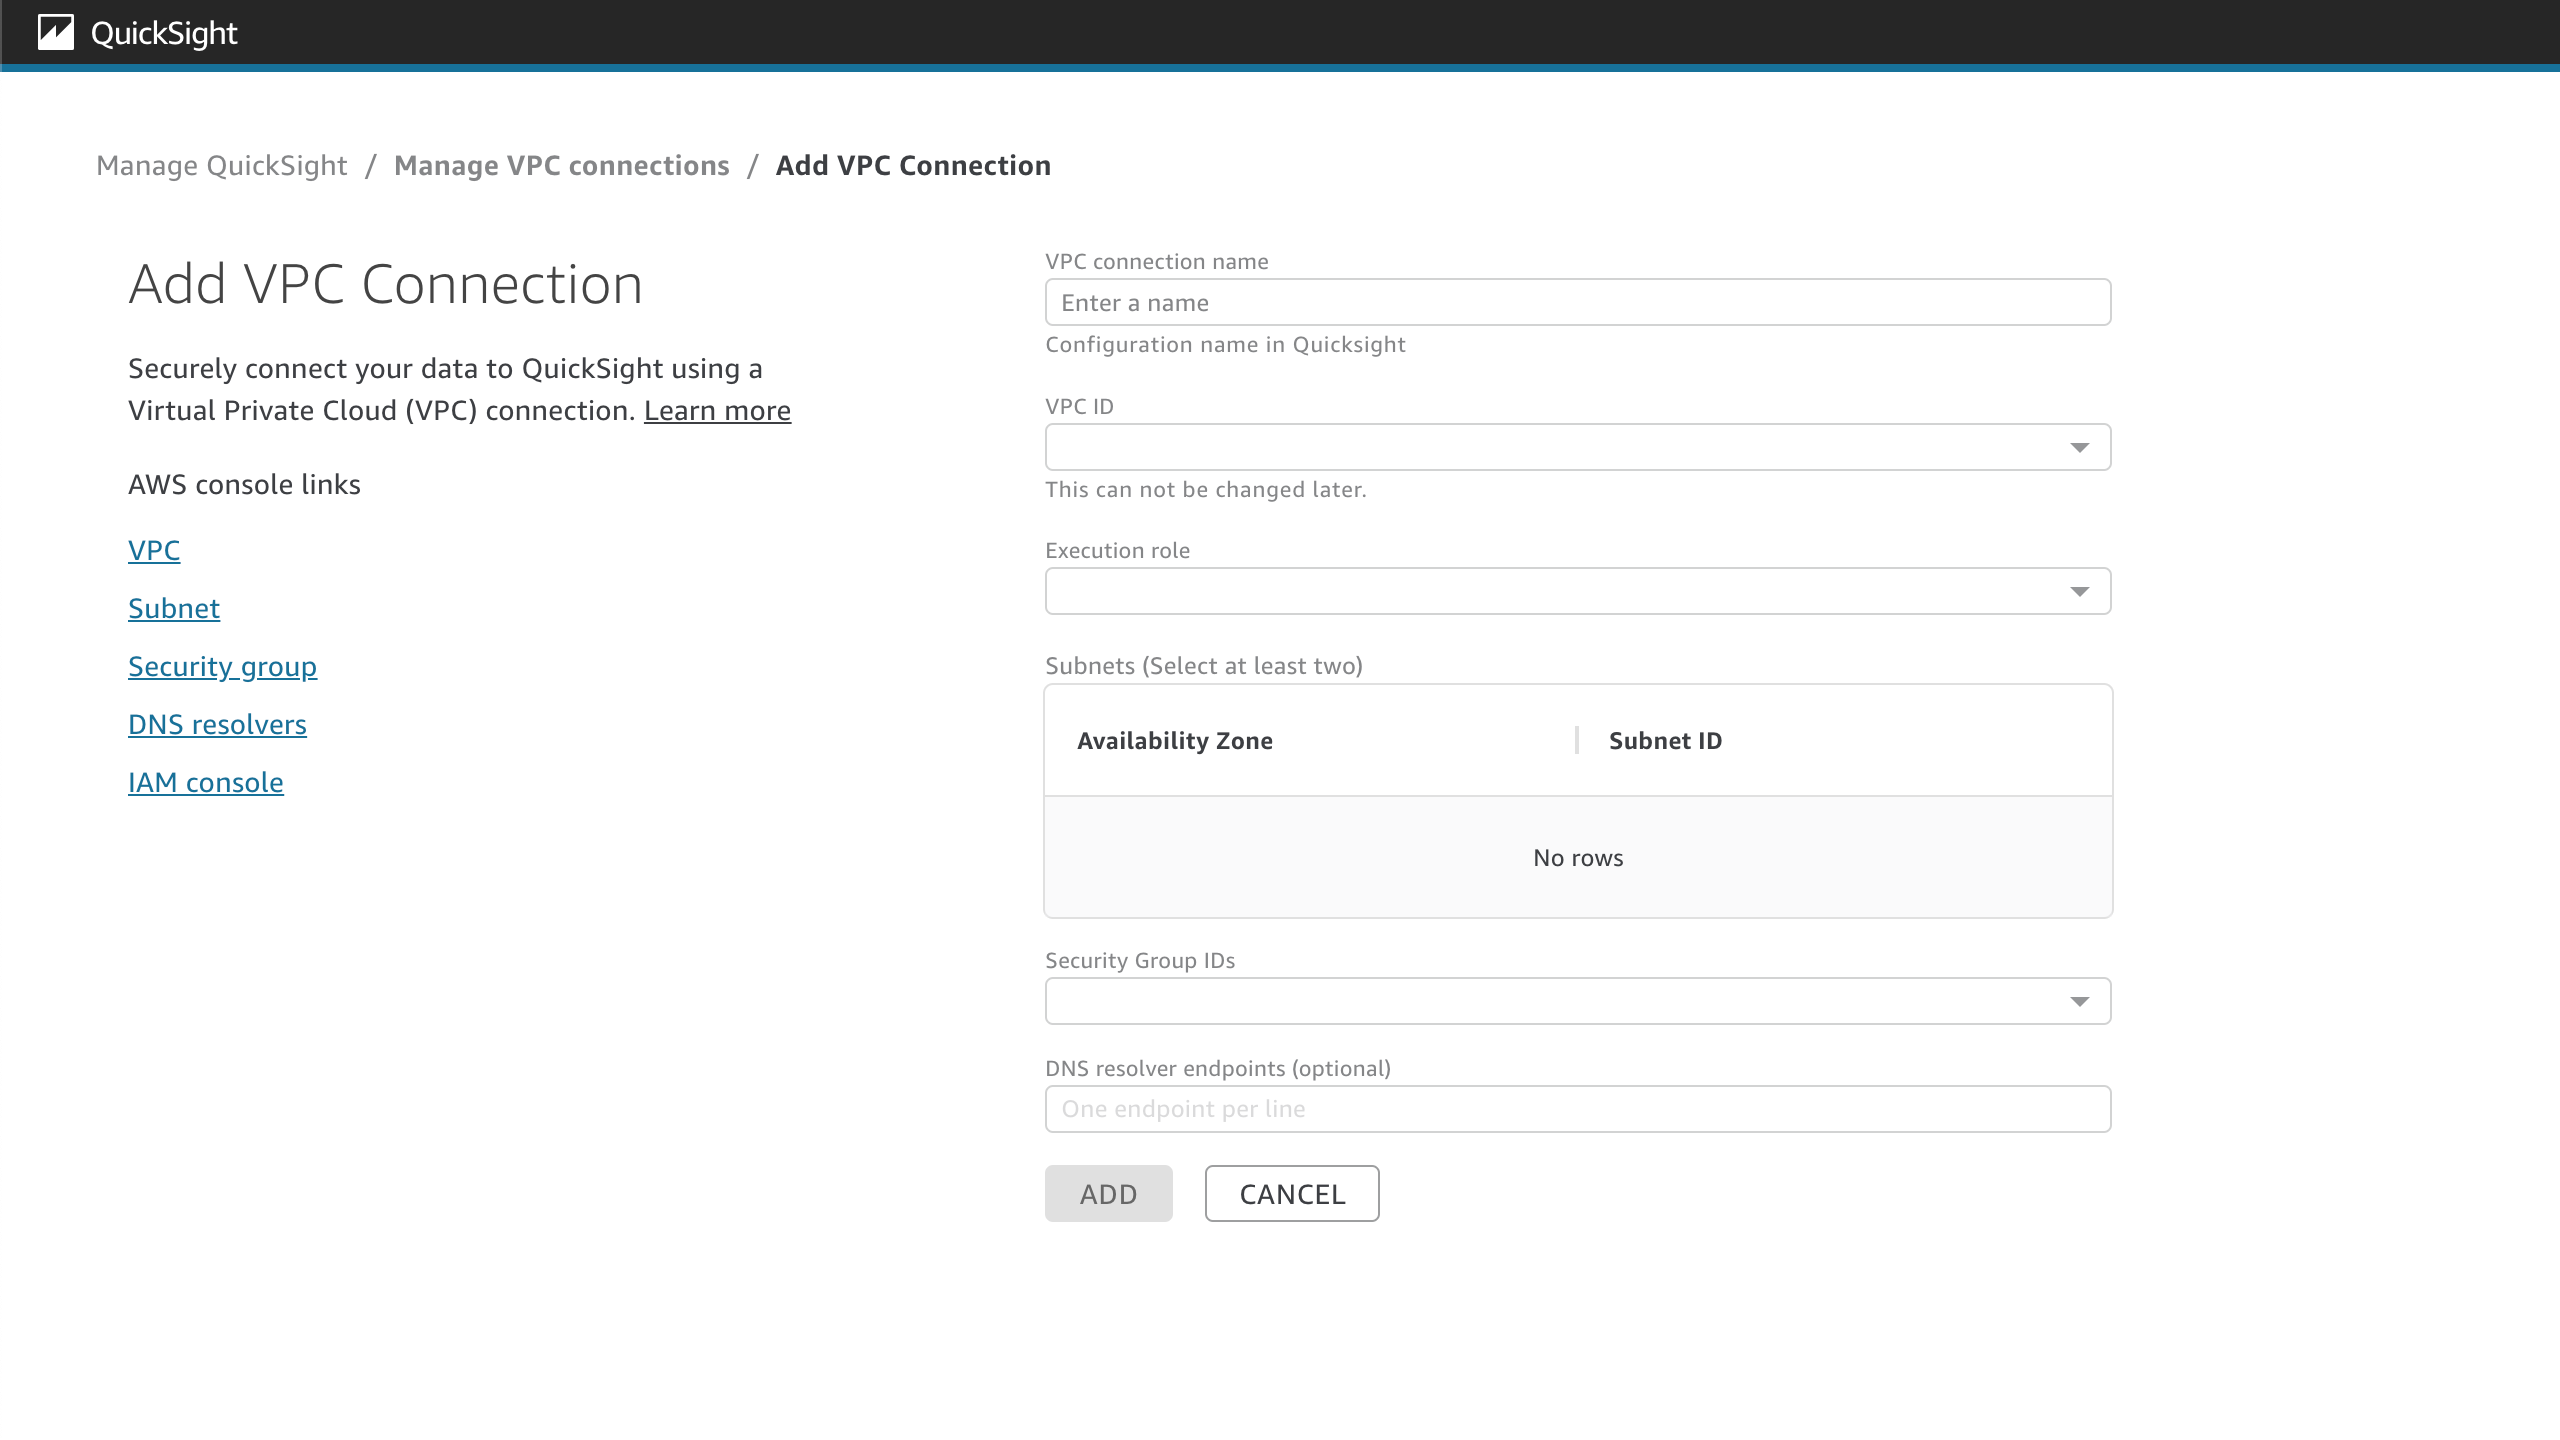
On the Manage VPC connections page that opens, choose Add VPC connection.

-
For VPC connection name, enter a unique descriptive name of your choice. This name doesn't need to be an actual VPC ID or name.
-
In the VPC ID dropdown menu, choose the ID of the VPC in Amazon EC2 that you want to connect to your QuickSight account. This field can't be changed later.
-
In the Execution role dropdown menu, choose the appropriate IAM role to use for the VPC connection. The Execution role dropdown only shows IAM policies that contain a trust policy that allows QuickSight to configure the VPC connection to your account.
-
In the Subnets table, choose a subnet ID from the Subnet ID dropdown menu of at least two of the listed Availability zones. The Availability Zones listed in the Subnets table are determined based on how you configured the VPC connection in the Amazon EC2 console.
-
(Optional) If you aren't using DNS resolver endpoints, skip to the next step.
If your database host IP address must be resolved through private DNS servers in your AWS account, enter IP addresses for Route 53 Resolver inbound endpoints (one per line).
Make sure that you are entering an endpoint, rather than a database address like the one you plan to use in QuickSight. Most databases that are hosted by AWS don't need to resolve DNS queries between VPCs and a customer's network. For more information, see Resolving DNS queries between VPCs and your network in the Amazon Route 53 Developer Guide. You only need this endpoint if you can't resolve the IP address that connects to your database by using the public DNS server system.
-
Review your choices, then choose ADD.

When you finish creating a VPC connection, the new connection appears in the Manage VPC connections table. In some cases, the status of the new VPC might be UNAVAILABLE until the connection is configured on the backend. After QuickSight is finished configuring the new connection, the status of the connection switches to AVAILABLE, which indicates that the connection has been established. The following table describes the different Status values for a VPC connection.
| Status | Description |
|---|---|
|
AVAILABLE |
The VPC connection is established and can be used. |
|
PARTIALLY AVAILABLE |
One of the network interfaces that is configured to the VPC connection is unavailable. The VPC connection can still be used. |
|
UNAVAILABLE |
The VPC connection is not established and can't be used. |
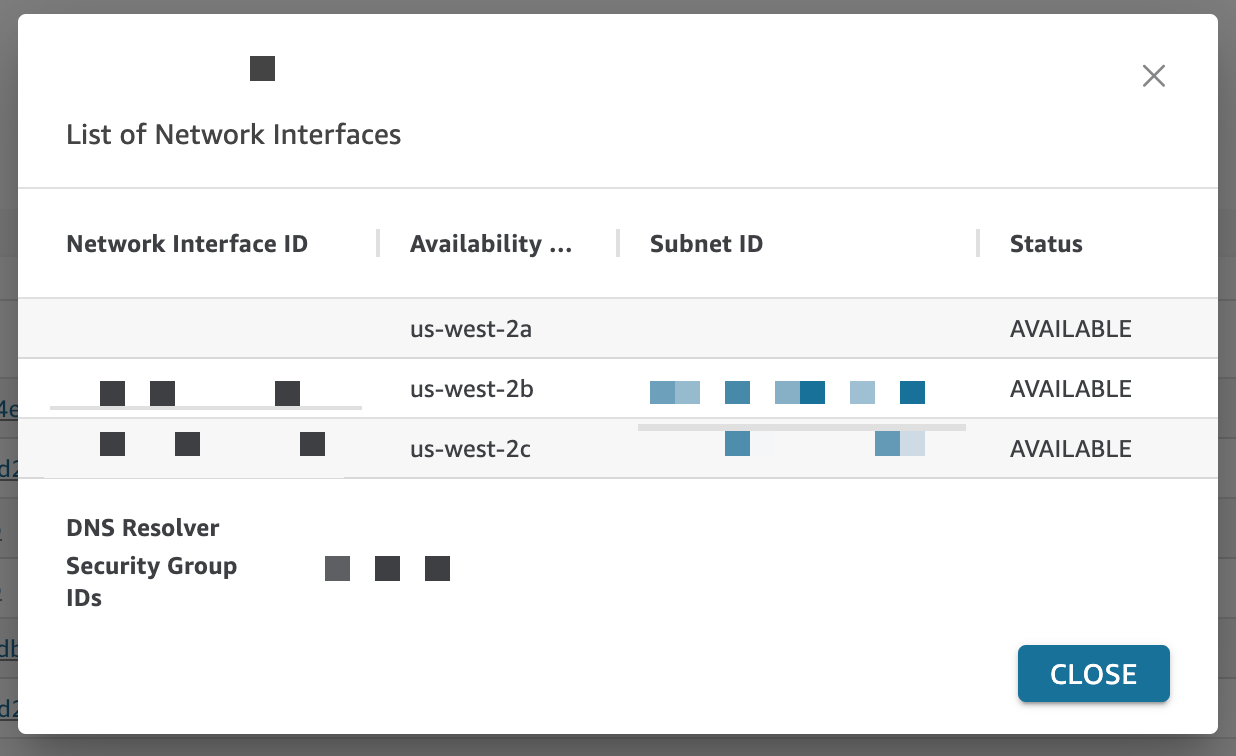
To see a summary of a VPC connection, choose a VPC connection from the VPC connection name row of the Manage VPC connections table. The pop-up box that appears shows information about the network interfaces associated with the VPC connection.

The following table describes the different Status values for a network interface.
| Status | Description |
|---|---|
|
CREATING |
The network interface creation is in progress. |
|
AVAILABLE |
The network interface is available for use. |
|
CREATION_FAILURE |
The network interface couldn't be created. |
|
UPDATING |
The security group associated with the network inferface is updating. |
|
UPDATE_FAILED |
The security group associated with the network interface did not update successfully. |
|
DELETING |
The network interface is in the process of being deleted. |
|
DELETED |
The network interface is deleted and can no longer be used. |
|
DELETION_FAILED |
The network interface deletion failed and can still be used. |
|
DELETION_SCHEDULED |
This network interface is scheduled for deletion. |
|
ATTACHMENT_FAILED_ROLLBACK_FAILED |
The elastic interface failed to attach and QuickSight was unable to delete the elastic network interface that was created within your account. |
When you delete a network interface from a VPC connection, the status of the connection changes to PARTIALLY AVAILABLE to indicate the loss of a network interface.
To make changes to an existing VPC connection, choose the more actions (three-dots) button to the right of the connection that you want to modify, and choose Edit. In the Edit VPC connection window that appears, make your changes, and then choose SAVE.
To delete a VPC connection, choose the more actions (three-dots) button to the right of the connection that you want to delete and choose Delete. In the Delete QuickSight VPC Connection pop-up that appears, confirm that you want to delete the connection, and then choose Delete.
