Run a custom load test
Amazon SageMaker Inference Recommender load tests conduct extensive benchmarks based on production requirements for latency and throughput, custom traffic patterns, and either serverless endpoints or real-time instances (up to 10) that you select.
The following sections demonstrate how to create, describe, and stop a load test programmatically using the AWS SDK for Python (Boto3) and the AWS CLI, or interactively using Amazon SageMaker Studio Classic or the SageMaker AI console.
Create a load test job
Create a load test programmatically using the AWS SDK for Python (Boto3), with the AWS CLI, or interactively using Studio Classic or the SageMaker AI console. As with Inference Recommender inference recommendations, specify a job name for your load test, an AWS IAM role ARN, an input configuration, and your model package ARN from when you registered your model with the model registry. Load tests require that you also specify a traffic pattern and stopping conditions.
- AWS SDK for Python (Boto3)
-
Use the
CreateInferenceRecommendationsJobAPI to create an Inference Recommender load test. SpecifyAdvancedfor theJobTypefield and provide:-
A job name for your load test (
JobName). The job name must be unique within your AWS Region and within your AWS account. -
The Amazon Resource Name (ARN) of an IAM role that enables Inference Recommender to perform tasks on your behalf. Define this for the
RoleArnfield. -
An endpoint configuration dictionary (
InputConfig) where you specify the following:-
For
TrafficPattern, specify either the phases or stairs traffic pattern. With the phases traffic pattern, new users spawn every minute at the rate you specify. With the stairs traffic pattern, new users spawn at timed intervals (or steps) at a rate you specify. Choose one of the following:-
For
TrafficType, specifyPHASES. Then, for thePhasesarray, specify theInitialNumberOfUsers(how many concurrent users to start with, with a minimum of 1 and a maximum of 3),SpawnRate(the number of users to be spawned in a minute for a specific phase of load testing, with a minimum of 0 and maximum of 3), andDurationInSeconds(how long the traffic phase should be, with a minimum of 120 and maximum of 3600). -
For
TrafficType, specifySTAIRS. Then, for theStairsarray, specify theDurationInSeconds(how long the traffic phase should be, with a minimum of 120 and maximum of 3600),NumberOfSteps(how many intervals are used during the phase), andUsersPerStep(how many users are added during each interval). Note that the length of each step is the value ofDurationInSeconds / NumberOfSteps. For example, if yourDurationInSecondsis600and you specify5steps, then each step is 120 seconds long.Note
A user is defined as a system-generated actor that runs in a loop and invokes requests to an endpoint as part of Inference Recommender. For a typical XGBoost container running on an
ml.c5.largeinstance, endpoints can reach 30,000 invocations per minute (500 tps) with just 15-20 users.
-
-
For
ResourceLimit, specifyMaxNumberOfTests(the maximum number of benchmarking load tests for an Inference Recommender job, with a minimum of 1 and a maximum of 10) andMaxParallelOfTests(the maximum number of parallel benchmarking load tests for an Inference Recommender job, with a minimum of 1 and a maximum of 10). -
For
EndpointConfigurations, you can specify one of the following:-
The
InstanceTypefield, where you specify the instance type on which you want to run your load tests. -
The
ServerlessConfig, in which you specify your ideal values forMaxConcurrencyandMemorySizeInMBfor a serverless endpoint. For more information, see the Serverless Inference documentation.
-
-
-
A stopping conditions dictionary (
StoppingConditions), where if any of the conditions are met, the Inference Recommender job stops. For this example, specify the following fields in the dictionary:-
For
MaxInvocations, specify the maximum number of requests per minute expected for the endpoint, with a minimum of 1 and a maximum of 30,000. -
For
ModelLatencyThresholds, specifyPercentile(the model latency percentile threshold) andValueInMilliseconds(the model latency percentile value in milliseconds). -
(Optional) For
FlatInvocations, you can specify whether to continue the load test when the TPS (invocations per minute) rate flattens. A flattened TPS rate usually means that the endpoint has reached capacity. However, you might want to continue monitoring the endpoint under full capacity conditions. To continue the load test when this happens, specify this value asContinue. Otherwise, the default value isStop.
-
# Create a low-level SageMaker service client. import boto3 aws_region=<INSERT>sagemaker_client=boto3.client('sagemaker', region=aws_region) # Provide a name to your recommendation based on load testing load_test_job_name="<INSERT>"# Provide the name of the sagemaker instance type instance_type="<INSERT>"# Provide the IAM Role that gives SageMaker permission to access AWS services role_arn='arn:aws:iam::<account>:role/*' # Provide your model package ARN that was created when you registered your # model with Model Registry model_package_arn='arn:aws:sagemaker:<region>:<account>:role/*' sagemaker_client.create_inference_recommendations_job( JobName=load_test_job_name, JobType="Advanced", RoleArn=role_arn, InputConfig={ 'ModelPackageVersionArn': model_package_arn, "JobDurationInSeconds": 7200, 'TrafficPattern' : { # Replace PHASES with STAIRS to use the stairs traffic pattern 'TrafficType': 'PHASES', 'Phases': [ { 'InitialNumberOfUsers': 1, 'SpawnRate': 1, 'DurationInSeconds': 120 }, { 'InitialNumberOfUsers': 1, 'SpawnRate': 1, 'DurationInSeconds': 120 } ] # Uncomment this section and comment out the Phases object above to use the stairs traffic pattern # 'Stairs' : { # 'DurationInSeconds': 240, # 'NumberOfSteps': 2, # 'UsersPerStep': 2 # } }, 'ResourceLimit': { 'MaxNumberOfTests': 10, 'MaxParallelOfTests': 3 }, "EndpointConfigurations" : [{ 'InstanceType': 'ml.c5.xlarge' }, { 'InstanceType': 'ml.m5.xlarge' }, { 'InstanceType': 'ml.r5.xlarge' }] # Uncomment the ServerlessConfig and comment out the InstanceType field if you want recommendations for a serverless endpoint # "ServerlessConfig": { # "MaxConcurrency":value, # "MemorySizeInMB":value# } }, StoppingConditions={ 'MaxInvocations': 1000, 'ModelLatencyThresholds':[{ 'Percentile': 'P95', 'ValueInMilliseconds': 100 }], # Change 'Stop' to 'Continue' to let the load test continue if invocations flatten 'FlatInvocations': 'Stop' } )See the Amazon SageMaker API Reference Guide for a full list of optional and required arguments you can pass to
CreateInferenceRecommendationsJob. -
- AWS CLI
-
Use the
create-inference-recommendations-jobAPI to create an Inference Recommender load test. SpecifyAdvancedfor theJobTypefield and provide:-
A job name for your load test (
job-name). The job name must be unique within your AWS Region and within your AWS account. -
The Amazon Resource Name (ARN) of an IAM role that enables Inference Recommender to perform tasks on your behalf. Define this for the
role-arnfield. -
An endpoint configuration dictionary (
input-config) where you specify the following:-
For
TrafficPattern, specify either the phases or stairs traffic pattern. With the phases traffic pattern, new users spawn every minute at the rate you specify. With the stairs traffic pattern, new users spawn at timed intervals (or steps) at a rate you specify. Choose one of the following:-
For
TrafficType, specifyPHASES. Then, for thePhasesarray, specify theInitialNumberOfUsers(how many concurrent users to start with, with a minimum of 1 and a maximum of 3),SpawnRate(the number of users to be spawned in a minute for a specific phase of load testing, with a minimum of 0 and maximum of 3), andDurationInSeconds(how long the traffic phase should be, with a minimum of 120 and maximum of 3600). -
For
TrafficType, specifySTAIRS. Then, for theStairsarray, specify theDurationInSeconds(how long the traffic phase should be, with a minimum of 120 and maximum of 3600),NumberOfSteps(how many intervals are used during the phase), andUsersPerStep(how many users are added during each interval). Note that the length of each step is the value ofDurationInSeconds / NumberOfSteps. For example, if yourDurationInSecondsis600and you specify5steps, then each step is 120 seconds long.Note
A user is defined as a system-generated actor that runs in a loop and invokes requests to an endpoint as part of Inference Recommender. For a typical XGBoost container running on an
ml.c5.largeinstance, endpoints can reach 30,000 invocations per minute (500 tps) with just 15-20 users.
-
-
For
ResourceLimit, specifyMaxNumberOfTests(the maximum number of benchmarking load tests for an Inference Recommender job, with a minimum of 1 and a maximum of 10) andMaxParallelOfTests(the maximum number of parallel benchmarking load tests for an Inference Recommender job, with a minimum of 1 and a maximum of 10). -
For
EndpointConfigurations, you can specify one of the following:-
The
InstanceTypefield, where you specify the instance type on which you want to run your load tests. -
The
ServerlessConfig, in which you specify your ideal values forMaxConcurrencyandMemorySizeInMBfor a serverless endpoint.
-
-
-
A stopping conditions dictionary (
stopping-conditions), where if any of the conditions are met, the Inference Recommender job stops. For this example, specify the following fields in the dictionary:-
For
MaxInvocations, specify the maximum number of requests per minute expected for the endpoint, with a minimum of 1 and a maximum of 30,000. -
For
ModelLatencyThresholds, specifyPercentile(the model latency percentile threshold) andValueInMilliseconds(the model latency percentile value in milliseconds). -
(Optional) For
FlatInvocations, you can specify whether to continue the load test when the TPS (invocations per minute) rate flattens. A flattened TPS rate usually means that the endpoint has reached capacity. However, you might want to continue monitoring the endpoint under full capacity conditions. To continue the load test when this happens, specify this value asContinue. Otherwise, the default value isStop.
-
aws sagemaker create-inference-recommendations-job\ --region<region>\ --job-name<job-name>\ --job-type ADVANCED\ --role-arn arn:aws:iam::<account>:role/*\ --input-config \"{ \"ModelPackageVersionArn\": \"arn:aws:sagemaker:<region>:<account>:role/*\", \"JobDurationInSeconds\": 7200, \"TrafficPattern\" : { # Replace PHASES with STAIRS to use the stairs traffic pattern \"TrafficType\": \"PHASES\", \"Phases\": [ { \"InitialNumberOfUsers\": 1, \"SpawnRate\": 60, \"DurationInSeconds\": 300 } ] # Uncomment this section and comment out the Phases object above to use the stairs traffic pattern # 'Stairs' : { # 'DurationInSeconds': 240, # 'NumberOfSteps': 2, # 'UsersPerStep': 2 # } }, \"ResourceLimit\": { \"MaxNumberOfTests\": 10, \"MaxParallelOfTests\": 3 }, \"EndpointConfigurations\" : [ { \"InstanceType\": \"ml.c5.xlarge\" }, { \"InstanceType\": \"ml.m5.xlarge\" }, { \"InstanceType\": \"ml.r5.xlarge\" } # Use the ServerlessConfig and leave out the InstanceType fields if you want recommendations for a serverless endpoint # \"ServerlessConfig\": { # \"MaxConcurrency\":value, # \"MemorySizeInMB\":value# } ] }\" --stopping-conditions \"{ \"MaxInvocations\": 1000, \"ModelLatencyThresholds\":[ { \"Percentile\": \"P95\", \"ValueInMilliseconds\": 100 } ], # Change 'Stop' to 'Continue' to let the load test continue if invocations flatten \"FlatInvocations\": \"Stop\" }\" -
- Amazon SageMaker Studio Classic
-
Create a load test with Studio Classic.
-
In your Studio Classic application, choose the home icon (
 ).
). -
In the left sidebar of Studio Classic, choose Deployments.
-
Choose Inference recommender from the dropdown list.
-
Choose Create inference recommender job. A new tab titled Create inference recommender job opens.
-
Select the name of your model group from the dropdown Model group field. The list includes all the model groups registered with the model registry in your account, including models registered outside of Studio Classic.
-
Select a model version from the dropdown Model version field.
-
Choose Continue.
-
Provide a name for the job in the Name field.
-
(Optional) Provide a description of your job in the Description field.
-
Choose an IAM role that grants Inference Recommender permission to access AWS services. You can create a role and attach the
AmazonSageMakerFullAccessIAM managed policy to accomplish this, or you can let Studio Classic create a role for you. -
Choose Stopping Conditions to expand the available input fields. Provide a set of conditions for stopping a deployment recommendation.
-
Specify the maximum number of requests per minute expected for the endpoint in the Max Invocations Per Minute field.
-
Specify the model latency threshold in microseconds in the Model Latency Threshold field. The Model Latency Threshold depicts the interval of time taken by a model to respond as viewed from Inference Recommender. The interval includes the local communication time taken to send the request and to fetch the response from the model container and the time taken to complete the inference in the container.
-
-
Choose Traffic Pattern to expand the available input fields.
-
Set the initial number of virtual users by specifying an integer in the Initial Number of Users field.
-
Provide an integer number for the Spawn Rate field. The spawn rate sets the number of users created per second.
-
Set the duration for the phase in seconds by specifying an integer in the Duration field.
-
(Optional) Add additional traffic patterns. To do so, choose Add.
-
-
Choose the Additional setting to reveal the Max test duration field. Specify, in seconds, the maximum time a test can take during a job. New jobs are not scheduled after the defined duration. This helps ensure jobs that are in progress are not stopped and that you only view completed jobs.
-
Choose Continue.
-
Choose Selected Instances.
-
In the Instances for benchmarking field, choose Add instances to test. Select up to 10 instances for Inference Recommender to use for load testing.
-
Choose Additional settings.
-
Provide an integer that sets an upper limit on the number of tests a job can make for the Max number of tests field. Note that each endpoint configuration results in a new load test.
-
Provide an integer for the Max parallel test field. This setting defines an upper limit on the number of load tests that can run in parallel.
-
-
Choose Submit.
The load test can take up to 2 hours.
Warning
Do not close this tab. If you close this tab, you cancel the Inference Recommender load test job.
-
- SageMaker AI console
-
Create a custom load test through the SageMaker AI console by doing the following:
-
Go to the SageMaker AI console at https://console.aws.amazon.com/sagemaker/
. -
In the left navigation pane, choose Inference, and then choose Inference recommender.
-
On the Inference recommender jobs page, choose Create job.
-
For Step 1: Model configuration, do the following:
-
For Job type, choose Advanced recommender job.
-
If you’re using a model registered in the SageMaker AI model registry, then turn on the Choose a model from the model registry toggle and do the following:
-
For the Model group dropdown list, choose the model group in SageMaker AI model registry where your model is.
-
For the Model version dropdown list, choose the desired version of your model.
-
-
If you’re using a model that you’ve created in SageMaker AI, then turn off the Choose a model from the model registry toggle and do the following:
-
For the Model name field, enter the name of your SageMaker AI model.
-
-
For IAM role, you can select an existing AWS IAM role that has the necessary permissions to create an instance recommendation job. Alternatively, if you don’t have an existing role, you can choose Create a new role to open the role creation pop-up, and SageMaker AI adds the necessary permissions to the new role that you create.
-
For S3 bucket for benchmarking payload, enter the Amazon S3 path to your sample payload archive, which should contain sample payload files that Inference Recommender uses to benchmark your model on different instance types.
-
For Payload content type, enter the MIME types of your sample payload data.
-
For Traffic pattern, configure phases for the load test by doing the following:
-
For Initial number of users, specify how many concurrent users you want to start with (with a minimum of 1 and a maximum of 3).
-
For Spawn rate, specify the number of users to be spawned in a minute for the phase (with a minimum of 0 and a maximum of 3).
-
For Duration (seconds), specify how low the traffic phase should be in seconds (with a minimum of 120 and a maximum of 3600).
-
-
(Optional) If you turned off the Choose a model from the model registry toggle and specified a SageMaker AI model, then for Container configuration, do the following:
-
For the Domain dropdown list, select the machine learning domain of the model, such as computer vision, natural language processing, or machine learning.
-
For the Framework dropdown list, select the framework of your container, such as TensorFlow or XGBoost.
-
For Framework version, enter the framework version of your container image.
-
For the Nearest model name dropdown list, select the pre-trained model that mostly closely matches your own.
-
For the Task dropdown list, select the machine learning task that the model accomplishes, such as image classification or regression.
-
-
(Optional) For Model compilation using SageMaker Neo, you can configure the recommendation job for a model that you’ve compiled using SageMaker Neo. For Data input configuration, enter the correct input data shape for your model in a format similar to
{'input':[1,1024,1024,3]}. -
Choose Next.
-
-
For Step 2: Instances and environment parameters, do the following:
-
For Select instances for benchmarking, select up to 8 instance types that you want to benchmark against.
-
(Optional) For Environment parameter ranges, you can specify environment parameters that help optimize your model. Specify the parameters as Key and Value pairs.
-
Choose Next.
-
-
For Step 3: Job parameters, do the following:
-
(Optional) For the Job name field, enter a name for your instance recommendation job. When you create the job, SageMaker AI appends a timestamp to the end of this name.
-
(Optional) For the Job description field, enter a description for the job.
-
(Optional) For the Encryption key dropdown list, choose an AWS KMS key by name or enter its ARN to encrypt your data.
-
(Optional) For Max number of tests, enter the number of test that you want to run during the recommendation job.
-
(Optional) For Max parallel tests, enter the maximum number of parallel tests that you want to run during the recommendation job.
-
For Max test duration (s), enter the maximum number of seconds you want each test to run for.
-
For Max invocations per minute, enter the maximum number of requests per minute the endpoint can reach before stopping the recommendation job. After reaching this limit, SageMaker AI ends the job.
-
For P99 Model latency threshold (ms), enter the model latency percentile in milliseconds.
-
Choose Next.
-
-
For Step 4: Review job, review your configurations and then choose Submit.
-
Get your load test results
You can programmatically collect metrics across all load tests once the load tests are done with AWS SDK for Python (Boto3), the AWS CLI, Studio Classic, or the SageMaker AI console.
- AWS SDK for Python (Boto3)
-
Collect metrics with the
DescribeInferenceRecommendationsJobAPI. Specify the job name of the load test for theJobNamefield:load_test_response = sagemaker_client.describe_inference_recommendations_job( JobName=load_test_job_name )Print the response object.
load_test_response['Status']This returns a JSON response similar to the following example. Note that this example shows the recommended instance types for real-time inference (for an example showing serverless inference recommendations, see the example after this one).
{ 'JobName':'job-name', 'JobDescription':'job-description', 'JobType': 'Advanced', 'JobArn': 'arn:aws:sagemaker:region:account-id:inference-recommendations-job/resource-id', 'Status': 'COMPLETED', 'CreationTime': datetime.datetime(2021, 10, 26, 19, 38, 30, 957000, tzinfo=tzlocal()), 'LastModifiedTime': datetime.datetime(2021, 10, 26, 19, 46, 31, 399000, tzinfo=tzlocal()), 'InputConfig': { 'ModelPackageVersionArn': 'arn:aws:sagemaker:region:account-id:model-package/resource-id', 'JobDurationInSeconds': 7200, 'TrafficPattern': { 'TrafficType': 'PHASES' }, 'ResourceLimit': { 'MaxNumberOfTests': 100, 'MaxParallelOfTests': 100 }, 'EndpointConfigurations': [{ 'InstanceType': 'ml.c5d.xlarge' }] }, 'StoppingConditions': { 'MaxInvocations': 1000, 'ModelLatencyThresholds': [{ 'Percentile': 'P95', 'ValueInMilliseconds': 100} ]}, 'InferenceRecommendations': [{ 'Metrics': { 'CostPerHour': 0.6899999976158142, 'CostPerInference': 1.0332434612791985e-05, 'MaximumInvocations': 1113, 'ModelLatency': 100000 }, 'EndpointConfiguration': { 'EndpointName':'endpoint-name', 'VariantName':'variant-name', 'InstanceType': 'ml.c5d.xlarge', 'InitialInstanceCount': 3 }, 'ModelConfiguration': { 'Compiled': False, 'EnvironmentParameters': [] } }], 'ResponseMetadata': { 'RequestId':'request-id', 'HTTPStatusCode': 200, 'HTTPHeaders': { 'x-amzn-requestid':'x-amzn-requestid', 'content-type':'content-type', 'content-length': '1199', 'date': 'Tue, 26 Oct 2021 19:57:42 GMT' }, 'RetryAttempts': 0} }The first few lines provide information about the load test job itself. This includes the job name, role ARN, creation, and deletion time.
The
InferenceRecommendationsdictionary contains a list of Inference Recommender inference recommendations.The
EndpointConfigurationnested dictionary contains the instance type (InstanceType) recommendation along with the endpoint and variant name (a deployed AWS machine learning model) used during the recommendation job. You can use the endpoint and variant name for monitoring in Amazon CloudWatch Events. See Amazon SageMaker AI metrics in Amazon CloudWatch for more information.The
EndpointConfigurationnested dictionary also contains the instance count (InitialInstanceCount) recommendation. This is the number of instances that you should provision in the endpoint to meet theMaxInvocationsspecified in theStoppingConditions. For example, if theInstanceTypeisml.m5.largeand theInitialInstanceCountis2, then you should provision 2ml.m5.largeinstances for your endpoint so that it can handle the TPS specified in theMaxInvocationsstopping condition.The
Metricsnested dictionary contains information about the estimated cost per hour (CostPerHour) for your real-time endpoint in US dollars, the estimated cost per inference (CostPerInference) for your real-time endpoint, the maximum number ofInvokeEndpointrequests sent to the endpoint, and the model latency (ModelLatency), which is the interval of time (in microseconds) that your model took to respond to SageMaker AI. The model latency includes the local communication times taken to send the request and to fetch the response from the model container and the time taken to complete the inference in the container.The following example shows the
InferenceRecommendationspart of the response for a load test job that was configured to return serverless inference recommendations:"InferenceRecommendations": [ { "EndpointConfiguration": { "EndpointName": "value", "InitialInstanceCount":value, "InstanceType": "value", "VariantName": "value", "ServerlessConfig": { "MaxConcurrency":value, "MemorySizeInMb":value} }, "InvocationEndTime":value, "InvocationStartTime":value, "Metrics": { "CostPerHour":value, "CostPerInference":value, "CpuUtilization":value, "MaxInvocations":value, "MemoryUtilization":value, "ModelLatency":value, "ModelSetupTime":value}, "ModelConfiguration": { "Compiled": "False", "EnvironmentParameters": [], "InferenceSpecificationName": "value" }, "RecommendationId": "value" } ]You can interpret the recommendations for serverless inference similarly to the results for real-time inference, with the exception of the
ServerlessConfig, which tells you the values you specified forMaxConcurrencyandMemorySizeInMBwhen setting up the load test. Serverless recommendations also measure the metricModelSetupTime, which measures (in microseconds) the time it takes to launch compute resources on a serverless endpoint. For more information about setting up serverless endpoints, see the Serverless Inference documentation. - AWS CLI
-
Collect metrics with the
describe-inference-recommendations-jobAPI. Specify the job name of the load test for thejob-nameflag:aws sagemaker describe-inference-recommendations-job --job-name<job-name>This returns a response similar to the following example. Note that this example shows the recommended instance types for real-time inference (for an example showing Serverless Inference recommendations, see the example after this one).
{ 'JobName':'job-name', 'JobDescription':'job-description', 'JobType': 'Advanced', 'JobArn': 'arn:aws:sagemaker:region:account-id:inference-recommendations-job/resource-id', 'Status': 'COMPLETED', 'CreationTime': datetime.datetime(2021, 10, 26, 19, 38, 30, 957000, tzinfo=tzlocal()), 'LastModifiedTime': datetime.datetime(2021, 10, 26, 19, 46, 31, 399000, tzinfo=tzlocal()), 'InputConfig': { 'ModelPackageVersionArn': 'arn:aws:sagemaker:region:account-id:model-package/resource-id', 'JobDurationInSeconds': 7200, 'TrafficPattern': { 'TrafficType': 'PHASES' }, 'ResourceLimit': { 'MaxNumberOfTests': 100, 'MaxParallelOfTests': 100 }, 'EndpointConfigurations': [{ 'InstanceType': 'ml.c5d.xlarge' }] }, 'StoppingConditions': { 'MaxInvocations': 1000, 'ModelLatencyThresholds': [{ 'Percentile': 'P95', 'ValueInMilliseconds': 100 }] }, 'InferenceRecommendations': [{ 'Metrics': { 'CostPerHour': 0.6899999976158142, 'CostPerInference': 1.0332434612791985e-05, 'MaximumInvocations': 1113, 'ModelLatency': 100000 }, 'EndpointConfiguration': { 'EndpointName':'endpoint-name', 'VariantName':'variant-name', 'InstanceType': 'ml.c5d.xlarge', 'InitialInstanceCount': 3 }, 'ModelConfiguration': { 'Compiled': False, 'EnvironmentParameters': [] } }], 'ResponseMetadata': { 'RequestId':'request-id', 'HTTPStatusCode': 200, 'HTTPHeaders': { 'x-amzn-requestid':'x-amzn-requestid', 'content-type':'content-type', 'content-length': '1199', 'date': 'Tue, 26 Oct 2021 19:57:42 GMT' }, 'RetryAttempts': 0 } }The first few lines provide information about the load test job itself. This includes the job name, role ARN, creation, and deletion time.
The
InferenceRecommendationsdictionary contains a list of Inference Recommender inference recommendations.The
EndpointConfigurationnested dictionary contains the instance type (InstanceType) recommendation along with the endpoint and variant name (a deployed AWS machine learning model) used during the recommendation job. You can use the endpoint and variant name for monitoring in Amazon CloudWatch Events. See Amazon SageMaker AI metrics in Amazon CloudWatch for more information.The
Metricsnested dictionary contains information about the estimated cost per hour (CostPerHour) for your real-time endpoint in US dollars, the estimated cost per inference (CostPerInference) for your real-time endpoint, the maximum number ofInvokeEndpointrequests sent to the endpoint, and the model latency (ModelLatency), which is the interval of time (in microseconds) that your model took to respond to SageMaker AI. The model latency includes the local communication times taken to send the request and to fetch the response from the model container and the time taken to complete the inference in the container.The following example shows the
InferenceRecommendationspart of the response for a load test job that was configured to return serverless inference recommendations:"InferenceRecommendations": [ { "EndpointConfiguration": { "EndpointName": "value", "InitialInstanceCount":value, "InstanceType": "value", "VariantName": "value", "ServerlessConfig": { "MaxConcurrency":value, "MemorySizeInMb":value} }, "InvocationEndTime":value, "InvocationStartTime":value, "Metrics": { "CostPerHour":value, "CostPerInference":value, "CpuUtilization":value, "MaxInvocations":value, "MemoryUtilization":value, "ModelLatency":value, "ModelSetupTime":value}, "ModelConfiguration": { "Compiled": "False", "EnvironmentParameters": [], "InferenceSpecificationName": "value" }, "RecommendationId": "value" } ]You can interpret the recommendations for serverless inference similarly to the results for real-time inference, with the exception of the
ServerlessConfig, which tells you the values you specified forMaxConcurrencyandMemorySizeInMBwhen setting up the load test. Serverless recommendations also measure the metricModelSetupTime, which measures (in microseconds) the time it takes to launch computer resources on a serverless endpoint. For more information about setting up serverless endpoints, see the Serverless Inference documentation. - Amazon SageMaker Studio Classic
-
The recommendations populate in a new tab called Inference recommendations within Studio Classic. It can take up to 2 hours for the results to show up. This tab contains Results and Details columns.
The Details column provides information about the load test job, such as the name given to the load test job, when the job was created (Creation time), and more. It also contains Settings information, such as the maximum number of invocation that occurred per minute and information about the Amazon Resource Names used.
The Results column provides Deployment goals and SageMaker AI recommendations windows in which you can adjust the order in which results are displayed based on deployment importance. There are three dropdown menus in which you can provide the level of importance of the Cost, Latency, and Throughput for your use case. For each goal (cost, latency, and throughput), you can set the level of importance: Lowest Importance, Low Importance, Moderate importance, High importance, or Highest importance.
Based on your selections of importance for each goal, Inference Recommender displays its top recommendation in the SageMaker recommendation field on the right of the panel, along with the estimated cost per hour and inference request. It also provides Information about the expected model latency, maximum number of invocations, and the number of instances.
In addition to the top recommendation displayed, you can also see the same information displayed for all instances that Inference Recommender tested in the All runs section.
- SageMaker AI console
-
You can view your custom load test job results in the SageMaker AI console by doing the following:
-
Go to the SageMaker AI console at https://console.aws.amazon.com/sagemaker/
. -
In the left navigation pane, choose Inference, and then choose Inference recommender.
-
On the Inference recommender jobs page, choose the name of your inference recommendation job.
On the details page for your job, you can view the Inference recommendations, which are the instance types SageMaker AI recommends for your model, as shown in the following screenshot.
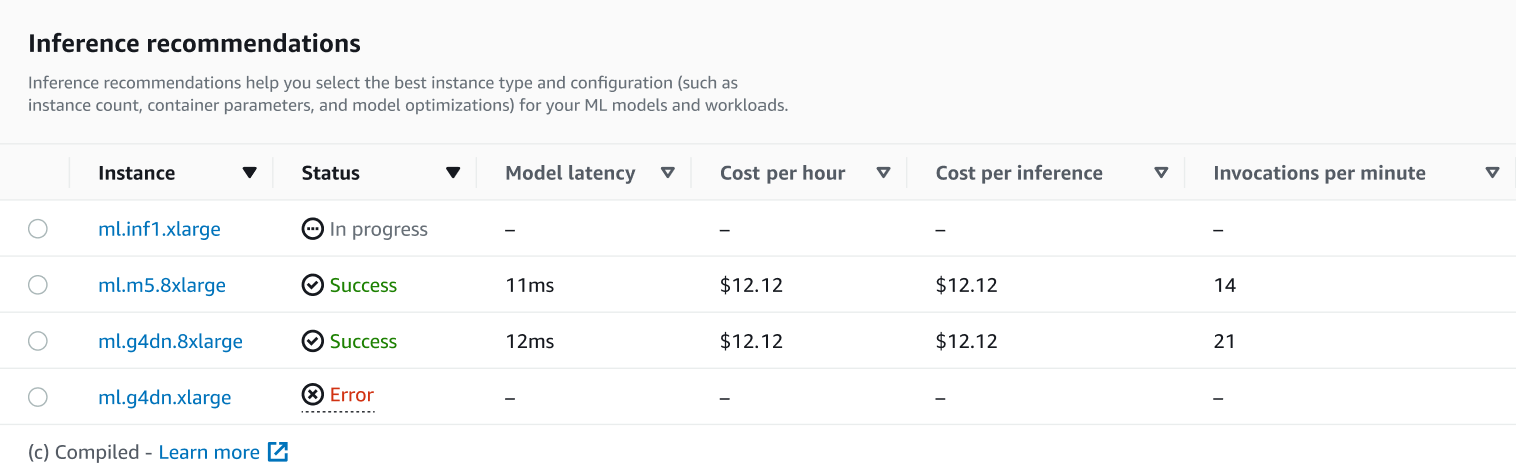
In this section, you can compare the instance types by various factors such as Model latency, Cost per hour, Cost per inference, and Invocations per minute.
On this page, you can also view the configurations you specified for your job. In the Monitor section, you can view the Amazon CloudWatch metrics that were logged for each instance type. To learn more about interpreting these metrics, see Interpret results.
-
