Register a Model Version
You can register an Amazon SageMaker model by creating a model version that specifies the model group to which it belongs. A model version must include both the model artifacts (the trained weights of a model) and the inference code for the model.
An inference pipeline is a SageMaker model composed of a linear sequence of two to fifteen containers that process inference requests. You register an inference pipeline by specifying the containers and the associated environment variables. For more information on inference pipelines, see Host models along with pre-processing logic as serial inference pipeline behind one endpoint.
You can register a model with an inference pipeline, by specifying the containers and the associated environment variables. To create a model version with an inference pipeline by using either the AWS SDK for Python (Boto3), the Amazon SageMaker Studio console, or by creating a step in a SageMaker model building pipeline, use the following steps.
Topics
Register a Model Version (SageMaker Pipelines)
To register a model version by using a SageMaker model building pipeline, create a
RegisterModel step in your pipeline. For information about creating a
RegisterModel step as part of a pipeline, see Step 8: Define a RegisterModel Step to Create a
Model Package.
Register a Model Version (Boto3)
To register a model version by using Boto3, call the
create_model_package API operation.
First, you set up the parameter dictionary to pass to the
create_model_package API operation.
# Specify the model source model_url = "s3://your-bucket-name/model.tar.gz" modelpackage_inference_specification = { "InferenceSpecification": { "Containers": [ { "Image":image_uri, "ModelDataUrl":model_url} ], "SupportedContentTypes": [ "text/csv" ], "SupportedResponseMIMETypes": [ "text/csv" ], } } # Alternatively, you can specify the model source like this: # modelpackage_inference_specification["InferenceSpecification"]["Containers"][0]["ModelDataUrl"]=model_url create_model_package_input_dict = { "ModelPackageGroupName" : model_package_group_name, "ModelPackageDescription" : "Model to detect 3 different types of irises (Setosa, Versicolour, and Virginica)", "ModelApprovalStatus" : "PendingManualApproval" } create_model_package_input_dict.update(modelpackage_inference_specification)
Then you call the create_model_package API operation, passing in the
parameter dictionary that you just set up.
create_model_package_response = sm_client.create_model_package(**create_model_package_input_dict)
model_package_arn = create_model_package_response["ModelPackageArn"]
print('ModelPackage Version ARN : {}'.format(model_package_arn))
Register a Model Version (console)
To register a model version in the Amazon SageMaker Studio console, complete the following steps based on whether you use Studio or Studio Classic.
Register a Model Version from a Different Account
To register model versions with a Model Group created by a different AWS account, you must add a cross-account AWS Identity and Access Management resource policy to enable that account. For example, one AWS account in your organization is responsible for training models, and a different account is responsible for managing, deploying, and updating models. You create IAM resource policies and apply the policies to the specific account resource to which you want to grant access for this case. For more information about cross-account resource policies in AWS, see Cross-account policy evaluation logic in the AWS Identity and Access Management User Guide.
Note
You must also use a KMS key to encrypt the output data config action during training for cross-account model deployment.
To enable cross-account model registry in SageMaker, you have to provide a cross-account resource policy for the Model Group that contains the model versions. The following is an example that creates cross-account policies for the Model Group and applies these policies to that specific resource.
The following configuration must be set in the source account which registers models cross-account in a Model Group. In this example, the source account is the model training account which will train and then register the model cross-account into the Model Registry of the Model Registry account.
The example assumes that you previously defined the following variables:
-
sm_client– A SageMaker Boto3 client. -
model_package_group_name– The Model Group to which you want to grant access. -
model_package_group_arn– The Model Group ARN to which you want to grant cross-account access. -
bucket– The Amazon S3 bucket where the model training artifacts are stored.
To be able to deploy a model created in a different account, the user must have a
role that has access to SageMaker actions, such as a role with the
AmazonSageMakerFullAccess managed policy. For information about
SageMaker managed policies, see AWS Managed Policies for Amazon SageMaker.
Required IAM resource policies
The following diagram captures the policies required to allow cross-account model registration. As shown, these policies need to be active during model training to properly register the model into the Model Registry account.
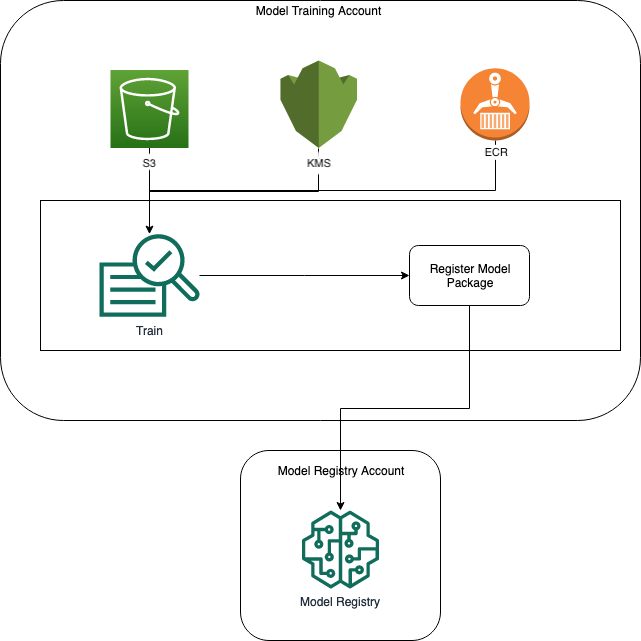
Amazon ECR, Amazon S3, and AWS KMS policies are demonstrated in the following code samples.
Sample Amazon ECR policy
{
  "Version": "2012-10-17",
  "Statement": [
    {
      "Sid": "AddPerm",
      "Effect": "Allow",
      "Principal": {
        "AWS": "arn:aws:iam::{model_registry_account}:root"
      },
      "Action": [
        "ecr:BatchGetImage",
        "ecr:Describe*"
      ]
    }
  ]
}
Sample Amazon S3 policy
{
  "Version": "2012-10-17",
  "Statement": [
    {
      "Sid": "AddPerm",
      "Effect": "Allow",
      "Principal": {
        "AWS": "arn:aws:iam::{model_registry_account}:root"
      },
      "Action": [
        "s3:GetObject",
        "s3:GetBucketAcl",
        "s3:GetObjectAcl"
      ],
      "Resource": "arn:aws:s3:::{bucket}/*"
    }
  ]
}
Sample AWS KMS policy
{
  "Version": "2012-10-17",
  "Statement": [
    {
      "Sid": "AddPerm",
      "Effect": "Allow",
      "Principal": {
        "AWS": "arn:aws:iam::{model_registry_account}:root"
      },
      "Action": [
        "kms:Decrypt",
        "kms:GenerateDataKey*"
      ],
      "Resource": "*"
    }
  ]
}
Apply resource policies to accounts
The following policy configuration applies the policies discussed in the previous section and must be put in the model training account.
import json # The Model Registry account id of the Model Group model_registry_account = "111111111111" # The model training account id where training happens model_training_account = "222222222222" # 1. Create a policy for access to the ECR repository # in the model training account for the Model Registry account Model Group ecr_repository_policy = {"Version": "2012-10-17", "Statement": [{"Sid": "AddPerm", "Effect": "Allow", "Principal": { "AWS": f"arn:aws:iam::{model_registry_account}:root" }, "Action": [ "ecr:BatchGetImage", "ecr:Describe*" ] }] } # Convert the ECR policy from JSON dict to string ecr_repository_policy = json.dumps(ecr_repository_policy) # Set the new ECR policy ecr = boto3.client('ecr') response = ecr.set_repository_policy( registryId = model_training_account, repositoryName = "decision-trees-sample", policyText = ecr_repository_policy ) # 2. Create a policy in the model training account for access to the S3 bucket # where the model is present in the Model Registry account Model Group bucket_policy = {"Version": "2012-10-17", "Statement": [{"Sid": "AddPerm", "Effect": "Allow", "Principal": {"AWS": f"arn:aws:iam::{model_registry_account}:root" }, "Action": [ "s3:GetObject", "s3:GetBucketAcl", "s3:GetObjectAcl" ], "Resource": "arn:aws:s3:::{bucket}/*" }] } # Convert the S3 policy from JSON dict to string bucket_policy = json.dumps(bucket_policy) # Set the new bucket policy s3 = boto3.client("s3") response = s3.put_bucket_policy( Bucket =bucket, Policy = bucket_policy) # 3. Create the KMS grant for the key used during training for encryption # in the model training account to the Model Registry account Model Group client = boto3.client("kms") response = client.create_grant( GranteePrincipal=model_registry_account, KeyId=kms_key_id Operations=[ "Decrypt", "GenerateDataKey", ], )
The following configuration needs to be put in the Model Registry account where the Model Group exists.
# The Model Registry account id of the Model Group model_registry_account = "111111111111" # 1. Create policy to allow the model training account to access the ModelPackageGroup model_package_group_policy = {"Version": "2012-10-17", "Statement": [ { "Sid": "AddPermModelPackageVersion", "Effect": "Allow", "Principal": {"AWS": f"arn:aws:iam::{model_training_account}:root"}, "Action": ["sagemaker:CreateModelPackage"], "Resource": f"arn:aws:sagemaker:{region}:{model_registry_account}:model-package/{model_package_group_name}/*" } ] } # Convert the policy from JSON dict to string model_package_group_policy = json.dumps(model_package_group_policy) # Set the new policy response = sm_client.put_model_package_group_policy( ModelPackageGroupName =model_package_group_name, ResourcePolicy = model_package_group_policy)
Finally, use the create_model_package action from the model training
account to register the model package in the cross-account.
# Specify the model source model_url = "s3://{bucket}/model.tar.gz" #Set up the parameter dictionary to pass to the create_model_package API operation modelpackage_inference_specification = { "InferenceSpecification": { "Containers": [ { "Image": f"{model_training_account}.dkr.ecr.us-east-2.amazonaws.com/decision-trees-sample:latest", "ModelDataUrl": model_url } ], "SupportedContentTypes": [ "text/csv" ], "SupportedResponseMIMETypes": [ "text/csv" ], } } # Alternatively, you can specify the model source like this: # modelpackage_inference_specification["InferenceSpecification"]["Containers"][0]["ModelDataUrl"]=model_url create_model_package_input_dict = { "ModelPackageGroupName" :model_package_group_arn, "ModelPackageDescription" : "Model to detect 3 different types of irises (Setosa, Versicolour, and Virginica)", "ModelApprovalStatus" : "PendingManualApproval" } create_model_package_input_dict.update(modelpackage_inference_specification) # Create the model package in the Model Registry account create_model_package_response = sm_client.create_model_package(**create_model_package_input_dict) model_package_arn = create_model_package_response["ModelPackageArn"] print('ModelPackage Version ARN : {}'.format(model_package_arn))
