Create instruction pages
Create custom instructions for labeling jobs to improve your worker's accuracy in completing their task. You can modify the default instructions that are provided in the console or you can create your own. The instructions are shown to the worker on the page where they complete their labeling task.
There are two kinds of instructions:
-
Short instructions—instructions that are shown on the same webpage where the worker completes their task. These instructions should provide an easy reference to show the worker the correct way to label an object.
-
Full instructions—instructions that are shown on a dialog box that overlays the page where the worker completes their task. We recommend that you provide detailed instructions for completing the task with multiple examples showing edge cases and other difficult situations for labeling objects.
Create instructions in the console when you are creating your labeling job. Start with the existing instructions for the task and use the editor to modify them to suit your labeling job.
Note
Once you create your labeling job, it will automatically start and you will not be able to modify your worker instructions. If you need to change your worker instructions, stop the labeling job that you created, clone it, and modify your worker instructions before creating a new job.
You can clone a labeling job in the console by selecting the labeling job and then selecting Clone in the Actions menu.
To clone a labeling job using the Amazon SageMaker API or your preferred Amazon SageMaker SDK, make a new
request to the CreateLabelingJob operation with the same specifications as
your original job after modifying your worker instructions.
For 3D point cloud and video frame labeling jobs, you can add worker instructions to your label category configuration file. You can use a single string to create instructions or you can add HTML mark up to customize the appearance of your instructions and add images. Make sure that any images you include in your instructions are publicly available, or if your instructions are in Amazon S3, that your workers have read access so that they can view them. For more information about the label category configuration file, see Labeling category configuration file with label category and frame attributes reference.
Short Instructions
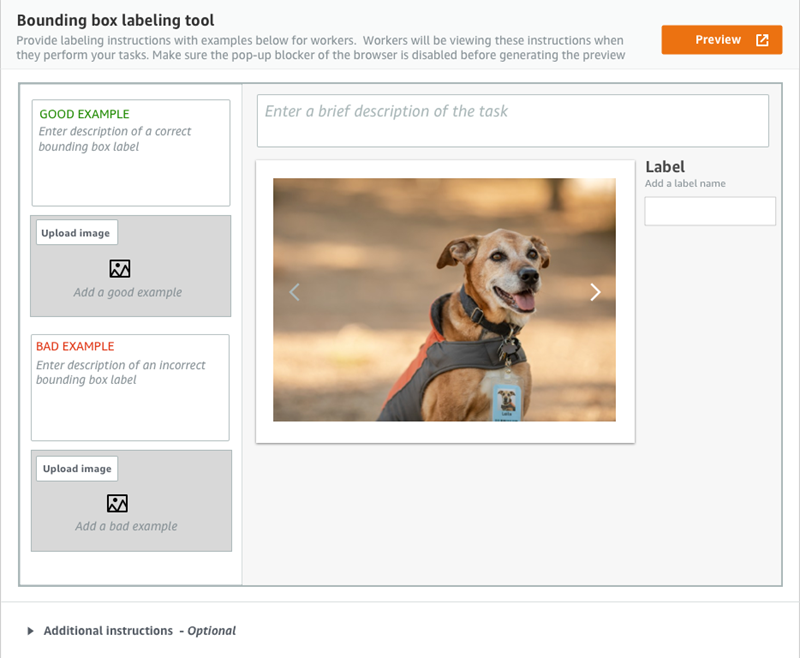
Short instructions appear on the same web page that workers use to label your data object. For example, the following is the editing page for a bounding box task. The short instructions panel is on the left.
Keep in mind that a worker will only spend seconds looking at the short instructions. Workers must be able to scan and understand your information quickly. In all cases it should take less time to understand the instructions than it takes to complete the task. Keep these points in mind:
-
Your instructions should be clear and simple.
-
Pictures are better than words. Create a simple illustration of your task that your workers can immediately understand.
-
If you must use words, use short, concise examples.
-
Your short instructions are more important than your full instructions.
The Amazon SageMaker Ground Truth console provides an editor so that you can create your short instructions. Replace the placeholder text and images with instructions for your task. Preview the worker's task page by choosing Preview. The preview will open in a new window, be sure to turn off pop-up blocking so that the window will show.
Full Instructions
You can provide additional instructions for your workers in a dialog box that overlays the page where workers label your data objects. Use full instructions to explain more complex tasks and to show workers the proper way to label edge cases or other difficult objects.
You can create full instructions using an editor in the Ground Truth console. As with quick instructions, keep the following in mind:
-
Workers will want detailed instruction the first few times that the complete your task. Any information that they must have should be in the quick instructions.
-
Pictures are more important than words.
-
Text should be concise.
-
Full instructions should supplement the short instructions. Don't repeat information that appears in the short instructions.
The Ground Truth console provides an editor so that you can create your full instructions. Replace the placeholder text and images with instructions for your task. Preview the full instruction page by choosing Preview. The preview will open in a new window, be sure to turn off pop-up blocking so that the window will show.
Add example images to your instructions
Images provide useful examples for your workers. To add a publicly accessible image to your instructions:
Place the cursor where the image should go in the instructions editor.
Click the image icon in the editor toolbar.
Enter the URL of your image.
If your instruction image in Amazon S3 is not publicly accessible:
As the image URL, enter:
{{ 'https://s3.amazonaws.com/.your-bucket-name/image-file-name' | grant_read_access }}This renders the image URL with a short-lived, one-time access code appended so the worker's browser can display it. A broken image icon is displayed in the instructions editor, but previewing the tool displays the image in the rendered preview.
