Use the solution
Allow a Return URL
This solution requires an Amazon Ads developer account and Login with Amazon (LwA) application to authorize to Amazon Ads API. Before using this solution, you must set up an allowed return URL in LwA.
-
Copy the CloudFront URL from stack outputs.
-
See the Allow a return URL documentation
to set the redirect_uri to the CloudFront URL/redirect. An example of the return URL of this solution is https:// aaabbb123.cloudfront.net/redirect.
Specify AMC instances
When signing in for the first time, you will be redirected to the Settings page to specify the OAuth credentials and the connection attributes for one or more AMC instances.
AMC Instances table with AMC Endpoint, Data Upload Account Id, and Tags columns for configuration.

-
Client ID and Secret - Credentials to access the Amazon Ads API.
-
AMC Instance Id - Identifier of an AMC instance. This is available in the AMC account landing page
. -
Amazon Ads Advertiser ID - The AMC account identifier that an AMC instance is linked to.
-
Amazon Ads MarketPlace ID - The marketplace identifier
for the marketplace in the request. The marketplaces are tied to the country. -
Data Upload Account Id - AWS account ID that is used to upload data to an AMC instance.
-
Tags - Arbitrary strings can be saved as tags to help organize the AMC instance list. Tags can also be used to help find specific AMC instances from the instance selector dialog provided elsewhere in the UI.
To retrieve the OAuth credentials and AMC instance connection properties, see Retrieving Client ID and Client Secret and Locating AMC instance information.
Select files
-
Select Step 1 - Select file. This displays all of the files that are available in the Amazon S3 bucket that you created in Step 1.
-
Select one or more files you want to use for the dataset.
-
Choose Next.
File selection interface showing multiple JSON files with their sizes and modification dates.

Select AMC destinations
-
Select Step 2 - Select destinations. This displays all of the AMC instances that have been saved under the Settings page.
-
Select one or more AMC instances to receive this dataset. Use the search field to filter the AMC instance list by instance IDs and tags.
-
Choose Next.

Define the dataset
-
Select Step 3 - Define dataset.
-
To create a new dataset, enter a name for the dataset. This will be the table name that you query within AMC. This must be unique to your AMC instance.
Alternatively, to update an existing dataset, select Add to existing dataset and select the dataset from the provided drop-down menu.
-
(Optional) Enter a description. This will be used to detail what this dataset is to others who may not be familiar within the AMC instance.
-
Select the appropriate dataset period. When uploading time-series data, each file must be partitioned according to a specific unit of time. This unit of time is referred to as the dataset period.
The available periods are:
-
PT1H (hourly)
-
P1D (daily)
-
P1M (monthly)
Select "DIMENSION" if no specific partition scheme is required for the dataset creation.
For details, refer to the AMC FACT vs. Dimension Datasets section of the Prepare Data
-
DIMENSION - Dimension datasets can upload to a static table or to any information which is not time bound. Some examples include CRM audience lists, campaign metadata, mapping tables, and product metadata (such as a table mapping ASINs to external product names, or sensitive cost-of-goods-sold data). When uploading data to a dimension table, each upload is treated as a full replace - AMC queries will also use data from the last file uploaded.
-
FACT - Fact datasets should be used for time-series data: data where each row has a corresponding date or timestamp associated. When defining a fact dataset, it is mandatory to designate one column as the main event time. Data must be segmented by day and must contain a Timestamp column.
-
Select the appropriate country code for the data that you’re preparing to upload. Identities will be resolved and addresses normalized according to the rules of this country. Be sure that each input file contains data for a single country and that this locale is the same for each file. For example, if you have data with both FR (French) and US (American) records, then these records should be split into different files and uploaded separately because this application will apply the same country-specific normalization rules for each file.
-
Choose Next.
-
Dataset configuration form with fields for name, description, type, period, and country.

Define the schema
-
Select Step 4 - Define columns.
-
Map the columns in your dataset to align with AMC’s schema requirements.
-
Choose Next.
Important
When defining columns in this step, it is important to carefully indicate which columns contain PII. If you neglect to indicate that a column contains PII, then that column will not be obfuscated during the PII hashing phase of the AWS Glue job, and will subsequently load as plain text into AMC.
Define Columns interface showing fields for data import with PII indicators.

Column definitions:
-
Data Type - Select the data type that matches your column. This is relevant to the format of the data.
-
String - UTF-8 encoded character data
-
Decimal - Numerical with two floating point level precision
-
Integer (32-bit) - 32-bit numerical, no floating points
-
Integer/LONG (64-bit) - 64-bit numerical, no floating points
-
TIMESTAMP - Format: yyyy-MM-ddThh:mm:ssZ (ISO 8601)
-
DATE - Format: yyyy-MM-dd
-
-
Column Type - Select the type of the column.
-
PII - A Personally Identifiable Information (PII) column contains sensitive information. Selecting PII requires you to define a PII Type to map the specific column to an identifier within Amazon Ads.
-
Dimension - These columns represent dimensional data such as Campaign Names, Product Names, Product IDs, etc. These columns must be grouped in AMC’s output.
-
Metric - These columns represent values such as sales, clicks, etc. They can be aggregated in the output using AMC’s supported aggregate functions. DIMENSION columns must be grouped in the output.
-
MainEventTime - (Required for FACT Dataset Type) - Only a single column may have this Column Type. This column contains the related Timestamp that is used to identify the date range of the dataset.
-
-
PII Type - This selector allows you to select what type of PII data exists within the column. These are DIMENSION values that are always Nullable.
-
Nullable - If there’s a chance that this column may be empty in one of your rows, select the Nullable checkbox.
-
Actions - If there is a specific column you do not want to send to Amazon Marketing Cloud, delete the column. If there is additional PII in your dataset that is not reflected in the PII Type field, delete it. It is not best practice to share unhashed PII data with Amazon.
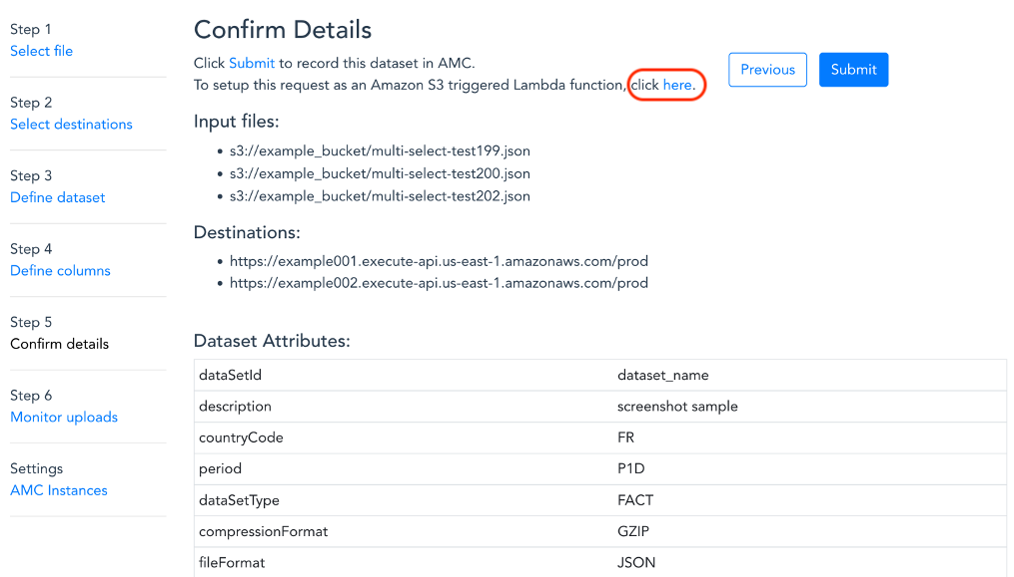
Confirm details
Verify that the dataset attributes are correct, then choose Submit.
Note
You can automatically start this ETL process for files copied to a designated Amazon S3 location by using an Amazon S3 initiated Lambda function. For details about how to set this up, select the relevant link on the Confirm Details screen.
Monitor job and verify dataset successfully uploaded
Your schema will be created within AMC and the AWS Glue job will be submitted to run asynchronously. As soon as the AWS Glue job completes the transformation, the application will notify AMC to upload the data from the ETL artifact Amazon S3 bucket to the AMC instance.
-
Select Step 6 - Monitor uploads.
-
Select an AMC instance from the AMC Instance selector.
-
From this page you can monitor dataset creation, upload status, and AWS Glue ETL jobs.
Datasets - This table shows information about each dataset existing in the selected AMC instance.
Uploads - This table shows uploads which have been performed for the selected dataset.
AWS Glue Jobs - This table shows information about the AWS Glue ETL jobs which have run in response to upload requests performed by users of this application.
Note
AWS Glue ETL results older than three days will be automatically removed from the ETL artifact bucket.
