List of automated migration activities using Migration Factory web console
The Cloud Migration Factory on AWS solution deploys automated migration activities that you can leverage for your migration projects. You can follow the migration activities listed below and customize them based on your business needs.
Before starting any of the activities, make sure you read User Guide - Run Automation from console to understand how this works. Also, you must Build an Automation server and create Windows and Linux users to run automation from the console.
Use the following procedures in the same order to conduct a complete test run of the solution using the sample automation script and activities.
Check prerequisites
Connect with the in-scope source servers to verify the necessary prerequisites such as TCP 1500, TCP 443, root volume free space, .Net framework version, and other parameters. These prerequisites are required for replication.
Before you can conduct the prerequisites check, you must install the first manually on one source server, so this will create a replication server in EC2. We will connect to this server for port 1500 testing. After installation, AWS Application Migration Service (AWS MGN) creates the replication server in Amazon Elastic Compute Cloud (Amazon EC2). You must verify the TCP port 1500 from the source server to the replication server in this activity. For information about installing the AWS MGN agent on your source servers, refer to Installation instructions in the AWS Application Migration Service User Guide.
Use the following procedure while signed in to the migration factory web console.
-
On the Migration Factory console, select Jobs on the left-hand side menu, and select Actions, and then Run Automation on the right-hand side.
-
Enter Job Name, select 0-Check MGN Prerequisites script and your automation server to run the script. If automation server does not exist, make sure you complete Build a migration automation server.
-
Select Linux Secrets and/or Windows Secrets depends on what OSs you have for this wave. Enter MGN replication server IP, choose the wave you want to run automation on and choose Submit Automation Job.
-
You will be redirected to the Jobs list page. The job status should be RUNNING. Choose Refresh to see the status. It should change to Complete after a few minutes.
-
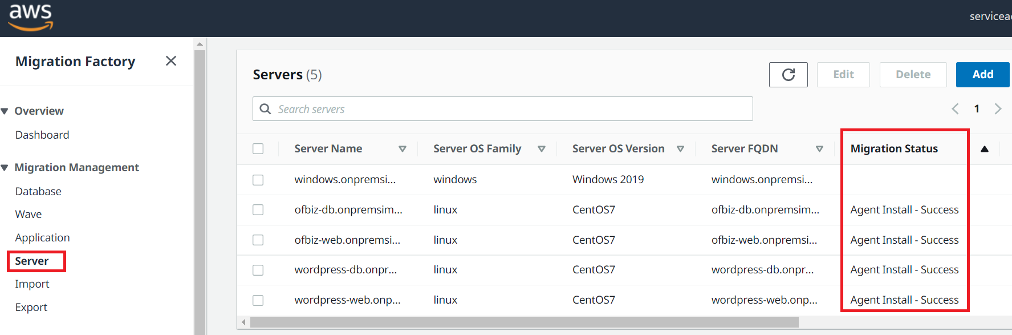
The script will also update the solution’s migration status in the Migration Factory web interface as shown in the following screenshot of an example project.
Migration status

Install the replication agents
Note
Before you install the agent, make sure AWS MGN is initialized in each target account and region.
Use the following procedure to automatically install the Replication agents in the in-scope source servers.
-
On the Migration Factory console, select Jobs on the left-hand side menu, and select Actions, and then Run Automation on the right-hand side.
-
Enter Job Name, select 1-Install MGN Agents script and your automation server to run the script. If automation server does not exist, make sure you complete Build a migration automation server.
-
Select Linux Secrets and/or Windows Secrets depends on what OSs you have for this wave. Choose the wave you want to run automation, and choose Submit Automation Job.
-
You will be redirected to the Jobs list page. The job status should be running. Choose Refresh to see the status. It should change to Complete after a few minutes.
-
The script also provides the migration status in the Migration Factory web interface as shown in the following example screenshot.
Migration status
Push the post-launch scripts
AWS Application Migration Service (MGN) supports post-launch scripts to help you automate OS-level activities, such as installing/uninstalling the software after launching target instances. This activity pushes the post-launch scripts to Windows and/or Linux machines, depending on the servers identified for migration.
Note
Before you push the post-launch scripts, you must copy the files to a folder on the migration automation server.
Use the following procedure to push the post-launch scripts to Windows machines.
-
On the Migration Factory console, select Jobs on the left-hand side menu, and select Actions, and then Run Automation on the right-hand side.
-
Enter Job Name, select 1-Copy Post Launch Scripts script and your automation server to run the script. If automation server does not exist, make sure you complete Build a migration automation server.
-
Select Linux Secrets and/or Windows Secrets depends on what OSs you have for this wave. Provide a Linux source location and/or Windows source location.
-
Choose the wave you want to run automaton and choose Submit Automation Job.
-
You will be redirected to the Jobs list page, the job status should be running, and you can choose Refresh to see the status. It should change to Complete after a few minutes.
Verify the replication status
This activity verifies the replication status for the in-scope source servers automatically. The script repeats every five minutes until the status of all source servers in the given wave changes to a Healthy status.
Use the following procedure to verify the replication status.
-
On the Migration Factory console, select Jobs on the left-hand side menu, and select Actions, and then Run Automation on the right-hand side.
-
Enter Job Name, select 2-Verify Replication Status script and your automation server to run the script. If automation server does not exist, make sure you complete Build a migration automation server.
-
Choose the wave you want to run automaton and choose Submit Automation Job.
-
You will be redirected to the Jobs list page, the job status should be running, and you can click refresh button to see the status. It should change to Complete after a few minutes.
Data replication status
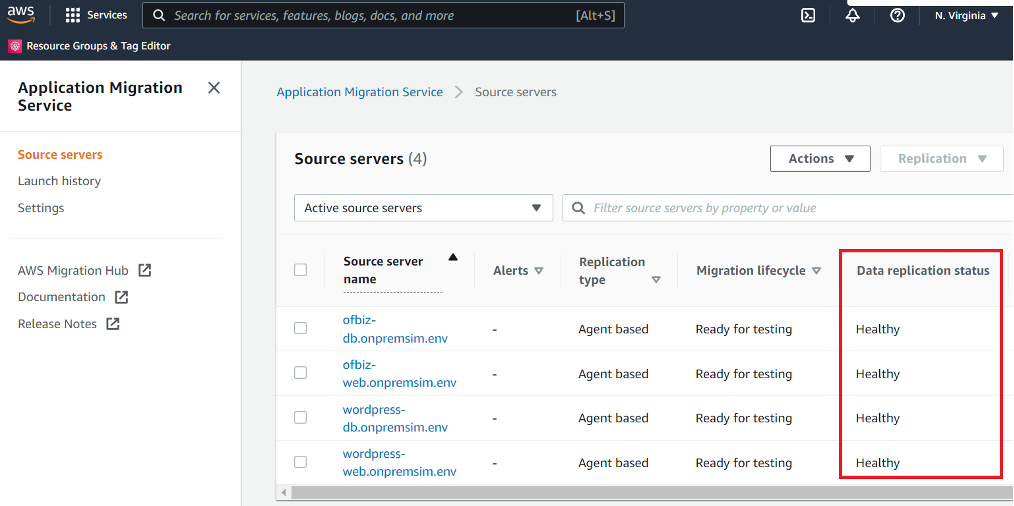
Note
Replication can take a while. You might not see the status update from the factory console for a few minutes. Optionally, you can also check the status in MGN service.
Validate launch template
This activity validates the server metadata in the migration factory and makes sure it works with EC2 template and no typos. It will validate both test and cutover metadata.
Use the following procedure to validate EC2 launch template.
-
Navigate to the Migration Factory console, and select Wave in the menu pane.
-
Select the target wave, and choose Actions. Select Rehost, and then select MGN.
-
Select Validate Launch Template *for the *Action, then select All* applications.*
-
Choose Submit to initiate the validation.
After some time, the validation will return a successful result.
Note
If validation is not successful, you will receive a specific error message:
The errors may be due to invalid data in the server attribute such as an invalid subnet_IDs, securitygroup_IDs, or instanceType.
You can switch to the Pipeline page from the Migration Factory web interface and select the problematic server to fix the errors.
Launch instances for testing
This activity launches all target machines for a given wave in AWS Application Migration Service (MGN) in test mode.
Use the following procedure to launch test instances.
-
On the Migration Factory console, select Wave on the navigation menu.
-
Select target wave, and choose Actions. Select Rehost, and then select MGN.
-
Select Launch Test Instances Action, select All applications.
-
Choose Submit to launch test instances.
-
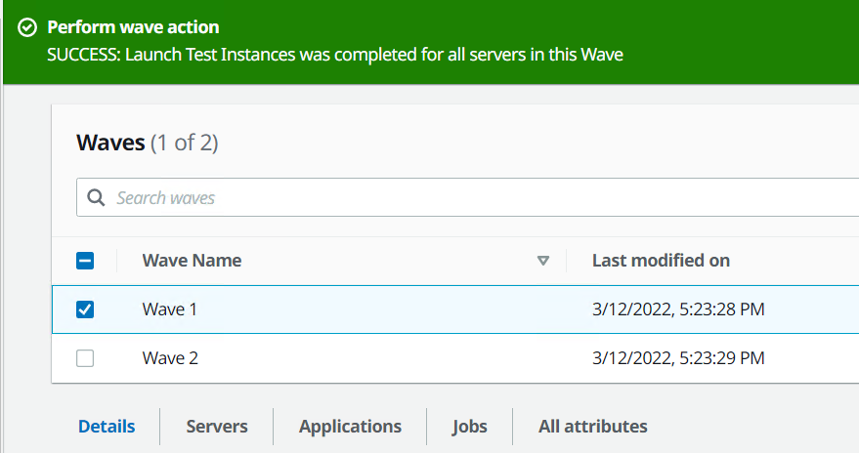
After some time, the validation will return a successful result.
Wave action success
Note
This action will also update the migration status for the server launched.
Verify the target instance status
This activity verifies the status of the target instance by checking the boot up process for all in-scope source servers in the same wave. It may take up to 30 minutes for the target instances to boot up. You can check the status manually by logging into the Amazon EC2 console, searching for the source server name, and checking the status. You will receive a health check message stating 2/2 checks passed, which indicates that the instance is healthy from an infrastructure perspective.
However, for a large-scale migration, it’s time consuming to check the status of each instance, so you can run this automated script to verify the 2/2 checks passed status for all source servers in a given wave.
Use the following procedure to verify the status of the target instance.
-
Navigate to the Migration Factory console, and select Jobs on the left-hand side menu.
-
Select Actions, then Run Automation on the right-hand side.
-
Enter Job Name, select 3-Verify Instance Status script and your automation server to run the script. If automation server does not exist, ensure you complete Build a migration automation server.
-
Choose the wave you want to run automaton, and choose Submit Automation Job.
-
You will be redirected to the Jobs list page, the job status should be running, and you can choose Refresh to see the status. It should change to Complete after a few minutes.
AWS Migration Management dashboard showing server list with migration status for 5 servers.

Note
Instance boot up can take a while and you might not see the status update from the factory console for a few minutes. Migration factory also receives a status update from the script. Refresh the screen if necessary.
Note
If your target instances fail the 2/2 health checks the first time, it may be due to the boot up process taking longer to complete. We recommend running the health checks a second time about an hour after the first health check. This ensures that the boot up process completes. If the health checks fail this second time, go to the AWS support center
Mark as ready for cutover
Once testing is finished, this activity changes the status of the source server to mark as ready for cutover, so that user is able to launch a cutover instance.
Use the following procedure to validate EC2 launch template.
-
On the Migration Factory console, and select Wave on the left-hand side.
-
Select target wave, and click Actions button. Select Rehost, and then select MGN.
-
Select Mark as Ready for Cutover Action, select All applications.
-
Choose Submit to launch live instances.
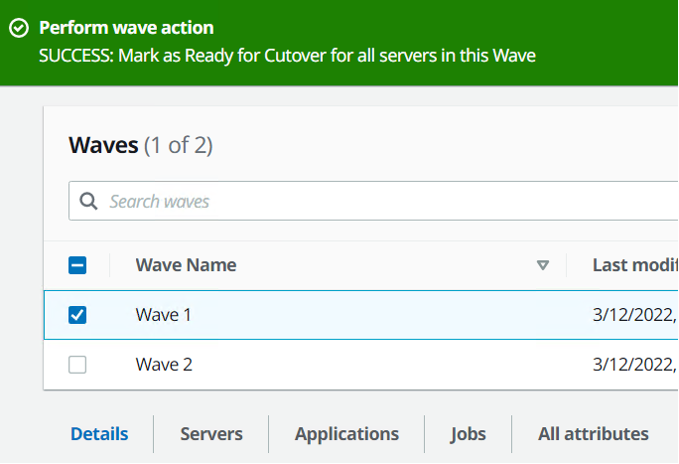
After some time, the validation will return a successful result.
Wave action ready for cutover
Shut down the in-scope source servers
This activity shuts down the in-scope source servers involved with the migration. After you verify the source servers' replication status, you are ready to shut down the source servers to stop transactions from the client applications to the servers. You can shut down the source servers in the cutover window. Shutting down the source servers manually could take five minutes per server, and, for large waves, it could take a few hours in total. Instead, you can run this automation script to shut down all your servers in the given wave.
Use the following procedure to shut down all the source servers involved with the migration.
-
On the Migration Factory console, select Jobs on the left-hand side menu, and select Actions, and then Run Automation on the right-hand side.
-
Enter Job Name, select 3-Shutdown All Servers script and your automation server to run the script. If automation server does not exist, make sure you complete Build a migration automation server.
-
Select Linux Secrets and/or Windows Secrets depends on what OSs you have for this wave.
-
Choose the wave you want to run automaton and choose Submit Automation Job.
-
You will be redirected to the Jobs list page, the job status should be running, and you can click refresh button to see the status. It should change to Complete after a few minutes.
Launch instances for Cutover
This activity launches all target machines for a given wave in AWS Application Migration Service (MGN) in Cutover mode.
Use the following procedure to launch test instances.
-
On the Migration Factory console, and select Wave on the left-hand side.
-
Select target wave, and choose Actions. Select Rehost, and then select MGN.
-
Select Launch Cutover Instances Action, select All applications.
-
Choose Submit to launch test instances.
After some time, the validation will return a successful result.
Note
This action will also update the migration status for the server launched.
