Pipeline Template Creation Using Visual Tools
This section describes how to create Cloud Migration Factory pipeline templates using visual diagramming tools. The solution supports template creation using either DrawIO or Lucid Chart.
Check Prerequisites
-
Access to either DrawIO or Lucid Chart diagramming tool
-
Access to your Cloud Migration Factory environment
-
List of valid automation script IDs from your CMF instance
Template Components
A pipeline template consists of the following core components:
| Element Type | Shape | Use When… |
|---|---|---|
|
Start Node |
Circle |
Indicating the start of a flow and when indicating the start of a branch |
|
Automated Task |
Rectangle |
Indicating that the automation exists already as part of the automation library of CMF |
|
Manual Task |
Rectangle |
Indicating that the task at hand is manual |
|
Connection |
Line/Arrow |
Shows task sequence |
Data Attributes
Each shape requires specific attributes for CMF conversion:
| Element Type | Required Attribute | Example |
|---|---|---|
|
Start Circle |
Start |
"Start": "Wave 1 Migration" |
|
Automated Task |
TaskType, AutomationID |
"TaskType": "Automated", "AutomationID": "<VALID_CMF_SCRIPT_NAME>" |
|
Manual Task |
TaskType |
"TaskType": "Manual" |
Important Concepts
Before creating your diagram, understand these key elements that enable successful conversion to CMF templates:
-
Template Naming
-
Your diagram’s tab/sheet name becomes your CMF template name.
-
Names must be unique across CMF.
-
Each tab creates a separate CMF template, allowing you to design multiple templates in a single file.
-
-
Task Naming
-
The task name will be identical to the text/label you give to each shape in your diagram.
-
Ensure each task has a unique and descriptive label for clear identification.
-
-
Attribute Requirements
-
TaskType must be exactly "manual" or "automated"
-
AutomationID must match existing CMF scripts name
-
Start circle’s "Start" property defines template description
-
Creating templates in DrawIO
-
Create Start Node:
-
Drag a Circle shape onto the canvas
-
Double-click and label it "Start"
-
Add Start attribute:
-
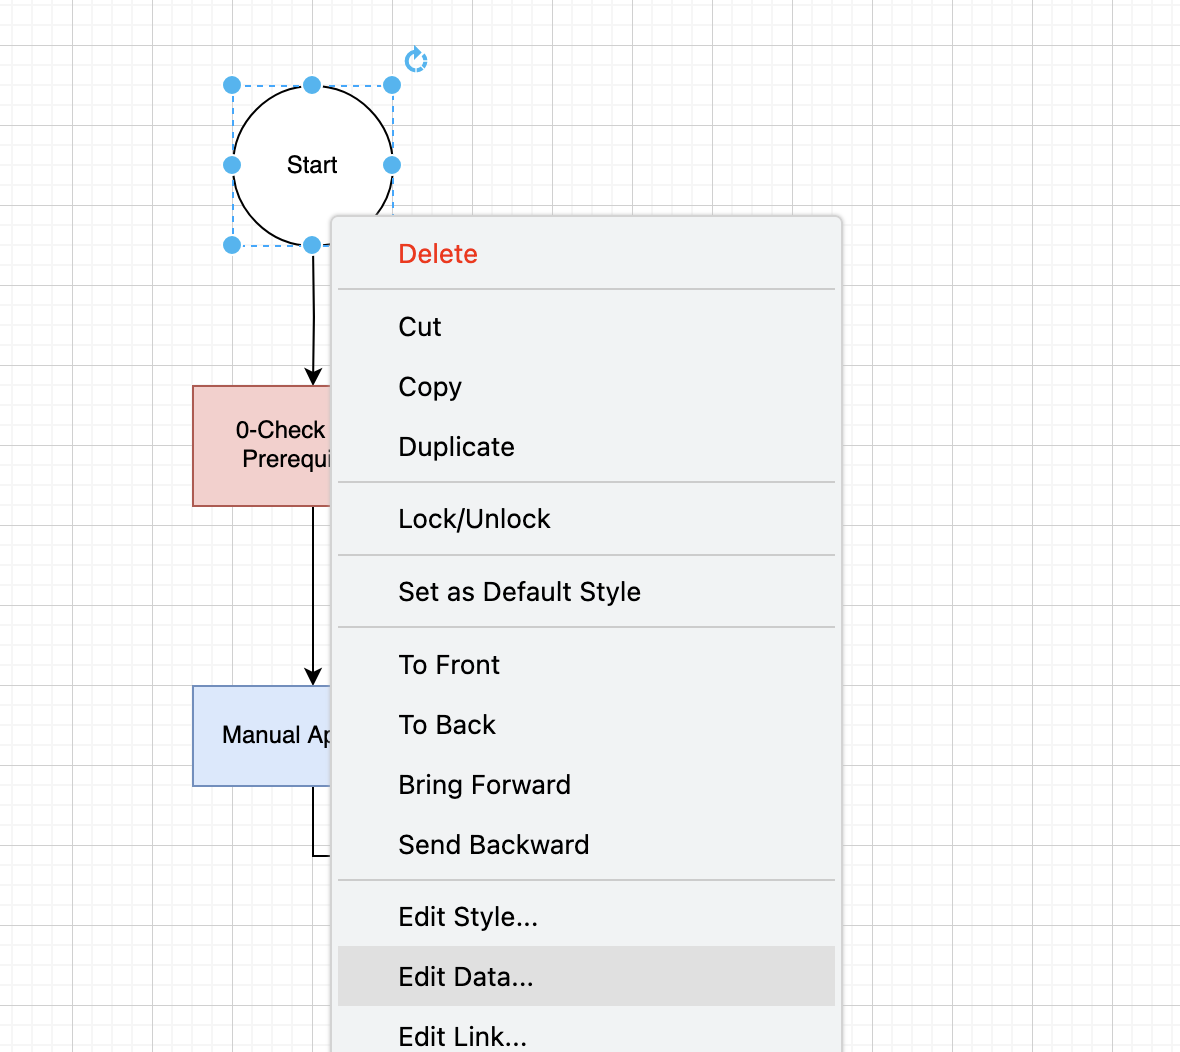
Right-click circle → Edit Data
DrawIO Shape Right-click panel
-
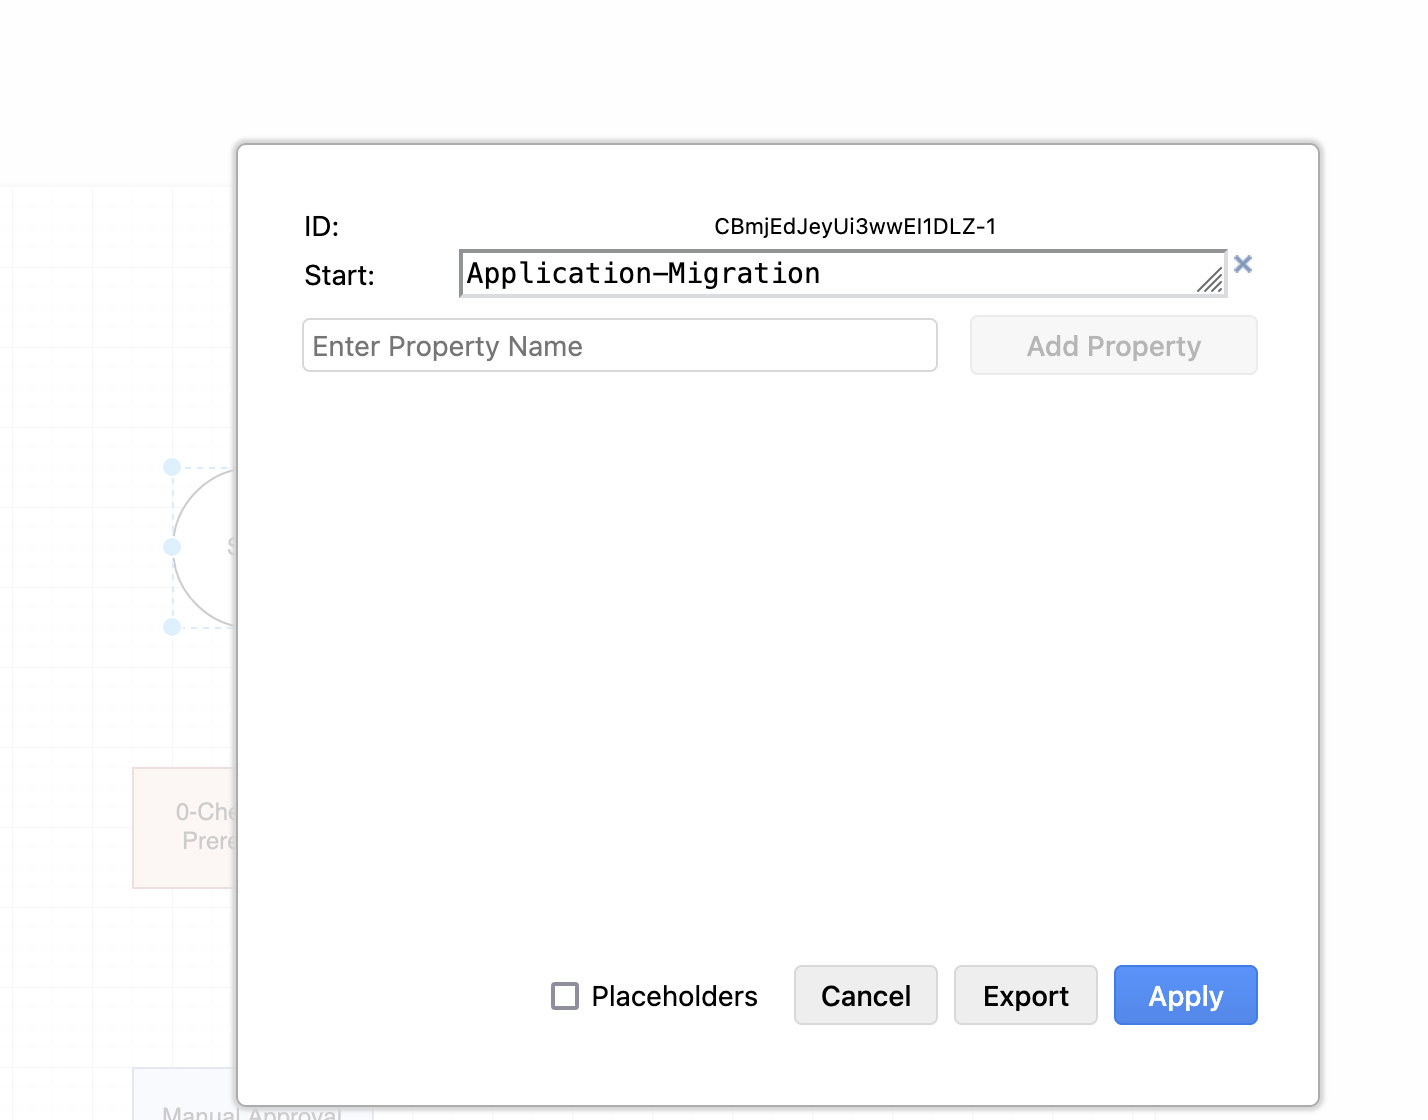
Add Data Attribute key "Start" and value (e.g., "Wave 1 Migration")
DrawIO Shape Data
-
-
-
-
Manual Task:
-
Drag a Rectangle shape onto the canvas
-
Double-click and add a descriptive label
-
Add attributes:
-
Right-click rectangle → Edit Data
-
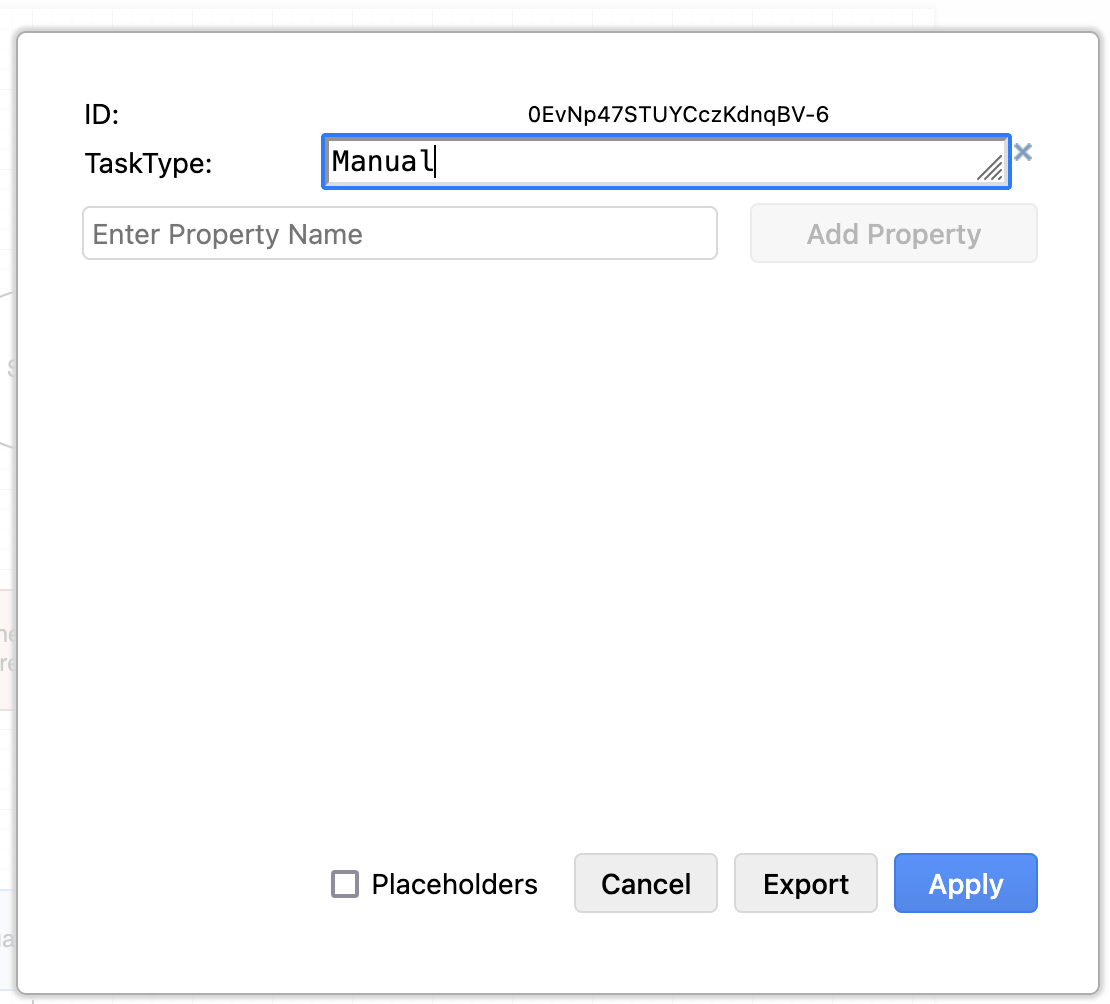
Add Data Attribute key "TaskType" with value "Manual"
DrawIO Manual Task Configuration
-
-
-
Automated task:
-
Drag a Rectangle shape onto the canvas
-
Double-click and add a descriptive label, this will be Task Name in CMF
-
Add attributes:
-
Right-click rectangle → Edit Data
-
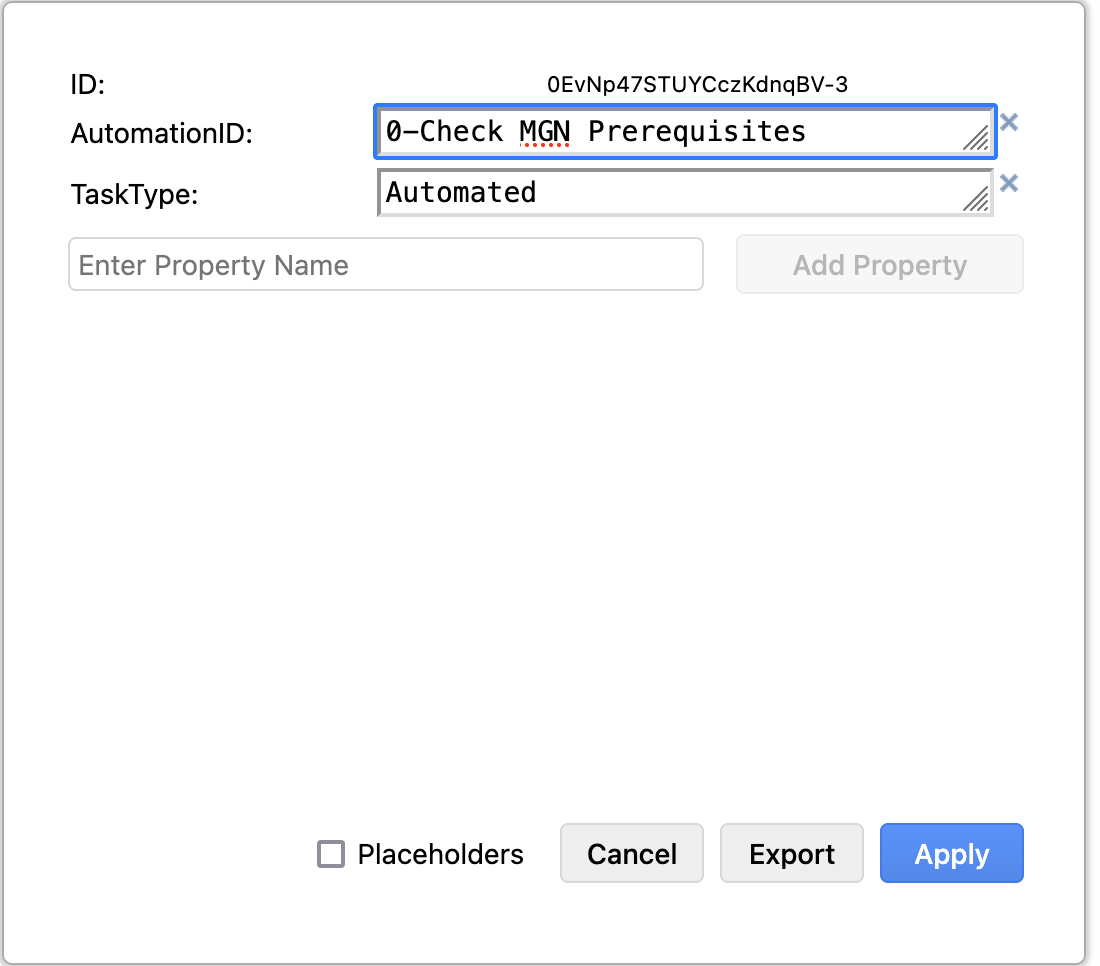
Add Data Attribute key "TaskType" with value "Automated"
-
Add Data Attribute key "AutomationID" with a valid CMF script name.
-
To find valid AutomationID:
-
Log into CMF portal
-
Navigate to "Scripts" under Automation in the left navigation bar
-
Browse or search for your desired script
CMF Scripts List

-
Use the script name as your AutomationID in your diagram
DrawIO Automated Task Configuration
-
-
-
-
-
Set template name
-
Rename the diagram tab to your desired template name
-
-
Saving & Exporting
-
File → Save As → Format: .drawio
-
-
Uploading to CMF
-
Log into CMF portal
-
Navigate to "Pipeline Templates" in the left navigation bar
-
Click on "Actions" and select "Import"
Pipeline Templates Action→Import

-
Choose your saved .drawio file
-
Click "Submit" to complete the import
Template Import Submit

-
After drawIO import is complete
-
A new template will be created under Pipeline Templates
-
To see how your diagram attributes are converted in CMF:
-
Locate your newly created template in the Pipeline Templates list
-
Click on the template to open it
-
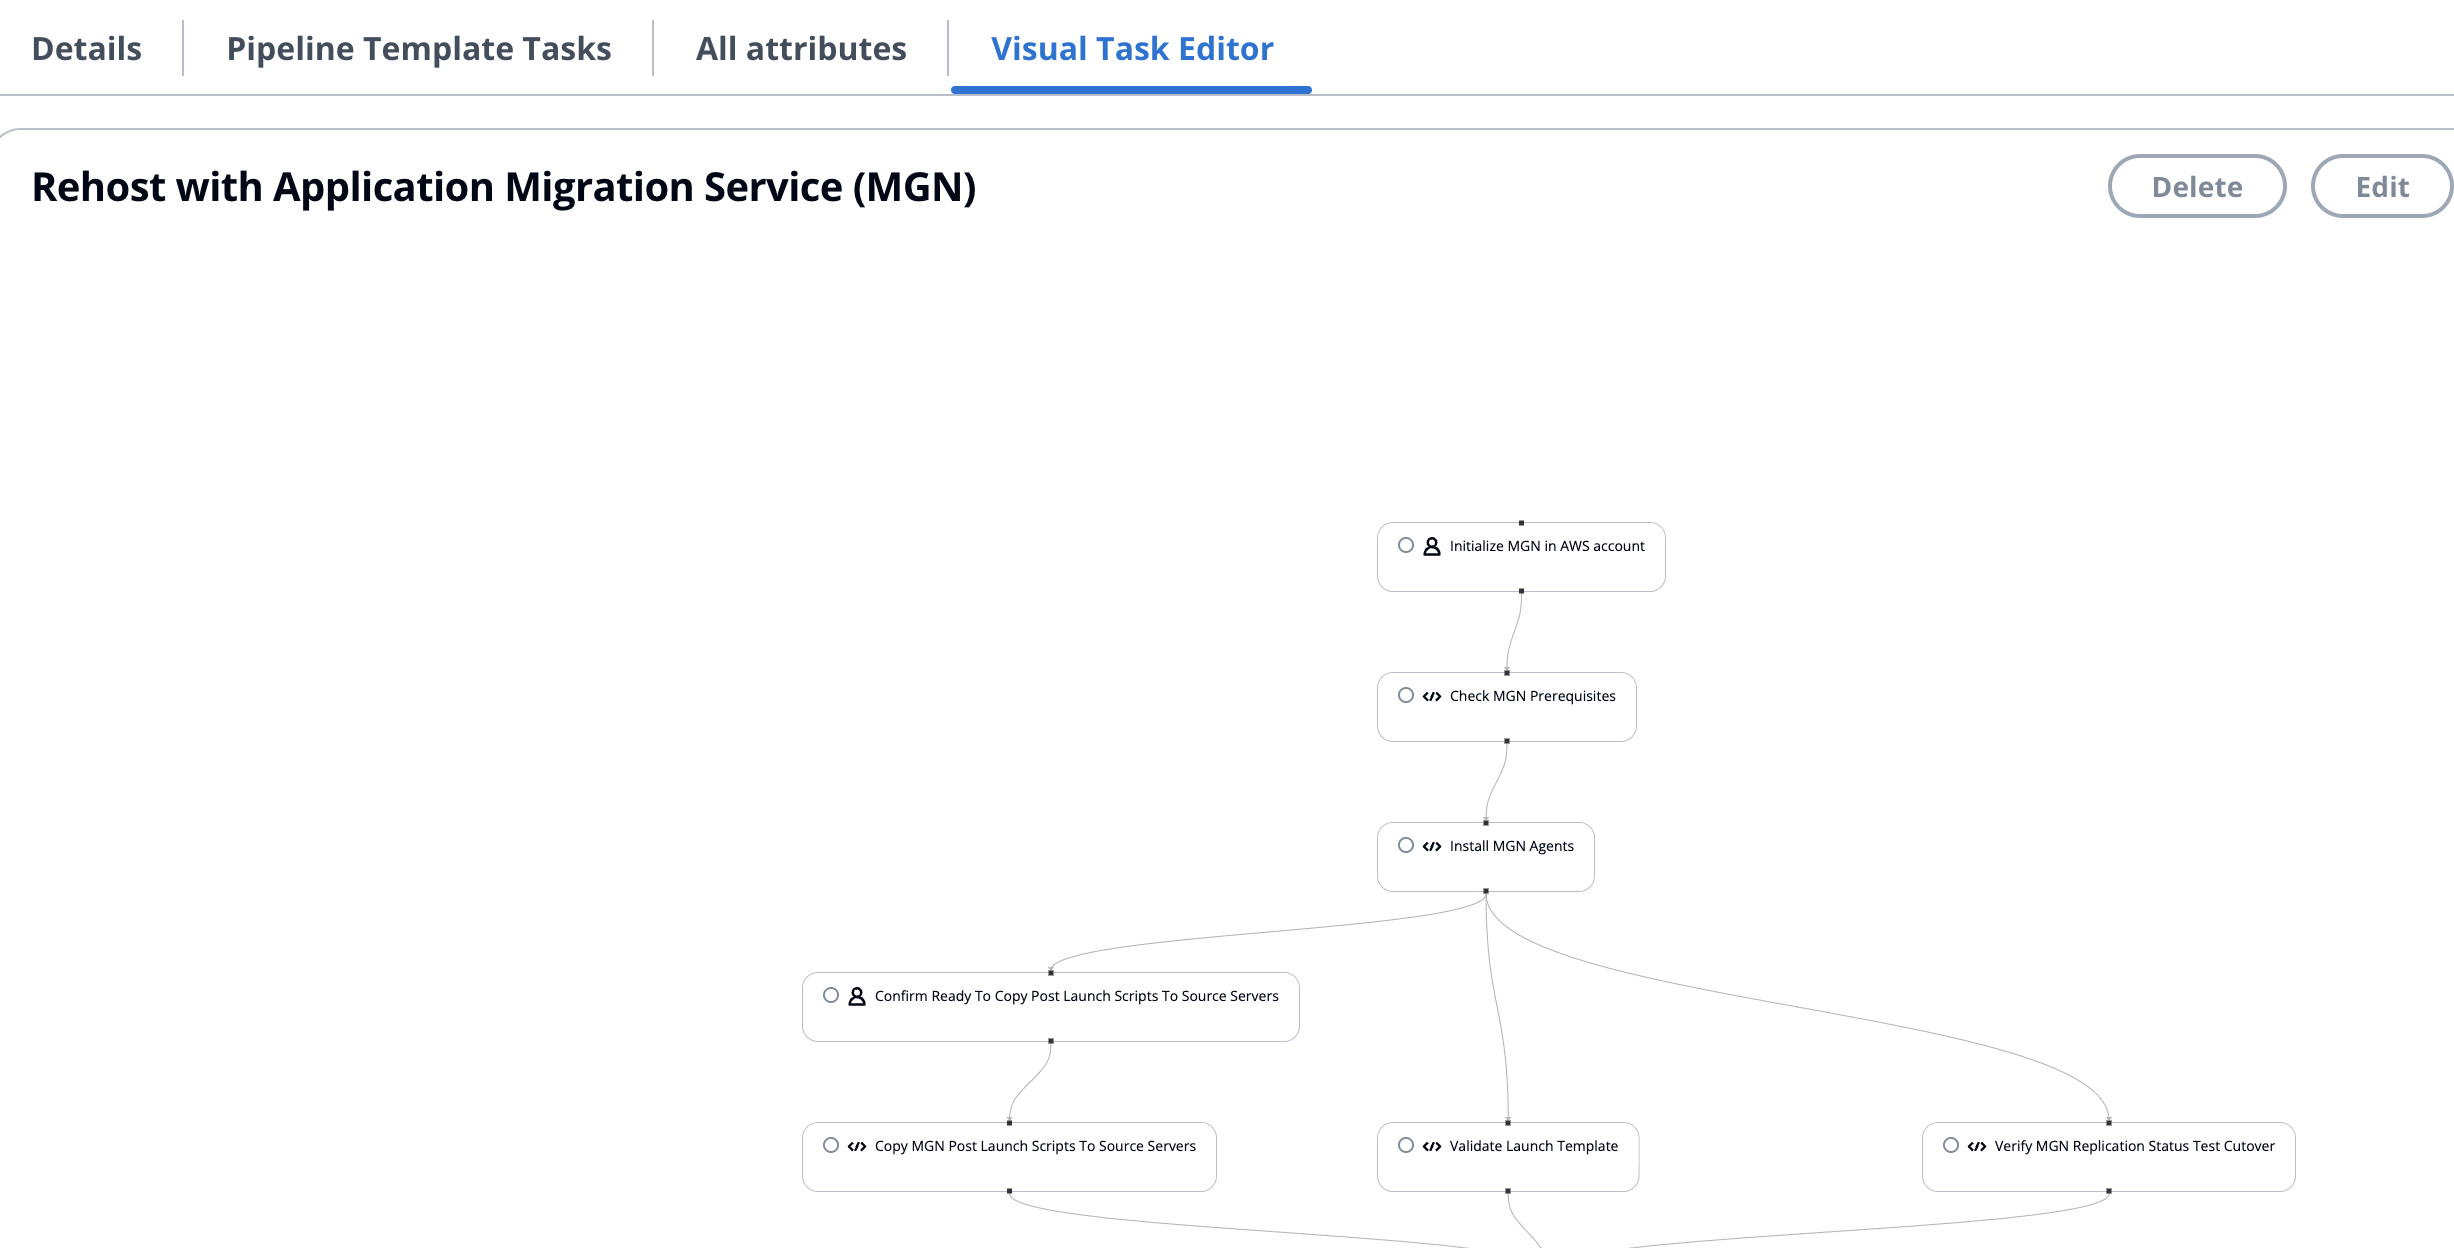
You’ll see a visual representation of your workflow under Visual task Editor
Pipeline Template Visual Task Editor
-
Each shape from your diagram is now a task in CMF
-
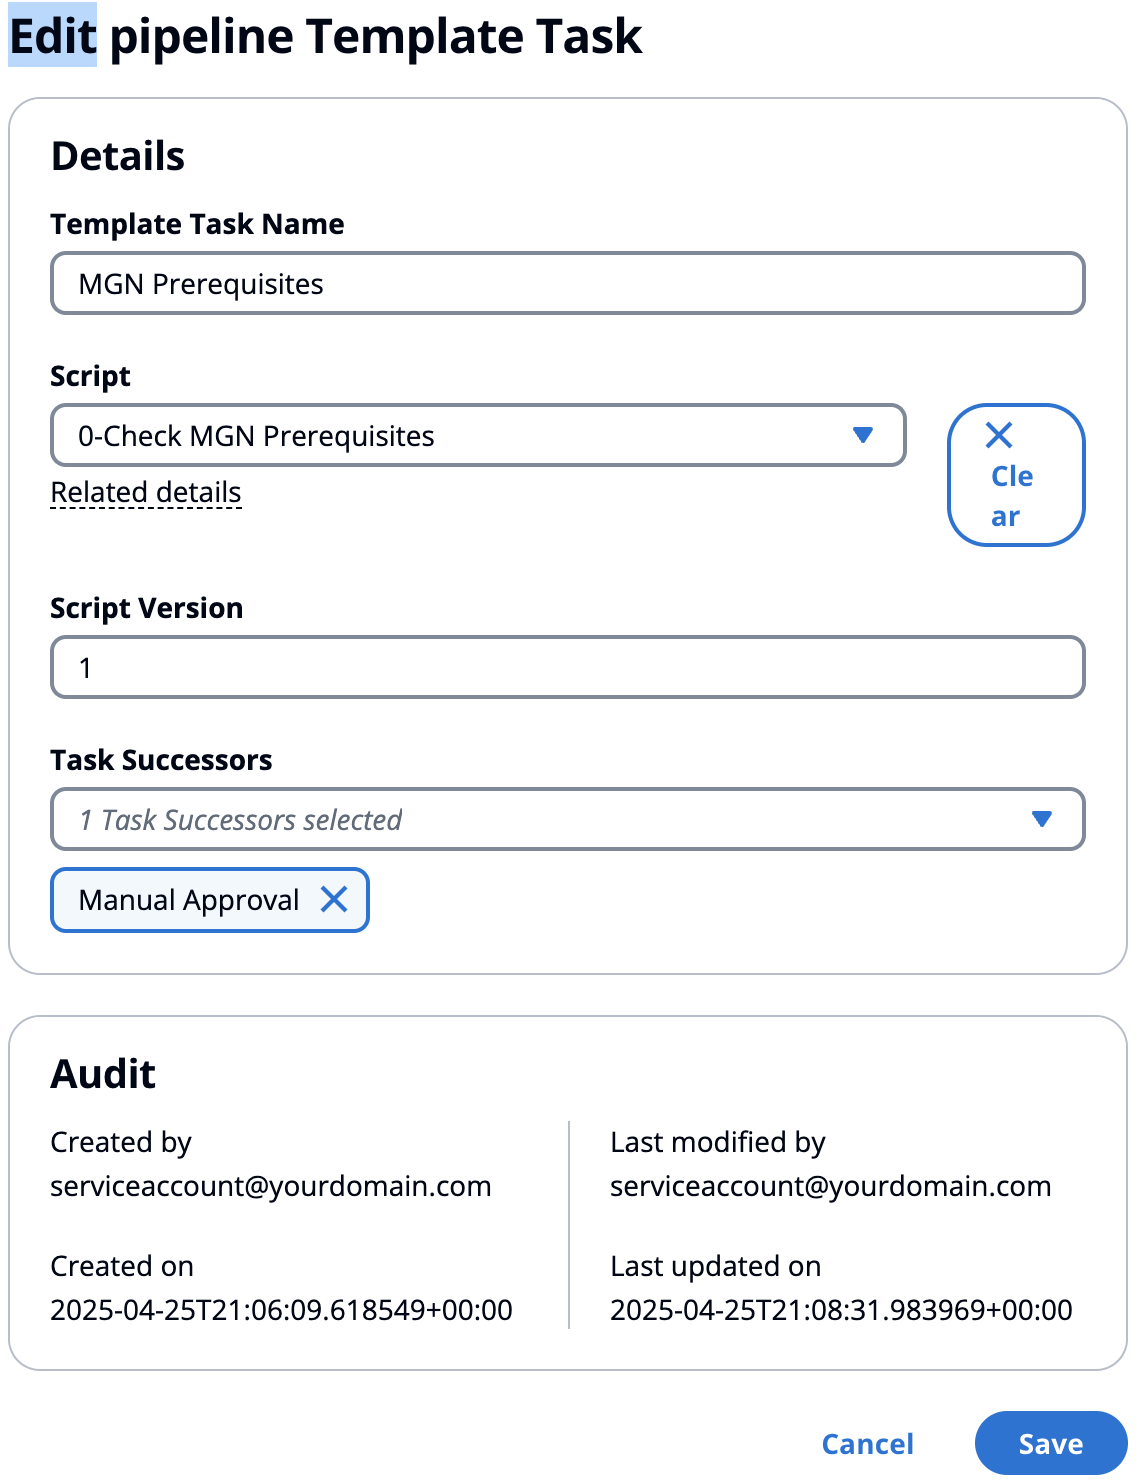
Click on a task to view its details:
-
Task names correspond to the labels you gave shapes
-
For automated tasks, you’ll see the assigned AutomationID under Scripts dropdown.
Pipeline Template Task Edit
-
-
Creating Templates in Lucid Chart
Follow these steps to create pipeline templates using Lucid Chart:
-
Create Start Node
-
Drag a Circle shape onto the canvas
-
Double-click and label it "Start"
-
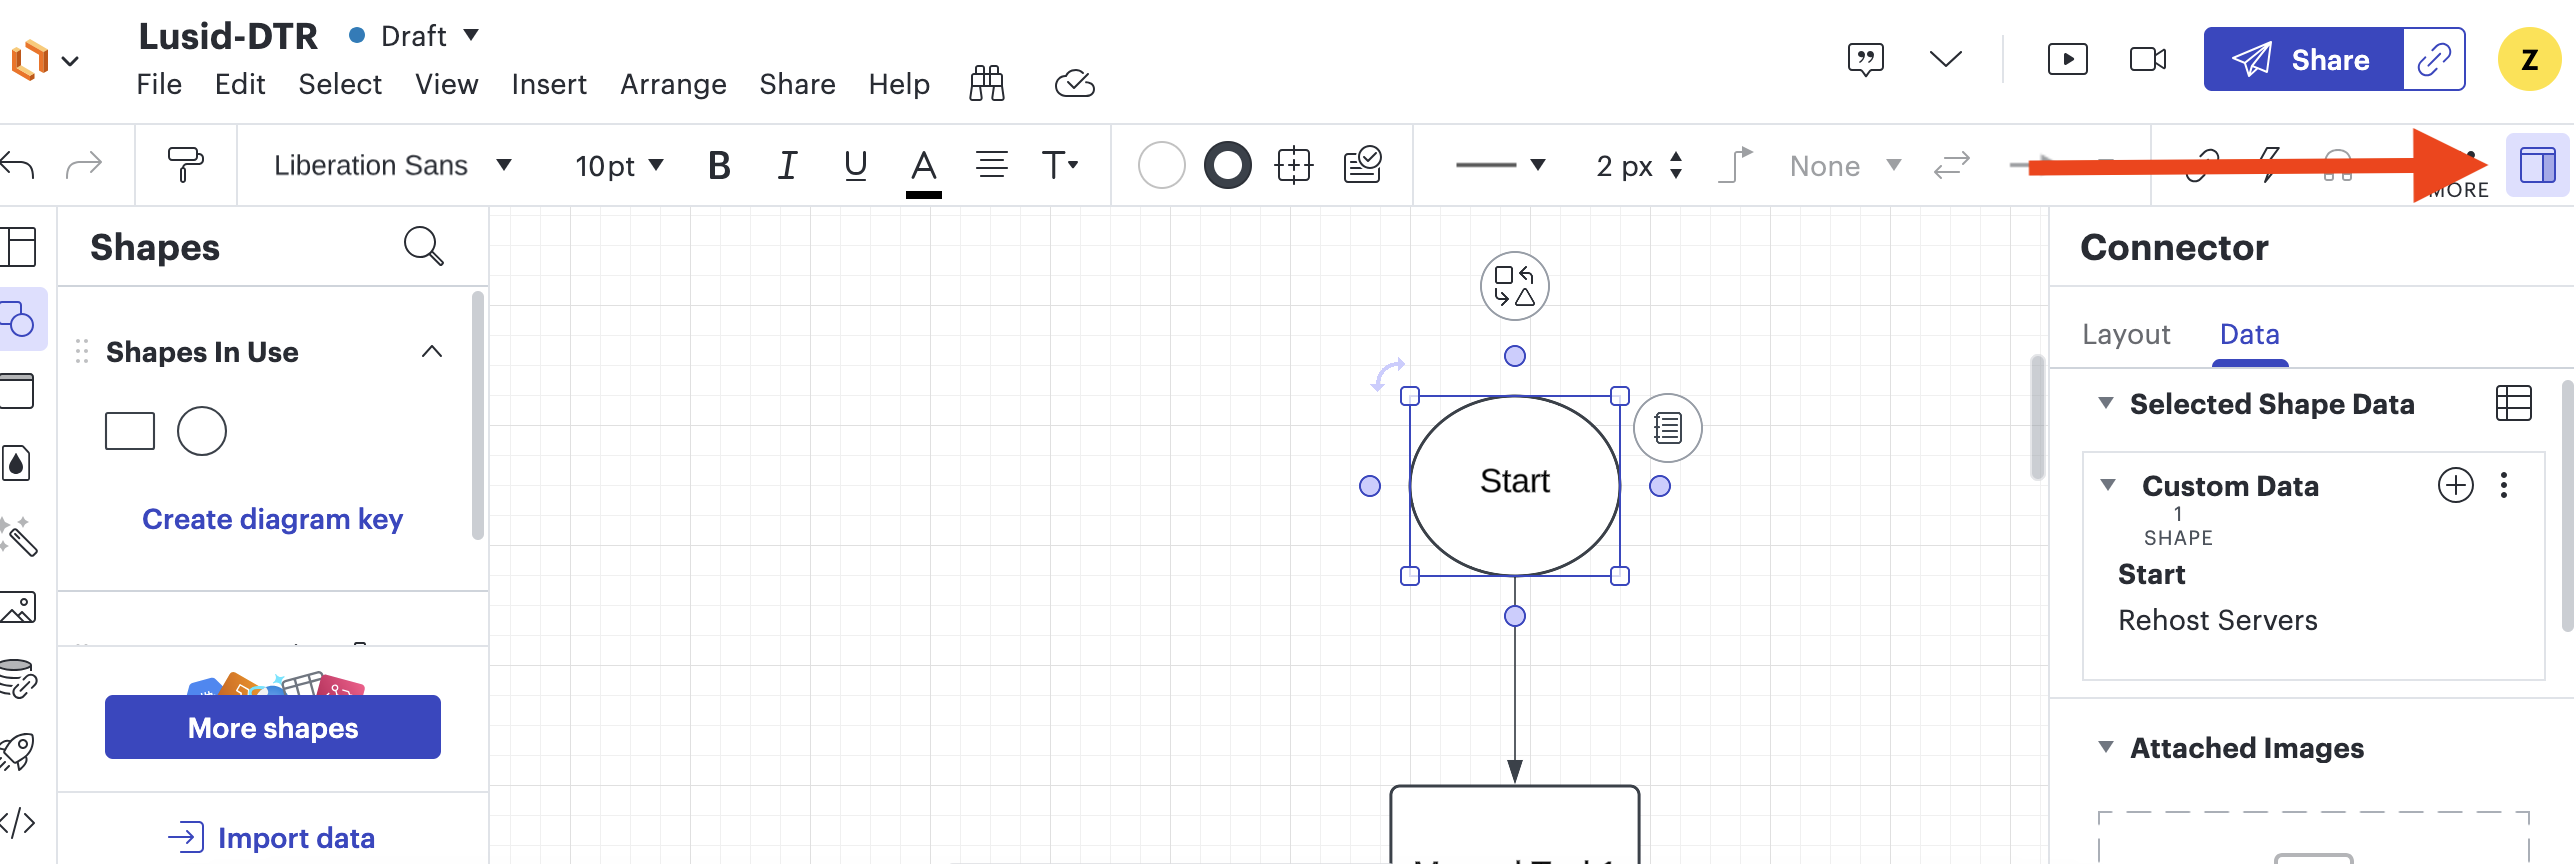
Add Start attribute:
-
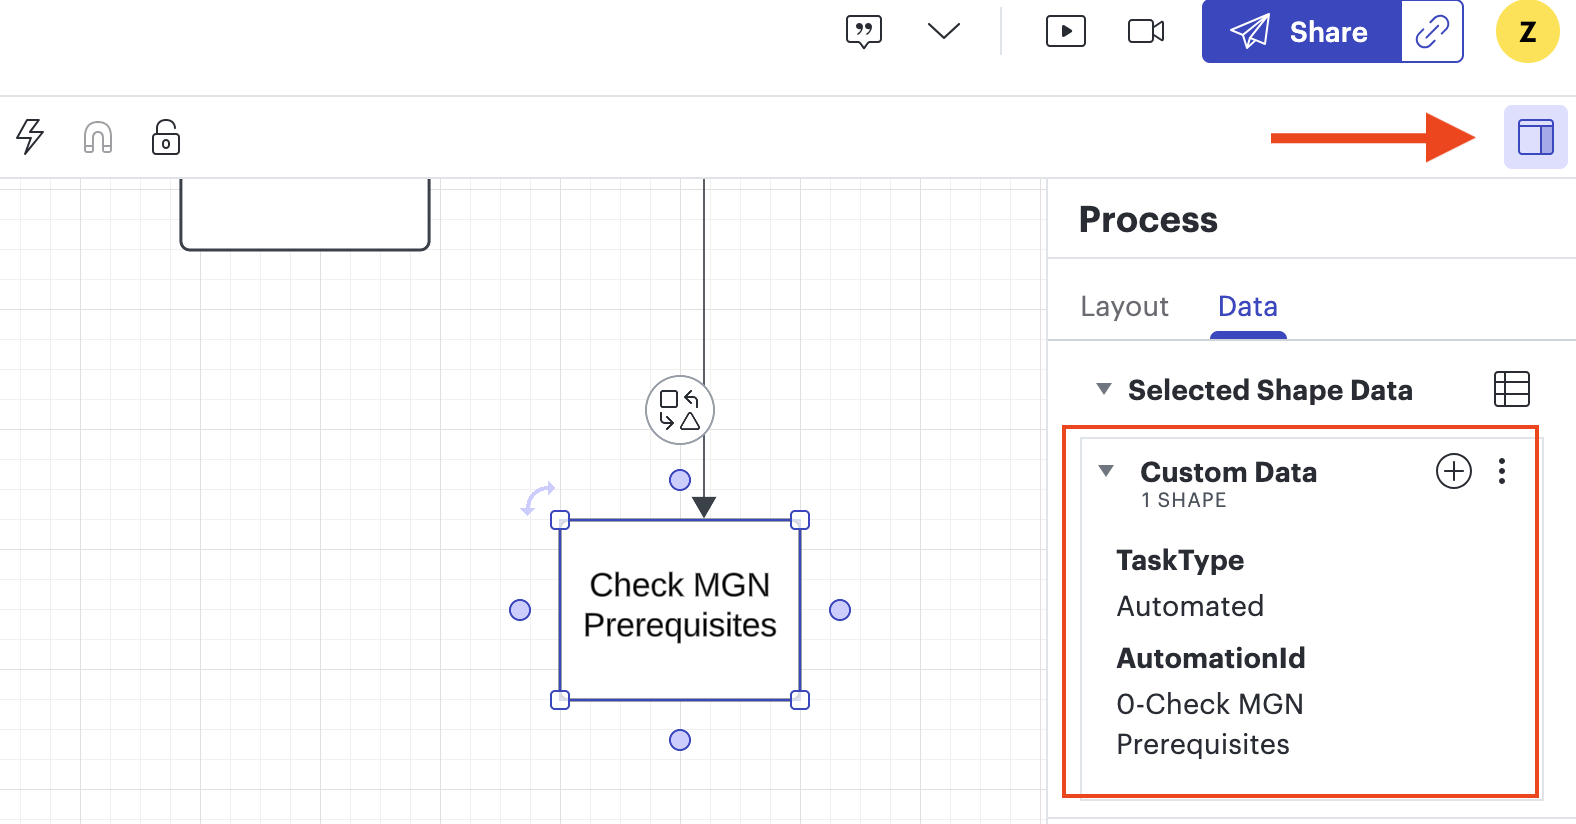
Click the data icon (marked by red arrow in UI)
-
Select the "Data" tab
-
Add Data Attribute key "Start" and value (e.g., "Rehost Servers")
Lucid Chart Start Node Configuration
-
-
-
Add Manual Tasks
-
Drag a Rectangle shape onto the canvas
-
Double-click and add a descriptive label
-
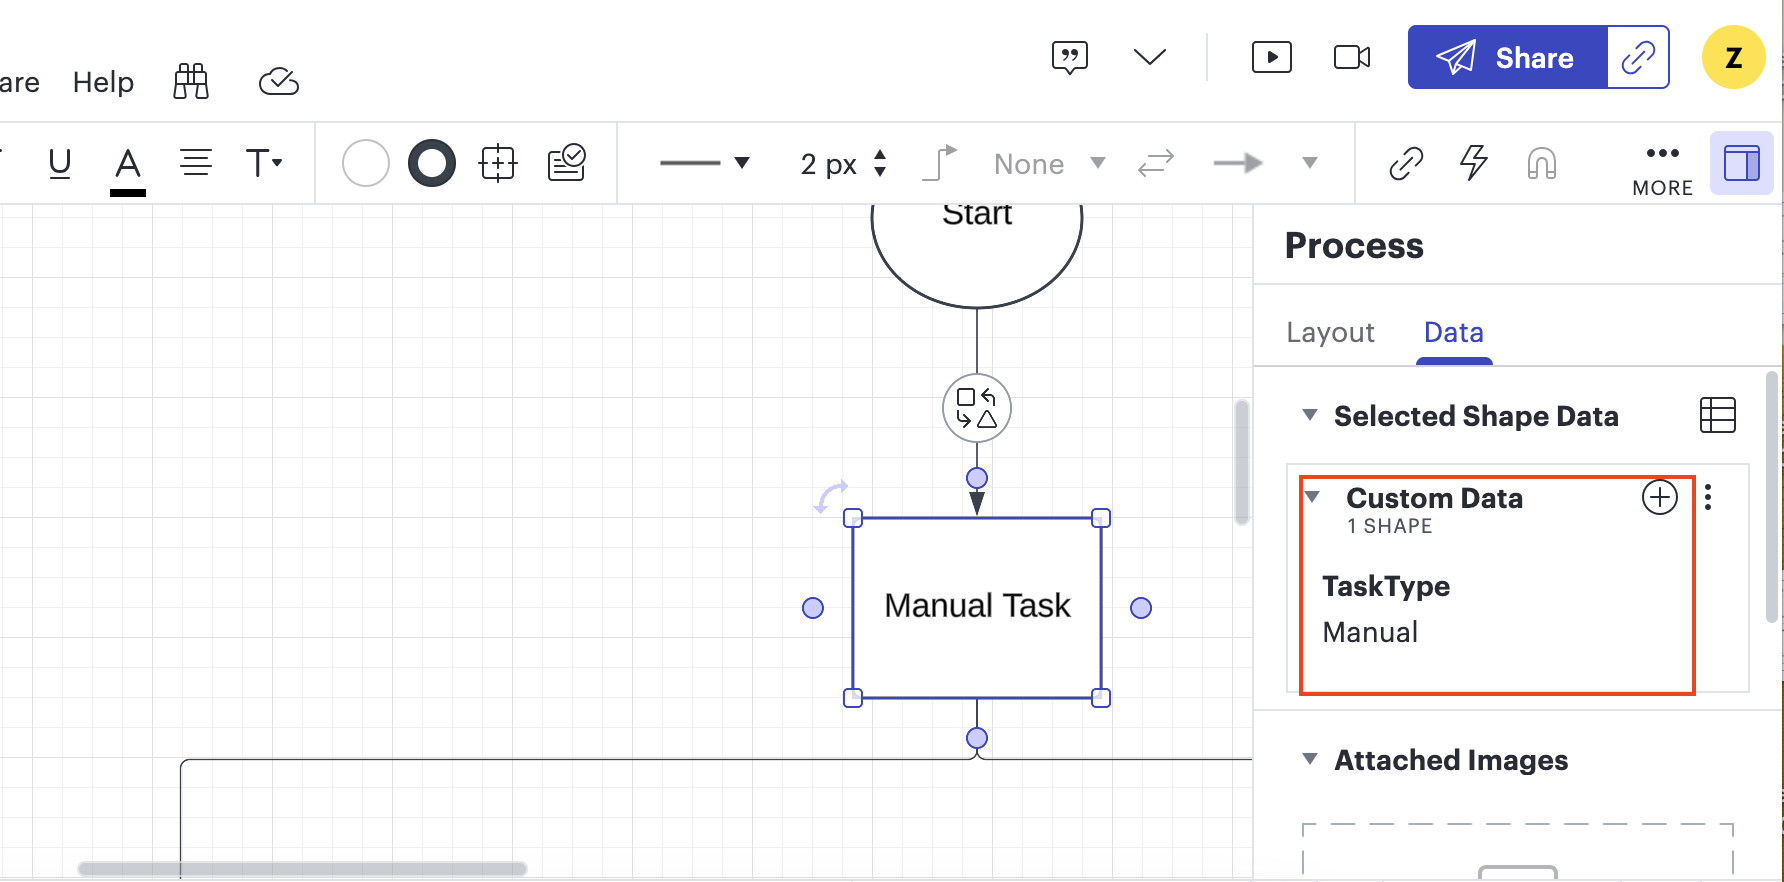
Add attributes:
-
Click the data icon
-
Select the "Data" tab
-
Add Data Attribute key "TaskType" with value "Manual"
Lucid Chart Manual Task Configuration
-
-
-
Add Automated Tasks
-
Drag a Rectangle shape onto the canvas
-
Double-click and add a descriptive label
-
Add attributes:
-
Click the data icon
-
Select the "Data" tab
-
Add Data Attribute key "TaskType" with value "Automated"
-
Add Data Attribute key "AutomationID" with a valid CMF script name
-
To find valid AutomationID:
-
Log into CMF portal
-
Navigate to "Scripts" under Automation in the left navigation bar
-
Browse or search for your desired script
CMF Scripts List

-
Use the script name as your AutomationID in your diagram
Lucid Chart Automated Task Configuration
-
-
-
-
-
Set template name
-
Rename the diagram tab to your desired template name
-
-
Saving & Exporting
-
File → Export → CSV of Shape Data
-
-
Uploading to CMF
-
Log into CMF portal
-
Navigate to "Pipeline Templates" in the left navigation bar
-
Click on "Actions" and select "Import"
Pipeline Templates Action→Import
-
Choose your saved lucid file
-
Click "Submit" to complete the import
Template Import Submit
-
After Lucid import is complete
-
A new template will be created under Pipeline Templates
-
To see how your diagram attributes are converted in CMF:
-
Locate your newly created template in the Pipeline Templates list
-
Click on the template to open it
-
You’ll see a visual representation of your workflow under Visual task Editor
Pipeline Template Visual Task Editor
-
Each shape from your diagram is now a task in CMF
-
Click on a task to view its details:
-
Task names correspond to the labels you gave shapes
-
For automated tasks, you’ll see the assigned AutomationID under Scripts dropdown.
Pipeline Template Task Edit
-
-
