Mapping targets for an automation
Use the Targets parameter to quickly define which resources are
targeted by an automation. For example, if you want to run an automation that
restarts your managed instances, then instead of manually selecting dozens of
instance IDs in the console or typing them in a command, you can target
instances by specifying Amazon Elastic Compute Cloud (Amazon EC2) tags with the Targets
parameter.
When you run an automation that uses a target, AWS Systems Manager creates a child automation for each target. For example, if you target Amazon Elastic Block Store (Amazon EBS) volumes by specifying tags, and those tags resolve to 100 Amazon EBS volumes, then Systems Manager creates 100 child automations. The parent automation is complete when all child automations reach a final state.
Note
Any input parameters that you specify at runtime (either in
the Input parameters section of the console or by using
the parameters option from the command line) are automatically
processed by all child automations.
You can target resources for an automation by using tags, Resource Groups,and parameter
values. Additionally, you can use the TargetMaps option to target
multiple parameter values from the command line or a file. The following section
describes each of these targeting options in more detail.
Targeting a tag
You can specify a single tag as the target of an automation. Many AWS resources support tags, including Amazon Elastic Compute Cloud (Amazon EC2) and Amazon Relational Database Service (Amazon RDS) instances, Amazon Elastic Block Store (Amazon EBS) volumes and snapshots, Resource Groups,and Amazon Simple Storage Service (Amazon S3) buckets, to name a few. You can quickly run automation on your AWS resources by targeting a tag. A tag is a key-value pair, such as Operating_System:Linux or Department:Finance. If you assign a specific name to a resource, then you can also use the word "Name" as a key, and the name of the resource as the value.
When you specify a tag as the target for an automation, you also specify a
target parameter. The target parameter uses the
TargetParameterName option. By choosing a target parameter,
you define the type of resource on which the automation runs. The target
parameter you specify with the tag must be a valid parameter defined in the
runbook. For example, if you want to target dozens of EC2 instances by using
tags, then choose the InstanceId target parameter. By choosing
this parameter, you define instances as the resource
type for the automation. When creating a custom runbook you must specify the
Target type as /AWS::EC2::Instance to
ensure only instances are used. Otherwise, all resources with the same tag
will be targeted. When targeting instances with a tag, terminated instances
might be included.
The following screenshot uses the AWS-DetachEBSVolume
runbook. The logical target parameter is VolumeId.
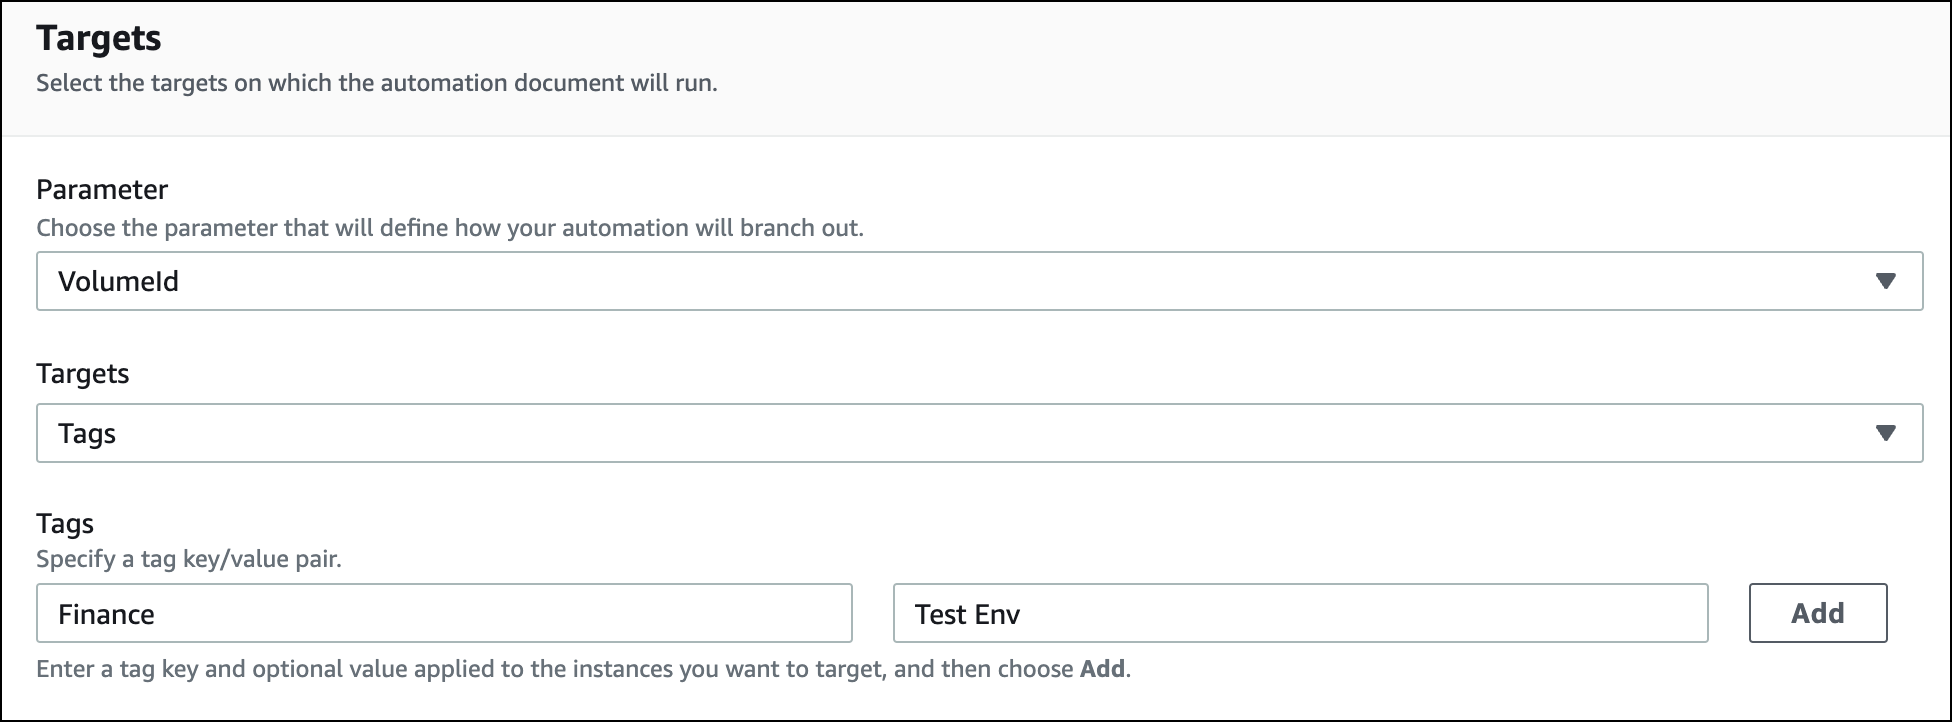
The AWS-DetachEBSVolume runbook also includes a special
property called Target type, which is set to
/AWS::EC2::Volume. This means that if the tag-key pair
Finance:TestEnv returns different types of resources (for
example, EC2 instances, Amazon EBS volumes, Amazon EBS snapshots) then only Amazon EBS
volumes will be used.
Important
Target parameter names are case sensitive. If you run automations by
using either the AWS Command Line Interface (AWS CLI) or AWS Tools for Windows PowerShell, then you must enter the
target parameter name exactly as it's defined in the runbook. If you
don't, the system returns an
InvalidAutomationExecutionParametersException error.
You can use the DescribeDocument API operation to see information about the
available target parameters in a specific runbook. Following is an
example AWS CLI command that provides information about the
AWS-DeleteSnapshot document.
aws ssm describe-document \
    --name AWS-DeleteSnapshot
Here are some example AWS CLI commands that target resources by using a tag.
Example 1: Targeting a tag using a key-value pair to restart Amazon EC2 instances
This example restarts all Amazon EC2 instances that are tagged with a key of Department and a value of HumanResources. The target parameter uses the InstanceId parameter from the runbook. The example uses an additional parameter to run the automation by using an Automation service role (also called an assume role).
aws ssm start-automation-execution \
    --document-name AWS-RestartEC2Instance \
    --targets Key=tag:Department,Values=HumanResources \
    --target-parameter-name InstanceId \
    --parameters "AutomationAssumeRole=arn:aws:iam::111122223333:role/AutomationServiceRole"
Example 2: Targeting a tag using a key-value pair to delete Amazon EBS snapshots
The following example uses the AWS-DeleteSnapshot runbook to
delete all snapshots with a key of Name and a value of
January2018Backups. The target parameter uses the
VolumeId parameter.
aws ssm start-automation-execution \
    --document-name AWS-DeleteSnapshot \
    --targets Key=tag:Name,Values=January2018Backups \
    --target-parameter-name VolumeId
Targeting AWS Resource Groups
You can specify a single AWS resource group as the target of an automation. Systems Manager creates a child automation for every object in the target Resource Group.
For example, say that one of your Resource Groups is named PatchedAMIs. This
Resource Group includes a list of 25 Windows Amazon Machine Images (AMIs) that
are routinely patched. If you run an automation that uses the
AWS-CreateManagedWindowsInstance runbook and target this
Resource Group, then Systems Manager creates a child automation for each of the 25
AMIs. This means, that by targeting the PatchedAMIs Resource Group, the
automation creates 25 instances from a list of patched AMIs. The parent
automation is complete when all child automations complete processing or
reach a final state.
The following AWS CLI command applies to the PatchAMIs Resource Group
example. The command takes the AmiId parameter for the
--target-parameter-name option. The command doesn't include
an additional parameter defining which type of instance to create from each
AMI. The AWS-CreateManagedWindowsInstance runbook defaults to
the t2.medium instance type, so this command would create 25 t2.medium Amazon EC2
instances for Windows Server.
aws ssm start-automation-execution \
    --document-name AWS-CreateManagedWindowsInstance \
    --targets Key=ResourceGroup,Values=PatchedAMIs  \
    --target-parameter-name AmiId
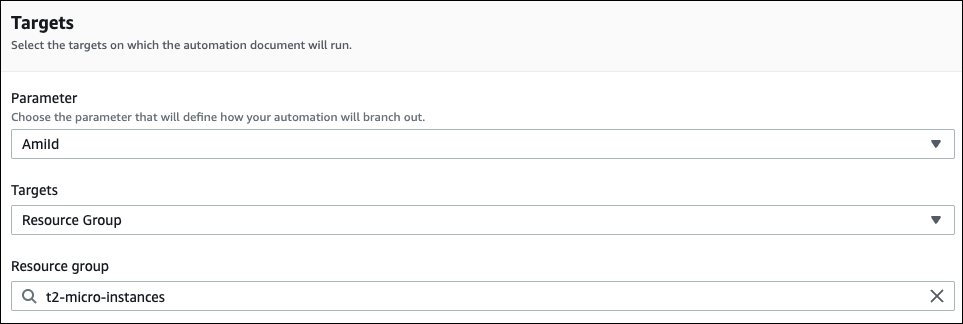
The following console example uses a Resource Group called t2-micro-instances.
Targeting parameter values
You can also target a parameter value. You enter
ParameterValues as the key and then enter the specific
resource value where you want the automation to run. If you specify multiple
values, Systems Manager runs a child automation on each value specified.
For example, say that your runbook includes an InstanceID parameter. If you target the values of the InstanceID parameter when you run the Automation, then Systems Manager runs a child automation for each instance ID value specified. The parent automation is complete when the automation finishes running each specified instance, or if the automation fails. You can target a maximum of 50 parameter values.
The following example uses the AWS-CreateImage runbook. The
target parameter name specified is InstanceId. The key
uses ParameterValues. The values are two Amazon EC2 instance
IDs. This command creates an automation for each instance, which produces an
AMI from each instance.
aws ssm start-automation-execution
    --document-name AWS-CreateImage \
    --target-parameter-name InstanceId \
    --targets Key=ParameterValues,Values=i-02573cafcfEXAMPLE,i-0471e04240EXAMPLE
Note
AutomationAssumeRole isn't a valid parameter. Don’t
choose this item when running automation that target a parameter
value.
Targeting parameter value maps
The TargetMaps option expands your ability to target
ParameterValues. You can enter an array of parameter
values by using TargetMaps at the command line. You can
specify a maximum of 50 parameter values at the command line. If you
want to run commands that specify more than 50 parameter values, then
you can enter the values in a JSON file. You can then call the file from
the command line.
Note
The TargetMaps option isn't supported in the
console.
Use the following format to specify multiple parameter values by using
the TargetMaps option in a command. Replace each
example resource placeholder with your
own information.
aws ssm start-automation-execution \ --document-namerunbook name\ --target-maps “parameter=value,parameter 2=value,parameter 3=value” “parameter 4=value,parameter 5=value,parameter 6=value”
If you want to enter more than 50 parameter values for the
TargetMaps option, then specify the values in a file by
using the following JSON format. Using a JSON file also improves
readability when providing multiple parameter values.
[

    {“parameter”: "value", “parameter 2”: "value", “parameter 3”: "value"},

    {“parameter 4”: "value", “parameter 5”: "value", "parameter 6": "value"}

]
Save the file with a .json file extension. You can call the file by
using the following command. Replace each example resource
placeholder with your own information.
aws ssm start-automation-execution \ --document-namerunbook name\ –-parametersinput parameters\ --target-mapspath to file/file name.json
You can also download the file from an Amazon Simple Storage Service (Amazon S3) bucket, as long
as you have permission to read data from the bucket. Use the following
command format. Replace each example resource
placeholder with your own information.
aws ssm start-automation-execution \ --document-namerunbook name\ --target-maps http://DOC-EXAMPLE-BUCKET.s3.amazonaws.com/file_name.json
Here is an example scenario to help you understand the
TargetMaps option. In this scenario, a user wants to
create Amazon EC2 instances of different types from different AMIs. To
perform this task, the user creates a runbook named AMI_Testing. This
runbook defines two input parameters: instanceType and
imageId.
{
  "description": "AMI Testing",
  "schemaVersion": "0.3",
  "assumeRole": "{{assumeRole}}",
  "parameters": {
    "assumeRole": {
      "type": "String",
      "description": "Role under which to run the automation",
      "default": ""
    },
    "instanceType": {
      "type": "String",
      "description": "Type of EC2 Instance to launch for this test"
    },
    "imageId": {
      "type": "String",
      "description": "Source AMI id from which to run instance"
    }
  },
  "mainSteps": [
    {
      "name": "runInstances",
      "action": "aws:runInstances",
      "maxAttempts": 1,
      "onFailure": "Abort",
      "inputs": {
        "ImageId": "{{imageId}}",
        "InstanceType": "{{instanceType}}",
        "MinInstanceCount": 1,
        "MaxInstanceCount": 1
      }
    }
  ],
  "outputs": [
    "runInstances.InstanceIds"
  ]
}
The user then specifies the following target parameter values in a
file named AMI_instance_types.json.
[
  {
    "instanceType" : ["t2.micro"],
    "imageId" : ["ami-b70554c8"]
  },
  {
    "instanceType" : ["t2.small"],
    "imageId" : ["ami-b70554c8"]
  },
  {
    "instanceType" : ["t2.medium"],
    "imageId" : ["ami-cfe4b2b0"]
  },
  {
    "instanceType" : ["t2.medium"],
    "imageId" : ["ami-cfe4b2b0"]
  },
  {
    "instanceType" : ["t2.medium"],
    "imageId" : ["ami-cfe4b2b0"]
  }
]
The user can run the automation and create the five EC2 instances
defined in AMI_instance_types.json by running the
following command.
aws ssm start-automation-execution \
    --document-name AMI_Testing \
    --target-parameter-name imageId \
    --target-maps file:///home/TestUser/workspace/runinstances/AMI_instance_types.json
Targeting all Amazon EC2 instances
You can run an automation on all Amazon EC2 instances in the current
AWS account and AWS Region by choosing All
instances in the Targets list. For
example, if you want to restart all Amazon EC2 instances your AWS account and
the current AWS Region, you can choose the
AWS-RestartEC2Instance runbook and
then choose All instances from the
Targets list.
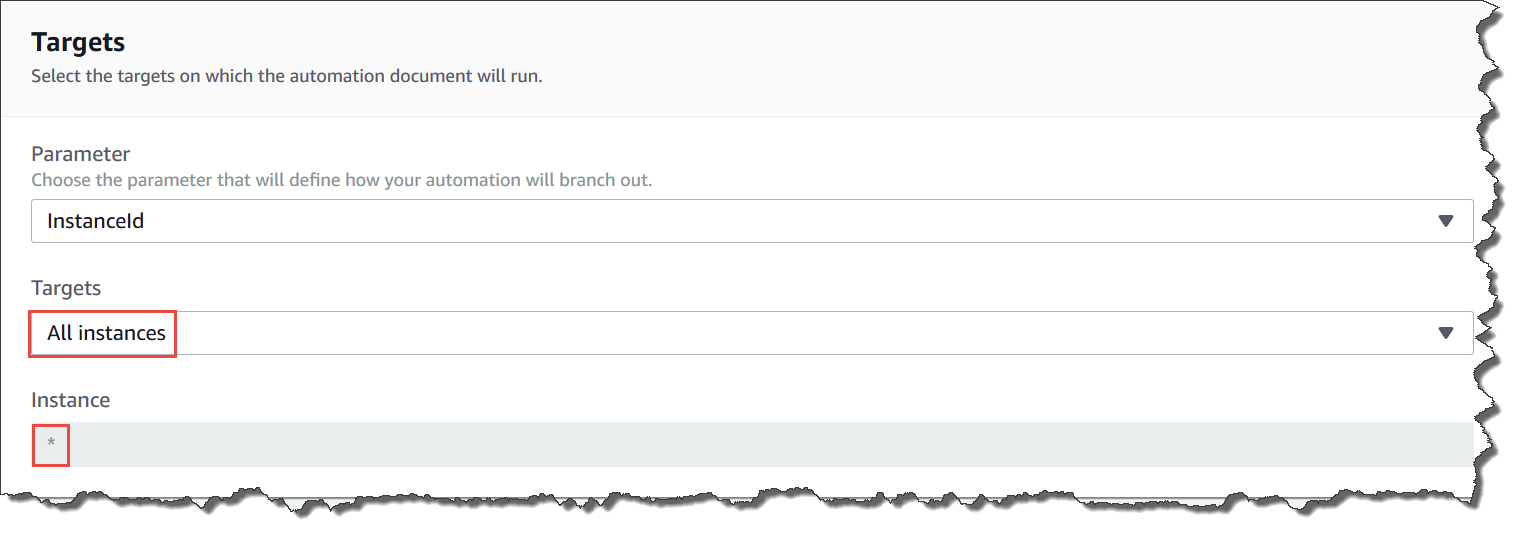
After you choose All instances, Systems Manager populates the Instance field with an asterisk (*) and makes the field unavailable for changes (the field is grayed out). Systems Manager also makes the InstanceId field in the Input parameters field unavailable for changes. Making these fields unavailable for changes is expected behavior if you choose to target all instances.
