# Amazon Textract Developer Guide
-----
*****Copyright © Amazon Web Services, Inc. and/or its affiliates. All rights reserved.*****
-----
Amazon's trademarks and trade dress may not be used in
connection with any product or service that is not Amazon's,
in any manner that is likely to cause confusion among customers,
or in any manner that disparages or discredits Amazon. All other
trademarks not owned by Amazon are the property of their respective
owners, who may or may not be affiliated with, connected to, or
sponsored by Amazon.
-----
## Contents
+ [What is Amazon Textract?](#what-is)
+ [Getting Started with Amazon Textract](#getting-started)
+ [Step 1: Set Up an AWS Account and Create a User](#setting-up)
+ [Step 2: Set Up the AWS CLI and AWS SDKs](#setup-awscli-sdk)
+ [Granting Programmatic Access](#program-access)
+ [Step 3: Get Started Using the AWS CLI and AWS SDK API](#get-started-exercise)
+ [Identifying Your Amazon Textract Use Case](#how-it-works)
+ [Detecting Text](#how-it-works-detecting)
+ [Analyzing Documents](#how-it-works-analyzing)
+ [Analyzing Invoices and Receipts](#invoices-receipts)
+ [Analyzing Identity Documents](#how-it-works-identity)
+ [Analyzing Lending Documents](#lending-document-classification-extraction)
+ [Customizing Outputs](#how-it-works-custom-queries)
+ [Interpreting Amazon Textract Responses](#document-response)
+ [Locating Items on a Document Page](#text-location)
+ [Text Detection and Document Analysis Response Objects](#how-it-works-document-layout)
+ [Pages](#how-it-works-pages)
+ [Lines and Words of Text](#how-it-works-lines-words)
+ [Form Data (Key-Value Pairs)](#how-it-works-kvp)
+ [Tables](#how-it-works-tables)
+ [Selection Elements](#how-it-works-selectables)
+ [Queries](#queryresponse)
+ [Layout Response Objects](#layoutresponse)
+ [Invoice and Receipt Response Objects](#expensedocuments)
+ [Identity Documentation Response Objects](#identitydocumentfields)
+ [Analyze Lending Response Objects](#lending-response-objects)
+ [Processing Documents Synchronously](#sync)
+ [Calling Amazon Textract Synchronous Operations](#sync-calling)
+ [Detecting Document Text with Amazon Textract](#detecting-document-text)
+ [Analyzing Document Text with Amazon Textract](#analyzing-document-text)
+ [Analyzing Invoices and Receipts with Amazon Textract](#analyzing-document-expense)
+ [Analyzing Identity Documentation with Amazon Textract](#analyzing-document-identity)
+ [Processing Documents Asynchronously](#async)
+ [Calling Amazon Textract Asynchronous Operations](#api-async)
+ [Configuring Amazon Textract for Asynchronous Operations](#api-async-roles)
+ [Detecting or Analyzing Text in a Multipage Document](#async-analyzing-with-sqs)
+ [Using the Analyze Lending Workflow](#async-using-lending)
+ [Amazon Textract Results Notification](#async-notification-payload)
+ [Customizing your Queries Responses](#textract-using-adapters)
+ [Creating adapters](#textract-creating-using-adapters)
+ [Create an Adapter](#textract-create-adapter)
+ [Get adapter](#textract-get-adapter)
+ [List adapters](#textract-list-adapter)
+ [Update adapter](#textract-update-adapter)
+ [Delete an Adapter](#textract-delete-adapter)
+ [Preparing training and testing datasets](#textract-preparing-training-testing)
+ [Training adapter versions](#training-adapter-versions)
+ [Create adapter version](#textract-create-adapter-version)
+ [Evaluating and improving your adapters](#textract-evaluating-improving-adapters)
+ [List adapter versions](#textract-list-adapter-version)
+ [Get an Adapter version](#textract-get-adapter-version)
+ [Delete adapter version](#textract-delete-adapter-version)
+ [Debugging training failures](#textract-debugging-failures-adapters)
+ [Using Adapters during Inference](#textract-adapter-inference)
+ [Custom Queries tutorial](#textract-adapters-tutorial)
+ [Copying adapters](#textract-copy-adapters)
+ [Best Practices](#textract-best-practices)
+ [Best Practices for Queries](#bestqueries)
+ [Best Practices for Bulk Document Uploader](#bulk-uploader-best-practices)
+ [Best practices for Amazon Textract Custom Queries](#best-practices-adapters)
+ [Handling Connection Errors](#handling-errors)
+ [Tutorials](#examples-blocks)
+ [Extracting Key-Value Pairs from a Form Document](#examples-extract-kvp)
+ [Exporting Tables into a CSV File](#examples-export-table-csv)
+ [Detecting text with an AWS Lambda function](#lambda)
+ [Extracting and Sending Text to AWS Comprehend for Analysis](#textract-to-comprehend)
+ [Additional Code Samples](#other-examples)
+ [Security in Amazon Textract](#security)
+ [Data Protection in Amazon Textract](#data-protection)
+ [Encryption in Amazon Textract](#encryption)
+ [Identity and Access Management for Amazon Textract](#security-iam)
+ [How Amazon Textract Works with IAM](#security_iam_service-with-iam)
+ [Amazon Textract Identity-Based Policy Examples](#security_iam_id-based-policy-examples)
+ [Troubleshooting Amazon Textract Identity and Access](#security_iam_troubleshoot)
+ [Logging and Monitoring](#textract_monitoring)
+ [Monitoring Amazon Textract](#textract-monitoring)
+ [CloudWatch Metrics for Amazon Textract](#cloudwatch-metricsdim)
+ [Logging Amazon Textract API Calls with AWS CloudTrail](#logging-using-cloudtrail)
+ [Tagging resources](#tagging-adapters)
+ [Tag resource](#w2aac46c25b5)
+ [List tags for resource](#w2aac46c25b7)
+ [Untag resource](#w2aac46c25b9)
+ [Compliance Validation for Amazon Textract](#SERVICENAME-compliance)
+ [Resilience in Amazon Textract](#disaster-recovery-resiliency)
+ [Cross-service confused deputy prevention](#cross-service-confused-deputy-prevention)
+ [Infrastructure Security in Amazon Textract](#infrastructure-security)
+ [Configuration and Vulnerability Analysis in Amazon Textract](#vulnerability-analysis-and-management)
+ [Amazon Textract and interface VPC endpoints (AWS PrivateLink)](#vpc-interface-endpoints)
+ [API Reference](#API_Reference)
+ [Quotas in Amazon Textract](#limits)
+ [Set Quotas in Amazon Textract](#limits-document)
+ [Modifying Default Quotas in Amazon Textract](#limits-quotas-explained)
+ [Document History for Amazon Textract](#document-history)
-----
# What is Amazon Textract?
Amazon Textract helps you add document text detection and analysis to your applications. Using Amazon Textract, you can do the following:
+ Detect typed and handwritten text in a variety of documents, including financial reports, medical records, and tax forms.
+ Extract text, forms, and tables from documents with structured data, using the Amazon Textract Document Analysis API.
+ Specify and extract information from documents using the Queries feature within the Amazon Textract Analyze Document API.
+ Process invoices and receipts with the AnalyzeExpense API.
+ Process ID documents such as drivers licenses and passports issued by U.S. government, using the AnalyzeID API.
+ Upload and process mortgage loan packages, through automatic routing of the the document pages to the appropriate Amazon Textract analysis operations using the Analyze Lending workflow. You can retrieve analysis results for each document page or you can retrieve summarized results for a set of document pages.
+ Use Custom Queries to customize the pretrained Queries feature using your data to support your down stream processing needs.
Amazon Textract is based on the same proven, highly scalable, deep-learning technology that was developed by Amazon's computer vision scientists to analyze billions of images and videos daily. You don't need any machine learning expertise to use it, as Amazon Textract includes simple, easy-to-use API operations that can analyze image files and PDF files. Amazon Textract is always learning from new data, and Amazon is continually adding new features to the service.
The following are common use cases for using Amazon Textract:
+ **Creating an intelligent search index** – Using Amazon Textract you can create libraries of text that is detected in image and PDF files.
+ **Using intelligent text extraction for natural language processing (NLP)** – Amazon Textract provides you with control over how text is grouped as an input for NLP applications. It can extract text as words and lines. It also groups text by table cells if Amazon Textract document table analysis is enabled.
+ **Accelerating the capture and normalization of data from different sources** – Amazon Textract enables text and tabular data extraction from a wide variety of documents, such as financial documents, research reports, and medical notes. With Amazon Textract Analyze Document APIs, you can easily and quickly extract unstructured and structured data from your documents.
+ **Automating data capture from forms** – Amazon Textract enables structured data to be extracted from forms. With Amazon Textract Analysis APIs, you can build extraction capabilities into existing business workflows so that user data submitted through forms can be extracted into a usable format.
+ **Automating document classification and extraction** – With Amazon Textract's Analyze Lending document processing API, you can automate the classification of lending documents into various document classes, and then automatically route the classified pages to the correct analysis operation for further processing.
Some of the benefits of using Amazon Textract include:
+ **Integration of document text detection into your apps** – Amazon Textract removes the complexity of building text detection capabilities into your applications by making powerful and accurate analysis available with a simple API. You don’t need computer vision or deep learning expertise to use Amazon Textract to detect document text. With Amazon Textract Text APIs, you can easily build text detection into any web, mobile, or connected device application.
+ **Scalable document analysis** – Amazon Textract enables you to analyze and extract data quickly from millions of documents, which can accelerate decision making.
+ **Low cost** – With Amazon Textract, you only pay for the documents you analyze. There are no minimum fees or upfront commitments. You can get started for free, and save more as you grow with our tiered pricing model.
With synchronous processing, Amazon Textract can analyze single-page documents for applications where latency is critical. Amazon Textract also provides asynchronous operations to extend support to multipage documents.
Amazon Textract's API operations have quotas that limit how quickly and how often you can use them. If the limit set for your account is frequently exceeded, you can request a limit increase. To change a limit, select the Amazon Textract option in the Service Quotas console. You can use the Quotas Calculator in the Amazon Textract console to determine your quota requirements. To learn more about default quotas that can be changed, see [Information on Default Quotas in Amazon Textract](#limits-quotas-explained).
Other quotas, like file size and languages supported by Amazon Textract, cannot be changed. For more information on set quotas, see [Set Quotas in Amazon Textract](#limits-document).
## First-Time Amazon Textract Users
If this is your first time using Amazon Textract, we recommend that you read the following sections in order:
1. **[Identifying Your Amazon Textract Use Case](#how-it-works)** – This section introduces the Amazon Textract components and how they work together for an end-to-end experience.
1. **[Getting Started with Amazon Textract](#getting-started)** – In this section, you set up your account and test the Amazon Textract API.
# Getting Started with Amazon Textract
This section provides topics to get you started using Amazon Textract. It covers the prerequisites of creating and configuring your AWS account and the AWS SDKs you will use to invoke the Amazon Textract APIs. If you're new to Amazon Textract, we recommend that you first review the concepts and terminology in [Identifying Your Amazon Textract Use Case](#how-it-works).
You can try the API by using the demonstration in the Amazon Textract console. For more information, see [https://console.aws.amazon.com/textract/](https://console.aws.amazon.com/textract/).
**Topics**
+ [Step 1: Set Up an AWS Account and Create a User](#setting-up)
+ [Step 2: Set Up the AWS CLI and AWS SDKs](#setup-awscli-sdk)
+ [Step 3: Get Started Using the AWS CLI and AWS SDK API](#get-started-exercise)
## Step 1: Set Up an AWS Account and Create a User
### Sign up for an AWS account
To get started with AWS, you need an AWS account. For information about creating an AWS account, see [Getting started with an AWS account](https://docs.aws.amazon.com/accounts/latest/reference/getting-started.html) in the *AWS Account Management Reference Guide*.
### Next Step
[Step 2: Set Up the AWS CLI and AWS SDKs](#setup-awscli-sdk)
## Step 2: Set Up the AWS CLI and AWS SDKs
The following steps show you how to install the AWS Command Line Interface (AWS CLI) and AWS SDKs that the examples in this documentation use.
There are a number of different ways to authenticate AWS SDK calls. The examples in this guide assume that you're using a default credentials profile for calling AWS CLI commands and AWS SDK API operations. Your default credentials will work across services, so if you have already configured your credentials you don't need to do so again. However, if you would like to create another set of credentials for this service, you can create a name profile. For more information about creating profiles, [see Named Profiles.](https://docs.aws.amazon.com/cli/latest/userguide/cli-configure-files.html#cli-configure-files-using-profiles)
For a list of available AWS Regions, see [Regions and Endpoints](https://docs.aws.amazon.com/general/latest/gr/rande.html) in the *Amazon Web Services General Reference*.
### Download AWS CLI and SDK
**To set up the AWS CLI and the AWS SDKs**
1. Download and install the AWS CLI and the AWS SDKs that you want to use. This guide provides examples for the AWS CLI, Java, and Python. For information about other AWS SDKs, see [Tools for Amazon Web Services](https://aws.amazon.com/tools/).
+ [AWS CLI](https://docs.aws.amazon.com/cli/latest/userguide/cli-chap-getting-set-up.html)
+ [AWS SDK for Java](https://docs.aws.amazon.com/sdk-for-java/latest/developer-guide/)
+ [AWS SDK for Python (Boto3)](https://docs.aws.amazon.com/boto3/latest/index.html)
1. Create an access key for the user that you created in [Step 1: Set Up an AWS Account and Create a User](#setting-up).
1. Sign in to the AWS Management Console and open the IAM console at [https://console.aws.amazon.com/iam/](https://console.aws.amazon.com/iam/).
1. In the navigation pane, choose **Users**.
1. Choose the name of the user that you created in [Step 1: Set Up an AWS Account and Create a User](#setting-up).
1. Choose the **Security credentials** tab.
1. Choose **Create access key**. Then choose **Download .csv file** to save the access key ID and secret access key to a CSV file on your computer. Store the file in a secure location. You will not have access to the secret access key again after this dialog box closes. After you've downloaded the CSV file, choose **Close**.
1. Set credentials in the AWS credentials profile file on your local system, located at:
+ `~/.aws/credentials` on Linux, macOS, or Unix.
+ `C:\Users\USERNAME\.aws\credentials` on Windows.
The `.aws` folder does not exist prior to your first initial configuration of your AWS instance. The first time you configure your credentials with the CLI, this folder will be created. For more information regarding AWS credentials, see [Configuration and Credential File Settings.](https://docs.aws.amazon.com/cli/latest/userguide/cli-configure-files.html)
This file should contain lines in the following format:
```
[default]
aws_access_key_id = your_access_key_id
aws_secret_access_key = your_secret_access_key
```
Substitute your access key ID and secret access key for *your\_access\_key\_id* and *your\_secret\_access\_key*.
1. Set the default AWS Region in the AWS `config` file on your local system, located at:
+ `~/.aws/config` on Linux, macOS, or Unix.
+ `C:\Users\USERNAME\.aws\config` on Windows.
The `.aws` folder does not exist prior to your first initial configuration of your AWS instance. The first time you configure your credentials with the CLI, this folder will be created. For more information regarding AWS credentials, see [Configuration and Credential File Settings.](https://docs.aws.amazon.com/cli/latest/userguide/cli-configure-files.html)
This file should contain the following lines:
```
[default]
region = your_aws_region
```
Substitute the AWS Region you want (for example, "us-west-2") for *your\_aws\_region*.
**Note**
If you don't choose a Region, then us-east-1 is used by default.
**Note**
If you intend to call the Amazon Textract demo objects programmatically, insure that you have access to the `arn:aws:s3:::textract-public-assets-{{region}}/* ` bucket.
From here, go to [Granting Programmatic Access](#program-access) so you can further set up your enviroment with appropriate permissions for using Amazon Textract operations.
### Next Step
[Step 3: Get Started Using the AWS CLI and AWS SDK API](#get-started-exercise)
### Granting Programmatic Access
You can run the AWS CLI and code examples in this guide on your local computer or other AWS enviroments, such as an Amazon Elastic Compute Cloud instance. To use the features in the Amazon Textract SDK, you'll need to grant your user access. This section will discuss what permissions a use might need for the Amazon Textract SDK, and assigning permissions to users.
#### Setting up SDK Permissions
We reccomend that you only grant permissions required to perform a task (least-privilege permissions) For example to call AnalyzeDocumentText, you need permission to perform `textract:AnalyzeDocumentText`. When starting out with the application you might not know what permissions you need, so you can start with broader permissions. You can use the `AmazonTextractFullAccess` managed policy to get complete access to the Amazon Textract API.
#### Running Code on your Local Computer
To run code on a local computer, we recommend that you use short-term credentials to grant a user access to AWS SDK operations. For specific information about running the AWS CLI and code examples on a local computer, see [Using a profile on your local computer](#local-profiles).
Users need programmatic access if they want to interact with AWS outside of the AWS Management Console. The way to grant programmatic access depends on the type of user that's accessing AWS.
To grant users programmatic access, choose one of the following options.
| Which user needs programmatic access? | To | By |
| --- | --- | --- |
| IAM | (Recommended) Use console credentials as temporary credentials to sign programmatic requests to the AWS CLI, AWS SDKs, or AWS APIs. | Following the instructions for the interface that you want to use.+ For the AWS CLI, see [Login for AWS local development](https://docs.aws.amazon.com/cli/latest/userguide/cli-configure-sign-in.html) in the *AWS Command Line Interface User Guide*.
+ For AWS SDKs, see [Login for AWS local development](https://docs.aws.amazon.com/sdkref/latest/guide/access-login.html) in the *AWS SDKs and Tools Reference Guide*. |
| Workforce identity
(Users managed in IAM Identity Center) | Use temporary credentials to sign programmatic requests to the AWS CLI, AWS SDKs, or AWS APIs. | Following the instructions for the interface that you want to use.+ For the AWS CLI, see [Configuring the AWS CLI to use AWS IAM Identity Center](https://docs.aws.amazon.com/cli/latest/userguide/cli-configure-sso.html) in the *AWS Command Line Interface User Guide*.
+ For AWS SDKs, tools, and AWS APIs, see [IAM Identity Center authentication](https://docs.aws.amazon.com/sdkref/latest/guide/access-sso.html) in the *AWS SDKs and Tools Reference Guide*. |
| IAM | Use temporary credentials to sign programmatic requests to the AWS CLI, AWS SDKs, or AWS APIs. | Following the instructions in [Using temporary credentials with AWS resources](https://docs.aws.amazon.com/IAM/latest/UserGuide/id_credentials_temp_use-resources.html) in the IAM User Guide. |
| IAM | (Not recommended)Use long-term credentials to sign programmatic requests to the AWS CLI, AWS SDKs, or AWS APIs. | Following the instructions for the interface that you want to use.+ For the AWS CLI, see [Authenticating using IAM user credentials](https://docs.aws.amazon.com/cli/latest/userguide/cli-authentication-user.html) in the *AWS Command Line Interface User Guide*.
+ For AWS SDKs and tools, see [Authenticate using long-term credentials](https://docs.aws.amazon.com/sdkref/latest/guide/access-iam-users.html) in the *AWS SDKs and Tools Reference Guide*.
+ For AWS APIs, see [Managing access keys for IAM users](https://docs.aws.amazon.com/IAM/latest/UserGuide/id_credentials_access-keys.html) in the *IAM User Guide*. |
##### Using a profile on your local computer
You can run the AWS CLI and code examples in this guide with the short-term credentials you create in Running code on your local computer. To get the credentials and other settings information, the examples use a profile named `profile-name` For example:
```
session = boto3.Session(profile_name="profile-name")
client = session.client("textract")
```
The user that the profile represents must have permissions to call the Textract SDK operations and other AWS SDK operations needed by the examples.
To create a profile that works with the AWS CLI and code examples, choose one of the following. Make sure the name of the profile you create is `profile-name`.
+ Users managed by IAM - Follow the instructions at [Switching to an IAM role (AWS CLI)](https://docs.aws.amazon.com/IAM/latest/UserGuide/id_roles_use_switch-role-cli.html).
+ Workforce identity (Users managed by AWS IAM Identity Center (successor to AWS Single Sign-On)) — Follow the instructions at [Configuring the AWS CLI to use AWS IAM Identity Center (successor to AWS Single Sign-On)](https://docs.aws.amazon.com/cli/latest/userguide/cli-configure-sso.html). For the code examples, we recommend using an Integrated Development Environment (IDE), which supports the AWS Toolkit enabling authentication through IAM Identity Center. For the Java examples, see [Start building with Java](https://aws.amazon.com/developer/language/java/). For the Python examples, see [Start building with Python](https://aws.amazon.com/developer/tools/#IDE_and_IDE_Toolkits). For more information, see [IAM Identity Center credentials](https://docs.aws.amazon.com/sdkref/latest/guide/feature-sso-credentials.html).
#### Running code in AWS enviroments
You shouldn't use user credentials to sign AWS SDK calls in AWS environments, such as production code running in an AWS Lambda function. Instead, you configure a role that defines the permissions that your code needs. You then attach the role to the environment that your code runs in. How you attach the role and make temporary credentials available varies depending on the environment that your code runs in:
+ AWS Lambda function — Use the temporary credentials that Lambda automatically provides to your function when it assumes the Lambda function's execution role. The credentials are available in the Lambda environment variables. You don't need to specify a profile. For more information, see [Lambda execution role](https://docs.aws.amazon.com/lambda/latest/dg/lambda-intro-execution-role.html).
+ Amazon EC2 — Use the Amazon EC2 instance metadata endpoint credentials provider. The provider automatically generates and refreshes credentials for you using the Amazon EC2 instance profile you attach to the Amazon EC2 instance. For more information, see [Using an IAM role to grant permissions to applications running on Amazon EC2 instances](https://docs.aws.amazon.com/IAM/latest/UserGuide/id_roles_use_switch-role-ec2.html).
+ Amazon Elastic Container Service — Use the Container credentials provider. Amazon ECS sends and refreshes credentials to a metadata endpoint. A task IAM role that you specify provides a strategy for managing the credentials that your application uses. For more information, see [Interact with AWS services](https://docs.aws.amazon.com/AmazonECS/latest/developerguide/task-iam-roles.html).
For more information about credential providers, see [ Standardized credential providers](https://docs.aws.amazon.com/sdkref/latest/guide/standardized-credentials.html).
#### Assigning permissions
To provide access, add permissions to your users, groups, or roles:
+ Users and groups in AWS IAM Identity Center:
Create a permission set. Follow the instructions in [Create a permission set](https://docs.aws.amazon.com/singlesignon/latest/userguide/howtocreatepermissionset.html) in the *AWS IAM Identity Center User Guide*.
+ Users managed in IAM through an identity provider:
Create a role for identity federation. Follow the instructions in [Create a role for a third-party identity provider (federation)](https://docs.aws.amazon.com/IAM/latest/UserGuide/id_roles_create_for-idp.html) in the *IAM User Guide*.
+ IAM users:
+ Create a role that your user can assume. Follow the instructions in [Create a role for an IAM user](https://docs.aws.amazon.com/IAM/latest/UserGuide/id_roles_create_for-user.html) in the *IAM User Guide*.
+ (Not recommended) Attach a policy directly to a user or add a user to a user group. Follow the instructions in [Adding permissions to a user (console)](https://docs.aws.amazon.com/IAM/latest/UserGuide/id_users_change-permissions.html#users_change_permissions-add-console) in the *IAM User Guide*.
## Step 3: Get Started Using the AWS CLI and AWS SDK API
After you've set up the AWS CLI and AWS SDKs that you want to use, you can build applications that use Amazon Textract. The following topics show you how to get started with Amazon Textract.
+ [Analyzing Document Text with Amazon Textract](#analyzing-document-text)
### Formatting the AWS CLI Examples
The AWS CLI examples in this guide are formatted for the Linux operating system. To use the samples with Microsoft Windows, you need to change the JSON formatting of the `--document` parameter, and change the line breaks from backslashes (\\) to carets (^). For more information about JSON formatting, see [Specifying Parameter Values for the AWS Command Line Interface](https://docs.aws.amazon.com/cli/latest/userguide/cli-using-param.html).
# Identifying Your Amazon Textract Use Case
Amazon Textract offers a variety of operations that apply to different documents. Below is a list of the operations you can perform with Amazon Textract and links to further information on each use case.
+ Detecting text only. For more information, see [Detecting Text](#how-it-works-detecting).
+ Detecting and analyzing relationships between text. For more information, see [Analyzing Documents](#how-it-works-analyzing).
+ Detecting and analyzing text in invoices and receipts. For more information, see [Analyzing Invoices and Receipts](#invoices-receipts).
+ Detecting and analyzing text in government identity documents. For more information, see [Analyzing Identity Documents](#how-it-works-identity).
+ Detecting and analyzing text in lending documents. For more information, see [Analyzing Lending Documents](#lending-document-classification-extraction).
Amazon Textract provides you with synchronous operations for processing single-page documents with near real-time responses. For more information, see [Processing Documents Synchronously](#sync). Amazon Textract also provides asynchronous operations that you can use to process larger, multipage documents. Asynchronous responses aren't in real time. For more information, see [Processing Documents Asynchronously](#async).
Amazon Textract provides you with a workflow to automatically classify lending document pages and route them to existing solutions. For more information see [Analyzing Lending Documents](#lending-document-classification-extraction).
Amazon Textract lets you customize the output of its pretrained Queries feature. With Amazon Textract Custom Queries, you can use your own documents and train an adapter to customize the base model, keeping complete control over your proprietary documents. See [Customizing your Queries Responses](#textract-using-adapters) for more information.
For information regarding the results returned by Analyze Lending, see [Analyze Lending Response Objects](#lending-response-objects).
**Topics**
+ [Detecting Text](#how-it-works-detecting)
+ [Analyzing Documents](#how-it-works-analyzing)
+ [Analyzing Invoices and Receipts](#invoices-receipts)
+ [Analyzing Identity Documents](#how-it-works-identity)
+ [Analyzing Lending Documents](#lending-document-classification-extraction)
+ [Customizing Outputs](#how-it-works-custom-queries)
## Detecting Text
Amazon Textract provides synchronous and asynchronous operations that return only the text detected in a document. For both sets of operations, the following information is returned in multiple [Block](https://docs.aws.amazon.com/textract/latest/APIReference/API_Block.html) objects:
+ The lines and words of detected text
+ The relationships between the lines and words of detected text
+ The page that the detected text appears on
+ The location of the lines and words of text on the document page
For more information, see [Lines and Words of Text](#how-it-works-lines-words).
To detect text synchronously, use the [DetectDocumentText](https://docs.aws.amazon.com/textract/latest/APIReference/API_DetectDocumentText.html) API operation, and pass a document file as input. The entire set of results is returned by the operation. For more information and an example, see [Processing Documents Synchronously](#sync).
**Note**
The Amazon Rekognition API operation `DetectText` is different from `DetectDocumentText`. You use `DetectText` to detect text in live scenes, such as posters or road signs.
To detect text asynchronously, use [StartDocumentTextDetection](https://docs.aws.amazon.com/textract/latest/APIReference/API_StartDocumentTextDetection.html) to start processing an input document file. To get the results, call [GetDocumentTextDetection](https://docs.aws.amazon.com/textract/latest/APIReference/API_GetDocumentTextDetection.html). The results are returned in one or more responses from `GetDocumentTextDetection`. For more information and an example, see [Processing Documents Asynchronously](#async).
## Analyzing Documents
Amazon Textract analyzes documents and forms for relationships among detected text. Amazon Textract analysis operations return 5 categories of document extraction — text, forms, tables, query responses, and signatures. The analysis of invoices and receipts is handled through a different process, for more information see [Analyzing Invoices and Receipts](#invoices-receipts).
**Text Extraction**
The raw text extracted from a document. For more information, see [Lines and words of text](#how-it-works-lines-words).
**Form Extraction**
Form data is linked to text items extracted from a document. Amazon Textract represents form data as key-value pairs.
In the following example, one of the lines of text detected by Amazon Textract is *Name: Jane Doe*. Amazon Textract also identifies a key (*Name:*) and a value (*Jane Doe*). For more information, see [Form data (Key-value pairs)](#how-it-works-kvp).
*Name: Jane Doe*
*Address: 123 Any Street, Anytown, USA*
*Birth date: 12-26-1980*
Key-value pairs are also used to represent check boxes or option buttons (radio buttons) that are extracted from forms.
*Male:* ☑
For more information, see [Selection elements](#how-it-works-selectables).
**Table Extraction**
Amazon Textract can extract tables, table cells, the items within table cells, table titles and footers, and the type of table. Amazon Textract can also be programmed to return the results in a JSON, CSV, or TXT file.
| Name | Address |
| --- | --- |
| Ana Carolina | 123 Any Town |
For more information, see [Tables](#how-it-works-tables). Selection elements can also be extracted from tables. For more information, see [Selection elements](#how-it-works-selectables).
**Signatures in Document Analysis**
Amazon Textract can detect the locations of signatures in text documents. These are returned as geometry objects with bounding boxes that provide the location of a signature on the page, alongside the confidence that a signature is in that location. If the signature feature is used by itself, Amazon Textract will return both signatures and standard text detection results. Signature detection can be used in conjunction with other feature types such as forms, tables, and queries. When using it with forms and tables, signatures can be detected as part of a key-value pair or within a table cell respectively.
**Queries in Document Analysis**
When processing a document with Amazon Textract, you may add queries to your analysis to specify what information you need. This involves passing a question, such as "What is the customer's social security number?" to Amazon Textract. Amazon Textract will then find the information in the document for that question and return it in a response structure separate from the rest of the document's information. For more information about this response structure, see [Query Response Structures](#queryresponse). For more information on best practices for query use, see [Best Practices for Queries](#bestqueries). Queries can be processed alone, or in combination with any other `FeatureType`, such as Tables or Forms.
Example Query: What is the customer’s SSN?
Example Answer: 111-xx-333
For analyzed items, Amazon Textract returns the following in multiple [Block](https://docs.aws.amazon.com/textract/latest/APIReference/API_Block.html) objects:
+ The lines and words of detected text
+ The content of detected items
+ The relationship between detected items
+ The page that the item was detected on
+ The location of the item on the document page
**Custom Queries**
With Amazon Textract document analysis, you can customize the model output through adapters trained on your own documents. Adapters are components that plug in to the Amazon Textract pre-trained deep learning model, customizing its output for your business specific documents. You create an adapter for your specific use case by annotating/labeling your sample documents and training the adapter on the annotated samples.
After you create an adapter, Amazon Textract provides you with an AdapterId. You can have multiple adapter versions within a single adapter. You can provide the AdapterId, along with an AdapterVersion, to an operation to specify that you want to use the adapter that you created. For example, you provide the two parameters to the [AnalyzeDocument](https://docs.aws.amazon.com/textract/latest/APIReference/API_AnalyzeDocument.html) API for synchronous document analysis, or the [StartDocumentAnalysis](https://docs.aws.amazon.com/textract/latest/APIReference/API_StartDocumentAnalysis.html) operation for asynchronous analysis. Providing the AdapterId as part of the request will automatically integrate the adapter into the analysis process and use it to enhance predictions for your documents. This way, you can leverage the capabilities of AnalyzeDocument while customizing the model to fit your own use case.
For more information on creating and using adapters, see [Customizing your Queries Responses](#textract-using-adapters). For a tutorial on how to create, train, and use adapters with the AWS Management Console, see [Custom Queries tutorial](#textract-adapters-tutorial).
**Layout in Document Analysis**
Amazon Textract can be used to detect the layout of a document by finding the locations of different elements and their associated lines of text. These elements are paragraphs, lists, headers, footers, page numbers, figures, tables, titles, and section headers. When analyzing the layout of a document, Amazon Textract returns a bounding box location of the layout elements as well as the text in those elements. This information is returned in the implied reading order of the document, listing elements from top to bottom, left to right.
You can use synchronous or asynchronous operations to analyze text in a document. To analyze text synchronously, use the [AnalyzeDocument](https://docs.aws.amazon.com/textract/latest/APIReference/API_AnalyzeDocument.html) operation, and pass a document as input. `AnalyzeDocument` returns the entire set of results. For more information, see [Analyzing Document Text with Amazon Textract](#analyzing-document-text).
To detect text asynchronously, use [StartDocumentAnalysis](https://docs.aws.amazon.com/textract/latest/APIReference/API_StartDocumentAnalysis.html) to start processing. To get the results, call [GetDocumentAnalysis](https://docs.aws.amazon.com/textract/latest/APIReference/API_GetDocumentAnalysis.html). The results are returned in one or more responses from `GetDocumentAnalysis`. For more information and an example, see [Detecting or Analyzing Text in a Multipage Document](#async-analyzing-with-sqs).
To specify which type of analysis to perform, you can use the `FeatureTypes` list input parameter. Add TABLES to the list to return information about the tables that are detected in the input document—for example, table cells, cell text, and selection elements in cells. Add FORMS to return word relationships, such as key-value pairs and selection elements. Add QUERIES to specify information you want Amazon Textract to look for in the document and get a response back in the form of a question-answer pair. Add LAYOUT to determine the layout of the document. To perform all types of analysis, add TABLES, FORMS, QUERIES, and LAYOUT to `FeatureTypes`.
All lines and words that are detected in the document are included in the response (including text not related to the value of `FeatureTypes`).
## Analyzing Invoices and Receipts
Amazon Textract extracts relevant data such as vendor and receiver contact information, from almost any invoice or receipt without the need for any templates or configuration. Invoices and receipts often use various layouts, making it difficult and time-consuming to manually extract data at scale. Amazon Textract uses ML to understand the context of invoices and receipts. It automatically extracts data such as invoice or receipt date, invoice or receipt number, item prices, total amount, and payment terms.
Amazon Textract also identifies vendor names that are critical for your workflows but may not be explicitly labeled. For example, Amazon Textract can find the vendor name on a receipt even if it's only indicated within a logo at the top of the page without an explicit key-value pair combination.
Amazon Textract also makes it easy for you to consolidate input from diverse receipts and invoices that use different words for the same concept. For example, Amazon Textract maps relationships between field names in different documents such as bill number, invoice number, receipt number, outputting standard taxonomy as `INVOICE_RECEIPT_ID`. In this case, Amazon Textract represents data consistently across different document types. The address fields are categorized as 'receiver', 'supplier', 'vendor', 'bill to', 'ship to', and 'remit to'. When expense documents do not have unique values for each of these categories, Amazon Textract will return only the categories with unique values.
Fields that do not align with the standard taxonomy are categorized as `OTHER`.
Following is a list of standard fields supported by expense analysis operations.
### List of Expense Analysis Standard Fields
+ Invoice Receipt Date — `INVOICE_RECEIPT_DATE`
+ Invoice Receipt ID — `INVOICE_RECEIPT_ID`
+ Invoice Tax Payer ID — `TAX_PAYER_ID`
+ Customer Number — `CUSTOMER_NUMBER`
+ Account Number — `ACCOUNT_NUMBER`
+ Vendor Name — `VENDOR_NAME`
+ Receiver Name — `RECEIVER_NAME`
+ Vendor Address — `VENDOR_ADDRESS`
+ Receiver Address — `RECEIVER_ADDRESS`
+ Order Date — `ORDER_DATE`
+ Due Date — `DUE_DATE`
+ Delivery Date — `DELIVERY_DATE`
+ PO Number — `PO_NUMBER`
+ Payment Terms — `PAYMENT_TERMS`
+ Total — `TOTAL`
+ Amount Due — `AMOUNT_DUE`
+ Amount Paid — `AMOUNT_PAID`
+ Subtotal — `SUBTOTAL`
+ Tax — `TAX`
+ Service Charge — `SERVICE_CHARGE`
+ Gratuity — `GRATUITY`
+ Prior Balance — `PRIOR_BALANCE`
+ Discount — `DISCOUNT`
+ Shipping and Handling Charge — `SHIPPING_HANDLING_CHARGE`
+ Vendor ABN Number — `VENDOR_ABN_NUMBER`
+ Vendor GST Number — `VENDOR_GST_NUMBER`
+ Vendor PAN Number — `VENDOR_PAN_NUMBER`
+ Vendor VAT Number — `VENDOR_VAT_NUMBER`
+ Receiver ABN Number — `RECEIVER_ABN_NUMBER`
+ Receiver GST Number — `RECEIVER_GST_NUMBER`
+ Receiver PAN Number — `RECEIVER_PAN_NUMBER`
+ Receiver VAT Number — `RECEIVER_VAT_NUMBER`
+ Vendor Phone — `VENDOR_PHONE`
+ Receiver Phone — `RECEIVER_PHONE`
+ Vendor URL — `VENDOR_URL`
+ Line Item/Item Description — `ITEM`
+ Line Item/Quantity — `QUANTITY`
+ Line Item/Total Price — `PRICE`
+ Line Item/Unit Price — `UNIT_PRICE`
+ Line Item/ProductCode — `PRODUCT_CODE`
+ Address (Bill To, Ship To, Remit To, Supplier) — `ADDRESS`
+ Name (Bill To, Ship To, Remit To, Supplier) — `NAME`
+ Core Address (Vendor, Receiver, Bill To, Ship To, Remit To, Supplier) — `ADDRESS_BLOCK`
+ Street Address (Vendor, Receiver, Bill To, Ship To, Remit To, Supplier) — `STREET`
+ City (Vendor, Receiver, Bill To, Ship To, Remit To, Supplier) — `CITY`
+ State (Vendor, Receiver, Bill To, Ship To, Remit To, Supplier) — `STATE`
+ Country (Vendor, Receiver, Bill To, Ship To, Remit To, Supplier) — `COUNTRY`
+ ZIP Code (Vendor, Receiver, Bill To, Ship To, Remit To, Supplier) — `ZIP_CODE`
The AnalyzeExpense API returns the following elements for a given document page:
+ The number of receipts or invoices within a document represented as `ExpenseIndex`
+ The standardized name for individual fields represented as `Type`
+ The actual name of the field as it appears on the document, represented as `LabelDetection`
+ The value of the corresponding field represented as `ValueDetection`
+ The number of pages within the submitted document represented as `Pages`
+ The page number on which the field, value, or line items are detected, represented as `PageNumber`
+ The geometry, which includes the bounding box and coordinates location of the individual field, value, or line items on the page, represented as `Geometry`
+ The confidence score associated with each piece of data detected on the document, represented as `Confidence`
+ The entire row of individual line items purchased, represented as `EXPENSE_ROW`
The following is a portion of the API output for a receipt processed by AnalyzeExpense that shows the Total: $55.64 in the document extracted as standard field `TOTAL`. Actual text on the document appears as “Total,” Confidence Score as “97.1,” Page Number as “1,” and the total value as “$55.64.” This also includes the bounding box and polygon coordinates:
```
{
"Type": {
"Text": "TOTAL",
"Confidence": 99.94717407226562
},
"LabelDetection": {
"Text": "Total:",
"Geometry": {
"BoundingBox": {
"Width": 0.09809663146734238,
"Height": 0.0234375,
"Left": 0.36822840571403503,
"Top": 0.8017578125
},
"Polygon": [
{
"X": 0.36822840571403503,
"Y": 0.8017578125
},
{
"X": 0.466325044631958,
"Y": 0.8017578125
},
{
"X": 0.466325044631958,
"Y": 0.8251953125
},
{
"X": 0.36822840571403503,
"Y": 0.8251953125
}
]
},
"Confidence": 97.10792541503906
},
"ValueDetection": {
"Text": "$55.64",
"Currency": {
"Code": USD
}
"Geometry": {
"BoundingBox": {
"Width": 0.10395314544439316,
"Height": 0.0244140625,
"Left": 0.66837477684021,
"Top": 0.802734375
},
"Polygon": [
{
"X": 0.66837477684021,
"Y": 0.802734375
},
{
"X": 0.7723279595375061,
"Y": 0.802734375
},
{
"X": 0.7723279595375061,
"Y": 0.8271484375
},
{
"X": 0.66837477684021,
"Y": 0.8271484375
}
]
},
"Confidence": 99.85165405273438
},
"PageNumber": 1
}
```
You can use synchronous operations to analyze an invoice or receipt. To analyze these documents, you use the AnalyzeExpense operation and pass a receipt or invoice to it. `AnalyzeExpense` returns the entire set of results. For more information, see [Analyzing Invoices and Receipts with Amazon Textract](#analyzing-document-expense).
To analyze invoices and receipts asynchronously, use [StartExpenseAnalysis](https://docs.aws.amazon.com/textract/latest/APIReference/API_StartExpenseAnalysis.html) to start processing an input document file. To get the results, call [GetExpenseAnalysis](https://docs.aws.amazon.com/textract/latest/APIReference/API_GetExpenseAnalysis.html). The results for a given call to [StartExpenseAnalysis](https://docs.aws.amazon.com/textract/latest/APIReference/API_StartExpenseAnalysis.html) are returned by `GetExpenseAnalysis`. For more information and an example, see [Processing Documents Asynchronously](#async).
## Analyzing Identity Documents
Amazon Textract can extract relevant information from passports, driver licenses, and other identity documentation issued by the US Government using the AnalyzeID API. With Analyze ID, businesses can quickly, and accurately extract information from IDs such as US driver licenses, and passports that have different template or format. AnalyzeID API returns three categories of data types:
+ Key-value pairs available on ID such as Date of Birth, Date of Issue, ID \#, Class, and Restrictions.
+ Implied fields on the document that may not have explicit keys associated with them such as Name, Address, and Issued By.
+ The text of the document, the same as would be returned by document text detection.
Key names are standardized within the response. For example, if your driver license says LIC\# (license number) and passport says Passport No, Analyze ID response will return the standardized key as “Document ID” along with the raw key (such as LIC\#). This standardization lets customers combine information across many IDs that use different terms for the same concept.

Analyze ID returns information in the structures called `IdentityDocumentFields`. These are `JSON` structures containing two pieces of information: the normalized Type and the Value associated with the Type. These both also have a confidence score. For more information, see [Identity Documentation Response Objects](#identitydocumentfields). For more information regarding the text detection returned by Analyze ID, see [Text Detection and Document Analysis Response Objects](#how-it-works-document-layout)
You can use synchronous operations to analyze a driver's license or passport. To analyze these documents, you use the AnalyzeID operation and pass an identity document to it. `AnalyzeID` returns the entire set of results. For more information, see [Analyzing Identity Documentation with Amazon Textract](#analyzing-document-identity).
**Note**
Some identity documents, such as driver's licenses, have two sides. You can pass the front and back images of driver licenses as separate images within the same Analyze ID API request.
## Analyzing Lending Documents
Analyze Lending is a document processing API for mortgage documents. With Analyze Lending, you can automatically extract, classify, and validate information in mortgage-related documents. Analyze Lending receives a loan document and then splits it into pages, classifying them according to the type of document. The document pages are then automatically routed to Amazon Textract text processing operations for accurate data extraction and analysis.
[StartLendingAnalysis](https://docs.aws.amazon.com/textract/latest/APIReference/API_StartLendingAnalysis.html) initiates the classification and analysis of a packet of lending documents. StartLendingAnalysis operates on a document file located in an Amazon S3 bucket.
After processing, you can retrieve the results by using [GetLendingAnalysis](https://docs.aws.amazon.com/textract/latest/APIReference/API_GetLendingAnalysis.html) while a summary can be retrieved with [GetLendingAnalysisSummary](https://docs.aws.amazon.com/textract/latest/APIReference/API_GetLendingAnalysisSummary.html). Note that Analyze Lending document analysis is for asynchronous processing only.
For a sample of the output for the GetLendingAnalysis operation, see the following. The return includes information about the document classification type for a page, the page number, and the fields extracted by Analyze Lending:
```
{
"DocumentMetadata": {
"Pages": 1
},
"JobStatus": "SUCCEEDED",
"Results": [
{
"Page": 1,
"PageClassification": {
"PageType": [
{
"Value": "1005",
"Confidence": 99.99947357177734
}
],
"PageNumber": [
{
"Value": "undetected",
"Confidence": 100.0
}
]
},
"Extractions": [
{
"LendingDocument": {
"LendingFields": [
{
"Type": "OVERTIME_CONTINUANCE_LIKELY",
"ValueDetections": [
{
"Text": "Yes",
"Geometry": {
"BoundingBox": {
"Width": 0.019448408856987953,
"Height": 0.007367494981735945,
"Left": 0.8211431503295898,
"Top": 0.485835462808609
},
"Polygon": [
{
"X": 0.8211431503295898,
"Y": 0.485835462808609
},
{
"X": 0.8405909538269043,
"Y": 0.4858577847480774
},
{
"X": 0.840591549873352,
"Y": 0.49320295453071594
},
{
"X": 0.8211436867713928,
"Y": 0.4931805729866028
}
]
},
"Confidence": 95.0
}
]
},
{
"Type": "CURRENT_GROSS_PAY_WEEKLY",
"KeyDetection": {
"Text": "Weekly",
"Geometry": {
"BoundingBox": {
"Width": 0.039741966873407364,
"Height": 0.009058262221515179,
"Left": 0.17564243078231812,
"Top": 0.5004485845565796
},
"Polygon": [
{
"X": 0.17564436793327332,
"Y": 0.5004485845565796
},
{
"X": 0.21538439393043518,
"Y": 0.5004944205284119
},
{
"X": 0.2153826206922531,
"Y": 0.5095068216323853
},
{
"X": 0.17564243078231812,
"Y": 0.5094608664512634
}
]
},
"Confidence": 99.98104858398438
},
"ValueDetections": [
{
"SelectionStatus": "NOT_SELECTED",
"Geometry": {
"BoundingBox": {
"Width": 0.010146399028599262,
"Height": 0.00771764200180769,
"Left": 0.1600940227508545,
"Top": 0.5003445148468018
},
"Polygon": [
{
"X": 0.16009573638439178,
"Y": 0.5003445148468018
},
{
"X": 0.17024043202400208,
"Y": 0.5003561973571777
},
{
"X": 0.17023874819278717,
"Y": 0.5080621242523193
},
{
"X": 0.1600940227508545,
"Y": 0.5080504417419434
}
]
},
"Confidence": 99.88064575195312
}
]
}
],
"SignatureDetections": [
{
"Confidence": 98.95830535888672,
"Geometry": {
"BoundingBox": {
"Width": 0.1505945473909378,
"Height": 0.019163239747285843,
"Left": 0.1145595833659172,
"Top": 0.8886017799377441
},
"Polygon": [
{
"X": 0.11456418037414551,
"Y": 0.8886017799377441
},
{
"X": 0.2651541233062744,
"Y": 0.8887989521026611
},
{
"X": 0.2651508152484894,
"Y": 0.9077650308609009
},
{
"X": 0.1145595833659172,
"Y": 0.9075667262077332
}
]
}
}
]
}
}
]
}
],
"AnalyzeLendingModelVersion": "1.0"
}
```
For a sample of the output for a GetLendingAnalysisSummary operation, see the following. The return includes information about all the documents grouped by the same document type, which are stored in DocumentGroups:
```
{
"DocumentMetadata": {
"Pages": 1
},
"JobStatus": "SUCCEEDED",
"Summary": {
"DocumentGroups": [
{
"Type": "1005",
"SplitDocuments": [
{
"Index": 1,
"Pages": [
1
]
}
],
"DetectedSignatures": [
{
"Page": 1
}
],
"UndetectedSignatures": []
}
],
"UndetectedDocumentTypes": [
"1040_SCHEDULE_C",
"1099_INT",
"1099_SSA",
"DEMOGRAPHIC_ADDENDUM",
"1065",
"1040",
"1120_S",
"IDENTITY_DOCUMENT",
"SSA_89",
"MORTGAGE_STATEMENT",
"1099_MISC",
"CHECKS",
"HOA_STATEMENT",
"INVESTMENT_STATEMENT",
"1120",
"1003",
"VBA_26_0551",
"1099_R",
"PAYSLIPS",
"1008",
"W_2",
"1099_NEC",
"BANK_STATEMENT",
"1040_SCHEDULE_E",
"UTILITY_BILLS",
"W_9",
"UNCLASSIFIED",
"HUD_92900_B",
"PAYOFF_STATEMENT",
"1099_G",
"CREDIT_CARD_STATEMENT",
"INVOICES",
"RECEIPTS",
"1040_SCHEDULE_D",
"1099_DIV"
]
},
"AnalyzeLendingModelVersion": "1.0"
}
```
For descriptions of the response objects, see [Analyze Lending Response Objects](#lending-response-objects).
Consult the file included with the assets folder for a list of all possible recognized classes.
## Customizing Outputs
With Amazon Textract document analysis, you can customize the model output through adapters trained on your own documents. Adapters are components that plug in to the Amazon Textract pre-trained deep learning model, customizing its output for your business specific documents. You create an adapter for your specific use case by annotating/labeling your sample documents and training the adapter on the annotated samples. When using this process, the Adapter used is similar to the use of queries, and as such this feature is referred to as Custom Queries
After you create an adapter, Amazon Textract provides you with an AdapterId. You can have multiple adapter versions within a single adapter. You can provide the AdapterId, along with an AdapterVersion, to an operation to specify that you want to use the adapter that you created. For example, you provide the two parameters to the [AnalyzeDocument](https://docs.aws.amazon.com/textract/latest/APIReference/API_AnalyzeDocument.html) API for synchronous document analysis, or the [StartDocumentAnalysis](https://docs.aws.amazon.com/textract/latest/APIReference/API_StartDocumentAnalysis.html) operation for asynchronous analysis. Providing the AdapterId as part of the request will automatically integrate the adapter into the analysis process and use it to enhance predictions for your documents. This way, you can leverage the capabilities of AnalyzeDocument while customizing the model to fit your own use case.
For more information on creating and using adapters, see [Customizing your Queries Responses](#textract-using-adapters). For a tutorial on how to create, train, and use adapters with the AWS Management Console, see [Custom Queries tutorial](#textract-adapters-tutorial).
# Interpreting Amazon Textract Responses
Amazon Textract operations return different types of objects depending on the operations run. Response objects are structured JSON outputs, with various elements that can be searched for within a response. For more information about these response objects, see the following sections:
**Topics**
+ [Locating Items on a Document Page](#text-location)
+ [Text Detection and Document Analysis Response Objects](#how-it-works-document-layout)
+ [Layout Response Objects](#layoutresponse)
+ [Invoice and Receipt Response Objects](#expensedocuments)
+ [Identity Documentation Response Objects](#identitydocumentfields)
+ [Analyze Lending Response Objects](#lending-response-objects)
## Locating Items on a Document Page
Amazon Textract operations return the location and geometry of items found on a document page. [DetectDocumentText](https://docs.aws.amazon.com/textract/latest/APIReference/API_DetectDocumentText.html) and [GetDocumentTextDetection](https://docs.aws.amazon.com/textract/latest/APIReference/API_GetDocumentTextDetection.html) return the location and geometry for lines and words, while [AnalyzeDocument](https://docs.aws.amazon.com/textract/latest/APIReference/API_AnalyzeDocument.html) and [GetDocumentAnalysis](https://docs.aws.amazon.com/textract/latest/APIReference/API_GetDocumentAnalysis.html) return the location and geometry of key-value pairs, tables, cells, and selection elements.
To determine where an item is on a document page, use the bounding box ([Geometry](https://docs.aws.amazon.com/textract/latest/APIReference/API_Geometry.html)) information returned by the Amazon Textract operation in a [Block](https://docs.aws.amazon.com/textract/latest/APIReference/API_Block.html) object. The `Geometry` object contains two types of location and geometric information for detected items:
+ An axis-aligned [BoundingBox](https://docs.aws.amazon.com/textract/latest/APIReference/API_BoundingBox.html) object that contains the top-left coordinate and the width and height of the item.
+ A polygon object that describes the outline of the item, specified as an array of [Point](https://docs.aws.amazon.com/textract/latest/APIReference/API_Point.html) objects that contain `X` (horizontal axis) and `Y` (vertical axis) document page coordinates of each point.
The JSON for a `Block` object looks similar to the following. Note the `BoundingBox` and `Polygon` fields.
```
{
"Geometry": {
"BoundingBox": {
"Width": 0.053907789289951324,
"Top": 0.08913730084896088,
"Left": 0.11085548996925354,
"Height": 0.013171200640499592
},
"Polygon": [
{
"Y": 0.08985357731580734,
"X": 0.11085548996925354
},
{
"Y": 0.08913730084896088,
"X": 0.16447919607162476
},
{
"Y": 0.10159222036600113,
"X": 0.16476328670978546
},
{
"Y": 0.10230850428342819,
"X": 0.11113958805799484
}
]
},
"Text": "Name:",
"TextType": "PRINTED",
"BlockType": "WORD",
"Confidence": 99.56285858154297,
"Id": "c734fca6-c4c4-415c-b6c1-30f7510b72ee"
},
```
You can use geometry information to draw bounding boxes around detected items. For an example that uses `BoundingBox` and `Polygon` information to draw boxes around lines and vertical lines at the start and end of each word, see [Detecting Document Text with Amazon Textract](#detecting-document-text). The example output is similar to the following.

### Bounding Box
A bounding box (`BoundingBox`) has the following properties:
+ Height – The height of the bounding box as a ratio of the overall document page height.
+ Left – The X coordinate of the top-left point of the bounding box as a ratio of the overall document page width.
+ Top – The Y coordinate of the top-left point of the bounding box as a ratio of the overall document page height.
+ Width – The width of the bounding box as a ratio of the overall document page width.
Each BoundingBox property has a value between 0 and 1. The value is a ratio of the overall image width (applies to `Left` and `Width`) or height (applies to `Height` and `Top`). For example, if the input image is 700 x 200 pixels, and the top-left coordinate of the bounding box is (350,50) pixels, the API returns a `Left` value of 0.5 (350/700) and a `Top` value of 0.25 (50/200).
The following diagram shows the range of a document page that each BoundingBox property covers.

To display the bounding box with the correct location and size, you multiply the BoundingBox values by the document page width or height (depending on the value you want) to get the pixel values. You use the pixel values to display the bounding box. An example is using a document page of 608 pixels width x 588 pixels height, and the following bounding box values for analyzed text:
```
BoundingBox.Left: 0.3922065
BoundingBox.Top: 0.15567766
BoundingBox.Width: 0.284666
BoundingBox.Height: 0.2930403
```
The location of the text bounding box in pixels is calculated as follows:
`Left coordinate = BoundingBox.Left (0.3922065) * document page width (608) = 238`
`Top coordinate = BoundingBox.Top (0.15567766) * document page height (588) = 91`
`Bounding box width = BoundingBox.Width (0.284666) * document page width (608) = 173`
`Bounding box height = BoundingBox.Height (0.2930403) * document page height (588) = 172`
You use these values to display a bounding box around the analyzed text. The following Java and Python examples demonstrate how to display a bounding box.
------
#### [ Java ]
```
public void ShowBoundingBox(int imageHeight, int imageWidth, BoundingBox box, Graphics2D g2d) {
float left = imageWidth * box.getLeft();
float top = imageHeight * box.getTop();
// Display bounding box.
g2d.setColor(new Color(0, 212, 0));
g2d.drawRect(Math.round(left / scale), Math.round(top / scale),
Math.round((imageWidth * box.getWidth()) / scale), Math.round((imageHeight * box.getHeight())) / scale);
}
```
------
#### [ Python ]
This Python example takes in the `response` returned by the [DetectDocumentText](https://docs.aws.amazon.com/textract/latest/APIReference/API_DetectDocumentText.html) API operation.
```
def process_text_detection(response):
# Get the text blocks
blocks = response['Blocks']
width, height = image.size
draw = ImageDraw.Draw(image)
print('Detected Document Text')
# Create image showing bounding box/polygon the detected lines/text
for block in blocks:
draw = ImageDraw.Draw(image)
if block['BlockType'] == "LINE":
box=block['Geometry']['BoundingBox']
left = width * box['Left']
top = height * box['Top']
draw.rectangle([left,top, left + (width * box['Width']), top +(height * box['Height'])],outline='black')
# Display the image
image.show()
return len(blocks)
```
------
### Polygon
The polygon returned by `AnalyzeDocument` is an array of [Point](https://docs.aws.amazon.com/textract/latest/APIReference/API_Point.html) objects. Each `Point` has an X and Y coordinate for a specific location on the document page. Like the BoundingBox coordinates, the polygon coordinates are normalized to the document width and height, and are between 0 and 1.
You can use points in the polygon array to display a finer-grain bounding box around a `Block` object. You calculate the position of each polygon point on the document page by using the same technique used for `BoundingBoxes`. Multiply the X coordinate by the document page width, and multiply the Y coordinate by the document page height.
The following example shows how to display the vertical lines of a polygon.
```
public void ShowPolygonVerticals(int imageHeight, int imageWidth, List points, Graphics2D g2d) {
g2d.setColor(new Color(0, 212, 0));
Object[] parry = points.toArray();
g2d.setStroke(new BasicStroke(2));
g2d.drawLine(Math.round(((Point) parry[0]).getX() * imageWidth),
Math.round(((Point) parry[0]).getY() * imageHeight), Math.round(((Point) parry[3]).getX() * imageWidth),
Math.round(((Point) parry[3]).getY() * imageHeight));
g2d.setColor(new Color(255, 0, 0));
g2d.drawLine(Math.round(((Point) parry[1]).getX() * imageWidth),
Math.round(((Point) parry[1]).getY() * imageHeight), Math.round(((Point) parry[2]).getX() * imageWidth),
Math.round(((Point) parry[2]).getY() * imageHeight));
}
```
### Rotation Angle
The final part of the Geometry object is the rotation angle of the text. Rotation angle is a number between 0 and 360 that respresents the degree the text is rotated.
## Text Detection and Document Analysis Response Objects
When Amazon Textract processes a document, it creates a list of [Block](https://docs.aws.amazon.com/textract/latest/APIReference/API_Block.html) objects for the detected or analyzed text. Each block contains information about a detected item, where it's located, and the confidence that Amazon Textract has in the accuracy of the processing.
A document is made up from the following types of `Block` objects.
+ [Pages](#how-it-works-pages)
+ [Lines and words of text](#how-it-works-lines-words)
+ [Form Data (Key-value pairs)](#how-it-works-kvp)
+ [Tables and Cells](#how-it-works-tables)
+ [Selection elements](#how-it-works-selectables)
+ [Queries](#queryresponse)
+ [Layout](#layoutresponse)
The contents of a block depend on the operation you call. If you call one of the text detection operations, the pages, lines, and words of detected text are returned. For more information, see [Detecting Text](#how-it-works-detecting). If you call one of the document analysis operations, information about detected pages, key-value pairs, tables, selection elements, and text is returned. For more information, see [Analyzing Documents](#how-it-works-analyzing).
Some `Block` object fields are common to both types of processing. For example, each block has a unique identifier.
For examples that show how to use `Block` objects, see [Tutorials](#examples-blocks).
### Document Layout
Amazon Textract returns a representation of a document as a list of different types of `Block` objects that are linked in a parent-to-child relationship or a key-value pair. Metadata that provides the number of pages in a document is also returned. The following is the JSON for a typical `Block` object of type `PAGE`.
```
{
"Blocks": [
{
"Geometry": {
"BoundingBox": {
"Width": 1.0,
"Top": 0.0,
"Left": 0.0,
"Height": 1.0
},
"Polygon": [
{
"Y": 0.0,
"X": 0.0
},
{
"Y": 0.0,
"X": 1.0
},
{
"Y": 1.0,
"X": 1.0
},
{
"Y": 1.0,
"X": 0.0
}
]
},
"Relationships": [
{
"Type": "CHILD",
"Ids": [
"2602b0a6-20e3-4e6e-9e46-3be57fd0844b",
"82aedd57-187f-43dd-9eb1-4f312ca30042",
"52be1777-53f7-42f6-a7cf-6d09bdc15a30",
"7ca7caa6-00ef-4cda-b1aa-5571dfed1a7c"
]
}
],
"BlockType": "PAGE",
"Id": "8136b2dc-37c1-4300-a9da-6ed8b276ea97"
}.....
],
"DocumentMetadata": {
"Pages": 1
}
}
```
A document is made from one or more `PAGE` blocks. Each page contains a list of child blocks for the primary items detected on the page, such as lines of text and tables. For more information, see [Pages](#how-it-works-pages).
You can determine the type of a `Block` object by inspecting the `BlockType` field.
A `Block` object contains a list of related `Block` objects in the `Relationships` field, which is an array of [Relationship](https://docs.aws.amazon.com/textract/latest/APIReference/API_Relationship.html) objects. A `Relationships` array is either of type CHILD or of type VALUE. An array of type CHILD is used to list the items that are children of the current block. For example, if the current block is of type LINE, `Relationships` contains a list of IDs for the WORD blocks that make up the line of text. An array of type VALUE is used to contain key-value pairs. You can determine the type of the relationship by inspecting the `Type` field of the `Relationship` object.
Child blocks don't have information about their parent Block objects.
For examples that show `Block` information, see [Processing Documents Synchronously](#sync).
### Confidence
Amazon Textract operations return the percentage confidence that Amazon Textract has in the accuracy of the detected item. To get the confidence, use the `Confidence` field of the `Block` object. A higher value indicates a higher confidence. Depending on the scenario, detections with a low confidence might need visual confirmation by a human.
### Geometry
Amazon Textract operations (except for identity analysis) return location information about the location of detected items on a document page. To get the location, use the `Geometry` field of the `Block` object. For more information, see [Locating Items on a Document Page](#text-location).
### Pages
A document consists of one or more pages. A [Block](https://docs.aws.amazon.com/textract/latest/APIReference/API_Block.html) object of type `PAGE` exists for each page of the document. A `PAGE` block object contains a list of the child IDs for the lines of text, key-value pairs, tables, Queries, and Query Results that are detected on the document page.

The JSON for a `PAGE` block looks similar to the following.
```
{
"Geometry": ....
"Relationships": [
{
"Type": "CHILD",
"Ids": [
"2602b0a6-20e3-4e6e-9e46-3be57fd0844b", // Line - Hello, world.
"82aedd57-187f-43dd-9eb1-4f312ca30042", // Line - How are you?
"52be1777-53f7-42f6-a7cf-6d09bdc15a30",
"7ca7caa6-00ef-4cda-b1aa-5571dfed1a7c"
]
}
],
"BlockType": "PAGE",
"Id": "8136b2dc-37c1-4300-a9da-6ed8b276ea97" // Page identifier
},
```
If you're using asynchronous operations with a multipage document that's in PDF format, you can determine the page that a block is located on by inspecting the `Page` field of the `Block` object. A scanned image (an image in JPEG, PNG, PDF, or TIFF format) is considered to be a single-page document, even if there's more than one document page on the image. Asynchronous operations always return a `Page` value of 1 for scanned images.
The total number of pages is returned in the `Pages` field of `DocumentMetadata`. `DocumentMetadata` is returned with each list of `Block` objects returned by an Amazon Textract operation.
### Lines and Words of Text
Detected text that's returned by Amazon Textract operations is returned in a list of [Block](https://docs.aws.amazon.com/textract/latest/APIReference/API_Block.html) objects. These objects represent lines of text or textual words that are detected on a document page. The following text shows two lines of text that are made from multiple words.
This is text.
In two separate lines.
Detected text is returned in the `Text` field of a `Block` object. The `BlockType` field determines if the text is a line of text (LINE) or a word (WORD). A *WORD* is one or more ISO basic Latin script characters that aren't separated by spaces. A *LINE* is a string of tab-delimited and contiguous words.
Additionally, Amazon Textract will determine if a piece of text was handwritten or printed using the `TextTypes` field. These return as HANDWRITING and PRINTED respectively.
The other `Block` properties are common to all block types, such as the ID, confidence, and geometry information. For more information, see [Text Detection and Document Analysis Response Objects](#how-it-works-document-layout).
To detect only lines and words, you can use [DetectDocumentText](https://docs.aws.amazon.com/textract/latest/APIReference/API_DetectDocumentText.html) or [StartDocumentTextDetection](https://docs.aws.amazon.com/textract/latest/APIReference/API_StartDocumentTextDetection.html). For more information, see [Detecting Text](#how-it-works-detecting). To get the detected text (lines and words) and information about how it relates to other parts of the document, such as tables, you can use [AnalyzeDocument](https://docs.aws.amazon.com/textract/latest/APIReference/API_AnalyzeDocument.html) or [StartDocumentAnalysis](https://docs.aws.amazon.com/textract/latest/APIReference/API_StartDocumentAnalysis.html). For more information, see [Analyzing Documents](#how-it-works-analyzing).
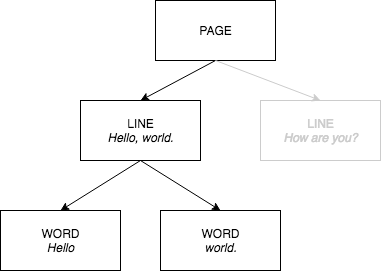
`PAGE`, `LINE`, and `WORD` blocks are related to each other in a parent-to-child relationship. A `PAGE` block is the parent for all `LINE` block objects on a document page. Because a LINE can have one or more words, the `Relationships` array for a LINE block stores the IDs for child WORD blocks that make up the line of text.
The following diagram shows how the line *Hello, world.* in the text *Hello, world. How are you?* is represented by `Block` objects.
The following is the JSON output from `DetectDocumentText` when the sentence *Hello, world. How are you?* is detected. The first example is the JSON for the document page. You can use the CHILD IDs to navigate through the document.
```
{
"Geometry": {...},
"Relationships": [
{
"Type": "CHILD",
"Ids": [
"d7fbd604-d609-4d69-857d-247a3f591238", // Line - Hello, world.
"b6c19a93-6493-4d8e-958f-853c8f7ca055" // Line - How are you?
]
}
],
"BlockType": "PAGE",
"Id": "56ec1d77-171f-4881-9852-2b5b7e761608"
},
```
The following is the JSON for the LINE blocks that make up the line "Hello, World":
```
{
"Relationships": [
{
"Type": "CHILD",
"Ids": [
"7f97e2ca-063e-47a8-981c-8beee31afc01", // Word - Hello,
"4b990aa0-af96-4369-b90f-dbe02538ed21" // Word - world.
]
}
],
"Confidence": 99.63229370117188,
"Geometry": {...},
"Text": "Hello, world.",
"BlockType": "LINE",
"Id": "d7fbd604-d609-4d69-857d-247a3f591238"
},
```
The following is the JSON for the WORD block for the word *Hello,*:
```
{
"Geometry": {...},
"Text": "Hello,",
"TextType": "PRINTED",
"BlockType": "WORD",
"Confidence": 99.74746704101562,
"Id": "7f97e2ca-063e-47a8-981c-8beee31afc01"
},
```
The final JSON is the WORD block for the word *world.*:
```
{
"Geometry": {...},
"Text": "world.",
"TextType": "PRINTED",
"BlockType": "WORD",
"Confidence": 99.5171127319336,
"Id": "4b990aa0-af96-4369-b90f-dbe02538ed21"
},
```
### Form Data (Key-Value Pairs)
Amazon Textract can extract form data from documents as key-value pairs. For example, in the following text, Amazon Textract can identify a key (*Name:*) and a value (*Ana Carolina*).
*Name: Ana Carolina*
Detected key-value pairs are returned as [Block](https://docs.aws.amazon.com/textract/latest/APIReference/API_Block.html) objects in the responses from [AnalyzeDocument](https://docs.aws.amazon.com/textract/latest/APIReference/API_AnalyzeDocument.html) and [GetDocumentAnalysis](https://docs.aws.amazon.com/textract/latest/APIReference/API_GetDocumentAnalysis.html). You can use the `FeatureTypes` input parameter to retrieve information about key-value pairs, tables, or both. For key-value pairs only, use the value `FORMS`. For an example, see [Extracting Key-Value Pairs from a Form Document](#examples-extract-kvp). For general information about how a document is represented by `Block` objects, see [Text Detection and Document Analysis Response Objects](#how-it-works-document-layout).
Dates found through key-value pair detection are returned exactly as detected on the input document, with most date formats supported.
Block objects with the type KEY\_VALUE\_SET are the containers for KEY or VALUE Block objects that store information about linked text items detected in a document. You can use the `EntityType` attribute to determine if a block is a KEY or a VALUE.
+ A *KEY* object contains information about the key for linked text. For example, *Name:*. A KEY block has two relationship lists. A relationship of type VALUE is a list that contains the ID of the VALUE block associated with the key. A relationship of type CHILD is a list of IDs for the WORD blocks that make up the text of the key.
+ A *VALUE* object contains information about the text associated with a key. In the preceding example, *Ana Carolina* is the value for the key *Name:*. A VALUE block has a relationship with a list of CHILD blocks that identify WORD blocks. Each WORD block contains one of the words that make up the text of the value. A `VALUE` object can also contain information about selected elements. For more information, see [Selection Elements](#how-it-works-selectables).
Amazon Textract returns the same confidence value for both KEY and VALUE in a KEY\_VALUE\_SET, as both KEY and VALUE are evaluated as a pair. It returns a different confidence value for a word in WORD blocks.
Each instance of a KEY\_VALUE\_SET `Block` object is a child of the PAGE `Block` object that corresponds to the current page.
The following diagram shows how the key-value pair *Name: Ana Carolina* is represented by `Block` objects.

The following examples show how the key-value pair *Name: Ana Carolina* is represented by JSON.
The PAGE block has CHILD blocks of type `KEY_VALUE_SET` for each KEY and VALUE block detected in the document.
```
{
"Geometry": ....
"Relationships": [
{
"Type": "CHILD",
"Ids": [
"2602b0a6-20e3-4e6e-9e46-3be57fd0844b",
"82aedd57-187f-43dd-9eb1-4f312ca30042",
"52be1777-53f7-42f6-a7cf-6d09bdc15a30", // Key - Name:
"7ca7caa6-00ef-4cda-b1aa-5571dfed1a7c" // Value - Ana Caroline
]
}
],
"BlockType": "PAGE",
"Id": "8136b2dc-37c1-4300-a9da-6ed8b276ea97" // Page identifier
},
```
The following JSON shows that the KEY block (52be1777-53f7-42f6-a7cf-6d09bdc15a30) has a relationship with the VALUE block (7ca7caa6-00ef-4cda-b1aa-5571dfed1a7c). It also has a CHILD block for the WORD block (c734fca6-c4c4-415c-b6c1-30f7510b72ee) that contains the text for the key (*Name:*).
```
{
"Relationships": [
{
"Type": "VALUE",
"Ids": [
"7ca7caa6-00ef-4cda-b1aa-5571dfed1a7c" // Value identifier
]
},
{
"Type": "CHILD",
"Ids": [
"c734fca6-c4c4-415c-b6c1-30f7510b72ee" // Name:
]
}
],
"Confidence": 51.55965805053711,
"Geometry": ....,
"BlockType": "KEY_VALUE_SET",
"EntityTypes": [
"KEY"
],
"Id": "52be1777-53f7-42f6-a7cf-6d09bdc15a30" //Key identifier
},
```
The following JSON shows that VALUE block 7ca7caa6-00ef-4cda-b1aa-5571dfed1a7c has a CHILD list of IDs for the WORD blocks that make up the text of the value (*Ana* and *Carolina*).
```
{
"Relationships": [
{
"Type": "CHILD",
"Ids": [
"db553509-64ef-4ecf-ad3c-bea62cc1cd8a", // Ana
"e5d7646c-eaa2-413a-95ad-f4ae19f53ef3" // Carolina
]
}
],
"Confidence": 51.55965805053711,
"Geometry": ....,
"BlockType": "KEY_VALUE_SET",
"EntityTypes": [
"VALUE"
],
"Id": "7ca7caa6-00ef-4cda-b1aa-5571dfed1a7c" // Value identifier
}
```
The following JSON shows the `Block` objects for the words *Name:*, *Ana*, and *Carolina*.
```
{
"Geometry": {...},
"Text": "Name:",
"TextType": "PRINTED".
"BlockType": "WORD",
"Confidence": 99.56285858154297,
"Id": "c734fca6-c4c4-415c-b6c1-30f7510b72ee"
},
{
"Geometry": {...},
"Text": "Ana",
"TextType": "PRINTED",
"BlockType": "WORD",
"Confidence": 99.52057647705078,
"Id": "db553509-64ef-4ecf-ad3c-bea62cc1cd8a"
},
{
"Geometry": {...},
"Text": "Carolina",
"TextType": "PRINTED",
"BlockType": "WORD",
"Confidence": 99.84207916259766,
"Id": "e5d7646c-eaa2-413a-95ad-f4ae19f53ef3"
},
```
### Tables
Use Amazon Textract to extract tables in a document and extract cells, merged cells, column headers, titles, section titles, footers, table type (structured or semistructured), and summary cells within a table.
Detected tables are returned as [Block](https://docs.aws.amazon.com/textract/latest/APIReference/API_Block.html) objects in the responses from [AnalyzeDocument](https://docs.aws.amazon.com/textract/latest/APIReference/API_AnalyzeDocument.html) and [GetDocumentAnalysis](https://docs.aws.amazon.com/textract/latest/APIReference/API_GetDocumentAnalysis.html). You can use the `FeatureTypes` input parameter to retrieve information about key-value pairs, tables, or both. For tables only, use the value `TABLES`. For an example, see [Exporting Tables into a CSV File](#examples-export-table-csv). For general information about how a document is represented by `Block` objects, see [Text Detection and Document Analysis Response Objects](#how-it-works-document-layout).
The following is an example of a table that could be detected by Amazon Textract.

The following diagram shows how a single cell in a table is represented by `Block` objects.

A cell contains `WORD` blocks for detected words, and where applicable, `TABLE_TITLE` blocks for table titles, `TABLE_FOOTER` blocks for table footers, and `SELECTION_ELEMENT` blocks for selection elements such as check boxes.
The following is part of the JSON for the preceding table. The `PAGE` block object has a list of `CHILD` block IDs for the `TABLE` block and each `LINE` of text that's detected.
```
{
"BlockType": "PAGE",
"Geometry": {
"BoundingBox": {
"Width": 1.0,
"Height": 1.0,
"Left": 0.0,
"Top": 0.0
},
},
"Id": "8a5d3f57-97bc-4a05-b028-f72617877626",
"Relationships": [
{
"Type": "CHILD",
"Ids": [
"7499ac64-3fa9-46fd-8e3f-581ec9c316eb",
"87ed4709-66f2-4b3d-abda-52c92a111474",
"27a87eb3-bd21-475e-80fe-3f8e16958dcf",
"d89894ea-2f37-4667-94b6-d90def01c5c1",
"9f9d6383-ed6d-4bd0-ba8c-71fc3eec704e",
"cdc74e1a-c568-439b-9eef-7bd54e060f18",
"1b64f24c-5e84-4c7e-851a-cb1f5258a53c",
"84a84878-04b4-4608-81b6-38117ead1629",
...
"8cef603b-932e-452b-adc4-15f8e02ad1fe",
"a3f97508-0d6b-4ae0-aa04-76078f9fe11a",
"dd1f23c6-dfad-447b-8105-29ba136bd3a4",
"46138f38-5b77-41a9-b068-f8394587122f",
"a5e5247c-2637-4fa8-a271-ab46399cd77c",
"63d7b889-71e3-422a-8cb7-2103ba0aa276",
"033e5c86-371a-46fb-bbea-eb7f6b0cd092",
"559b1354-ef94-4cb9-8e03-9eca83c6dba4",
"55edc4fa-052f-40f9-9edd-739b100e6f75"
]
}
]
},
```
To learn more about the table, access the `TABLE` block object. The table block includes four types of relationships: “Child,” “Merged Cells,” "Title," and "Footer." For relationship type `CHILD`, each child ID represents a single cell within the table. A merged cell is broken down into all the individual cells that are combined to make one merged cell. `TABLE_TITLE` and `TABLE_FOOTER` relationship types contain the block ID for the corresponding `TABLE_TITLE` and `TABLE_FOOTER` blocks, where information about the title and footer is stored. The table block type has an `EntityType` of either `STRUCTURED_TABLE` or `SEMI_STRUCTURED_TABLE` that identifies the type of table.
The following JSON shows that the preceding table has 65 cells for 13 rows and 5 columns, which are listed in the `CHILD` relationship `Ids` array. For relationship type `MERGED_CELL`, each merged cell ID represents a single merged cell within the table. The following JSON shows that the table has 9 merged cells, which are listed in the `MERGED_CELL` relationship `Ids` array. The two additional relationship types, `TABLE_TITLE` and `TABLE_FOOTER`, list the IDs of the respective title and footer blocks. The following JSON also shows that the table is structured in the `EntityTypes` block.
```
{
"BlockType": "TABLE",
"Confidence": 99.8046875,
"Geometry": {...},
"Id": "55edc4fa-052f-40f9-9edd-739b100e6f75",
"Relationships": [
{
"Type": "CHILD",
"Ids": [
"c1c03d64-d365-4906-af7a-a852f1acc040",
"8b415996-6b05-4183-a959-d27d12ccef79",
"48b0e972-7dba-4db7-896e-ca7066e8c761",
"69948207-47d8-4825-8929-1d7abb650a88",
"b9ac9f14-8899-43b3-8572-0e997180e0a4",
"6f06c024-0b36-4acd-b61f-4467203234dd",
"c8a88487-dbc7-4662-a69b-21103049b61d",
...
"2b41c8e1-f754-4b37-91b6-a97cdc413f91",
"365a1bab-0c18-4cd8-a465-6f7bc7e25e60",
"f08af959-cfac-4ad6-a63f-2771c7a8ff62",
"e4f6fbfd-c7d8-4f64-9102-733d4806850f",
"68c0b8ff-fd35-41ce-ba76-de08c26084d7",
"44e80372-aa70-4a36-9aac-3a93aaa91bb1"
]
},
{
"Type": "MERGED_CELL",
"Ids": [
"a27a3ecc-afd0-4f7c-9db2-6f8e6d31c605",
"6c02cf21-40de-4480-b755-e94462ac4884",
"6faad856-8d37-4751-b741-c4ad8d5dcbe3",
"d777d6e2-7430-4c6e-a261-03ec5a612c8c",
"f0f5a9fb-5bfa-4c80-8f41-1d4fad674b09",
"83c7af02-8128-4479-89c9-962544ad4048",
"b2b5126c-409f-4b67-9adf-e3e12f60bf86",
"87d7f688-3d38-4198-b491-433af0da4d8b",
"1c2436e2-a1fc-4b2a-9e73-cc8a1ca67568"
]
},
{
"Type": "TABLE_TITLE",
"Ids": [
"cde34920-0131-4e68-a3ec-82922269afd4"
]
},
{
"Type": "TABLE_FOOTER",
"Ids": [
"11dfd98c-6140-49e8-a544-e220d76bdd2f",
"ad1b9c81-3b53-4fc7-a533-dabb3d29b0b1"
]
}
],
"EntityTypes": [
"STRUCTURED_TABLE"
]
},
```
The block type for each table cell is `CELL`. The cell block type will always have row span of 1 and column span of 1. The block object for each cell includes information about the cell location compared to other cells in the table. It also includes geometry information for the location of the cell on the document. In addition, cell blocks can have different `EntityTypes` that identify them as a particular type of cell, including TABLE\_TITLE, TABLE\_FOOTER, TABLE\_SECTION\_TITLE, COLUMN\_HEADER, and TABLE\_SUMMARY. For example, in the preceding table, the cell that contains the word “Date” is a column header, as shown in the following example.
```
{
"BlockType": "CELL",
"Confidence": 81.8359375,
"RowIndex": 2,
"ColumnIndex": 1,
"RowSpan": 1,
"ColumnSpan": 1,
"Geometry": {...},
"Id": "6f06c024-0b36-4acd-b61f-4467203234dd",
"Relationships": [
{
"Type": "CHILD",
"Ids": [
"c49f55d5-a7e4-41d5-9c29-d8244f56181c"
]
}
],
"EntityTypes": [
"COLUMN_HEADER"
]
},
```
The cell that contains the word "Deposit" is not a title, footer, column header, section title, or summary cell. This is shown by the lack of the field `"EntityTypes"`.
```
{
"BlockType": "CELL",
"Confidence": 86.181640625,
"RowIndex": 7,
"ColumnIndex": 2,
"RowSpan": 1,
"ColumnSpan": 1,
"Geometry": {...},
"Id": "7af5160b-bd60-45f5-a12c-bf376e9d742c",
"Relationships": [
{
"Type": "CHILD",
"Ids": [
"bb9bcaed-5998-44a6-9076-aa1ecc82fbc6"
]
}
]
},
```
All the merged cells are listed under `"Type": "MERGED_CELL"` in the `TABLE` block. In the preceding example table, there are nine merged cells.
```
{
"Type": "MERGED_CELL",
"Ids": [
"a27a3ecc-afd0-4f7c-9db2-6f8e6d31c605",
"6c02cf21-40de-4480-b755-e94462ac4884",
"6faad856-8d37-4751-b741-c4ad8d5dcbe3",
"d777d6e2-7430-4c6e-a261-03ec5a612c8c",
"f0f5a9fb-5bfa-4c80-8f41-1d4fad674b09",
"83c7af02-8128-4479-89c9-962544ad4048",
"b2b5126c-409f-4b67-9adf-e3e12f60bf86",
"87d7f688-3d38-4198-b491-433af0da4d8b",
"1c2436e2-a1fc-4b2a-9e73-cc8a1ca67568"
]
},
```
To find specific details associated with each merged cell, go to `"BlockType": "MERGED_CELL"`. For the merged cell “Balance Sheet”, which is also a title cell, the ID associated with it is `"a27a3ecc-afd0-4f7c-9db2-6f8e6d31c605"`.
There are 5 cells that constitute this merged cell, as shown by the "ColumnSpan" of 5. To find the text within the merged cell, go further down to the `Ids` array for details on `"BlockType": "CELL"` followed by `"BlockType": "WORD"`.
```
{
"BlockType": "MERGED_CELL",
"Confidence": 77.44140625,
"RowIndex": 1,
"ColumnIndex": 1,
"RowSpan": 1,
"ColumnSpan": 5,
"Geometry": {...},
"Id": "a27a3ecc-afd0-4f7c-9db2-6f8e6d31c605",
"Relationships": [
{
"Type": "CHILD",
"Ids": [
"c1c03d64-d365-4906-af7a-a852f1acc040",
"8b415996-6b05-4183-a959-d27d12ccef79",
"48b0e972-7dba-4db7-896e-ca7066e8c761",
"69948207-47d8-4825-8929-1d7abb650a88",
"b9ac9f14-8899-43b3-8572-0e997180e0a4"
]
}
],
"EntityTypes": [
"TABLE_TITLE"
]
},
```
On the cell level, there are 5 cells for the merged cell “Balance Sheet”. Each cell has an `EntityType` of `TABLE_TITLE` because the title was identified in the merged cell. The cell with an `Id` of `48b0e972-7dba-4db7-896e-ca7066e8c761` contains two `CHILD` relationship IDs that correspond to the `WORD` blocks that make up this merged title cell.
```
{
"BlockType": "CELL",
"Confidence": 77.44140625,
"RowIndex": 1,
"ColumnIndex": 1,
"RowSpan": 1,
"ColumnSpan": 1,
"Geometry": {...},
"Id": "c1c03d64-d365-4906-af7a-a852f1acc040",
"EntityTypes": [
"TABLE_TITLE"
]
},
{
"BlockType": "CELL",
"Confidence": 77.44140625,
"RowIndex": 1,
"ColumnIndex": 2,
"RowSpan": 1,
"ColumnSpan": 1,
"Geometry": {...},
"Id": "8b415996-6b05-4183-a959-d27d12ccef79",
"EntityTypes": [
"TABLE_TITLE"
]
},
{
"BlockType": "CELL",
"Confidence": 77.44140625,
"RowIndex": 1,
"ColumnIndex": 3,
"RowSpan": 1,
"ColumnSpan": 1,
"Geometry": {...},
"Id": "48b0e972-7dba-4db7-896e-ca7066e8c761",
"Relationships": [
{
"Type": "CHILD",
"Ids": [
"998394ef-c6cf-491b-9bac-ec470c638ecd",
"1c875a06-f8e5-4df7-8f6a-583c47cbd9fe"
]
}
],
"EntityTypes": [
"TABLE_TITLE"
]
},
{
"BlockType": "CELL",
"Confidence": 77.44140625,
"RowIndex": 1,
"ColumnIndex": 4,
"RowSpan": 1,
"ColumnSpan": 1,
"Geometry": {...},
"Id": "69948207-47d8-4825-8929-1d7abb650a88",
"EntityTypes": [
"TABLE_TITLE"
]
},
{
"BlockType": "CELL",
"Confidence": 77.44140625,
"RowIndex": 1,
"ColumnIndex": 5,
"RowSpan": 1,
"ColumnSpan": 1,
"Geometry": {...},
"Id": "b9ac9f14-8899-43b3-8572-0e997180e0a4",
"EntityTypes": [
"TABLE_TITLE"
]
},
```
On the word level, there are two words, “Balance” and "Sheet." Since the first two and last two cells on columns 1, 2, 4, and 5 are blank, there are no words associated with them. This is also shown in the previous JSON output, where only the third cell contains child IDs.
```
{
"BlockType": "WORD",
"Confidence": 99.95711517333984,
"Text": "Balance",
"TextType": "PRINTED",
"Geometry": {...},
"Id": "998394ef-c6cf-491b-9bac-ec470c638ecd"
},
{
"BlockType": "WORD",
"Confidence": 99.87372589111328,
"Text": "Sheet",
"TextType": "PRINTED",
"Geometry": {...},
"Id": "1c875a06-f8e5-4df7-8f6a-583c47cbd9fe"
},
```
The `TABLE_TITLE` and `TABLE_FOOTER` block types contain information about title and footer cells, including `CHILD` relationships that point to the `WORD` blocks that make up the title or footer. This is shown in the following JSON response.
In this example, the title is an in-table title, meaning it is found within the structure of the table itself, as opposed to outside of the table as a floating title. This means that the title also has a `CELL` block type that contains the child IDs of the word blocks that make up the title. See the previous JSON output for the five cell blocks that comprise the merged title cell, which includes the title cell block with the child IDs of the word blocks. The footer cells for this table would also be represented by cell blocks for each footer.
```
{
"BlockType": "TABLE_TITLE",
"Confidence": 97.802734375,
"Geometry": {...},
"Id": "cde34920-0131-4e68-a3ec-82922269afd4",
"Relationships": [
{
"Type": "CHILD",
"Ids": [
"998394ef-c6cf-491b-9bac-ec470c638ecd",
"1c875a06-f8e5-4df7-8f6a-583c47cbd9fe"
]
}
]
},
{
"BlockType": "TABLE_FOOTER",
"Confidence": 88.0859375,
"Geometry": {...},
"Id": "11dfd98c-6140-49e8-a544-e220d76bdd2f",
"Relationships": [
{
"Type": "CHILD",
"Ids": [
"77a70b2d-c137-4161-8d9c-65170266e5ff",
"d413ef1f-fa1b-44cb-87ed-809494fc87d8",
"19616f50-1a34-431f-94bf-7e575106cd85",
"35063ea4-a3c7-4e19-9d32-10eca92807b8",
"48de1523-7776-49ef-96d9-fc19bcde89c5"
]
}
]
},
```
### Selection Elements
Amazon Textract can detect selection elements such as option buttons (radio buttons), check boxes, underlined, and circled text on a document page. Selection elements can be detected in [form data](#how-it-works-kvp) and in [tables](#how-it-works-tables). For example, when the following table is detected on a form, Amazon Textract detects the check boxes in the table cells.
| | | | |
| --- |--- |--- |--- |
| | **Agree** | **Neutral** | **Disagree** |
| **Good Service** | ☑ | ☐ | ☐ |
| **Easy to Use** | ☐ | ☑ | ☐ |
| **Fair Price** | ☑ | ☐ | ☐ |
Detected selection elements are returned as [Block](https://docs.aws.amazon.com/textract/latest/APIReference/API_Block.html) objects in the responses from [AnalyzeDocument](https://docs.aws.amazon.com/textract/latest/APIReference/API_AnalyzeDocument.html) and [GetDocumentAnalysis](https://docs.aws.amazon.com/textract/latest/APIReference/API_GetDocumentAnalysis.html).
Below is a table that provides examples of the different selectable types supported by Amazon Textract.
| | |
| --- |--- |
| Selectable Type | Example |
| Radio Button | Yes ○ No ● |
| Checkbox | Yes ☐ No ☑ |
| Underlined Words | Yes *No* |
| Circled Words |  |
| Crossed Out Words |  |
Additionally Amazon Textract can detect implicit clickables, or clickables that are structured as questions and answered by marking one of several answers. These are returned the same way clickables are.
**Note**
You can use the `FeatureTypes` input parameter to retrieve information about key-value pairs, tables, or both. For example, if you filter on tables, the response includes the selection elements that are detected in tables. Selection elements that are detected in key-value pairs aren't included in the response.
Information about a selection element is contained in a `Block` object of type `SELECTION_ELEMENT`. To determine the status of a selectable element, use the `SelectionStatus` field of the `SELECTION_ELEMENT` block. The status can be either *SELECTED* or *NOT\_SELECTED*. For example, the value of `SelectionStatus` for the previous image is *SELECTED*.
A `SELECTION_ELEMENT` `Block` object is associated with either a key-value pair or a table cell. A `SELECTION_ELEMENT` `Block` object contains bounding box information for a selection element in the `Geometry` field. A `SELECTION_ELEMENT` `Block` object isn't a child of a `PAGE` `Block` object.
#### Form Data (Key-Value Pairs)
A key-value pair is used to represent a selection element that's detected on a form. The `KEY` block contains the text for the selection element. The `VALUE` block contains the SELECTION\_ELEMENT block. The following diagram shows how selection elements are represented by [Block](https://docs.aws.amazon.com/textract/latest/APIReference/API_Block.html) objects.

For more information about key-value pairs, see [Form Data (Key-Value Pairs)](#how-it-works-kvp).
The following JSON snippet shows the key for a key-value pair that contains a selection element (**male ☑**). The child ID (Id bd14cfd5-9005-498b-a7f3-45ceb171f0ff) is the ID of the WORD block that contains the text for the selection element (*male*). The value ID (Id 24aaac7f-fcce-49c7-a4f0-3688b05586d4) is the ID of the `VALUE` block that contains the `SELECTION_ELEMENT` block object.
```
{
"Relationships": [
{
"Type": "VALUE",
"Ids": [
"24aaac7f-fcce-49c7-a4f0-3688b05586d4" // Value containing Selection Element
]
},
{
"Type": "CHILD",
"Ids": [
"bd14cfd5-9005-498b-a7f3-45ceb171f0ff" // WORD - male
]
}
],
"Confidence": 94.15619659423828,
"Geometry": {
"BoundingBox": {
"Width": 0.022914813831448555,
"Top": 0.08072036504745483,
"Left": 0.18966935575008392,
"Height": 0.014860388822853565
},
"Polygon": [
{
"Y": 0.08072036504745483,
"X": 0.18966935575008392
},
{
"Y": 0.08072036504745483,
"X": 0.21258416771888733
},
{
"Y": 0.09558075666427612,
"X": 0.21258416771888733
},
{
"Y": 0.09558075666427612,
"X": 0.18966935575008392
}
]
},
"BlockType": "KEY_VALUE_SET",
"EntityTypes": [
"KEY"
],
"Id": "a118dc43-d5f7-49a2-a20a-5f876d9ffd79"
}
```
The following JSON snippet is the WORD block for the word *Male*. The WORD block also has a parent LINE block.
```
{
"Geometry": {
"BoundingBox": {
"Width": 0.022464623674750328,
"Top": 0.07842985540628433,
"Left": 0.18863198161125183,
"Height": 0.01617223583161831
},
"Polygon": [
{
"Y": 0.07842985540628433,
"X": 0.18863198161125183
},
{
"Y": 0.07842985540628433,
"X": 0.2110965996980667
},
{
"Y": 0.09460209310054779,
"X": 0.2110965996980667
},
{
"Y": 0.09460209310054779,
"X": 0.18863198161125183
}
]
},
"Text": "Male",
"BlockType": "WORD",
"Confidence": 54.06439208984375,
"Id": "bd14cfd5-9005-498b-a7f3-45ceb171f0ff"
},
```
The VALUE block has a child (Id f2f5e8cd-e73a-4e99-a095-053acd3b6bfb) that is the SELECTION\_ELEMENT block.
```
{
"Relationships": [
{
"Type": "CHILD",
"Ids": [
"f2f5e8cd-e73a-4e99-a095-053acd3b6bfb" // Selection element
]
}
],
"Confidence": 94.15619659423828,
"Geometry": {
"BoundingBox": {
"Width": 0.017281491309404373,
"Top": 0.07643391191959381,
"Left": 0.2271782010793686,
"Height": 0.026274094358086586
},
"Polygon": [
{
"Y": 0.07643391191959381,
"X": 0.2271782010793686
},
{
"Y": 0.07643391191959381,
"X": 0.24445968866348267
},
{
"Y": 0.10270800441503525,
"X": 0.24445968866348267
},
{
"Y": 0.10270800441503525,
"X": 0.2271782010793686
}
]
},
"BlockType": "KEY_VALUE_SET",
"EntityTypes": [
"VALUE"
],
"Id": "24aaac7f-fcce-49c7-a4f0-3688b05586d4"
},
}
```
The following JSON is the SELECTION\_ELEMENT block. The value of `SelectionStatus` indicates that the check box is selected.
```
{
"Geometry": {
"BoundingBox": {
"Width": 0.020316146314144135,
"Top": 0.07575977593660355,
"Left": 0.22590067982673645,
"Height": 0.027631107717752457
},
"Polygon": [
{
"Y": 0.07575977593660355,
"X": 0.22590067982673645
},
{
"Y": 0.07575977593660355,
"X": 0.2462168186903
},
{
"Y": 0.1033908873796463,
"X": 0.2462168186903
},
{
"Y": 0.1033908873796463,
"X": 0.22590067982673645
}
]
},
"BlockType": "SELECTION_ELEMENT",
"SelectionStatus": "SELECTED",
"Confidence": 74.14942932128906,
"Id": "f2f5e8cd-e73a-4e99-a095-053acd3b6bfb"
}
```
#### Table Cells
Amazon Textract can detect selection elements inside a table cell. For example, the cells in the following table have check boxes.
| | | | |
| --- |--- |--- |--- |
| | **Agree** | **Neutral** | **Disagree** |
| **Good Service** | ☑ | ☐ | ☐ |
| **Easy to Use** | ☐ | ☑ | ☐ |
| **Fair Price** | ☑ | ☐ | ☐ |
A `CELL` block can contain child `SELECTION_ELEMENT` objects for selection elements and child `WORD` blocks for detected text.

For more information about tables, see [Tables](#how-it-works-tables).
The TABLE `Block` object for the previous table looks similar to this.
```
{
"Geometry": {.....},
"Relationships": [
{
"Type": "CHILD",
"Ids": [
"652c09eb-8945-473d-b1be-fa03ac055928",
"37efc5cc-946d-42cd-aa04-e68e5ed4741d",
"4a44940a-435a-4c5c-8a6a-7fea341fa295",
"2de20014-9a3b-4e26-b453-0de755144b1a",
"8ed78aeb-5c9a-4980-b669-9e08b28671d2",
"1f8e1c68-2c97-47b2-847c-a19619c02ca9",
"9927e1d1-6018-4960-ac17-aadb0a94f4d9",
"68f0ed8b-a887-42a5-b618-f68b494a6034",
"fcba16e0-6bd7-4ea5-b86e-36e8330b68ea",
"2250357c-ae34-4ed9-86da-45dac5a5e903",
"c63ad40d-5a14-4646-a8df-2d4304213dbc", // Cell
"2b8417dc-e65f-4fcd-aa0f-61a23f1e8cb0",
"26c62932-72f0-4dc2-9893-1ae27829c060",
"27f291cc-abf4-4c23-aa24-676abe99cb1e",
"7e5ce028-1bcd-4d9f-ad42-15ac181c5b47",
"bf32e3d2-efa2-4fc1-b09b-ab9cc52ff734"
]
}
],
"BlockType": "TABLE",
"Confidence": 99.99993896484375,
"Id": "f66eac36-2e74-406e-8032-14d1c14e0b86"
}
```
The CELL `BLOCK` object (Id c63ad40d-5a14-4646-a8df-2d4304213dbc) for the cell that contains the check box *Good Service* looks like the following. It includes a child `Block` (Id = 26d122fd-c5f4-4b53-92c4-0ae92730ee1e) that is the `SELECTION_ELEMENT` `Block` object for the check box.
```
{
"Geometry": {.....},
"Relationships": [
{
"Type": "CHILD",
"Ids": [
"26d122fd-c5f4-4b53-92c4-0ae92730ee1e" // Selection Element
]
}
],
"Confidence": 79.741689682006836,
"RowSpan": 1,
"RowIndex": 3,
"ColumnIndex": 3,
"ColumnSpan": 1,
"BlockType": "CELL",
"Id": "c63ad40d-5a14-4646-a8df-2d4304213dbc"
}
```
The SELECTION\_ELEMENT `Block` object for the check box is as follows. The value of `SelectionStatus` indicates that the check box is selected.
```
{
"Geometry": {.......},
"BlockType": "SELECTION_ELEMENT",
"SelectionStatus": "SELECTED",
"Confidence": 88.79517364501953,
"Id": "26d122fd-c5f4-4b53-92c4-0ae92730ee1e"
}
```
### Queries
When provided a query, Amazon Textract provides a specialized response object. This object repeats the question back to the user along with the alias for the question. It then provides the confidence Amazon Textract has with the answer, a location of the answer on the page, and the text answer to the question. If no answer is found, this response element is kept blank.
Detected queries are returned as Block objects in the responses from AnalyzeDocument and GetDocumentAnalysis. You can use the FeatureTypes input parameter to retrieve information about key-value pairs, tables, or Queries. For general information about how a document is represented by Block objects, see [Text Detection and Document Analysis Response Objects](#how-it-works-document-layout).
The following shows a diagram of how a query response is represented in `Block` objects.

Following is an example for a query response as part of a full response of document analysis.
```
{
"BlockType": "QUERY",
"Id": "77cfbd28-168a-40fc-9c8a-863ba3066bd2",
"Relationships": [
{
"Type": "ANSWER",
"Ids": [
"21396475-27ee-4da7-965b-f7631ef60fcc"
]
}
],
"Query": {
"Text": "What is the patient first name?",
"Alias": "PATIENT_FIRST_NAME"
}
},
{
"BlockType": "QUERY_RESULT",
"Confidence": 1.0,
"Text": "ALEJANDRO",
"Id": "21396475-27ee-4da7-965b-f7631ef60fcc"
}
```
We have compiled a list of example queries for common documents in the [Example Queries document](samples/Example%20Queries.zip).
## Layout Response Objects
When using Layout on a document with Amazon Textract, the different layout elements are returned as a BlockType in the Block object. These elements correspond to the different portions of the layout, and are:
+ Title — The main title of the document. Returned as `LAYOUT_TITLE`.
+ Header — Text located in the top margin of the document. Returned as `LAYOUT_HEADER`.
+ Footer — Text located in the bottom margin of the document. Returned as `LAYOUT_FOOTER`.
+ Section Title — The titles for individual document sections. Returned as `LAYOUT_SECTION_HEADER`.
+ Page Number — The page number of the documents. Returned as `LAYOUT_PAGE_NUMBER`.
+ List — Any information grouped together in list form. Returned as `LAYOUT_LIST`.
+ Figure — Indicates the location of an image in a document. Returned as `LAYOUT_FIGURE`.
+ Table — Indicates the location of a table in the document. Returned as `LAYOUT_TABLE`.
+ Key Value — Indicates the location of form key-values in a document. Returned as `LAYOUT_KEY_VALUE`.
+ Text — Text that is present typically as a part of paragraphs in documents. Returned as `LAYOUT_TEXT`
Each element returns two key pieces of information. First is the bounding box of the layout element, which shows its location. Second, the element contains a list of IDs. These IDs point to the components of the layout element, often lines of text represented by `LINE` objects. Layout elements can also point to different objects, such as `TABLE` objects, Key-Value pairs, or `LAYOUT_TEXT` elements in the case of `LAYOUT_LIST`.
Elements are returned in implied reading order. This means layout elements will be returned by document analysis left to right, top to bottom. For multicolumn pages, elements are returned from the top of the leftmost column, moving left to right until the bottom of the column is reached. Then, the elements from the next leftmost column are returned in the same way.
Below is an example of a `LAYOUT_TITLE` response element, with the bounding box geometry section removed. The three IDs point towards the three `LINE` objects representing the three lines of text in the title.
```
{
"BlockType": "LAYOUT_TITLE",
"Confidence": 57.177734375,
"Geometry": {
...
},
"Id": "e02654d0-dce1-4205-bf1c-6fac1cc0a35a",
"Relationships": [
{
"Type": "CHILD",
"Ids": [
"8afeedb5-44f2-48ec-ae97-07edc204f8d8",
"fa505358-51ff-405c-b227-e51faffb28fe",
"95ef9c97-5a98-4060-9100-d09222b166f6"
]
}
]
},
```
When Amazon Textract detects a list in a document's layout, instead of the IDs pointing directly to the `LINE` objects, it instead points to the `LAYOUT_TEXT` objects located within the list. Below is a shortened example response displaying this relationship. Within the `LAYOUT_TEXT` objects you can see the IDs corresponding to the IDs in the `LAYOUT_LIST` response object. These `LAYOUT_TEXT` objects then contain their own list of IDs, which correspond to the `LINE` objects for each line of text in the layout element.
```
{
"BlockType": "LAYOUT_LIST",
"Relationships": [
{
"Ids": [ "98d2f88c-9116-4025-bf4f-70e4345ac347", // LAYOUT_TEXT
"d132fcd3-2be0-4f23-8c98-61295f5c6ac2" ], // LAYOUT_TEXT
"Type": "CHILD"
}
],
"ID": "c685fb89-692b-4e80-8083-7b783735e287",
...
},
{
"BlockType": "LAYOUT_TEXT",
"ID": "98d2f88c-9116-4025-bf4f-70e4345ac347",
...
},
{
"BlockType": "LAYOUT_TEXT",
"ID": "d132fcd3-2be0-4f23-8c98-61295f5c6ac2",
...
}
```
## Invoice and Receipt Response Objects
When you submit an invoice or a receipt to the AnalyzeExpense API, it returns a series of ExpenseDocuments objects. Each ExpenseDocument is further separated into `LineItemGroups` and `SummaryFields`. Most invoices and receipts contain information such as the vendor name, receipt number, receipt date, or total amount. AnalyzeExpense returns this information under `SummaryFields`. Receipts and invoices also contain details about the items purchased. The AnalyzeExpense API returns this information under `LineItemGroups`. The `ExpenseIndex` field uniquely identifies the expense, and associates the appropriate `SummaryFields` and `LineItemGroups` detected in that expense. Finally, expense analysis will return a `Block` object, giving you the same information as text detection would on your document.
Certain information, such as addresses and names, can be difficult to discern between based on a single response. Expense Analysis uses the object `ExpenseGroupProperties` to help distinguish nebulous responses. This object contains a type from the following list:
+ VENDOR\_REMIT\_TO
+ RECEIVER\_SHIP\_TO
+ RECEIVER\_SOLD\_TO
+ RECEIVER\_BILL\_TO
+ VENDOR\_SUPPLIER
These types distinguish between the different groups of responses. Multiple elements belonging to the same group are connected via identification number, also returned in `ExpenseGroupProperties`.
The most granular level of data in the AnalyzeExpense response consists of `Type`, `ValueDetection`, and `LabelDetection` (Optional). The individual entities are:
+ [Type](#how-it-works-type): Refers to what kind of information is detected on a high level.
+ [LabelDetection](#how-it-works-labeldetection): Refers to the label of an associated value within the text of the document. `LabelDetection` is optional and only returned if the label is written.
+ [ValueDetection](#how-it-works-valuedetection): Refers to the value of the label or type returned.
The AnalyzeExpense API also detects `ITEM`, `QUANTITY`, and `PRICE` within line items as normalized fields. If there is other text in a line item on the receipt image such as SKU or detailed description, it will be included in the JSON as `EXPENSE_ROW`. This is shown in the following example:
```
{
"Type": {
"Text": "EXPENSE_ROW",
"Confidence": 99.95216369628906
},
"ValueDetection": {
"Text": "Banana 5 $2.5",
"Geometry": {
…
},
"Confidence": 98.11214447021484
}
```
The preceding example shows how the AnalyzeExpense API operation returns the entire row on a receipt that contains line item information about 5 bananas sold for $2.5.
### Type
Following is an example of the standard or normalized type of the key-value pair:
```
{
"PageNumber": 1,
"Type": {
"Text": "VENDOR_NAME",
"Confidence": 70.0
},
"ValueDetection": {
"Geometry": { ... },
"Text": "AMAZON",
"Confidence": 87.89806365966797
}
}
```
The receipt did not have “Vendor Name” explicitly listed. However, the Analyze Expense API recognized the value "AMAZON" as Type `VENDOR_NAME`.
### LabelDetection
Following is an example of text as it is shown on a customer document page:
```
{
"PageNumber": 1,
"Type": {
"Text": "OTHER",
"Confidence": 70.0
},
"LabelDetection": {
"Geometry": { ... },
"Text": "CASHIER",
"Confidence": 88.19171142578125
},
"ValueDetection": {
"Geometry": { ... },
"Text": "Mina",
"Confidence": 87.89806365966797
}
}
```
The example document contained “CASHIER Mina.” The Analyze Expense API extracted the as-is value and returns it under `LabelDetection`. For implied values such as “Invoice Date,” where the “key” is not explicitly shown in the receipt, `LabelDetection` will not be included in the AnalyzeExpense element. In such cases, the AnalyzeExpense API operation does not return `LabelDetection`.
### ValueDetection
The following is an example that shows the “value” of the key-value pair.
```
{
"PageNumber": 1,
"Type": {
"Text": "OTHER",
"Confidence": 70.0
},
"LabelDetection": {
"Geometry": { ... },
"Text": "CASHIER",
"Confidence": 88.19171142578125
},
"ValueDetection": {
"Geometry": { ... },
"Text": "Mina",
"Confidence": 87.89806365966797
}
}
```
In the example, the document contained “CASHIER Mina”. The AnalyzeExpense API detected the Cashier value as Mina and returned it under `ValueDetection`.
## Identity Documentation Response Objects
When you submit an identity document to the AnalyzeID API, it returns a series of `IdentityDocumentField` objects. Each of these objects contains `Type`, and `Value`. `Type` records the normalized field that Amazon Textract detects, and `Value` records the text associated with the normalized field.
Following is an example of an `IdentityDocumentField`, shortened for brevity.
```
{
"DocumentMetadata": {
"Pages": 1
},
"IdentityDocumentFields": [
{
"Type": {
"Text": "first name"
},
"ValueDetection": {
"Text": "jennifer",
"Confidence": 99.99908447265625
}
},
{
"Type": {
"Text": "last name"
},
"ValueDetection": {
"Text": "sample",
"Confidence": 99.99758911132812
}
},
```
These are two examples of IdentityDocumentFields cut from a longer response. There is a separation between the type detected and the value for that type. Here, it is the first and last name respectively. This structure repeats with all contained information. If a type is not recognized as a normalized field, it will be listed as "other." Additionally, AnalyzeID returns a Blocks object, the same as document text detection so you can have access to the full text of the document.
Following is a list of normalized fields for Driver's Licenses:
+ First Name — FIRST\_NAME
+ Last Name — LAST\_NAME
+ Middle Name — MIDDLE\_NAME
+ Suffix — SUFFIX
+ City in Address — CITY\_IN\_ADDRESS
+ Zip Code In Address — ZIP\_CODE\_IN\_ADDRESS
+ State In Address — STATE\_IN\_ADDRESS
+ County — COUNTY
+ Document Number — DOCUMENT\_NUMBER
+ Expiration Date — EXPIRATION\_DATE
+ Date of Birth — DATE\_OF\_BIRTH
+ State Name — STATE\_NAME
+ Date of Issue — DATE\_OF\_ISSUE
+ Class — CLASS
+ Restrictions — RESTRICTIONS
+ Endorsements — ENDORSEMENTS
+ Id Type — ID\_TYPE
+ Veteran — VETERAN
+ Address — ADDRESS
Following is a list of normalized fields for U.S Passports:
+ First Name — FIRST\_NAME
+ Last Name — LAST\_NAME
+ Middle Name — MIDDLE\_NAME
+ Document Number — DOCUMENT\_NUMBER
+ Expiration Date — EXPIRATON\_DATE
+ Date of Birth — DATE\_OF\_BIRTH
+ Place of Birth — PLACE\_OF\_BIRTH
+ Date of Issue — DATE\_OF\_ISSUE
+ Id Type — ID\_TYPE
+ MRZ Code — MRZ\_CODE
## Analyze Lending Response Objects
When you submit a document to the Analyze Lending workflow, the document is split apart into individual pages and the pages are classified. The individual pages are then sent to the appropriate Amazon Textract operation for further analysis, depending on their classification. Amazon Textract analyzes the data and returns the relevant information extracted from the documents, such as detected signatures, identity information, forms, expense values, and queries data.
After processing a document with [StartLendingAnalysis](https://docs.aws.amazon.com/textract/latest/APIReference/API_StartLendingAnalysis.html), you can obtain analysis results for individual pages by using [GetLendingAnalysis](https://docs.aws.amazon.com/textract/latest/APIReference/API_GetLendingAnalysis.html), or you can get a summary of the information in the document with [GetLendingAnalysisSummary](https://docs.aws.amazon.com/textract/latest/APIReference/API_GetLendingAnalysisSummary.html). The returned summary includes information about documents grouped together by a common document type.
The results for the analysis of individual pages follow one general structure, regardless of the class of the document. The response from `GetLendingAnalysis` contains information regarding the page number and page classification, along with the information extracted by one of Amazon Textract ’s analysis operations. For the general structure of the analysis results, see the following example :
```
{
"Page": number,
"PageClassification": {
"PageNumber": [
{
"Confidence": number,
"Value": "string"
}
],
"PageType": [
{
"Confidence": number,
"Value": "string"
}
]
},
"Extractions": [
{ LendingDocument | ExpenseDocument | IdentityDocument }
]
}
```
`GetLendingAnalysis` returns a structure that contains information on the page classification and the relevant information extracted from the given page using the appropriate operation. The `Page` entity refers to the physical page number, `PageNumber` refers to the detected page number, and `PageClassification` is the class detected for the page. The information extracted by an analysis operation is stored in the `Extractions` structure, which contains the normalized key-value pairs from the appropriate operation.
In the following sample response, the document is a `LendingDocument` and contains extracted information and associated structures:
```
{
"DocumentMetadata": {
"Pages": 1
},
"JobStatus": "SUCCEEDED",
"Results": [
{
"Page": 1,
"PageClassification": {
"PageType": [
{
"Value": "1005",
"Confidence": 99.99947357177734
}
],
"PageNumber": [
{
"Value": "undetected",
"Confidence": 100.0
}
]
},
"Extractions": [
{
"LendingDocument": {
"LendingFields": [
{
"Type": "OVERTIME_CONTINUANCE_LIKELY",
"ValueDetections": [
{
"Text": "Yes",
"Geometry": {
"BoundingBox": {
"Width": 0.019448408856987953,
"Height": 0.007367494981735945,
"Left": 0.8211431503295898,
"Top": 0.485835462808609
},
"Polygon": [
{
"X": 0.8211431503295898,
"Y": 0.485835462808609
},
{
"X": 0.8405909538269043,
"Y": 0.4858577847480774
},
{
"X": 0.840591549873352,
"Y": 0.49320295453071594
},
{
"X": 0.8211436867713928,
"Y": 0.4931805729866028
}
]
},
"Confidence": 95.0
}
]
},
{
"Type": "CURRENT_GROSS_PAY_WEEKLY",
"KeyDetection": {
"Text": "Weekly",
"Geometry": {
"BoundingBox": {
"Width": 0.039741966873407364,
"Height": 0.009058262221515179,
"Left": 0.17564243078231812,
"Top": 0.5004485845565796
},
"Polygon": [
{
"X": 0.17564436793327332,
"Y": 0.5004485845565796
},
{
"X": 0.21538439393043518,
"Y": 0.5004944205284119
},
{
"X": 0.2153826206922531,
"Y": 0.5095068216323853
},
{
"X": 0.17564243078231812,
"Y": 0.5094608664512634
}
]
},
"Confidence": 99.98104858398438
},
"ValueDetections": [
{
"SelectionStatus": "NOT_SELECTED",
"Geometry": {
"BoundingBox": {
"Width": 0.010146399028599262,
"Height": 0.00771764200180769,
"Left": 0.1600940227508545,
"Top": 0.5003445148468018
},
"Polygon": [
{
"X": 0.16009573638439178,
"Y": 0.5003445148468018
},
{
"X": 0.17024043202400208,
"Y": 0.5003561973571777
},
{
"X": 0.17023874819278717,
"Y": 0.5080621242523193
},
{
"X": 0.1600940227508545,
"Y": 0.5080504417419434
}
]
},
"Confidence": 99.88064575195312
}
]
}
],
"SignatureDetections": [
{
"Confidence": 98.95830535888672,
"Geometry": {
"BoundingBox": {
"Width": 0.1505945473909378,
"Height": 0.019163239747285843,
"Left": 0.1145595833659172,
"Top": 0.8886017799377441
},
"Polygon": [
{
"X": 0.11456418037414551,
"Y": 0.8886017799377441
},
{
"X": 0.2651541233062744,
"Y": 0.8887989521026611
},
{
"X": 0.2651508152484894,
"Y": 0.9077650308609009
},
{
"X": 0.1145595833659172,
"Y": 0.9075667262077332
}
]
}
}
]
}
}
]
}
],
"AnalyzeLendingModelVersion": "1.0"
}
```
Responses from `GetLendingAnalysis` may include the following attributes:
+ Text – The detected text.
+ Confidence – The Confidence score for the detected text.
+ Geometry – Location information for the detected text.
+ LendingDocument – Holds the structured data returned by Analyze Lending for lending documents.
+ LendingField – Holds the normalized key-value pairs returned by Analyze Lending, including the normalized key for the detection, detected text, and geometry.
+ LendingFields – An array of LendingField objects.
+ Type – The normalized value associated with a detection. For a list of all possible document types, click [here](samples/textract_AnalyzeLending_keys.zip).
+ ValueDetections – An array of LendingDetection objects.
+ LendingDetection – The results extracted for a lending document.
+ SelectionStatus – The selection status of a selection element, such as an option button or check box.
+ KeyDetection – Object containing information about the detected key.
+ SignatureDetections – An array of SignatureDetection objects, which contain information regarding detected signatures.
+ SignatureDetection – Information regarding the confidence and geometry for the detected signatures.
ExpenseDocument extractions contain structures defined in [Invoice and Receipt Response Objects](#expensedocuments).
IdentityDocument extractions contain structures defined in [Identity Documentation Response Objects](#identitydocumentfields).
For an example of the summary returned by the `GetLendingAnalysisSummary` operation, see the following:
```
{
"DocumentMetadata": {
"Pages": 1
},
"JobStatus": "SUCCEEDED",
"Summary": {
"DocumentGroups": [
{
"Type": "1005",
"SplitDocuments": [
{
"Index": 1,
"Pages": [
1
]
}
],
"DetectedSignatures": [
{
"Page": 1
}
],
"UndetectedSignatures": []
}
],
"UndetectedDocumentTypes": [
"1040_SCHEDULE_C",
"1099_INT",
"1099_SSA",
"DEMOGRAPHIC_ADDENDUM",
"1065",
"1040",
"1120_S",
"IDENTITY_DOCUMENT",
"SSA_89",
"MORTGAGE_STATEMENT",
"1099_MISC",
"CHECKS",
"HOA_STATEMENT",
"INVESTMENT_STATEMENT",
"1120",
"1003",
"VBA_26_0551",
"1099_R",
"PAYSLIPS",
"1008",
"W_2",
"1099_NEC",
"BANK_STATEMENT",
"1040_SCHEDULE_E",
"UTILITY_BILLS",
"W_9",
"UNCLASSIFIED",
"HUD_92900_B",
"PAYOFF_STATEMENT",
"1099_G",
"CREDIT_CARD_STATEMENT",
"INVOICES",
"RECEIPTS",
"1040_SCHEDULE_D",
"1099_DIV"
]
},
"AnalyzeLendingModelVersion": "1.0"
}
```
The response elements returned by `GetLendingAnalysisSummary` include:
+ LendingSummary - Contains information regarding DocumentGroups and UndetectedDocumentTypes.
+ DocumentGroup - Contains information about all the documents grouped by the same document type.
+ DocumentGroups - Contains an array of all DocumentGroup objects.
+ Type - The type of the documents in a DocumentGroup.
+ SplitDocument - Contains information about the pages of a document, defined by logical boundary with regard to document type.
+ SplitDocuments - An array of SplitDocument objects.
+ Index - The index for a given document in a DocumentGroup of a specific Type.
+ Pages - An array of page numbers for a given document, ordered by a logical boundary with regard to document type.
+ UndetectedDocumentTypes - An array of strings, in which each string represents an undetected document type.
For documents that have a signature field, the following structures are included in the response:
+ DetectedSignature – Contains information about the page where a signature was found.
+ DetectedSignatures –An array of DetectedSignature objects.
+ Page (within DetectedSignature and UndetectedSignature objects) – Physical page number in the document.
+ UndetectedSignature – Contains information about the page where a signature was expected, but was not found. Refer this list to understand where a signature is expected.
+ UndetectedSignatures – An array of UndetectedSignature objects.
### Document Types
The following table contains a list of all document types recognized by Analyze Lending. Also indicated is whether the document has a signature field:
### Document Types
| Type | Signature |
| --- | --- |
| 1003 | YES |
| 1005 | YES |
| 1008 | YES |
| 1040 | YES |
| 1065 | YES |
| 1120 | YES |
| 1040\_SCHEDULE\_C | NO |
| 1040\_SCHEDULE\_D | NO |
| 1040\_SCHEDULE\_E | NO |
| 1099\_DIV | NO |
| 1099\_G | NO |
| 1099\_INT | NO |
| 1099\_MISC | NO |
| 1099\_NEC | NO |
| 1099\_R | NO |
| 1099\_SSA | NO |
| 1120\_S | YES |
| BANK\_STATEMENT | NO |
| CHECKS | YES |
| CREDIT\_CARD\_STATEMENT | NO |
| DEMOGRAPHIC\_ADDENDUM | NO |
| HOA\_STATEMENT | NO |
| HUD\_92900\_B | YES |
| IDENTITY\_DOCUMENT | NO |
| INVESTMENT\_STATEMENT | NO |
| INVOICES | NO |
| MORTGAGE\_STATEMENT | NO |
| PAYOFF\_STATEMENT | NO |
| PAYSLIPS | NO |
| RECEIPTS | NO |
| SSA\_89 | YES |
| UNCLASSIFIED | NO |
| UTILITY\_BILLS | NO |
| VBA\_26\_0551 | YES |
| W\_2 | NO |
| W\_9 | YES |
# Processing Documents Synchronously
Amazon Textract can detect and analyze text in single-page documents that are provided as images in JPEG, PNG, PDF, and TIFF format. The operations are synchronous and return results in near real time. For more information about documents, see [Text Detection and Document Analysis Response Objects](#how-it-works-document-layout).
This section covers how you can use Amazon Textract to detect and analyze text in a single-page document synchronously. To detect and analyze text in multipage documents, or to detect JPEG and PNG documents asynchronously, see [Processing Documents Asynchronously](#async).
You can use Amazon Textract synchronous operations for the following purposes:
+ Text detection – You can detect lines and words on a single-page document image by using the [DetectDocumentText](https://docs.aws.amazon.com/textract/latest/APIReference/API_DetectDocumentText.html) operation. For more information, see [Detecting Text](#how-it-works-detecting).
+ Text analysis – You can identify relationships between detected text on a single-page document by using the [AnalyzeDocument](https://docs.aws.amazon.com/textract/latest/APIReference/API_AnalyzeDocument.html) operation. For more information, see [Analyzing Documents](#how-it-works-analyzing).
+ Invoice and receipt analysis – You can identify financial relationships between detected text on a single-page invoice or receipt using the AnalyzeExpense operation. For more information, see [Analyzing Invoices and Receipts](#invoices-receipts)
+ Identity document analysis – You can analyze identity documents issued by the US Government and extract information along with common types of information found on identity documents. For more information, see [Analyzing Identity Documents](#how-it-works-identity).
**Topics**
+ [Calling Amazon Textract Synchronous Operations](#sync-calling)
+ [Detecting Document Text with Amazon Textract](#detecting-document-text)
+ [Analyzing Document Text with Amazon Textract](#analyzing-document-text)
+ [Analyzing Invoices and Receipts with Amazon Textract](#analyzing-document-expense)
+ [Analyzing Identity Documentation with Amazon Textract](#analyzing-document-identity)
## Calling Amazon Textract Synchronous Operations
Amazon Textract operations process document images that are stored on a local file system, or document images stored in an Amazon S3 bucket. You specify where the input document is located by using the [Document](https://docs.aws.amazon.com/textract/latest/APIReference/API_Document.html) input parameter. The document image can be in either PNG, JPEG, PDF, or TIFF format. Results for synchronous operations are returned immediately and are not stored for retrieval.
For a complete example, see [Detecting Document Text with Amazon Textract](#detecting-document-text).
### Request
The following describes how requests work in Amazon Textract.
#### Documents Passed as Image Bytes
You can pass a document image to an Amazon Textract operation by passing the image as a base64-encoded byte array. An example is a document image loaded from a local file system. Your code might not need to encode document file bytes if you're using an AWS SDK to call Amazon Textract API operations.
The image bytes are specified in the `Bytes` field of the `Document` input parameter. The following example shows the input JSON for an Amazon Textract operation that passes the image bytes in the `Bytes` input parameter.
```
{
"Document": {
"Bytes": "/9j/4AAQSk....."
}
}
```
**Note**
If you're using the AWS CLI, you can't pass image bytes to Amazon Textract operations. Instead, you must reference an image stored in an Amazon S3 bucket.
The following Java code shows how to load an image from a local file system and call an Amazon Textract operation.
```
String document="input.png";
ByteBuffer imageBytes;
try (InputStream inputStream = new FileInputStream(new File(document))) {
imageBytes = ByteBuffer.wrap(IOUtils.toByteArray(inputStream));
}
AmazonTextract client = AmazonTextractClientBuilder.defaultClient();
DetectDocumentTextRequest request = new DetectDocumentTextRequest()
.withDocument(new Document()
.withBytes(imageBytes));
DetectDocumentTextResult result = client.detectDocumentText(request);
```
#### Documents Stored in an Amazon S3 Bucket
Amazon Textract can analyze document images that are stored in an Amazon S3 bucket. You specify the bucket and file name by using the [S3Object](https://docs.aws.amazon.com/textract/latest/APIReference/API_S3Object.html) field of the `Document` input parameter. The following example shows the input JSON for an Amazon Textract operation that processes a document stored in an Amazon S3 bucket.
```
{
"Document": {
"S3Object": {
"Bucket": "bucket",
"Name": "input.png"
}
}
}
```
The following example shows how to call an Amazon Textract operation using an image stored in an Amazon S3 bucket.
```
String document="input.png";
String bucket="bucket";
AmazonTextract client = AmazonTextractClientBuilder.defaultClient();
DetectDocumentTextRequest request = new DetectDocumentTextRequest()
.withDocument(new Document()
.withS3Object(new S3Object()
.withName(document)
.withBucket(bucket)));
DetectDocumentTextResult result = client.detectDocumentText(request);
```
### Using an adapter
With Amazon Textract, you can customize the output or response of a call to AnalyzeDocument by using an AdapterId and adapter version. To use an adapter, you must first have created and trained an adapter using the Amazon Textract Console or the API. To apply your adapter, provide its ID when calling the AnalyzeDocument API. This enhances predictions on your documents. Note that when calling the [Document](https://docs.aws.amazon.com/textract/latest/APIReference/API_Document.html), you can only use one adapter per page.
```
"AdaptersConfig": {
"Adapters": [
{
"AdapterId": "2e9bf1c4aa31",
"Version": "1"
}
]
}
```
The following Java example shows how to create Queries and a list of adapters, then provide these to AnalyzeDocument, using the AWS SDK for Java.
```
String document="input.png";
ByteBuffer imageBytes;
try (InputStream inputStream = new FileInputStream(new File(document))) {
imageBytes = ByteBuffer.wrap(IOUtils.toByteArray(inputStream));
}
AmazonTextract client = AmazonTextractClientBuilder.defaultClient();
List queries = new ArrayList();
queries.add(new Query().withText("What is the employee name?")
.withAlias("CUST_NAME")
.withPages(Arrays.asList("*")));
List adapters = new ArrayList();
adapters.add(new Adapter()
.withAdapterId("1111111111")
.withVersion("1")
.withPages(Arrays.asList("*")));
AnalyzeDocumentRequest request = new AnalyzeDocumentRequest()
.withFeatureTypes("QUERIES", "SIGNATURES")
.withDocument(new Document()
.withBytes(imageBytes))
.withAdaptersConfig(new AdaptersConfig()
.withAdapters(adapters));
AnalyzeDocumentResult result = client.analyzeDocument(request);
```
### Response
The following sample is the JSON response from a call to `DetectDocumentText`. For more information, see [Detecting Text](#how-it-works-detecting).
```
{
{
"DocumentMetadata": {
"Pages": 1
},
"Blocks": [
{
"BlockType": "PAGE",
"Geometry": {
"BoundingBox": {
"Width": 0.9995205998420715,
"Height": 1.0,
"Left": 0.0,
"Top": 0.0
},
"Polygon": [
{
"X": 0.0,
"Y": 0.0
},
{
"X": 0.9995205998420715,
"Y": 2.297314024515845E-16
},
{
"X": 0.9995205998420715,
"Y": 1.0
},
{
"X": 0.0,
"Y": 1.0
}
]
},
"Id": "ca4b9171-7109-4adb-a811-e09bbe4834dd",
"Relationships": [
{
"Type": "CHILD",
"Ids": [
"26085884-d005-4144-b4c2-4d83dc50739b",
"ee9d01bc-d91c-401d-8c0a-eec76f5f7862",
"404bb3d3-d7ab-4008-a195-5dec87a08664",
"8ae1b4ba-67c1-4486-bd20-54f461886ce9",
"47aab5ab-be2c-4c73-97c7-d0a45454e843",
"dd06bb49-6a56-4ea7-beec-a2aa09835c3c",
"8837153d-81b8-4031-a49f-83a3d81803c2",
"5dae3b74-9e95-4b62-99b7-93b88fe70648",
"4508da80-64d8-42a8-8846-cfafe6eab10c",
"e87be7a9-5519-42e1-b18e-ae10e2d3ed13",
"f04bb223-d075-41c3-b328-7354611c826b",
"a234f0e8-67de-46f4-a7c7-0bbe8d5159ce",
"61b20e27-ff8a-450a-a8b1-bc0259f82fd6",
"445f4fdd-c77b-4a7b-a2fc-6ca07cfe9ed7",
"359f3870-7183-43f5-b638-970f5cefe4d5",
"b9deea0a-244c-4d54-b774-cf03fbaaa8b1",
"e2a43881-f620-44f2-b067-500ce7dc8d4d",
"41756974-64ef-432d-b4b2-34702505975a",
"93d96d32-8b4a-4a98-9578-8b4df4f227a6",
"bc907357-63d6-43c0-ab87-80d7e76d377e",
"2d727ca7-3acb-4bb9-a564-5885c90e9325",
"f32a5989-cbfb-41e6-b0fc-ce1c77c014bd",
"e0ba06d0-dbb6-4962-8047-8cac3adfe45a",
"b6ed204d-ae01-4b75-bb91-c85d4147a37e",
"ac4b9ee0-c9b2-4239-a741-5753e5282033",
"ebc18885-48d7-45b8-90e3-d172b4357802",
"babf6360-789e-49c1-9c78-0784acc14a0c"
]
}
]
},
{
"BlockType": "LINE",
"Confidence": 99.93761444091797,
"Text": "Employment Application",
"Geometry": {
"BoundingBox": {
"Width": 0.3391372561454773,
"Height": 0.06906412541866302,
"Left": 0.29548385739326477,
"Top": 0.027493247762322426
},
"Polygon": [
{
"X": 0.29548385739326477,
"Y": 0.027493247762322426
},
{
"X": 0.6346210837364197,
"Y": 0.027493247762322426
},
{
"X": 0.6346210837364197,
"Y": 0.0965573713183403
},
{
"X": 0.29548385739326477,
"Y": 0.0965573713183403
}
]
},
"Id": "26085884-d005-4144-b4c2-4d83dc50739b",
"Relationships": [
{
"Type": "CHILD",
"Ids": [
"ed48dacc-d089-498f-8e93-1cee1e5f39f3",
"ac7370f3-cbb7-4cd9-a8f9-bdcb2252caaf"
]
}
]
},
{
"BlockType": "LINE",
"Confidence": 99.91246795654297,
"Text": "Application Information",
"Geometry": {
"BoundingBox": {
"Width": 0.19878505170345306,
"Height": 0.03754019737243652,
"Left": 0.03988289833068848,
"Top": 0.14050349593162537
},
"Polygon": [
{
"X": 0.03988289833068848,
"Y": 0.14050349593162537
},
{
"X": 0.23866795003414154,
"Y": 0.14050349593162537
},
{
"X": 0.23866795003414154,
"Y": 0.1780436933040619
},
{
"X": 0.03988289833068848,
"Y": 0.1780436933040619
}
]
},
"Id": "ee9d01bc-d91c-401d-8c0a-eec76f5f7862",
"Relationships": [
{
"Type": "CHILD",
"Ids": [
"efe3fc6d-becb-4520-80ee-49a329386aee",
"c2260852-6cfd-4a71-9fc6-62b2f9b02355"
]
}
]
},
{
"BlockType": "LINE",
"Confidence": 99.88693237304688,
"Text": "Full Name: Jane Doe",
"Geometry": {
"BoundingBox": {
"Width": 0.16733919084072113,
"Height": 0.031106337904930115,
"Left": 0.03899926319718361,
"Top": 0.21361036598682404
},
"Polygon": [
{
"X": 0.03899926319718361,
"Y": 0.21361036598682404
},
{
"X": 0.20633845031261444,
"Y": 0.21361036598682404
},
{
"X": 0.20633845031261444,
"Y": 0.24471670389175415
},
{
"X": 0.03899926319718361,
"Y": 0.24471670389175415
}
]
},
"Id": "404bb3d3-d7ab-4008-a195-5dec87a08664",
"Relationships": [
{
"Type": "CHILD",
"Ids": [
"e94eb587-9545-4215-b0fc-8e8cb1172958",
"090aeba5-8428-4b7a-a54b-7a95a774120e",
"64ff0abb-736b-4a6b-aa8d-ad2c0086ae1d",
"565ffc30-89d6-4295-b8c6-d22b4ed76584"
]
}
]
},
{
"BlockType": "LINE",
"Confidence": 99.9206314086914,
"Text": "Phone Number: 555-0100",
"Geometry": {
"BoundingBox": {
"Width": 0.3115004599094391,
"Height": 0.047169625759124756,
"Left": 0.03604753687977791,
"Top": 0.2812676727771759
},
"Polygon": [
{
"X": 0.03604753687977791,
"Y": 0.2812676727771759
},
{
"X": 0.3475480079650879,
"Y": 0.2812676727771759
},
{
"X": 0.3475480079650879,
"Y": 0.32843729853630066
},
{
"X": 0.03604753687977791,
"Y": 0.32843729853630066
}
]
},
"Id": "8ae1b4ba-67c1-4486-bd20-54f461886ce9",
"Relationships": [
{
"Type": "CHILD",
"Ids": [
"d782f847-225b-4a1b-b52d-f252f8221b1f",
"fa69c5cd-c80d-4fac-81df-569edae8d259",
"d4bbc0f1-ae02-41cf-a26f-8a1e899968cc"
]
}
]
},
{
"BlockType": "LINE",
"Confidence": 99.48902893066406,
"Text": "Home Address: 123 Any Street, Any Town. USA",
"Geometry": {
"BoundingBox": {
"Width": 0.7431139945983887,
"Height": 0.09577702730894089,
"Left": 0.03359385207295418,
"Top": 0.3258342146873474
},
"Polygon": [
{
"X": 0.03359385207295418,
"Y": 0.3258342146873474
},
{
"X": 0.7767078280448914,
"Y": 0.3258342146873474
},
{
"X": 0.7767078280448914,
"Y": 0.4216112196445465
},
{
"X": 0.03359385207295418,
"Y": 0.4216112196445465
}
]
},
"Id": "47aab5ab-be2c-4c73-97c7-d0a45454e843",
"Relationships": [
{
"Type": "CHILD",
"Ids": [
"acfbed90-4a00-42c6-8a90-d0a0756eea36",
"046c8a40-bb0e-4718-9c71-954d3630e1dd",
"82b838bc-4591-4287-8dea-60c94a4925e4",
"5cdcde7a-f5a6-4231-a941-b6396e42e7ba",
"beafd497-185f-487e-b070-db4df5803e94",
"ef1b77fb-8ba6-41fe-ba53-dce039af22ed",
"7b555310-e7f8-4cd2-bb3d-dcec37f3d90e",
"b479c24d-448d-40ef-9ed5-36a6ef08e5c7"
]
}
]
},
{
"BlockType": "LINE",
"Confidence": 99.89382934570312,
"Text": "Mailing Address: same as above",
"Geometry": {
"BoundingBox": {
"Width": 0.26575741171836853,
"Height": 0.039571404457092285,
"Left": 0.03068041242659092,
"Top": 0.43351811170578003
},
"Polygon": [
{
"X": 0.03068041242659092,
"Y": 0.43351811170578003
},
{
"X": 0.2964377999305725,
"Y": 0.43351811170578003
},
{
"X": 0.2964377999305725,
"Y": 0.4730895161628723
},
{
"X": 0.03068041242659092,
"Y": 0.4730895161628723
}
]
},
"Id": "dd06bb49-6a56-4ea7-beec-a2aa09835c3c",
"Relationships": [
{
"Type": "CHILD",
"Ids": [
"d7261cdc-6ac5-4711-903c-4598fe94952d",
"287f80c3-6db2-4dd7-90ec-5f017c80aa31",
"ce31c3ad-b51e-4068-be64-5fc9794bc1bc",
"e96eb92c-6774-4d6f-8f4a-68a7618d4c66",
"88b85c05-427a-4d4f-8cc4-3667234e8364"
]
}
]
},
{
"BlockType": "LINE",
"Confidence": 94.67343139648438,
"Text": "Previous Employment History",
"Geometry": {
"BoundingBox": {
"Width": 0.3309842050075531,
"Height": 0.051920413970947266,
"Left": 0.3194798231124878,
"Top": 0.5172380208969116
},
"Polygon": [
{
"X": 0.3194798231124878,
"Y": 0.5172380208969116
},
{
"X": 0.6504639983177185,
"Y": 0.5172380208969116
},
{
"X": 0.6504639983177185,
"Y": 0.5691584348678589
},
{
"X": 0.3194798231124878,
"Y": 0.5691584348678589
}
]
},
"Id": "8837153d-81b8-4031-a49f-83a3d81803c2",
"Relationships": [
{
"Type": "CHILD",
"Ids": [
"8b324501-bf38-4ce9-9777-6514b7ade760",
"b0cea99a-5045-464d-ac8a-a63ab0470995",
"b92a6ee5-ca59-44dc-9c47-534c133b11e7"
]
}
]
},
{
"BlockType": "LINE",
"Confidence": 99.66949462890625,
"Text": "Start Date",
"Geometry": {
"BoundingBox": {
"Width": 0.08310240507125854,
"Height": 0.030944595113396645,
"Left": 0.034429505467414856,
"Top": 0.6123942136764526
},
"Polygon": [
{
"X": 0.034429505467414856,
"Y": 0.6123942136764526
},
{
"X": 0.1175319030880928,
"Y": 0.6123942136764526
},
{
"X": 0.1175319030880928,
"Y": 0.6433387994766235
},
{
"X": 0.034429505467414856,
"Y": 0.6433387994766235
}
]
},
"Id": "5dae3b74-9e95-4b62-99b7-93b88fe70648",
"Relationships": [
{
"Type": "CHILD",
"Ids": [
"ffe8b8e0-df59-4ac5-9aba-6b54b7c51b45",
"91e582cd-9871-4e9c-93cc-848baa426338"
]
}
]
},
{
"BlockType": "LINE",
"Confidence": 99.86717224121094,
"Text": "End Date",
"Geometry": {
"BoundingBox": {
"Width": 0.07581500709056854,
"Height": 0.03223184868693352,
"Left": 0.14846202731132507,
"Top": 0.6120467782020569
},
"Polygon": [
{
"X": 0.14846202731132507,
"Y": 0.6120467782020569
},
{
"X": 0.22427703440189362,
"Y": 0.6120467782020569
},
{
"X": 0.22427703440189362,
"Y": 0.6442786455154419
},
{
"X": 0.14846202731132507,
"Y": 0.6442786455154419
}
]
},
"Id": "4508da80-64d8-42a8-8846-cfafe6eab10c",
"Relationships": [
{
"Type": "CHILD",
"Ids": [
"7c97b56b-699f-49b0-93f4-98e6d90b107c",
"7af04e27-0c15-447e-a569-b30edb99a133"
]
}
]
},
{
"BlockType": "LINE",
"Confidence": 99.9539794921875,
"Text": "Employer Name",
"Geometry": {
"BoundingBox": {
"Width": 0.1347292959690094,
"Height": 0.0392492413520813,
"Left": 0.2647075653076172,
"Top": 0.6140711903572083
},
"Polygon": [
{
"X": 0.2647075653076172,
"Y": 0.6140711903572083
},
{
"X": 0.3994368314743042,
"Y": 0.6140711903572083
},
{
"X": 0.3994368314743042,
"Y": 0.6533204317092896
},
{
"X": 0.2647075653076172,
"Y": 0.6533204317092896
}
]
},
"Id": "e87be7a9-5519-42e1-b18e-ae10e2d3ed13",
"Relationships": [
{
"Type": "CHILD",
"Ids": [
"a9bfeb55-75cd-47cd-b953-728e602a3564",
"9f0f9c06-d02c-4b07-bb39-7ade70be2c1b"
]
}
]
},
{
"BlockType": "LINE",
"Confidence": 99.35584259033203,
"Text": "Position Held",
"Geometry": {
"BoundingBox": {
"Width": 0.11393272876739502,
"Height": 0.03415105864405632,
"Left": 0.49973347783088684,
"Top": 0.614840030670166
},
"Polygon": [
{
"X": 0.49973347783088684,
"Y": 0.614840030670166
},
{
"X": 0.6136661767959595,
"Y": 0.614840030670166
},
{
"X": 0.6136661767959595,
"Y": 0.6489911079406738
},
{
"X": 0.49973347783088684,
"Y": 0.6489911079406738
}
]
},
"Id": "f04bb223-d075-41c3-b328-7354611c826b",
"Relationships": [
{
"Type": "CHILD",
"Ids": [
"6d5edf02-845c-40e0-9514-e56d0d652ae0",
"3297ab59-b237-45fb-ae60-a108f0c95ac2"
]
}
]
},
{
"BlockType": "LINE",
"Confidence": 99.9817886352539,
"Text": "Reason for leaving",
"Geometry": {
"BoundingBox": {
"Width": 0.16511960327625275,
"Height": 0.04062700271606445,
"Left": 0.7430596351623535,
"Top": 0.6116235852241516
},
"Polygon": [
{
"X": 0.7430596351623535,
"Y": 0.6116235852241516
},
{
"X": 0.9081792235374451,
"Y": 0.6116235852241516
},
{
"X": 0.9081792235374451,
"Y": 0.6522505879402161
},
{
"X": 0.7430596351623535,
"Y": 0.6522505879402161
}
]
},
"Id": "a234f0e8-67de-46f4-a7c7-0bbe8d5159ce",
"Relationships": [
{
"Type": "CHILD",
"Ids": [
"f4b8cf26-d2da-4a76-8345-69562de3cc11",
"386d4a63-1194-4c0e-a18d-4d074a0b1f93",
"a8622541-1896-4d54-8d10-7da2c800ec5c"
]
}
]
},
{
"BlockType": "LINE",
"Confidence": 99.77413177490234,
"Text": "1/15/2009",
"Geometry": {
"BoundingBox": {
"Width": 0.08799663186073303,
"Height": 0.03832906484603882,
"Left": 0.03175082430243492,
"Top": 0.691371738910675
},
"Polygon": [
{
"X": 0.03175082430243492,
"Y": 0.691371738910675
},
{
"X": 0.11974745243787766,
"Y": 0.691371738910675
},
{
"X": 0.11974745243787766,
"Y": 0.7297008037567139
},
{
"X": 0.03175082430243492,
"Y": 0.7297008037567139
}
]
},
"Id": "61b20e27-ff8a-450a-a8b1-bc0259f82fd6",
"Relationships": [
{
"Type": "CHILD",
"Ids": [
"da7a6482-0964-49a4-bc7d-56942ff3b4e1"
]
}
]
},
{
"BlockType": "LINE",
"Confidence": 99.72286224365234,
"Text": "6/30/2011",
"Geometry": {
"BoundingBox": {
"Width": 0.08843101561069489,
"Height": 0.03991425037384033,
"Left": 0.14642837643623352,
"Top": 0.6919752955436707
},
"Polygon": [
{
"X": 0.14642837643623352,
"Y": 0.6919752955436707
},
{
"X": 0.2348593920469284,
"Y": 0.6919752955436707
},
{
"X": 0.2348593920469284,
"Y": 0.731889545917511
},
{
"X": 0.14642837643623352,
"Y": 0.731889545917511
}
]
},
"Id": "445f4fdd-c77b-4a7b-a2fc-6ca07cfe9ed7",
"Relationships": [
{
"Type": "CHILD",
"Ids": [
"5a8da66a-ecce-4ee9-a765-a46d6cdc6cde"
]
}
]
},
{
"BlockType": "LINE",
"Confidence": 99.86936950683594,
"Text": "Any Company",
"Geometry": {
"BoundingBox": {
"Width": 0.11800950765609741,
"Height": 0.03943679481744766,
"Left": 0.2626699209213257,
"Top": 0.6972727179527283
},
"Polygon": [
{
"X": 0.2626699209213257,
"Y": 0.6972727179527283
},
{
"X": 0.3806794285774231,
"Y": 0.6972727179527283
},
{
"X": 0.3806794285774231,
"Y": 0.736709475517273
},
{
"X": 0.2626699209213257,
"Y": 0.736709475517273
}
]
},
"Id": "359f3870-7183-43f5-b638-970f5cefe4d5",
"Relationships": [
{
"Type": "CHILD",
"Ids": [
"77749c2b-aa7f-450e-8dd2-62bcaf253ba2",
"713bad19-158d-4e3e-b01f-f5707ddb04e5"
]
}
]
},
{
"BlockType": "LINE",
"Confidence": 99.582275390625,
"Text": "Assistant baker",
"Geometry": {
"BoundingBox": {
"Width": 0.13280922174453735,
"Height": 0.032666124403476715,
"Left": 0.49814170598983765,
"Top": 0.699238657951355
},
"Polygon": [
{
"X": 0.49814170598983765,
"Y": 0.699238657951355
},
{
"X": 0.630950927734375,
"Y": 0.699238657951355
},
{
"X": 0.630950927734375,
"Y": 0.7319048047065735
},
{
"X": 0.49814170598983765,
"Y": 0.7319048047065735
}
]
},
"Id": "b9deea0a-244c-4d54-b774-cf03fbaaa8b1",
"Relationships": [
{
"Type": "CHILD",
"Ids": [
"989944f9-f684-4714-87d8-9ad9a321d65c",
"ae82e2aa-1601-4e0c-8340-1db7ad0c9a31"
]
}
]
},
{
"BlockType": "LINE",
"Confidence": 99.96180725097656,
"Text": "relocated",
"Geometry": {
"BoundingBox": {
"Width": 0.08668994903564453,
"Height": 0.033302485942840576,
"Left": 0.7426905632019043,
"Top": 0.6974037289619446
},
"Polygon": [
{
"X": 0.7426905632019043,
"Y": 0.6974037289619446
},
{
"X": 0.8293805122375488,
"Y": 0.6974037289619446
},
{
"X": 0.8293805122375488,
"Y": 0.7307062149047852
},
{
"X": 0.7426905632019043,
"Y": 0.7307062149047852
}
]
},
"Id": "e2a43881-f620-44f2-b067-500ce7dc8d4d",
"Relationships": [
{
"Type": "CHILD",
"Ids": [
"a9cf9a8c-fdaa-413e-9346-5a28a98aebdb"
]
}
]
},
{
"BlockType": "LINE",
"Confidence": 99.98190307617188,
"Text": "7/1/2011",
"Geometry": {
"BoundingBox": {
"Width": 0.09747002273797989,
"Height": 0.07067441940307617,
"Left": 0.028500309213995934,
"Top": 0.7745237946510315
},
"Polygon": [
{
"X": 0.028500309213995934,
"Y": 0.7745237946510315
},
{
"X": 0.12597033381462097,
"Y": 0.7745237946510315
},
{
"X": 0.12597033381462097,
"Y": 0.8451982140541077
},
{
"X": 0.028500309213995934,
"Y": 0.8451982140541077
}
]
},
"Id": "41756974-64ef-432d-b4b2-34702505975a",
"Relationships": [
{
"Type": "CHILD",
"Ids": [
"0f711065-1872-442a-ba6d-8fababaa452a"
]
}
]
},
{
"BlockType": "LINE",
"Confidence": 99.98418426513672,
"Text": "8/10/2013",
"Geometry": {
"BoundingBox": {
"Width": 0.10664612054824829,
"Height": 0.06439518928527832,
"Left": 0.14159755408763885,
"Top": 0.7791688442230225
},
"Polygon": [
{
"X": 0.14159755408763885,
"Y": 0.7791688442230225
},
{
"X": 0.24824367463588715,
"Y": 0.7791688442230225
},
{
"X": 0.24824367463588715,
"Y": 0.8435640335083008
},
{
"X": 0.14159755408763885,
"Y": 0.8435640335083008
}
]
},
"Id": "93d96d32-8b4a-4a98-9578-8b4df4f227a6",
"Relationships": [
{
"Type": "CHILD",
"Ids": [
"a92d8eef-db28-45ba-801a-5da0f589d277"
]
}
]
},
{
"BlockType": "LINE",
"Confidence": 99.98075866699219,
"Text": "Example Corp.",
"Geometry": {
"BoundingBox": {
"Width": 0.2114926278591156,
"Height": 0.058415766805410385,
"Left": 0.26764172315597534,
"Top": 0.794414758682251
},
"Polygon": [
{
"X": 0.26764172315597534,
"Y": 0.794414758682251
},
{
"X": 0.47913435101509094,
"Y": 0.794414758682251
},
{
"X": 0.47913435101509094,
"Y": 0.8528305292129517
},
{
"X": 0.26764172315597534,
"Y": 0.8528305292129517
}
]
},
"Id": "bc907357-63d6-43c0-ab87-80d7e76d377e",
"Relationships": [
{
"Type": "CHILD",
"Ids": [
"d6962efb-34ab-4ffb-9f2f-5f263e813558",
"1876c8ea-d3e8-4c39-870e-47512b3b5080"
]
}
]
},
{
"BlockType": "LINE",
"Confidence": 99.91166687011719,
"Text": "Baker",
"Geometry": {
"BoundingBox": {
"Width": 0.09931200742721558,
"Height": 0.06008726358413696,
"Left": 0.5098910331726074,
"Top": 0.787897527217865
},
"Polygon": [
{
"X": 0.5098910331726074,
"Y": 0.787897527217865
},
{
"X": 0.609203040599823,
"Y": 0.787897527217865
},
{
"X": 0.609203040599823,
"Y": 0.847984790802002
},
{
"X": 0.5098910331726074,
"Y": 0.847984790802002
}
]
},
"Id": "2d727ca7-3acb-4bb9-a564-5885c90e9325",
"Relationships": [
{
"Type": "CHILD",
"Ids": [
"00adeaef-ed57-44eb-b8a9-503575236d62"
]
}
]
},
{
"BlockType": "LINE",
"Confidence": 99.93852233886719,
"Text": "better opp.",
"Geometry": {
"BoundingBox": {
"Width": 0.18919607996940613,
"Height": 0.06994765996932983,
"Left": 0.7428008317947388,
"Top": 0.7928366661071777
},
"Polygon": [
{
"X": 0.7428008317947388,
"Y": 0.7928366661071777
},
{
"X": 0.9319968819618225,
"Y": 0.7928366661071777
},
{
"X": 0.9319968819618225,
"Y": 0.8627843260765076
},
{
"X": 0.7428008317947388,
"Y": 0.8627843260765076
}
]
},
"Id": "f32a5989-cbfb-41e6-b0fc-ce1c77c014bd",
"Relationships": [
{
"Type": "CHILD",
"Ids": [
"c0fc9a58-7a4b-4f69-bafd-2cff32be2665",
"bf6dc8ee-2fb3-4b6c-aee4-31e96912a2d8"
]
}
]
},
{
"BlockType": "LINE",
"Confidence": 99.92573547363281,
"Text": "8/15/2013",
"Geometry": {
"BoundingBox": {
"Width": 0.10257463902235031,
"Height": 0.05412459373474121,
"Left": 0.027909137308597565,
"Top": 0.8608770370483398
},
"Polygon": [
{
"X": 0.027909137308597565,
"Y": 0.8608770370483398
},
{
"X": 0.13048377633094788,
"Y": 0.8608770370483398
},
{
"X": 0.13048377633094788,
"Y": 0.915001630783081
},
{
"X": 0.027909137308597565,
"Y": 0.915001630783081
}
]
},
"Id": "e0ba06d0-dbb6-4962-8047-8cac3adfe45a",
"Relationships": [
{
"Type": "CHILD",
"Ids": [
"5384f860-f857-4a94-9438-9dfa20eed1c6"
]
}
]
},
{
"BlockType": "LINE",
"Confidence": 99.99625396728516,
"Text": "Present",
"Geometry": {
"BoundingBox": {
"Width": 0.09982697665691376,
"Height": 0.06888341903686523,
"Left": 0.1420602649450302,
"Top": 0.8511748909950256
},
"Polygon": [
{
"X": 0.1420602649450302,
"Y": 0.8511748909950256
},
{
"X": 0.24188724160194397,
"Y": 0.8511748909950256
},
{
"X": 0.24188724160194397,
"Y": 0.9200583100318909
},
{
"X": 0.1420602649450302,
"Y": 0.9200583100318909
}
]
},
"Id": "b6ed204d-ae01-4b75-bb91-c85d4147a37e",
"Relationships": [
{
"Type": "CHILD",
"Ids": [
"0bb96ed6-b2e6-4da4-90b3-b85561bbd89d"
]
}
]
},
{
"BlockType": "LINE",
"Confidence": 99.9826431274414,
"Text": "AnyCompany",
"Geometry": {
"BoundingBox": {
"Width": 0.18611276149749756,
"Height": 0.08581399917602539,
"Left": 0.2615866959095001,
"Top": 0.869536280632019
},
"Polygon": [
{
"X": 0.2615866959095001,
"Y": 0.869536280632019
},
{
"X": 0.4476994574069977,
"Y": 0.869536280632019
},
{
"X": 0.4476994574069977,
"Y": 0.9553502798080444
},
{
"X": 0.2615866959095001,
"Y": 0.9553502798080444
}
]
},
"Id": "ac4b9ee0-c9b2-4239-a741-5753e5282033",
"Relationships": [
{
"Type": "CHILD",
"Ids": [
"25343360-d906-440a-88b7-92eb89e95949"
]
}
]
},
{
"BlockType": "LINE",
"Confidence": 99.99549102783203,
"Text": "head baker",
"Geometry": {
"BoundingBox": {
"Width": 0.1937451809644699,
"Height": 0.056156039237976074,
"Left": 0.49359121918678284,
"Top": 0.8702592849731445
},
"Polygon": [
{
"X": 0.49359121918678284,
"Y": 0.8702592849731445
},
{
"X": 0.6873363852500916,
"Y": 0.8702592849731445
},
{
"X": 0.6873363852500916,
"Y": 0.9264153242111206
},
{
"X": 0.49359121918678284,
"Y": 0.9264153242111206
}
]
},
"Id": "ebc18885-48d7-45b8-90e3-d172b4357802",
"Relationships": [
{
"Type": "CHILD",
"Ids": [
"0ef3c194-8322-4575-94f1-82819ee57e3a",
"d296acd9-3e9a-4985-95f8-f863614f2c46"
]
}
]
},
{
"BlockType": "LINE",
"Confidence": 99.98360443115234,
"Text": "N/A, current",
"Geometry": {
"BoundingBox": {
"Width": 0.22544169425964355,
"Height": 0.06588292121887207,
"Left": 0.7411766648292542,
"Top": 0.8722732067108154
},
"Polygon": [
{
"X": 0.7411766648292542,
"Y": 0.8722732067108154
},
{
"X": 0.9666183590888977,
"Y": 0.8722732067108154
},
{
"X": 0.9666183590888977,
"Y": 0.9381561279296875
},
{
"X": 0.7411766648292542,
"Y": 0.9381561279296875
}
]
},
"Id": "babf6360-789e-49c1-9c78-0784acc14a0c",
"Relationships": [
{
"Type": "CHILD",
"Ids": [
"195cfb5b-ae06-4203-8520-4e4b0a73b5ce",
"549ef3f9-3a13-4b77-bc25-fb2e0996839a"
]
}
]
},
{
"BlockType": "WORD",
"Confidence": 99.94815826416016,
"Text": "Employment",
"TextType": "PRINTED",
"Geometry": {
"BoundingBox": {
"Width": 0.17462396621704102,
"Height": 0.06266549974679947,
"Left": 0.29548385739326477,
"Top": 0.03389188274741173
},
"Polygon": [
{
"X": 0.29548385739326477,
"Y": 0.03389188274741173
},
{
"X": 0.4701078236103058,
"Y": 0.03389188274741173
},
{
"X": 0.4701078236103058,
"Y": 0.0965573862195015
},
{
"X": 0.29548385739326477,
"Y": 0.0965573862195015
}
]
},
"Id": "ed48dacc-d089-498f-8e93-1cee1e5f39f3"
},
{
"BlockType": "WORD",
"Confidence": 99.92706298828125,
"Text": "Application",
"TextType": "PRINTED",
"Geometry": {
"BoundingBox": {
"Width": 0.15933875739574432,
"Height": 0.062391020357608795,
"Left": 0.47528234124183655,
"Top": 0.027493247762322426
},
"Polygon": [
{
"X": 0.47528234124183655,
"Y": 0.027493247762322426
},
{
"X": 0.6346211433410645,
"Y": 0.027493247762322426
},
{
"X": 0.6346211433410645,
"Y": 0.08988427370786667
},
{
"X": 0.47528234124183655,
"Y": 0.08988427370786667
}
]
},
"Id": "ac7370f3-cbb7-4cd9-a8f9-bdcb2252caaf"
},
{
"BlockType": "WORD",
"Confidence": 99.9821548461914,
"Text": "Application",
"TextType": "PRINTED",
"Geometry": {
"BoundingBox": {
"Width": 0.09610454738140106,
"Height": 0.03656719997525215,
"Left": 0.03988289833068848,
"Top": 0.14147649705410004
},
"Polygon": [
{
"X": 0.03988289833068848,
"Y": 0.14147649705410004
},
{
"X": 0.13598744571208954,
"Y": 0.14147649705410004
},
{
"X": 0.13598744571208954,
"Y": 0.1780436933040619
},
{
"X": 0.03988289833068848,
"Y": 0.1780436933040619
}
]
},
"Id": "efe3fc6d-becb-4520-80ee-49a329386aee"
},
{
"BlockType": "WORD",
"Confidence": 99.84278106689453,
"Text": "Information",
"TextType": "PRINTED",
"Geometry": {
"BoundingBox": {
"Width": 0.10029315203428268,
"Height": 0.03209415823221207,
"Left": 0.13837480545043945,
"Top": 0.14050349593162537
},
"Polygon": [
{
"X": 0.13837480545043945,
"Y": 0.14050349593162537
},
{
"X": 0.23866795003414154,
"Y": 0.14050349593162537
},
{
"X": 0.23866795003414154,
"Y": 0.17259766161441803
},
{
"X": 0.13837480545043945,
"Y": 0.17259766161441803
}
]
},
"Id": "c2260852-6cfd-4a71-9fc6-62b2f9b02355"
},
{
"BlockType": "WORD",
"Confidence": 99.83993530273438,
"Text": "Full",
"TextType": "PRINTED",
"Geometry": {
"BoundingBox": {
"Width": 0.03039788082242012,
"Height": 0.031106330454349518,
"Left": 0.03899926319718361,
"Top": 0.21361036598682404
},
"Polygon": [
{
"X": 0.03899926319718361,
"Y": 0.21361036598682404
},
{
"X": 0.06939714401960373,
"Y": 0.21361036598682404
},
{
"X": 0.06939714401960373,
"Y": 0.24471670389175415
},
{
"X": 0.03899926319718361,
"Y": 0.24471670389175415
}
]
},
"Id": "e94eb587-9545-4215-b0fc-8e8cb1172958"
},
{
"BlockType": "WORD",
"Confidence": 99.93611907958984,
"Text": "Name:",
"TextType": "PRINTED",
"Geometry": {
"BoundingBox": {
"Width": 0.05555811896920204,
"Height": 0.030184319242835045,
"Left": 0.07123806327581406,
"Top": 0.2137702852487564
},
"Polygon": [
{
"X": 0.07123806327581406,
"Y": 0.2137702852487564
},
{
"X": 0.1267961859703064,
"Y": 0.2137702852487564
},
{
"X": 0.1267961859703064,
"Y": 0.2439546138048172
},
{
"X": 0.07123806327581406,
"Y": 0.2439546138048172
}
]
},
"Id": "090aeba5-8428-4b7a-a54b-7a95a774120e"
},
{
"BlockType": "WORD",
"Confidence": 99.91043853759766,
"Text": "Jane",
"TextType": "PRINTED",
"Geometry": {
"BoundingBox": {
"Width": 0.03905024006962776,
"Height": 0.02941947989165783,
"Left": 0.12933772802352905,
"Top": 0.214289128780365
},
"Polygon": [
{
"X": 0.12933772802352905,
"Y": 0.214289128780365
},
{
"X": 0.16838796436786652,
"Y": 0.214289128780365
},
{
"X": 0.16838796436786652,
"Y": 0.24370861053466797
},
{
"X": 0.12933772802352905,
"Y": 0.24370861053466797
}
]
},
"Id": "64ff0abb-736b-4a6b-aa8d-ad2c0086ae1d"
},
{
"BlockType": "WORD",
"Confidence": 99.86123657226562,
"Text": "Doe",
"TextType": "PRINTED",
"Geometry": {
"BoundingBox": {
"Width": 0.035229459404945374,
"Height": 0.030427640303969383,
"Left": 0.17110899090766907,
"Top": 0.21377210319042206
},
"Polygon": [
{
"X": 0.17110899090766907,
"Y": 0.21377210319042206
},
{
"X": 0.20633845031261444,
"Y": 0.21377210319042206
},
{
"X": 0.20633845031261444,
"Y": 0.244199737906456
},
{
"X": 0.17110899090766907,
"Y": 0.244199737906456
}
]
},
"Id": "565ffc30-89d6-4295-b8c6-d22b4ed76584"
},
{
"BlockType": "WORD",
"Confidence": 99.92633056640625,
"Text": "Phone",
"TextType": "PRINTED",
"Geometry": {
"BoundingBox": {
"Width": 0.052783288061618805,
"Height": 0.03104414977133274,
"Left": 0.03604753687977791,
"Top": 0.28701552748680115
},
"Polygon": [
{
"X": 0.03604753687977791,
"Y": 0.28701552748680115
},
{
"X": 0.08883082121610641,
"Y": 0.28701552748680115
},
{
"X": 0.08883082121610641,
"Y": 0.31805968284606934
},
{
"X": 0.03604753687977791,
"Y": 0.31805968284606934
}
]
},
"Id": "d782f847-225b-4a1b-b52d-f252f8221b1f"
},
{
"BlockType": "WORD",
"Confidence": 99.86275482177734,
"Text": "Number:",
"TextType": "PRINTED",
"Geometry": {
"BoundingBox": {
"Width": 0.07424934208393097,
"Height": 0.030300479382276535,
"Left": 0.0915418416261673,
"Top": 0.28639692068099976
},
"Polygon": [
{
"X": 0.0915418416261673,
"Y": 0.28639692068099976
},
{
"X": 0.16579118371009827,
"Y": 0.28639692068099976
},
{
"X": 0.16579118371009827,
"Y": 0.3166973888874054
},
{
"X": 0.0915418416261673,
"Y": 0.3166973888874054
}
]
},
"Id": "fa69c5cd-c80d-4fac-81df-569edae8d259"
},
{
"BlockType": "WORD",
"Confidence": 99.97282409667969,
"Text": "555-0100",
"TextType": "HANDWRITING",
"Geometry": {
"BoundingBox": {
"Width": 0.17021971940994263,
"Height": 0.047169629484415054,
"Left": 0.17732827365398407,
"Top": 0.2812676727771759
},
"Polygon": [
{
"X": 0.17732827365398407,
"Y": 0.2812676727771759
},
{
"X": 0.3475480079650879,
"Y": 0.2812676727771759
},
{
"X": 0.3475480079650879,
"Y": 0.32843729853630066
},
{
"X": 0.17732827365398407,
"Y": 0.32843729853630066
}
]
},
"Id": "d4bbc0f1-ae02-41cf-a26f-8a1e899968cc"
},
{
"BlockType": "WORD",
"Confidence": 99.66238403320312,
"Text": "Home",
"TextType": "PRINTED",
"Geometry": {
"BoundingBox": {
"Width": 0.049357783049345016,
"Height": 0.03134990110993385,
"Left": 0.03359385207295418,
"Top": 0.36172014474868774
},
"Polygon": [
{
"X": 0.03359385207295418,
"Y": 0.36172014474868774
},
{
"X": 0.0829516351222992,
"Y": 0.36172014474868774
},
{
"X": 0.0829516351222992,
"Y": 0.3930700421333313
},
{
"X": 0.03359385207295418,
"Y": 0.3930700421333313
}
]
},
"Id": "acfbed90-4a00-42c6-8a90-d0a0756eea36"
},
{
"BlockType": "WORD",
"Confidence": 99.6871109008789,
"Text": "Address:",
"TextType": "PRINTED",
"Geometry": {
"BoundingBox": {
"Width": 0.07411003112792969,
"Height": 0.0314042791724205,
"Left": 0.08516156673431396,
"Top": 0.3600046932697296
},
"Polygon": [
{
"X": 0.08516156673431396,
"Y": 0.3600046932697296
},
{
"X": 0.15927159786224365,
"Y": 0.3600046932697296
},
{
"X": 0.15927159786224365,
"Y": 0.3914089798927307
},
{
"X": 0.08516156673431396,
"Y": 0.3914089798927307
}
]
},
"Id": "046c8a40-bb0e-4718-9c71-954d3630e1dd"
},
{
"BlockType": "WORD",
"Confidence": 99.93781280517578,
"Text": "123",
"TextType": "HANDWRITING",
"Geometry": {
"BoundingBox": {
"Width": 0.05761868134140968,
"Height": 0.05008566007018089,
"Left": 0.1750781387090683,
"Top": 0.35484206676483154
},
"Polygon": [
{
"X": 0.1750781387090683,
"Y": 0.35484206676483154
},
{
"X": 0.23269681632518768,
"Y": 0.35484206676483154
},
{
"X": 0.23269681632518768,
"Y": 0.40492773056030273
},
{
"X": 0.1750781387090683,
"Y": 0.40492773056030273
}
]
},
"Id": "82b838bc-4591-4287-8dea-60c94a4925e4"
},
{
"BlockType": "WORD",
"Confidence": 99.96530151367188,
"Text": "Any",
"TextType": "HANDWRITING",
"Geometry": {
"BoundingBox": {
"Width": 0.06814215332269669,
"Height": 0.06354366987943649,
"Left": 0.2550157308578491,
"Top": 0.35471394658088684
},
"Polygon": [
{
"X": 0.2550157308578491,
"Y": 0.35471394658088684
},
{
"X": 0.3231579065322876,
"Y": 0.35471394658088684
},
{
"X": 0.3231579065322876,
"Y": 0.41825762391090393
},
{
"X": 0.2550157308578491,
"Y": 0.41825762391090393
}
]
},
"Id": "5cdcde7a-f5a6-4231-a941-b6396e42e7ba"
},
{
"BlockType": "WORD",
"Confidence": 99.87527465820312,
"Text": "Street,",
"TextType": "HANDWRITING",
"Geometry": {
"BoundingBox": {
"Width": 0.12156613171100616,
"Height": 0.05449587106704712,
"Left": 0.3357025980949402,
"Top": 0.3550415635108948
},
"Polygon": [
{
"X": 0.3357025980949402,
"Y": 0.3550415635108948
},
{
"X": 0.45726871490478516,
"Y": 0.3550415635108948
},
{
"X": 0.45726871490478516,
"Y": 0.4095374345779419
},
{
"X": 0.3357025980949402,
"Y": 0.4095374345779419
}
]
},
"Id": "beafd497-185f-487e-b070-db4df5803e94"
},
{
"BlockType": "WORD",
"Confidence": 99.99514770507812,
"Text": "Any",
"TextType": "HANDWRITING",
"Geometry": {
"BoundingBox": {
"Width": 0.07748188823461533,
"Height": 0.07339789718389511,
"Left": 0.47723668813705444,
"Top": 0.3482133150100708
},
"Polygon": [
{
"X": 0.47723668813705444,
"Y": 0.3482133150100708
},
{
"X": 0.554718554019928,
"Y": 0.3482133150100708
},
{
"X": 0.554718554019928,
"Y": 0.4216112196445465
},
{
"X": 0.47723668813705444,
"Y": 0.4216112196445465
}
]
},
"Id": "ef1b77fb-8ba6-41fe-ba53-dce039af22ed"
},
{
"BlockType": "WORD",
"Confidence": 96.80656433105469,
"Text": "Town.",
"TextType": "HANDWRITING",
"Geometry": {
"BoundingBox": {
"Width": 0.11213835328817368,
"Height": 0.057233039289712906,
"Left": 0.5563329458236694,
"Top": 0.3331930637359619
},
"Polygon": [
{
"X": 0.5563329458236694,
"Y": 0.3331930637359619
},
{
"X": 0.6684713363647461,
"Y": 0.3331930637359619
},
{
"X": 0.6684713363647461,
"Y": 0.3904260993003845
},
{
"X": 0.5563329458236694,
"Y": 0.3904260993003845
}
]
},
"Id": "7b555310-e7f8-4cd2-bb3d-dcec37f3d90e"
},
{
"BlockType": "WORD",
"Confidence": 99.98260498046875,
"Text": "USA",
"TextType": "HANDWRITING",
"Geometry": {
"BoundingBox": {
"Width": 0.08771833777427673,
"Height": 0.05706935003399849,
"Left": 0.6889894604682922,
"Top": 0.3258342146873474
},
"Polygon": [
{
"X": 0.6889894604682922,
"Y": 0.3258342146873474
},
{
"X": 0.7767078280448914,
"Y": 0.3258342146873474
},
{
"X": 0.7767078280448914,
"Y": 0.3829035460948944
},
{
"X": 0.6889894604682922,
"Y": 0.3829035460948944
}
]
},
"Id": "b479c24d-448d-40ef-9ed5-36a6ef08e5c7"
},
{
"BlockType": "WORD",
"Confidence": 99.9583969116211,
"Text": "Mailing",
"TextType": "PRINTED",
"Geometry": {
"BoundingBox": {
"Width": 0.06291338801383972,
"Height": 0.03957144916057587,
"Left": 0.03068041242659092,
"Top": 0.43351811170578003
},
"Polygon": [
{
"X": 0.03068041242659092,
"Y": 0.43351811170578003
},
{
"X": 0.09359379857778549,
"Y": 0.43351811170578003
},
{
"X": 0.09359379857778549,
"Y": 0.4730895459651947
},
{
"X": 0.03068041242659092,
"Y": 0.4730895459651947
}
]
},
"Id": "d7261cdc-6ac5-4711-903c-4598fe94952d"
},
{
"BlockType": "WORD",
"Confidence": 99.87476348876953,
"Text": "Address:",
"TextType": "PRINTED",
"Geometry": {
"BoundingBox": {
"Width": 0.07364854216575623,
"Height": 0.03147412836551666,
"Left": 0.0954652726650238,
"Top": 0.43450701236724854
},
"Polygon": [
{
"X": 0.0954652726650238,
"Y": 0.43450701236724854
},
{
"X": 0.16911381483078003,
"Y": 0.43450701236724854
},
{
"X": 0.16911381483078003,
"Y": 0.465981125831604
},
{
"X": 0.0954652726650238,
"Y": 0.465981125831604
}
]
},
"Id": "287f80c3-6db2-4dd7-90ec-5f017c80aa31"
},
{
"BlockType": "WORD",
"Confidence": 99.94071960449219,
"Text": "same",
"TextType": "PRINTED",
"Geometry": {
"BoundingBox": {
"Width": 0.04640670120716095,
"Height": 0.026415130123496056,
"Left": 0.17156922817230225,
"Top": 0.44010937213897705
},
"Polygon": [
{
"X": 0.17156922817230225,
"Y": 0.44010937213897705
},
{
"X": 0.2179759293794632,
"Y": 0.44010937213897705
},
{
"X": 0.2179759293794632,
"Y": 0.46652451157569885
},
{
"X": 0.17156922817230225,
"Y": 0.46652451157569885
}
]
},
"Id": "ce31c3ad-b51e-4068-be64-5fc9794bc1bc"
},
{
"BlockType": "WORD",
"Confidence": 99.76510620117188,
"Text": "as",
"TextType": "PRINTED",
"Geometry": {
"BoundingBox": {
"Width": 0.02041218988597393,
"Height": 0.025104399770498276,
"Left": 0.2207803726196289,
"Top": 0.44124215841293335
},
"Polygon": [
{
"X": 0.2207803726196289,
"Y": 0.44124215841293335
},
{
"X": 0.24119256436824799,
"Y": 0.44124215841293335
},
{
"X": 0.24119256436824799,
"Y": 0.4663465619087219
},
{
"X": 0.2207803726196289,
"Y": 0.4663465619087219
}
]
},
"Id": "e96eb92c-6774-4d6f-8f4a-68a7618d4c66"
},
{
"BlockType": "WORD",
"Confidence": 99.9301528930664,
"Text": "above",
"TextType": "PRINTED",
"Geometry": {
"BoundingBox": {
"Width": 0.05268359184265137,
"Height": 0.03216424956917763,
"Left": 0.24375422298908234,
"Top": 0.4354657828807831
},
"Polygon": [
{
"X": 0.24375422298908234,
"Y": 0.4354657828807831
},
{
"X": 0.2964377999305725,
"Y": 0.4354657828807831
},
{
"X": 0.2964377999305725,
"Y": 0.4676300287246704
},
{
"X": 0.24375422298908234,
"Y": 0.4676300287246704
}
]
},
"Id": "88b85c05-427a-4d4f-8cc4-3667234e8364"
},
{
"BlockType": "WORD",
"Confidence": 85.3905029296875,
"Text": "Previous",
"TextType": "PRINTED",
"Geometry": {
"BoundingBox": {
"Width": 0.09860499948263168,
"Height": 0.04000622034072876,
"Left": 0.3194798231124878,
"Top": 0.5194430351257324
},
"Polygon": [
{
"X": 0.3194798231124878,
"Y": 0.5194430351257324
},
{
"X": 0.4180848002433777,
"Y": 0.5194430351257324
},
{
"X": 0.4180848002433777,
"Y": 0.5594492554664612
},
{
"X": 0.3194798231124878,
"Y": 0.5594492554664612
}
]
},
"Id": "8b324501-bf38-4ce9-9777-6514b7ade760"
},
{
"BlockType": "WORD",
"Confidence": 99.14524841308594,
"Text": "Employment",
"TextType": "PRINTED",
"Geometry": {
"BoundingBox": {
"Width": 0.14039960503578186,
"Height": 0.04645847901701927,
"Left": 0.4214291274547577,
"Top": 0.5219109654426575
},
"Polygon": [
{
"X": 0.4214291274547577,
"Y": 0.5219109654426575
},
{
"X": 0.5618287324905396,
"Y": 0.5219109654426575
},
{
"X": 0.5618287324905396,
"Y": 0.568369448184967
},
{
"X": 0.4214291274547577,
"Y": 0.568369448184967
}
]
},
"Id": "b0cea99a-5045-464d-ac8a-a63ab0470995"
},
{
"BlockType": "WORD",
"Confidence": 99.48454284667969,
"Text": "History",
"TextType": "PRINTED",
"Geometry": {
"BoundingBox": {
"Width": 0.08361124992370605,
"Height": 0.05192042887210846,
"Left": 0.5668527483940125,
"Top": 0.5172380208969116
},
"Polygon": [
{
"X": 0.5668527483940125,
"Y": 0.5172380208969116
},
{
"X": 0.6504639983177185,
"Y": 0.5172380208969116
},
{
"X": 0.6504639983177185,
"Y": 0.5691584348678589
},
{
"X": 0.5668527483940125,
"Y": 0.5691584348678589
}
]
},
"Id": "b92a6ee5-ca59-44dc-9c47-534c133b11e7"
},
{
"BlockType": "WORD",
"Confidence": 99.78699493408203,
"Text": "Start",
"TextType": "PRINTED",
"Geometry": {
"BoundingBox": {
"Width": 0.041341401636600494,
"Height": 0.030926469713449478,
"Left": 0.034429505467414856,
"Top": 0.6124123334884644
},
"Polygon": [
{
"X": 0.034429505467414856,
"Y": 0.6124123334884644
},
{
"X": 0.07577090710401535,
"Y": 0.6124123334884644
},
{
"X": 0.07577090710401535,
"Y": 0.6433387994766235
},
{
"X": 0.034429505467414856,
"Y": 0.6433387994766235
}
]
},
"Id": "ffe8b8e0-df59-4ac5-9aba-6b54b7c51b45"
},
{
"BlockType": "WORD",
"Confidence": 99.55198669433594,
"Text": "Date",
"TextType": "PRINTED",
"Geometry": {
"BoundingBox": {
"Width": 0.03923053666949272,
"Height": 0.03072454035282135,
"Left": 0.07830137014389038,
"Top": 0.6123942136764526
},
"Polygon": [
{
"X": 0.07830137014389038,
"Y": 0.6123942136764526
},
{
"X": 0.1175319105386734,
"Y": 0.6123942136764526
},
{
"X": 0.1175319105386734,
"Y": 0.6431187391281128
},
{
"X": 0.07830137014389038,
"Y": 0.6431187391281128
}
]
},
"Id": "91e582cd-9871-4e9c-93cc-848baa426338"
},
{
"BlockType": "WORD",
"Confidence": 99.8897705078125,
"Text": "End",
"TextType": "PRINTED",
"Geometry": {
"BoundingBox": {
"Width": 0.03212086856365204,
"Height": 0.03193363919854164,
"Left": 0.14846202731132507,
"Top": 0.6120467782020569
},
"Polygon": [
{
"X": 0.14846202731132507,
"Y": 0.6120467782020569
},
{
"X": 0.1805828958749771,
"Y": 0.6120467782020569
},
{
"X": 0.1805828958749771,
"Y": 0.6439804434776306
},
{
"X": 0.14846202731132507,
"Y": 0.6439804434776306
}
]
},
"Id": "7c97b56b-699f-49b0-93f4-98e6d90b107c"
},
{
"BlockType": "WORD",
"Confidence": 99.8445816040039,
"Text": "Date",
"TextType": "PRINTED",
"Geometry": {
"BoundingBox": {
"Width": 0.03987143933773041,
"Height": 0.03142518177628517,
"Left": 0.1844055950641632,
"Top": 0.612853467464447
},
"Polygon": [
{
"X": 0.1844055950641632,
"Y": 0.612853467464447
},
{
"X": 0.22427703440189362,
"Y": 0.612853467464447
},
{
"X": 0.22427703440189362,
"Y": 0.6442786455154419
},
{
"X": 0.1844055950641632,
"Y": 0.6442786455154419
}
]
},
"Id": "7af04e27-0c15-447e-a569-b30edb99a133"
},
{
"BlockType": "WORD",
"Confidence": 99.9652328491211,
"Text": "Employer",
"TextType": "PRINTED",
"Geometry": {
"BoundingBox": {
"Width": 0.08150768280029297,
"Height": 0.0392492301762104,
"Left": 0.2647075653076172,
"Top": 0.6140711903572083
},
"Polygon": [
{
"X": 0.2647075653076172,
"Y": 0.6140711903572083
},
{
"X": 0.34621524810791016,
"Y": 0.6140711903572083
},
{
"X": 0.34621524810791016,
"Y": 0.6533204317092896
},
{
"X": 0.2647075653076172,
"Y": 0.6533204317092896
}
]
},
"Id": "a9bfeb55-75cd-47cd-b953-728e602a3564"
},
{
"BlockType": "WORD",
"Confidence": 99.94273376464844,
"Text": "Name",
"TextType": "PRINTED",
"Geometry": {
"BoundingBox": {
"Width": 0.05018233880400658,
"Height": 0.03248906135559082,
"Left": 0.34925445914268494,
"Top": 0.6162016987800598
},
"Polygon": [
{
"X": 0.34925445914268494,
"Y": 0.6162016987800598
},
{
"X": 0.3994368016719818,
"Y": 0.6162016987800598
},
{
"X": 0.3994368016719818,
"Y": 0.6486907601356506
},
{
"X": 0.34925445914268494,
"Y": 0.6486907601356506
}
]
},
"Id": "9f0f9c06-d02c-4b07-bb39-7ade70be2c1b"
},
{
"BlockType": "WORD",
"Confidence": 98.85071563720703,
"Text": "Position",
"TextType": "PRINTED",
"Geometry": {
"BoundingBox": {
"Width": 0.07007700204849243,
"Height": 0.03255689889192581,
"Left": 0.49973347783088684,
"Top": 0.6164342164993286
},
"Polygon": [
{
"X": 0.49973347783088684,
"Y": 0.6164342164993286
},
{
"X": 0.5698104500770569,
"Y": 0.6164342164993286
},
{
"X": 0.5698104500770569,
"Y": 0.6489911079406738
},
{
"X": 0.49973347783088684,
"Y": 0.6489911079406738
}
]
},
"Id": "6d5edf02-845c-40e0-9514-e56d0d652ae0"
},
{
"BlockType": "WORD",
"Confidence": 99.86096954345703,
"Text": "Held",
"TextType": "PRINTED",
"Geometry": {
"BoundingBox": {
"Width": 0.04017873853445053,
"Height": 0.03292537108063698,
"Left": 0.5734874606132507,
"Top": 0.614840030670166
},
"Polygon": [
{
"X": 0.5734874606132507,
"Y": 0.614840030670166
},
{
"X": 0.6136662364006042,
"Y": 0.614840030670166
},
{
"X": 0.6136662364006042,
"Y": 0.6477653980255127
},
{
"X": 0.5734874606132507,
"Y": 0.6477653980255127
}
]
},
"Id": "3297ab59-b237-45fb-ae60-a108f0c95ac2"
},
{
"BlockType": "WORD",
"Confidence": 99.97740936279297,
"Text": "Reason",
"TextType": "PRINTED",
"Geometry": {
"BoundingBox": {
"Width": 0.06497219949960709,
"Height": 0.03248770162463188,
"Left": 0.7430596351623535,
"Top": 0.6136704087257385
},
"Polygon": [
{
"X": 0.7430596351623535,
"Y": 0.6136704087257385
},
{
"X": 0.8080317974090576,
"Y": 0.6136704087257385
},
{
"X": 0.8080317974090576,
"Y": 0.6461580991744995
},
{
"X": 0.7430596351623535,
"Y": 0.6461580991744995
}
]
},
"Id": "f4b8cf26-d2da-4a76-8345-69562de3cc11"
},
{
"BlockType": "WORD",
"Confidence": 99.98371887207031,
"Text": "for",
"TextType": "PRINTED",
"Geometry": {
"BoundingBox": {
"Width": 0.029645200818777084,
"Height": 0.03462234139442444,
"Left": 0.8108851909637451,
"Top": 0.6117717623710632
},
"Polygon": [
{
"X": 0.8108851909637451,
"Y": 0.6117717623710632
},
{
"X": 0.8405303955078125,
"Y": 0.6117717623710632
},
{
"X": 0.8405303955078125,
"Y": 0.6463940739631653
},
{
"X": 0.8108851909637451,
"Y": 0.6463940739631653
}
]
},
"Id": "386d4a63-1194-4c0e-a18d-4d074a0b1f93"
},
{
"BlockType": "WORD",
"Confidence": 99.98424530029297,
"Text": "leaving",
"TextType": "PRINTED",
"Geometry": {
"BoundingBox": {
"Width": 0.06517849862575531,
"Height": 0.040626998990774155,
"Left": 0.8430007100105286,
"Top": 0.6116235852241516
},
"Polygon": [
{
"X": 0.8430007100105286,
"Y": 0.6116235852241516
},
{
"X": 0.9081792235374451,
"Y": 0.6116235852241516
},
{
"X": 0.9081792235374451,
"Y": 0.6522505879402161
},
{
"X": 0.8430007100105286,
"Y": 0.6522505879402161
}
]
},
"Id": "a8622541-1896-4d54-8d10-7da2c800ec5c"
},
{
"BlockType": "WORD",
"Confidence": 99.77413177490234,
"Text": "1/15/2009",
"TextType": "PRINTED",
"Geometry": {
"BoundingBox": {
"Width": 0.08799663186073303,
"Height": 0.03832906112074852,
"Left": 0.03175082430243492,
"Top": 0.691371738910675
},
"Polygon": [
{
"X": 0.03175082430243492,
"Y": 0.691371738910675
},
{
"X": 0.11974745243787766,
"Y": 0.691371738910675
},
{
"X": 0.11974745243787766,
"Y": 0.7297008037567139
},
{
"X": 0.03175082430243492,
"Y": 0.7297008037567139
}
]
},
"Id": "da7a6482-0964-49a4-bc7d-56942ff3b4e1"
},
{
"BlockType": "WORD",
"Confidence": 99.72286224365234,
"Text": "6/30/2011",
"TextType": "PRINTED",
"Geometry": {
"BoundingBox": {
"Width": 0.08843102306127548,
"Height": 0.03991425037384033,
"Left": 0.14642837643623352,
"Top": 0.6919752955436707
},
"Polygon": [
{
"X": 0.14642837643623352,
"Y": 0.6919752955436707
},
{
"X": 0.2348593920469284,
"Y": 0.6919752955436707
},
{
"X": 0.2348593920469284,
"Y": 0.731889545917511
},
{
"X": 0.14642837643623352,
"Y": 0.731889545917511
}
]
},
"Id": "5a8da66a-ecce-4ee9-a765-a46d6cdc6cde"
},
{
"BlockType": "WORD",
"Confidence": 99.92295837402344,
"Text": "Any",
"TextType": "PRINTED",
"Geometry": {
"BoundingBox": {
"Width": 0.034067559987306595,
"Height": 0.037968240678310394,
"Left": 0.2626699209213257,
"Top": 0.6972727179527283
},
"Polygon": [
{
"X": 0.2626699209213257,
"Y": 0.6972727179527283
},
{
"X": 0.2967374622821808,
"Y": 0.6972727179527283
},
{
"X": 0.2967374622821808,
"Y": 0.7352409362792969
},
{
"X": 0.2626699209213257,
"Y": 0.7352409362792969
}
]
},
"Id": "77749c2b-aa7f-450e-8dd2-62bcaf253ba2"
},
{
"BlockType": "WORD",
"Confidence": 99.81578063964844,
"Text": "Company",
"TextType": "PRINTED",
"Geometry": {
"BoundingBox": {
"Width": 0.08160992711782455,
"Height": 0.03890080004930496,
"Left": 0.29906952381134033,
"Top": 0.6978086829185486
},
"Polygon": [
{
"X": 0.29906952381134033,
"Y": 0.6978086829185486
},
{
"X": 0.3806794583797455,
"Y": 0.6978086829185486
},
{
"X": 0.3806794583797455,
"Y": 0.736709475517273
},
{
"X": 0.29906952381134033,
"Y": 0.736709475517273
}
]
},
"Id": "713bad19-158d-4e3e-b01f-f5707ddb04e5"
},
{
"BlockType": "WORD",
"Confidence": 99.37964630126953,
"Text": "Assistant",
"TextType": "PRINTED",
"Geometry": {
"BoundingBox": {
"Width": 0.0789310410618782,
"Height": 0.03139699995517731,
"Left": 0.49814170598983765,
"Top": 0.7005078196525574
},
"Polygon": [
{
"X": 0.49814170598983765,
"Y": 0.7005078196525574
},
{
"X": 0.5770727396011353,
"Y": 0.7005078196525574
},
{
"X": 0.5770727396011353,
"Y": 0.7319048047065735
},
{
"X": 0.49814170598983765,
"Y": 0.7319048047065735
}
]
},
"Id": "989944f9-f684-4714-87d8-9ad9a321d65c"
},
{
"BlockType": "WORD",
"Confidence": 99.784912109375,
"Text": "baker",
"TextType": "PRINTED",
"Geometry": {
"BoundingBox": {
"Width": 0.050264399498701096,
"Height": 0.03237773850560188,
"Left": 0.5806865096092224,
"Top": 0.699238657951355
},
"Polygon": [
{
"X": 0.5806865096092224,
"Y": 0.699238657951355
},
{
"X": 0.630950927734375,
"Y": 0.699238657951355
},
{
"X": 0.630950927734375,
"Y": 0.7316163778305054
},
{
"X": 0.5806865096092224,
"Y": 0.7316163778305054
}
]
},
"Id": "ae82e2aa-1601-4e0c-8340-1db7ad0c9a31"
},
{
"BlockType": "WORD",
"Confidence": 99.96180725097656,
"Text": "relocated",
"TextType": "PRINTED",
"Geometry": {
"BoundingBox": {
"Width": 0.08668994158506393,
"Height": 0.03330250084400177,
"Left": 0.7426905632019043,
"Top": 0.6974037289619446
},
"Polygon": [
{
"X": 0.7426905632019043,
"Y": 0.6974037289619446
},
{
"X": 0.8293805122375488,
"Y": 0.6974037289619446
},
{
"X": 0.8293805122375488,
"Y": 0.7307062149047852
},
{
"X": 0.7426905632019043,
"Y": 0.7307062149047852
}
]
},
"Id": "a9cf9a8c-fdaa-413e-9346-5a28a98aebdb"
},
{
"BlockType": "WORD",
"Confidence": 99.98190307617188,
"Text": "7/1/2011",
"TextType": "HANDWRITING",
"Geometry": {
"BoundingBox": {
"Width": 0.09747002273797989,
"Height": 0.07067439705133438,
"Left": 0.028500309213995934,
"Top": 0.7745237946510315
},
"Polygon": [
{
"X": 0.028500309213995934,
"Y": 0.7745237946510315
},
{
"X": 0.12597033381462097,
"Y": 0.7745237946510315
},
{
"X": 0.12597033381462097,
"Y": 0.8451982140541077
},
{
"X": 0.028500309213995934,
"Y": 0.8451982140541077
}
]
},
"Id": "0f711065-1872-442a-ba6d-8fababaa452a"
},
{
"BlockType": "WORD",
"Confidence": 99.98418426513672,
"Text": "8/10/2013",
"TextType": "HANDWRITING",
"Geometry": {
"BoundingBox": {
"Width": 0.10664612054824829,
"Height": 0.06439515948295593,
"Left": 0.14159755408763885,
"Top": 0.7791688442230225
},
"Polygon": [
{
"X": 0.14159755408763885,
"Y": 0.7791688442230225
},
{
"X": 0.24824367463588715,
"Y": 0.7791688442230225
},
{
"X": 0.24824367463588715,
"Y": 0.843563973903656
},
{
"X": 0.14159755408763885,
"Y": 0.843563973903656
}
]
},
"Id": "a92d8eef-db28-45ba-801a-5da0f589d277"
},
{
"BlockType": "WORD",
"Confidence": 99.97722625732422,
"Text": "Example",
"TextType": "HANDWRITING",
"Geometry": {
"BoundingBox": {
"Width": 0.12127546221017838,
"Height": 0.05682983994483948,
"Left": 0.26764172315597534,
"Top": 0.794414758682251
},
"Polygon": [
{
"X": 0.26764172315597534,
"Y": 0.794414758682251
},
{
"X": 0.3889172077178955,
"Y": 0.794414758682251
},
{
"X": 0.3889172077178955,
"Y": 0.8512446284294128
},
{
"X": 0.26764172315597534,
"Y": 0.8512446284294128
}
]
},
"Id": "d6962efb-34ab-4ffb-9f2f-5f263e813558"
},
{
"BlockType": "WORD",
"Confidence": 99.98429870605469,
"Text": "Corp.",
"TextType": "HANDWRITING",
"Geometry": {
"BoundingBox": {
"Width": 0.07650306820869446,
"Height": 0.05481306090950966,
"Left": 0.4026312530040741,
"Top": 0.7980174422264099
},
"Polygon": [
{
"X": 0.4026312530040741,
"Y": 0.7980174422264099
},
{
"X": 0.47913432121276855,
"Y": 0.7980174422264099
},
{
"X": 0.47913432121276855,
"Y": 0.8528305292129517
},
{
"X": 0.4026312530040741,
"Y": 0.8528305292129517
}
]
},
"Id": "1876c8ea-d3e8-4c39-870e-47512b3b5080"
},
{
"BlockType": "WORD",
"Confidence": 99.91166687011719,
"Text": "Baker",
"TextType": "HANDWRITING",
"Geometry": {
"BoundingBox": {
"Width": 0.09931197017431259,
"Height": 0.06008723005652428,
"Left": 0.5098910331726074,
"Top": 0.787897527217865
},
"Polygon": [
{
"X": 0.5098910331726074,
"Y": 0.787897527217865
},
{
"X": 0.609203040599823,
"Y": 0.787897527217865
},
{
"X": 0.609203040599823,
"Y": 0.8479847311973572
},
{
"X": 0.5098910331726074,
"Y": 0.8479847311973572
}
]
},
"Id": "00adeaef-ed57-44eb-b8a9-503575236d62"
},
{
"BlockType": "WORD",
"Confidence": 99.98870849609375,
"Text": "better",
"TextType": "HANDWRITING",
"Geometry": {
"BoundingBox": {
"Width": 0.10782185196876526,
"Height": 0.06207133084535599,
"Left": 0.7428008317947388,
"Top": 0.7928366661071777
},
"Polygon": [
{
"X": 0.7428008317947388,
"Y": 0.7928366661071777
},
{
"X": 0.8506226539611816,
"Y": 0.7928366661071777
},
{
"X": 0.8506226539611816,
"Y": 0.8549079895019531
},
{
"X": 0.7428008317947388,
"Y": 0.8549079895019531
}
]
},
"Id": "c0fc9a58-7a4b-4f69-bafd-2cff32be2665"
},
{
"BlockType": "WORD",
"Confidence": 99.8883285522461,
"Text": "opp.",
"TextType": "HANDWRITING",
"Geometry": {
"BoundingBox": {
"Width": 0.07421936094760895,
"Height": 0.058906231075525284,
"Left": 0.8577775359153748,
"Top": 0.8038780689239502
},
"Polygon": [
{
"X": 0.8577775359153748,
"Y": 0.8038780689239502
},
{
"X": 0.9319969415664673,
"Y": 0.8038780689239502
},
{
"X": 0.9319969415664673,
"Y": 0.8627843260765076
},
{
"X": 0.8577775359153748,
"Y": 0.8627843260765076
}
]
},
"Id": "bf6dc8ee-2fb3-4b6c-aee4-31e96912a2d8"
},
{
"BlockType": "WORD",
"Confidence": 99.92573547363281,
"Text": "8/15/2013",
"TextType": "HANDWRITING",
"Geometry": {
"BoundingBox": {
"Width": 0.10257463902235031,
"Height": 0.05412459000945091,
"Left": 0.027909137308597565,
"Top": 0.8608770370483398
},
"Polygon": [
{
"X": 0.027909137308597565,
"Y": 0.8608770370483398
},
{
"X": 0.13048377633094788,
"Y": 0.8608770370483398
},
{
"X": 0.13048377633094788,
"Y": 0.915001630783081
},
{
"X": 0.027909137308597565,
"Y": 0.915001630783081
}
]
},
"Id": "5384f860-f857-4a94-9438-9dfa20eed1c6"
},
{
"BlockType": "WORD",
"Confidence": 99.99625396728516,
"Text": "Present",
"TextType": "HANDWRITING",
"Geometry": {
"BoundingBox": {
"Width": 0.09982697665691376,
"Height": 0.06888339668512344,
"Left": 0.1420602649450302,
"Top": 0.8511748909950256
},
"Polygon": [
{
"X": 0.1420602649450302,
"Y": 0.8511748909950256
},
{
"X": 0.24188724160194397,
"Y": 0.8511748909950256
},
{
"X": 0.24188724160194397,
"Y": 0.9200583100318909
},
{
"X": 0.1420602649450302,
"Y": 0.9200583100318909
}
]
},
"Id": "0bb96ed6-b2e6-4da4-90b3-b85561bbd89d"
},
{
"BlockType": "WORD",
"Confidence": 99.9826431274414,
"Text": "AnyCompany",
"TextType": "HANDWRITING",
"Geometry": {
"BoundingBox": {
"Width": 0.18611273169517517,
"Height": 0.08581399917602539,
"Left": 0.2615866959095001,
"Top": 0.869536280632019
},
"Polygon": [
{
"X": 0.2615866959095001,
"Y": 0.869536280632019
},
{
"X": 0.4476994276046753,
"Y": 0.869536280632019
},
{
"X": 0.4476994276046753,
"Y": 0.9553502798080444
},
{
"X": 0.2615866959095001,
"Y": 0.9553502798080444
}
]
},
"Id": "25343360-d906-440a-88b7-92eb89e95949"
},
{
"BlockType": "WORD",
"Confidence": 99.99523162841797,
"Text": "head",
"TextType": "HANDWRITING",
"Geometry": {
"BoundingBox": {
"Width": 0.07429949939250946,
"Height": 0.05485520139336586,
"Left": 0.49359121918678284,
"Top": 0.8714361190795898
},
"Polygon": [
{
"X": 0.49359121918678284,
"Y": 0.8714361190795898
},
{
"X": 0.5678907036781311,
"Y": 0.8714361190795898
},
{
"X": 0.5678907036781311,
"Y": 0.926291286945343
},
{
"X": 0.49359121918678284,
"Y": 0.926291286945343
}
]
},
"Id": "0ef3c194-8322-4575-94f1-82819ee57e3a"
},
{
"BlockType": "WORD",
"Confidence": 99.99574279785156,
"Text": "baker",
"TextType": "HANDWRITING",
"Geometry": {
"BoundingBox": {
"Width": 0.1019822508096695,
"Height": 0.05615599825978279,
"Left": 0.585354208946228,
"Top": 0.8702592849731445
},
"Polygon": [
{
"X": 0.585354208946228,
"Y": 0.8702592849731445
},
{
"X": 0.6873364448547363,
"Y": 0.8702592849731445
},
{
"X": 0.6873364448547363,
"Y": 0.9264153242111206
},
{
"X": 0.585354208946228,
"Y": 0.9264153242111206
}
]
},
"Id": "d296acd9-3e9a-4985-95f8-f863614f2c46"
},
{
"BlockType": "WORD",
"Confidence": 99.9880599975586,
"Text": "N/A,",
"TextType": "HANDWRITING",
"Geometry": {
"BoundingBox": {
"Width": 0.08230073750019073,
"Height": 0.06588289886713028,
"Left": 0.7411766648292542,
"Top": 0.8722732067108154
},
"Polygon": [
{
"X": 0.7411766648292542,
"Y": 0.8722732067108154
},
{
"X": 0.8234773874282837,
"Y": 0.8722732067108154
},
{
"X": 0.8234773874282837,
"Y": 0.9381561279296875
},
{
"X": 0.7411766648292542,
"Y": 0.9381561279296875
}
]
},
"Id": "195cfb5b-ae06-4203-8520-4e4b0a73b5ce"
},
{
"BlockType": "WORD",
"Confidence": 99.97914123535156,
"Text": "current",
"TextType": "HANDWRITING",
"Geometry": {
"BoundingBox": {
"Width": 0.12791454792022705,
"Height": 0.04768490046262741,
"Left": 0.8387037515640259,
"Top": 0.8843405842781067
},
"Polygon": [
{
"X": 0.8387037515640259,
"Y": 0.8843405842781067
},
{
"X": 0.9666182994842529,
"Y": 0.8843405842781067
},
{
"X": 0.9666182994842529,
"Y": 0.9320254921913147
},
{
"X": 0.8387037515640259,
"Y": 0.9320254921913147
}
]
},
"Id": "549ef3f9-3a13-4b77-bc25-fb2e0996839a"
}
],
"DetectDocumentTextModelVersion": "1.0",
"ResponseMetadata": {
"RequestId": "337129e6-3af7-4014-842b-f6484e82cbf6",
"HTTPStatusCode": 200,
"HTTPHeaders": {
"x-amzn-requestid": "337129e6-3af7-4014-842b-f6484e82cbf6",
"content-type": "application/x-amz-json-1.1",
"content-length": "45675",
"date": "Mon, 09 Nov 2020 23:54:38 GMT"
},
"RetryAttempts": 0
}
}
}
```
## Detecting Document Text with Amazon Textract
To detect text in a document, you use the [DetectDocumentText](https://docs.aws.amazon.com/textract/latest/APIReference/API_DetectDocumentText.html) operation, and pass a document file as input. `DetectDocumentText` returns a JSON structure that contains lines and words of detected text, the location of the text in the document, and the relationships between detected text. For more information, see [Detecting Text](#how-it-works-detecting).
You can provide an input document as an image byte array (base64-encoded image bytes), or as an Amazon S3 object. In this procedure, you upload an image file to your S3 bucket and specify the file name.
**To detect text in a document (API)**
1. If you haven't already:
1. Give a user the `AmazonTextractFullAccess` and `AmazonS3ReadOnlyAccess` permissions. For more information, see [Step 1: Set Up an AWS Account and Create a User](#setting-up).
1. Install and configure the AWS CLI and the AWS SDKs. For more information, see [Step 2: Set Up the AWS CLI and AWS SDKs](#setup-awscli-sdk).
1. Upload a document to your S3 bucket.
For instructions, see [Uploading Objects into Amazon S3](https://docs.aws.amazon.com/AmazonS3/latest/userguide/UploadingObjectsintoAmazonS3.html) in the *Amazon Simple Storage Service User Guide*.
1. Use the following examples to call the `DetectDocumentText` operation.
------
#### [ Java ]
The following example code displays the document and boxes around lines of detected text.
In the function `main`, replace the values of `bucket` and `document` with the names of the Amazon S3 bucket and document that you used in step 2. Replace the value of `credentialsProvider` with the name of your developer profile.
```
//Calls DetectDocumentText.
//Loads document from S3 bucket. Displays the document and bounding boxes around detected lines/words of text.
import java.awt.*;
import java.awt.image.BufferedImage;
import java.util.List;
import javax.imageio.ImageIO;
import javax.swing.*;
import com.amazonaws.services.s3.AmazonS3;
import com.amazonaws.services.s3.AmazonS3ClientBuilder;
import com.amazonaws.services.s3.model.S3ObjectInputStream;
import com.amazonaws.client.builder.AwsClientBuilder.EndpointConfiguration;
import com.amazonaws.auth.profile.ProfileCredentialsProvider;
import com.amazonaws.services.textract.AmazonTextract;
import com.amazonaws.services.textract.AmazonTextractClientBuilder;
import com.amazonaws.services.textract.model.Block;
import com.amazonaws.services.textract.model.BoundingBox;
import com.amazonaws.services.textract.model.DetectDocumentTextRequest;
import com.amazonaws.services.textract.model.DetectDocumentTextResult;
import com.amazonaws.services.textract.model.Document;
import com.amazonaws.services.textract.model.S3Object;
import com.amazonaws.services.textract.model.Point;
import com.amazonaws.services.textract.model.Relationship;
public class DocumentText extends JPanel {
private static final long serialVersionUID = 1L;
BufferedImage image;
DetectDocumentTextResult result;
public DocumentText(DetectDocumentTextResult documentResult, BufferedImage bufImage) throws Exception {
super();
result = documentResult; // Results of text detection.
image = bufImage; // The image containing the document.
}
// Draws the image and text bounding box.
public void paintComponent(Graphics g) {
int height = image.getHeight(this);
int width = image.getWidth(this);
Graphics2D g2d = (Graphics2D) g; // Create a Java2D version of g.
// Draw the image.
g2d.drawImage(image, 0, 0, image.getWidth(this) , image.getHeight(this), this);
// Iterate through blocks and display polygons around lines of detected text.
List blocks = result.getBlocks();
for (Block block : blocks) {
DisplayBlockInfo(block);
if ((block.getBlockType()).equals("LINE")) {
ShowPolygon(height, width, block.getGeometry().getPolygon(), g2d);
/*
ShowBoundingBox(height, width, block.getGeometry().getBoundingBox(), g2d);
*/
} else { // its a word, so just show vertical lines.
ShowPolygonVerticals(height, width, block.getGeometry().getPolygon(), g2d);
}
}
}
// Show bounding box at supplied location.
private void ShowBoundingBox(int imageHeight, int imageWidth, BoundingBox box, Graphics2D g2d) {
float left = imageWidth * box.getLeft();
float top = imageHeight * box.getTop();
// Display bounding box.
g2d.setColor(new Color(0, 212, 0));
g2d.drawRect(Math.round(left), Math.round(top),
Math.round(imageWidth * box.getWidth()), Math.round(imageHeight * box.getHeight()));
}
// Shows polygon at supplied location
private void ShowPolygon(int imageHeight, int imageWidth, List points, Graphics2D g2d) {
g2d.setColor(new Color(0, 0, 0));
Polygon polygon = new Polygon();
// Construct polygon and display
for (Point point : points) {
polygon.addPoint((Math.round(point.getX() * imageWidth)),
Math.round(point.getY() * imageHeight));
}
g2d.drawPolygon(polygon);
}
// Draws only the vertical lines in the supplied polygon.
private void ShowPolygonVerticals(int imageHeight, int imageWidth, List points, Graphics2D g2d) {
g2d.setColor(new Color(0, 212, 0));
Object[] parry = points.toArray();
g2d.setStroke(new BasicStroke(2));
g2d.drawLine(Math.round(((Point) parry[0]).getX() * imageWidth),
Math.round(((Point) parry[0]).getY() * imageHeight), Math.round(((Point) parry[3]).getX() * imageWidth),
Math.round(((Point) parry[3]).getY() * imageHeight));
g2d.setColor(new Color(255, 0, 0));
g2d.drawLine(Math.round(((Point) parry[1]).getX() * imageWidth),
Math.round(((Point) parry[1]).getY() * imageHeight), Math.round(((Point) parry[2]).getX() * imageWidth),
Math.round(((Point) parry[2]).getY() * imageHeight));
}
//Displays information from a block returned by text detection and text analysis
private void DisplayBlockInfo(Block block) {
System.out.println("Block Id : " + block.getId());
if (block.getText()!=null)
System.out.println(" Detected text: " + block.getText());
System.out.println(" Type: " + block.getBlockType());
if (block.getBlockType().equals("PAGE") !=true) {
System.out.println(" Confidence: " + block.getConfidence().toString());
}
if(block.getBlockType().equals("CELL"))
{
System.out.println(" Cell information:");
System.out.println(" Column: " + block.getColumnIndex());
System.out.println(" Row: " + block.getRowIndex());
System.out.println(" Column span: " + block.getColumnSpan());
System.out.println(" Row span: " + block.getRowSpan());
}
System.out.println(" Relationships");
List relationships=block.getRelationships();
if(relationships!=null) {
for (Relationship relationship : relationships) {
System.out.println(" Type: " + relationship.getType());
System.out.println(" IDs: " + relationship.getIds().toString());
}
} else {
System.out.println(" No related Blocks");
}
System.out.println(" Geometry");
System.out.println(" Bounding Box: " + block.getGeometry().getBoundingBox().toString());
System.out.println(" Polygon: " + block.getGeometry().getPolygon().toString());
List entityTypes = block.getEntityTypes();
System.out.println(" Entity Types");
if(entityTypes!=null) {
for (String entityType : entityTypes) {
System.out.println(" Entity Type: " + entityType);
}
} else {
System.out.println(" No entity type");
}
if(block.getPage()!=null)
System.out.println(" Page: " + block.getPage());
System.out.println();
}
public static void main(String arg[]) throws Exception {
// The S3 bucket and document
String document = "";
String bucket = "";
// set provider credentials
AWSCredentialsProvider credentialsProvider = new ProfileCredentialsProvider("default");
AmazonS3 s3client = AmazonS3ClientBuilder.standard().withCredentials(credentialsProvider)
.withEndpointConfiguration(
new EndpointConfiguration("https://s3.amazonaws.com","us-east-1"))
.build();
// Get the document from S3
com.amazonaws.services.s3.model.S3Object s3object = s3client.getObject(bucket, document);
S3ObjectInputStream inputStream = s3object.getObjectContent();
BufferedImage image = ImageIO.read(inputStream);
// Call DetectDocumentText
EndpointConfiguration endpoint = new EndpointConfiguration(
"https://textract.us-east-1.amazonaws.com", "us-east-1");
AmazonTextract client = AmazonTextractClientBuilder.standard().withCredentials(credentialsProvider)
.withEndpointConfiguration(endpoint).build();
DetectDocumentTextRequest request = new DetectDocumentTextRequest()
.withDocument(new Document().withS3Object(new S3Object().withName(document).withBucket(bucket)));
DetectDocumentTextResult result = client.detectDocumentText(request);
// Create frame and panel.
JFrame frame = new JFrame("RotateImage");
frame.setDefaultCloseOperation(JFrame.EXIT_ON_CLOSE);
DocumentText panel = new DocumentText(result, image);
panel.setPreferredSize(new Dimension(image.getWidth() , image.getHeight() ));
frame.setContentPane(panel);
frame.pack();
frame.setVisible(true);
}
}
```
------
#### [ Java V2 ]
The following example code displays the document and boxes around lines of detected text.
In the function `main`, replace the values of `bucket` and `document` with the names of the Amazon S3 bucket and document that you used in step 2. Replace `profile-name` in the line that creates the `TextractClient` with the name of your developer profile.
```
import software.amazon.awssdk.auth.credentials.ProfileCredentialsProvider;
import software.amazon.awssdk.regions.Region;
import software.amazon.awssdk.services.textract.model.S3Object;
import software.amazon.awssdk.services.textract.TextractClient;
import software.amazon.awssdk.services.textract.model.Document;
import software.amazon.awssdk.services.textract.model.DetectDocumentTextRequest;
import software.amazon.awssdk.services.textract.model.DetectDocumentTextResponse;
import software.amazon.awssdk.services.textract.model.Block;
import software.amazon.awssdk.services.textract.model.DocumentMetadata;
import software.amazon.awssdk.services.textract.model.TextractException;
import java.util.Iterator;
import java.util.List;
//snippet-end:[textract.java2._detect_s3_text.import]
/**
* Before running this Java V2 code example, set up your development environment, including your credentials.
*
* For more information, see the following documentation topic:
*
* https://docs.aws.amazon.com/sdk-for-java/latest/developer-guide/get-started.html
*/
public class DetectText {
public static void main(String[] args) {
final String usage = "\n" +
"Usage:\n" +
" \n\n" +
"Where:\n" +
" bucketName - The name of the Amazon S3 bucket that contains the document. \n\n" +
" docName - The document name (must be an image, i.e., book.png). \n";
if (args.length != 2) {
System.out.println(usage);
System.exit(1);
}
String bucketName = args[0];
String docName = args[1];
Region region = Region.US_EAST_1;
TextractClient textractClient = TextractClient.builder()
.region(region)
.credentialsProvider(ProfileCredentialsProvider.create("profile-name"))
.build();
detectDocTextS3(textractClient, bucketName, docName);
textractClient.close();
}
// snippet-start:[textract.java2._detect_s3_text.main]
public static void detectDocTextS3 (TextractClient textractClient, String bucketName, String docName) {
try {
S3Object s3Object = S3Object.builder()
.bucket(bucketName)
.name(docName)
.build();
// Create a Document object and reference the s3Object instance
Document myDoc = Document.builder()
.s3Object(s3Object)
.build();
DetectDocumentTextRequest detectDocumentTextRequest = DetectDocumentTextRequest.builder()
.document(myDoc)
.build();
DetectDocumentTextResponse textResponse = textractClient.detectDocumentText(detectDocumentTextRequest);
for (Block block: textResponse.blocks()) {
System.out.println("The block type is " +block.blockType().toString());
}
DocumentMetadata documentMetadata = textResponse.documentMetadata();
System.out.println("The number of pages in the document is " +documentMetadata.pages());
} catch (TextractException e) {
System.err.println(e.getMessage());
System.exit(1);
}
}
// snippet-end:[textract.java2._detect_s3_text.main]
}
```
------
#### [ AWS CLI ]
This AWS CLI command displays the JSON output for the `detect-document-text` CLI operation.
Replace the values of `Bucket` and `Name` with the names of the Amazon S3 bucket and document that you used in step 2. Replace `profile-name` with the name of a profile that can assume the role and `region` with the region in which you want to run the code.
```
aws textract detect-document-text \
--document '{"S3Object":{"Bucket":"{{bucket}}","Name":"{{document}}"}}' \
--profile {{profile-name}} \
--region {{region}}
```
------
#### [ Python ]
The following example code displays the document and boxes around detected lines of text.
In the function `main`, replace the values of `bucket` and `document` with the names of the Amazon S3 bucket and document that you used in step 2. Replace `profile-name` with the name of a profile that can assume the role and `region` with the region in which you want to run the code.
```
#Detects text in a document stored in an S3 bucket. Display polygon box around text and angled text
import boto3
import io
from PIL import Image, ImageDraw
def process_text_detection(s3_connection, client, bucket, document):
#Get the document from S3
s3_object = s3_connection.Object(bucket,document)
s3_response = s3_object.get()
stream = io.BytesIO(s3_response['Body'].read())
image=Image.open(stream)
#To process using image bytes:
#image_binary = stream.getvalue()
#response = client.detect_document_text(Document={'Bytes': image_binary})
# Detect text in the document
# Process using S3 object
response = client.detect_document_text(
Document={'S3Object': {'Bucket': bucket, 'Name': document}})
# Get the text blocks
blocks=response['Blocks']
width, height =image.size
print ('Detected Document Text')
# Create image showing bounding box/polygon the detected lines/text
for block in blocks:
# Display information about a block returned by text detection
print('Type: ' + block['BlockType'])
if block['BlockType'] != 'PAGE':
print('Detected: ' + block['Text'])
print('Confidence: ' + "{:.2f}".format(block['Confidence']) + "%")
print('Id: {}'.format(block['Id']))
if 'Relationships' in block:
print('Relationships: {}'.format(block['Relationships']))
print('Bounding Box: {}'.format(block['Geometry']['BoundingBox']))
print('Polygon: {}'.format(block['Geometry']['Polygon']))
print()
draw=ImageDraw.Draw(image)
# Draw WORD - Green - start of word, red - end of word
if block['BlockType'] == "WORD":
draw.line([(width * block['Geometry']['Polygon'][0]['X'],
height * block['Geometry']['Polygon'][0]['Y']),
(width * block['Geometry']['Polygon'][3]['X'],
height * block['Geometry']['Polygon'][3]['Y'])],fill='green',
width=2)
draw.line([(width * block['Geometry']['Polygon'][1]['X'],
height * block['Geometry']['Polygon'][1]['Y']),
(width * block['Geometry']['Polygon'][2]['X'],
height * block['Geometry']['Polygon'][2]['Y'])],
fill='red',
width=2)
# Draw box around entire LINE
if block['BlockType'] == "LINE":
points=[]
for polygon in block['Geometry']['Polygon']:
points.append((width * polygon['X'], height * polygon['Y']))
draw.polygon((points), outline='black')
# Display the image
image.show()
return len(blocks)
def main():
session = boto3.Session(profile_name='profile-name')
s3_connection = session.resource('s3')
client = session.client('textract', region_name='region')
bucket = ''
document = ''
block_count=process_text_detection(s3_connection,client,bucket,document)
print("Blocks detected: " + str(block_count))
if __name__ == "__main__":
main()
```
------
#### [ Node.js ]
The following Node.js example code displays the document and boxes around detected lines of text. It outputs an image of the results to the directory you run the code from. It makes use of the `image-size` and `images` packages.
In the function `main`, replace the values of `bucket` and `document` with the names of the Amazon S3 bucket and document that you used in step 2. Replace the value of `regionConfig` with the name of the region your account is in. Replace the value of `credentials`with the name of your developer profile.
```
//Copyright 2018 Amazon.com, Inc. or its affiliates. All Rights Reserved.
//PDX-License-Identifier: MIT-0 (For details, see https://github.com/awsdocs/amazon-rekognition-developer-guide/blob/master/LICENSE-SAMPLECODE.)
async function main(){
// Import AWS
const AWS = require("aws-sdk")
// Use Image-Size to get
const sizeOf = require('image-size');
// Image tool to draw buffers
const images = require("images");
// Set variables
var credentials = new AWS.SharedIniFileCredentials({profile: 'default'});
AWS.config.credentials = credentials;
AWS.config.update({region:'region-name'});
const bucket = 'bucket-name' // the s3 bucket name
const photo = 'photo-name' // the name of file
// Create a canvas and get the context
const { createCanvas } = require('canvas')
const canvas = createCanvas(200, 200)
const ctx = canvas.getContext('2d')
// Connect to Textract
const client = new AWS.Textract();
// Connect to S3 to display image
const s3 = new AWS.S3();
// Define paramaters
const params = {
Document: {
S3Object: {
Bucket: bucket,
Name: photo
},
},
}
// Function to display image
async function getImage(){
const imageData = s3.getObject(
{
Bucket: bucket,
Key: photo
}
).promise();
return imageData;
}
// get image
var imageData = await getImage()
// Get the height, width of the image
const dimensions = sizeOf(imageData.Body)
const width = dimensions.width
const height = dimensions.height
console.log(imageData.Body)
console.log(width, height)
canvas.width = width;
canvas.height = height;
try{
// Call API and log response
const res = await client.detectDocumentText(params).promise();
var image = images(imageData.Body).size(width, height)
//console.log the type of block, text, text type, and confidence
res.Blocks.forEach(block => {
console.log(`Block Type: ${block.BlockType}`),
console.log(`Text: ${block.Text}`)
console.log(`TextType: ${block.TextType}`)
console.log(`Confidence: ${block.Confidence}`)
// Draw box around detected text using polygons
ctx.strokeStyle = 'rgba(0,0,0,0.5)';
ctx.beginPath();
block.Geometry.Polygon.forEach(({X, Y}) =>
ctx.lineTo(width * X - 10, height * Y - 10)
);
ctx.closePath();
ctx.stroke();
console.log("-----")
})
// render image
var buffer = canvas.toBuffer("image/png");
image.draw(images(buffer), 10, 10)
image.save("output-image.jpg");
} catch (err){
console.error(err);}
}
main()
```
------
#### [ .NET ]
The following example provides detected text as a list. Replace the values of `bucket` and `document` with the names of the Amazon S3 bucket and document image that you used in step 2.
```
using System;
using System.Linq;
using Amazon.Textract;
using Amazon.Textract.Model;
namespace TextractAnalyzeID
{
class Program
{
static async Task Main()
{
String document = "{{document}}";
String bucket = "{{bucket}}";
AmazonTextractClient textractClient = new AmazonTextractClient();
DetectDocumentTextRequest detectDocumentTextRequest = new DetectDocumentTextRequest()
{
Document = new Document()
{
S3Object = new S3Object()
{
Name = document,
Bucket = bucket
}
}
};
try
{
var DocumentText = await textractClient.DetectDocumentTextAsync(detectDocumentTextRequest);
foreach (Block block in DocumentText.Blocks)
{
Console.WriteLine(block.BlockType);
if (block.BlockType != "PAGE") {
Console.WriteLine("Detected Text= " + block.Text);
Console.WriteLine("Confidence= " + block.Confidence);
}
Console.WriteLine("Id= " + block.Id);
foreach(Relationship relationship in block.Relationships) {
Console.WriteLine(relationship.Type);
relationship.Ids.ForEach(id => Console.WriteLine("Id= " + id));
}
}
}
catch (Exception e)
{
Console.WriteLine(e.Message);
}
}
}
}
```
------
1. Run the example. The Python and Java examples display the document image. A black box surrounds each line of detected text. A green vertical line is the start of a detected word. A red vertical line is the end of a detected word. The AWS CLI example displays only the JSON output for the `DetectDocumentText` operation.
## Analyzing Document Text with Amazon Textract
To analyze text in a document, you use the [AnalyzeDocument](https://docs.aws.amazon.com/textract/latest/APIReference/API_AnalyzeDocument.html) operation, and pass a document file as input. `AnalyzeDocument` returns a JSON structure that contains the analyzed text. For more information, see [Analyzing Documents](#how-it-works-analyzing).
You can provide an input document as an image byte array (base64-encoded image bytes), or as an Amazon S3 object. In this procedure, you upload an image file to your S3 bucket and specify the file name.
**To analyze text in a document (API)**
1. If you haven't already:
1. Give a user the `AmazonTextractFullAccess` and `AmazonS3ReadOnlyAccess` permissions. For more information, see [Step 1: Set Up an AWS Account and Create a User](#setting-up).
1. Install and configure the AWS CLI and the AWS SDKs. For more information, see [Step 2: Set Up the AWS CLI and AWS SDKs](#setup-awscli-sdk).
1. Upload an image that contains a document to your S3 bucket.
For instructions, see [Uploading Objects into Amazon S3](https://docs.aws.amazon.com/AmazonS3/latest/userguide/upload-objects.html) in the *Amazon Simple Storage Service User Guide*.
1. Use the following examples to call the `AnalyzeDocument` operation.
------
#### [ Java ]
The following example code displays the document and boxes around detected items.
In the function `main`, replace the values of `bucket` and `document` with the names of the Amazon S3 bucket and document image that you used in step 2. Replace the value of `credentialsProvider` with the name of your developer profile.
```
//Loads document from S3 bucket. Displays the document and polygon around detected lines of text.
import java.awt.*;
import java.awt.image.BufferedImage;
import java.util.List;
import javax.imageio.ImageIO;
import javax.swing.*;
import com.amazonaws.services.s3.AmazonS3;
import com.amazonaws.services.s3.AmazonS3ClientBuilder;
import com.amazonaws.services.s3.model.S3ObjectInputStream;
import com.amazonaws.auth.profile.ProfileCredentialsProvider;
import com.amazonaws.services.textract.AmazonTextract;
import com.amazonaws.services.textract.AmazonTextractClientBuilder;
import com.amazonaws.services.textract.model.AnalyzeDocumentRequest;
import com.amazonaws.services.textract.model.AnalyzeDocumentResult;
import com.amazonaws.services.textract.model.Block;
import com.amazonaws.services.textract.model.BoundingBox;
import com.amazonaws.services.textract.model.Document;
import com.amazonaws.services.textract.model.S3Object;
import com.amazonaws.services.textract.model.Point;
import com.amazonaws.services.textract.model.Relationship;
import com.amazonaws.client.builder.AwsClientBuilder.EndpointConfiguration;
public class AnalyzeDocument extends JPanel {
private static final long serialVersionUID = 1L;
BufferedImage image;
AnalyzeDocumentResult result;
public AnalyzeDocument(AnalyzeDocumentResult documentResult, BufferedImage bufImage) throws Exception {
super();
result = documentResult; // Results of text detection.
image = bufImage; // The image containing the document.
}
// Draws the image and text bounding box.
public void paintComponent(Graphics g) {
int height = image.getHeight(this);
int width = image.getWidth(this);
Graphics2D g2d = (Graphics2D) g; // Create a Java2D version of g.
// Draw the image.
g2d.drawImage(image, 0, 0, image.getWidth(this), image.getHeight(this), this);
// Iterate through blocks and display bounding boxes around everything.
List blocks = result.getBlocks();
for (Block block : blocks) {
DisplayBlockInfo(block);
switch(block.getBlockType()) {
case "KEY_VALUE_SET":
if (block.getEntityTypes().contains("KEY")){
ShowBoundingBox(height, width, block.getGeometry().getBoundingBox(), g2d, new Color(255,0,0));
}
else { //VALUE
ShowBoundingBox(height, width, block.getGeometry().getBoundingBox(), g2d, new Color(0,255,0));
}
break;
case "TABLE":
ShowBoundingBox(height, width, block.getGeometry().getBoundingBox(), g2d, new Color(0,0,255));
break;
case "CELL":
ShowBoundingBox(height, width, block.getGeometry().getBoundingBox(), g2d, new Color(255,255,0));
break;
case "SELECTION_ELEMENT":
if (block.getSelectionStatus().equals("SELECTED"))
ShowSelectedElement(height, width, block.getGeometry().getBoundingBox(), g2d, new Color(0,0,255));
break;
default:
//PAGE, LINE & WORD
//ShowBoundingBox(height, width, block.getGeometry().getBoundingBox(), g2d, new Color(200,200,0));
}
}
// uncomment to show polygon around all blocks
//ShowPolygon(height,width,block.getGeometry().getPolygon(),g2d);
}
// Show bounding box at supplied location.
private void ShowBoundingBox(int imageHeight, int imageWidth, BoundingBox box, Graphics2D g2d, Color color) {
float left = imageWidth * box.getLeft();
float top = imageHeight * box.getTop();
// Display bounding box.
g2d.setColor(color);
g2d.drawRect(Math.round(left), Math.round(top),
Math.round(imageWidth * box.getWidth()), Math.round(imageHeight * box.getHeight()));
}
private void ShowSelectedElement(int imageHeight, int imageWidth, BoundingBox box, Graphics2D g2d, Color color) {
float left = imageWidth * box.getLeft();
float top = imageHeight * box.getTop();
// Display bounding box.
g2d.setColor(color);
g2d.fillRect(Math.round(left), Math.round(top),
Math.round(imageWidth * box.getWidth()), Math.round(imageHeight * box.getHeight()));
}
// Shows polygon at supplied location
private void ShowPolygon(int imageHeight, int imageWidth, List points, Graphics2D g2d) {
g2d.setColor(new Color(0, 0, 0));
Polygon polygon = new Polygon();
// Construct polygon and display
for (Point point : points) {
polygon.addPoint((Math.round(point.getX() * imageWidth)),
Math.round(point.getY() * imageHeight));
}
g2d.drawPolygon(polygon);
}
//Displays information from a block returned by text detection and text analysis
private void DisplayBlockInfo(Block block) {
System.out.println("Block Id : " + block.getId());
if (block.getText()!=null)
System.out.println(" Detected text: " + block.getText());
System.out.println(" Type: " + block.getBlockType());
if (block.getBlockType().equals("PAGE") !=true) {
System.out.println(" Confidence: " + block.getConfidence().toString());
}
if(block.getBlockType().equals("CELL"))
{
System.out.println(" Cell information:");
System.out.println(" Column: " + block.getColumnIndex());
System.out.println(" Row: " + block.getRowIndex());
System.out.println(" Column span: " + block.getColumnSpan());
System.out.println(" Row span: " + block.getRowSpan());
}
System.out.println(" Relationships");
List relationships=block.getRelationships();
if(relationships!=null) {
for (Relationship relationship : relationships) {
System.out.println(" Type: " + relationship.getType());
System.out.println(" IDs: " + relationship.getIds().toString());
}
} else {
System.out.println(" No related Blocks");
}
System.out.println(" Geometry");
System.out.println(" Bounding Box: " + block.getGeometry().getBoundingBox().toString());
System.out.println(" Polygon: " + block.getGeometry().getPolygon().toString());
List entityTypes = block.getEntityTypes();
System.out.println(" Entity Types");
if(entityTypes!=null) {
for (String entityType : entityTypes) {
System.out.println(" Entity Type: " + entityType);
}
} else {
System.out.println(" No entity type");
}
if(block.getBlockType().equals("SELECTION_ELEMENT")) {
System.out.print(" Selection element detected: ");
if (block.getSelectionStatus().equals("SELECTED")){
System.out.println("Selected");
}else {
System.out.println(" Not selected");
}
}
if(block.getPage()!=null)
System.out.println(" Page: " + block.getPage());
System.out.println();
}
public static void main(String arg[]) throws Exception {
// The S3 bucket and document
String document = "";
String bucket = "";
// set provider credentials
AWSCredentialsProvider credentialsProvider = new ProfileCredentialsProvider("default");
AmazonS3 s3client = AmazonS3ClientBuilder.standard().withCredentials(credentialsProvider)
.withEndpointConfiguration(
new EndpointConfiguration("https://s3.amazonaws.com","us-east-1"))
.build();
// Get the document from S3
com.amazonaws.services.s3.model.S3Object s3object = s3client.getObject(bucket, document);
S3ObjectInputStream inputStream = s3object.getObjectContent();
BufferedImage image = ImageIO.read(inputStream);
// Call AnalyzeDocument
EndpointConfiguration endpoint = new EndpointConfiguration(
"https://textract.us-east-1.amazonaws.com", "us-east-1");
AmazonTextract client = AmazonTextractClientBuilder.standard().withCredentials(credentialsProvider)
.withEndpointConfiguration(endpoint).build();
AnalyzeDocumentRequest request = new AnalyzeDocumentRequest()
.withFeatureTypes("TABLES","FORMS","SIGNATURES")
.withDocument(new Document().
withS3Object(new S3Object().withName(document).withBucket(bucket)));
AnalyzeDocumentResult result = client.analyzeDocument(request);
// Create frame and panel.
JFrame frame = new JFrame("RotateImage");
frame.setDefaultCloseOperation(JFrame.EXIT_ON_CLOSE);
AnalyzeDocument panel = new AnalyzeDocument(result, image);
panel.setPreferredSize(new Dimension(image.getWidth(), image.getHeight()));
frame.setContentPane(panel);
frame.pack();
frame.setVisible(true);
}
}
```
------
#### [ Java V2 ]
The following example code displays the document and boxes around lines of detected text.
In the function `main`, replace the values of `bucket` and `document` with the names of the Amazon S3 bucket and document that you used in step 2. Replace `profile-name` in the line that creates the `TextractClient` with the name of your developer profile.
```
import software.amazon.awssdk.auth.credentials.ProfileCredentialsProvider;
import software.amazon.awssdk.core.SdkBytes;
import software.amazon.awssdk.regions.Region;
import software.amazon.awssdk.services.textract.TextractClient;
import software.amazon.awssdk.services.textract.model.AnalyzeDocumentRequest;
import software.amazon.awssdk.services.textract.model.Document;
import software.amazon.awssdk.services.textract.model.FeatureType;
import software.amazon.awssdk.services.textract.model.S3Object;
import software.amazon.awssdk.services.textract.model.AnalyzeDocumentResponse;
import software.amazon.awssdk.services.textract.model.Block;
import software.amazon.awssdk.services.textract.model.TextractException;
import java.io.File;
import java.io.FileInputStream;
import java.io.FileNotFoundException;
import java.io.InputStream;
import java.util.ArrayList;
import java.util.Iterator;
import java.util.List;
// snippet-end:[textract.java2._analyze_doc.import]
/**
* Before running this Java V2 code example, set up your development environment, including your credentials.
*
* For more information, see the following documentation topic:
*
* https://docs.aws.amazon.com/sdk-for-java/latest/developer-guide/get-started.html
*/
public class AnalyzeDocument {
public static void main(String[] args) {
final String usage = "\n" +
"Usage:\n" +
" \n\n" +
"Where:\n" +
" bucketName - The name of the Amazon S3 bucket that contains the document. \n\n" +
" docName - The document name (must be an image, i.e., book.png). \n";
if (args.length != 2) {
System.out.println(usage);
System.exit(1);
}
String bucketName = args[0];
String docName = args[1];
Region region = Region.US_EAST_1;
TextractClient textractClient = TextractClient.builder()
.region(region)
.credentialsProvider(ProfileCredentialsProvider.create("profile-name"))
.build();
analyzeDoc(textractClient, bucketName, docName);
textractClient.close();
}
// snippet-start:[textract.java2._analyze_doc.main]
public static void analyzeDoc(TextractClient textractClient, String bucketName, String docName) {
try {
S3Object s3Object = S3Object.builder()
.bucket(bucketName)
.name(docName)
.build();
// Create a Document object and reference the s3Object instance
Document myDoc = Document.builder()
.s3Object(s3Object)
.build();
List featureTypes = new ArrayList();
featureTypes.add(FeatureType.FORMS);
featureTypes.add(FeatureType.TABLES);
AnalyzeDocumentRequest analyzeDocumentRequest = AnalyzeDocumentRequest.builder()
.featureTypes(featureTypes)
.document(myDoc)
.build();
AnalyzeDocumentResponse analyzeDocument = textractClient.analyzeDocument(analyzeDocumentRequest);
List docInfo = analyzeDocument.blocks();
Iterator blockIterator = docInfo.iterator();
while(blockIterator.hasNext()) {
Block block = blockIterator.next();
System.out.println("The block type is " +block.blockType().toString());
}
} catch (TextractException e) {
System.err.println(e.getMessage());
System.exit(1);
}
}
// snippet-end:[textract.java2._analyze_doc.main]
}
```
------
#### [ AWS CLI ]
This AWS CLI command displays the JSON output for the `analyze-document` CLI operation.
Replace the values of `Bucket` and `Name` with the names of the Amazon S3 bucket and document that you used in step 2. Replace `profile-name` with the name of a profile that can assume the role and `region` with the region in which you want to run the code.
```
aws textract analyze-document \
--document '{"S3Object":{"Bucket":"{{bucket}}","Name":"{{document}}"}}' \
--feature-types '["TABLES","FORMS","SIGNATURES"]' \
--profile {{profile-name}} \
--region {{region}}
```
In order to use the Queries feature, include the '`QUERIES`' value in the '`feature-types`' parameter and then provide a `Queries` object to the '`queries-config`' parameter. To use an adapter, include any `AdapterId`s and `Version`s in a list of `Adapters` provided to the `AdapterConfig` parameter.
```
aws textract analyze-document \
--document '{"S3Object":{"Bucket":"{{bucket}}","Name":"{{document}}"}}'\
--feature-types '["QUERIES"]' \
--queries-config '{"Queries":[{"Text":"{{Question}}"}]}' \
--profile {{profile-name}} \
--region {{region}}
--adapters-config '{"Adapters": [{"AdapterId": "{{AdapterId}}", "Version": "{{1}}"]}'
```
------
#### [ Python ]
The following example code displays the document and boxes around detected items.
In the function `main`, replace the values of `bucket` and `document` with the names of the Amazon S3 bucket and document that you used in step 2. Replace `profile-name` with the name of a profile that can assume the role and `region` with the region in which you want to run the code. To use an adapter, include any `AdapterId`s and `Version`s in a list of `Adapters` provided to the `AdapterConfig` parameter.
```
#Analyzes text in a document stored in an S3 bucket. Display polygon box around text and angled text
import boto3
import io
from PIL import Image, ImageDraw
def ShowBoundingBox(draw,box,width,height,boxColor):
left = width * box['Left']
top = height * box['Top']
draw.rectangle([left,top, left + (width * box['Width']), top +(height * box['Height'])],outline=boxColor)
def ShowSelectedElement(draw,box,width,height,boxColor):
left = width * box['Left']
top = height * box['Top']
draw.rectangle([left,top, left + (width * box['Width']), top +(height * box['Height'])],fill=boxColor)
# Displays information about a block returned by text detection and text analysis
def DisplayBlockInformation(block):
print('Id: {}'.format(block['Id']))
if 'Text' in block:
print(' Detected: ' + block['Text'])
print(' Type: ' + block['BlockType'])
if 'Confidence' in block:
print(' Confidence: ' + "{:.2f}".format(block['Confidence']) + "%")
if block['BlockType'] == 'CELL':
print(" Cell information")
print(" Column:" + str(block['ColumnIndex']))
print(" Row:" + str(block['RowIndex']))
print(" Column Span:" + str(block['ColumnSpan']))
print(" RowSpan:" + str(block['ColumnSpan']))
if 'Relationships' in block:
print(' Relationships: {}'.format(block['Relationships']))
print(' Geometry: ')
print(' Bounding Box: {}'.format(block['Geometry']['BoundingBox']))
print(' Polygon: {}'.format(block['Geometry']['Polygon']))
if block['BlockType'] == "KEY_VALUE_SET":
print (' Entity Type: ' + block['EntityTypes'][0])
if block['BlockType'] == 'SELECTION_ELEMENT':
print(' Selection element detected: ', end='')
if block['SelectionStatus'] =='SELECTED':
print('Selected')
else:
print('Not selected')
if 'Page' in block:
print('Page: ' + block['Page'])
print()
def process_text_analysis(s3_connection, client, bucket, document):
# Get the document from S3
s3_object = s3_connection.Object(bucket,document)
s3_response = s3_object.get()
stream = io.BytesIO(s3_response['Body'].read())
image=Image.open(stream)
# Analyze the document
image_binary = stream.getvalue()
response = client.analyze_document(Document={'Bytes': image_binary},
FeatureTypes=["TABLES", "FORMS", "SIGNATURES"])
### Uncomment to process using S3 object ###
#response = client.analyze_document(
# Document={'S3Object': {'Bucket': bucket, 'Name': document}},
# FeatureTypes=["TABLES", "FORMS", "SIGNATURES"])
### Uncomment to analyze a local file ###
# with open("pathToFile", 'rb') as img_file:
### To display image using PIL ###
# image = Image.open()
### Read bytes ###
# img_bytes = img_file.read()
# response = client.analyze_document(Document={'Bytes': img_bytes}, FeatureTypes=["TABLES", "FORMS", "SIGNATURES"])
#Get the text blocks
blocks=response['Blocks']
width, height =image.size
print ('Detected Document Text')
# Create image showing bounding box/polygon the detected lines/text
for block in blocks:
DisplayBlockInformation(block)
draw=ImageDraw.Draw(image)
# Draw bounding boxes for different detected response objects
if block['BlockType'] == "KEY_VALUE_SET":
if block['EntityTypes'][0] == "KEY":
ShowBoundingBox(draw, block['Geometry']['BoundingBox'],width,height,'red')
else:
ShowBoundingBox(draw, block['Geometry']['BoundingBox'],width,height,'green')
if block['BlockType'] == 'TABLE':
ShowBoundingBox(draw, block['Geometry']['BoundingBox'],width,height, 'blue')
if block['BlockType'] == 'CELL':
ShowBoundingBox(draw, block['Geometry']['BoundingBox'],width,height, 'yellow')
if block['BlockType'] == 'SELECTION_ELEMENT':
if block['SelectionStatus'] =='SELECTED':
ShowSelectedElement(draw, block['Geometry']['BoundingBox'],width,height, 'blue')
# Display the image
image.show()
return len(blocks)
def main():
session = boto3.Session(profile_name='profile-name')
s3_connection = session.resource('s3')
client = session.client('textract', region_name='region')
bucket = ""
document = ""
block_count=process_text_analysis(s3_connection, client, bucket, document)
print("Blocks detected: " + str(block_count))
if __name__ == "__main__":
main()
```
In order to use different features of the `AnalyzeDocument` operation, you provide the proper feature type to the `features-type` parameter. For example, to use the Queries feature, include the `QUERIES` value in the `feature-types` parameter and then provide a `Queries` object to the `queries-config` parameter. To query your document, add the `query_document` function in the following code to the preceding code example. Then, include the `question` variable and line that invokes the `query_document` function to the preceding `main` function.
```
def query_document(client, bucket, document, question):
# Analyze the document
response = client.analyze_document(Document={'S3Object': {'Bucket': bucket, 'Name': document}},
FeatureTypes=["TABLES", "FORMS", "QUERIES"],
QueriesConfig={'Queries':[
{'Text':'{}'.format(question)}
]})
for block in response['Blocks']:
if block["BlockType"] == "QUERY":
print("Query info:")
print(block["Query"])
if block["BlockType"] == "QUERY_RESULT":
print("Query answer:")
print(block["Text"])
question = "{{query here}}"
query_document(client, bucket, document, question)
```
------
#### [ Node.js ]
The following example code displays the document and boxes around detected items.
In the following code, replace the values of `bucket` and `photo` with the names of the Amazon S3 bucket and document that you used in step 2. Replace the value of `region` with the region associated with your account. Replace the value of `credentials` with the name of your developer profile.
```
// Import required AWS SDK clients and commands for Node.js
import { AnalyzeDocumentCommand } from "@aws-sdk/client-textract";
import { TextractClient } from "@aws-sdk/client-textract";
import {fromIni} from '@aws-sdk/credential-providers';
// Set the AWS Region.
const REGION = "region"; //e.g. "us-east-1"
const profileName = "default";
// Create SNS service object.
const textractClient = new TextractClient({region: REGION,
credentials: fromIni({profile: profileName,}),
});
const bucket = 'buckets'
const photo = 'photo'
// Set params
const params = {
Document: {
S3Object: {
Bucket: bucket,
Name: photo
},
},
FeatureTypes: ['TABLES', 'FORMS', 'SIGNATURES'],
}
const displayBlockInfo = async (response) => {
try {
response.Blocks.forEach(block => {
console.log(`ID: ${block.Id}`)
console.log(`Block Type: ${block.BlockType}`)
if ("Text" in block && block.Text !== undefined){
console.log(`Text: ${block.Text}`)
}
else{}
if ("Confidence" in block && block.Confidence !== undefined){
console.log(`Confidence: ${block.Confidence}`)
}
else{}
if (block.BlockType == 'CELL'){
console.log("Cell info:")
console.log(` Column Index - ${block.ColumnIndex}`)
console.log(` Row - ${block.RowIndex}`)
console.log(` Column Span - ${block.ColumnSpan}`)
console.log(` Row Span - ${block.RowSpan}`)
}
if ("Relationships" in block && block.Relationships !== undefined){
console.log(block.Relationships)
console.log("Geometry:")
console.log(` Bounding Box - ${JSON.stringify(block.Geometry.BoundingBox)}`)
console.log(` Polygon - ${JSON.stringify(block.Geometry.Polygon)}`)
}
console.log("-----")
});
} catch (err) {
console.log("Error", err);
}
}
const analyze_document_text = async () => {
try {
const analyzeDoc = new AnalyzeDocumentCommand(params);
const response = await textractClient.send(analyzeDoc);
//console.log(response)
displayBlockInfo(response)
return response; // For unit tests.
} catch (err) {
console.log("Error", err);
}
}
analyze_document_text()
```
------
#### [ .NET ]
The following example displays detected text and their relationships in a list.
Replace the values of `bucket` and `document` with the names of the Amazon S3 bucket and document image that you used in step 2.
```
using System;
using System.Linq;
using System.Reflection.Emit;
using Amazon.Runtime;
using Amazon.Textract;
using Amazon.Textract.Model;
namespace TextractAnalyzeExpense
{
class Program
{
static async Task Main()
{
String document = "{{document}}";
String bucket = "{{bucket}}";
AmazonTextractClient textractClient = new AmazonTextractClient();
AnalyzeExpenseRequest analyzeExpenseRequest = new AnalyzeExpenseRequest()
{
Document = new Document()
{
S3Object = new S3Object()
{
Name = document,
Bucket = bucket
}
}
};
try
{
var ExpenseAnalysis = await textractClient.AnalyzeExpenseAsync(analyzeExpenseRequest);
Console.WriteLine("Line Items:");
foreach (ExpenseDocument expenseDocument in ExpenseAnalysis.ExpenseDocuments)
{
Console.WriteLine("Line Items:");
foreach(LineItemGroup linegroup in expenseDocument.LineItemGroups)
{
PrintLineItems.LineItemPrinter.LineItemParse(linegroup);
}
Console.WriteLine("Summary:\n");
foreach(ExpenseField summary in expenseDocument.SummaryFields)
{
if (summary.LabelDetection is not null)
{
Console.WriteLine(summary.LabelDetection.Text);
}
if (summary.ValueDetection is not null)
{
Console.WriteLine(summary.ValueDetection.Text);
}
}
}
}
catch (Exception e)
{
Console.WriteLine(e.Message);
}
}
}
}
namespace PrintLineItems
{
class LineItemPrinter
{
public static void LineItemParse(LineItemGroup lineitemgroup)
{
foreach(LineItemFields lineitem in lineitemgroup.LineItems) {
foreach(ExpenseField expense in lineitem.LineItemExpenseFields){
if (expense.LabelDetection is not null)
{
Console.WriteLine(expense.LabelDetection.Text);
}
if (expense.ValueDetection is not null)
{
Console.WriteLine(expense.ValueDetection.Text);
}
}
}
}
}
}
```
------
1. Run the example. The Python and Java examples display the document image with the following colored bounding boxes:
+ Red – KEY Block objects
+ Green – VALUE Block objects
+ Blue – TABLE Block objects
+ Yellow – CELL Block objects
Selection elements that are selected are filled with blue.
The AWS CLI example displays only the JSON output for the `AnalyzeDocument` operation.
## Analyzing Invoices and Receipts with Amazon Textract
To analyze invoice and receipt documents, use the AnalyzeExpense API operations and pass a document file as input. `AnalyzeExpense` is a synchronous operation that returns a JSON structure that contains the analyzed text. For more information, see [Analyzing Invoices and Receipts](#invoices-receipts).
To analyze invoice and receipts asynchronously, use `StartExpenseAnalysis` to start processing an input document file and use `GetExpenseAnalysis` to get the results.
You can provide an input document as an image byte array (base64-encoded image bytes), or as an Amazon S3 object. In this procedure, you upload an image file to your S3 bucket and specify the file name.
**To analyze an invoice or receipt (API)**
1. If you haven't already:
1. Give a user the `AmazonTextractFullAccess` and `AmazonS3ReadOnlyAccess` permissions. For more information, see [Step 1: Set Up an AWS Account and Create a User](#setting-up).
1. Install and configure the AWS CLI and the AWS SDKs. For more information, see [Step 2: Set Up the AWS CLI and AWS SDKs](#setup-awscli-sdk).
1. Upload an image that contains a document to your S3 bucket.
For instructions, see [Uploading Objects into Amazon S3](https://docs.aws.amazon.com/AmazonS3/latest/userguide/UploadingObjectsintoAmazonS3.html) in the *Amazon Simple Storage Service User Guide*.
1. Use the following examples to call the `AnalyzeExpense` operation.
------
#### [ AWS CLI ]
This AWS CLI command displays the JSON output for the `analyze-expense` CLI operation.
Replace the values of `Bucket` and `Name` with the names of the Amazon S3 bucket and document that you used in step 2. Replace `profile-name` with the name of a profile that can assume the role and `region` with the region in which you want to run the code.
```
aws textract analyze-expense \
--document '{"S3Object": {"Bucket": "{{bucket}}","Name": "{{object}}"}}' \
--profile {{profile-name}} \
--region {{region}}
```
------
#### [ Python ]
The following example code displays the document and boxes around detected items.
In the function `main`, replace the values of `bucket` and `document` with the names of the Amazon S3 bucket and document that you used in step 2. Replace `profile-name` with the name of a profile that can assume the role and `region` with the region in which you want to run the code.
```
import boto3
import io
from PIL import Image, ImageDraw
def draw_bounding_box(key, val, width, height, draw):
# If a key is Geometry, draw the bounding box info in it
if "Geometry" in key:
# Draw bounding box information
box = val["BoundingBox"]
left = width * box['Left']
top = height * box['Top']
draw.rectangle([left, top, left + (width * box['Width']), top + (height * box['Height'])],
outline='black')
# Takes a field as an argument and prints out the detected labels and values
def print_labels_and_values(field):
# Only if labels are detected and returned
if "LabelDetection" in field:
print("Summary Label Detection - Confidence: {}".format(
str(field.get("LabelDetection")["Confidence"])) + ", "
+ "Summary Values: {}".format(str(field.get("LabelDetection")["Text"])))
print(field.get("LabelDetection")["Geometry"])
else:
print("Label Detection - No labels returned.")
if "ValueDetection" in field:
print("Summary Value Detection - Confidence: {}".format(
str(field.get("ValueDetection")["Confidence"])) + ", "
+ "Summary Values: {}".format(str(field.get("ValueDetection")["Text"])))
print(field.get("ValueDetection")["Geometry"])
else:
print("Value Detection - No values returned")
def process_expense_analysis(s3_connection, client, bucket, document):
# Get the document from S3
s3_object = s3_connection.Object(bucket, document)
s3_response = s3_object.get()
# opening binary stream using an in-memory bytes buffer
stream = io.BytesIO(s3_response['Body'].read())
# loading stream into image
image = Image.open(stream)
# Analyze document
# process using S3 object
response = client.analyze_expense(
Document={'S3Object': {'Bucket': bucket, 'Name': document}})
# Set width and height to display image and draw bounding boxes
# Create drawing object
width, height = image.size
draw = ImageDraw.Draw(image)
for expense_doc in response["ExpenseDocuments"]:
for line_item_group in expense_doc["LineItemGroups"]:
for line_items in line_item_group["LineItems"]:
for expense_fields in line_items["LineItemExpenseFields"]:
print_labels_and_values(expense_fields)
print()
print("Summary:")
for summary_field in expense_doc["SummaryFields"]:
print_labels_and_values(summary_field)
print()
#For draw bounding boxes
for line_item_group in expense_doc["LineItemGroups"]:
for line_items in line_item_group["LineItems"]:
for expense_fields in line_items["LineItemExpenseFields"]:
for key, val in expense_fields["ValueDetection"].items():
if "Geometry" in key:
draw_bounding_box(key, val, width, height, draw)
for label in expense_doc["SummaryFields"]:
if "LabelDetection" in label:
for key, val in label["LabelDetection"].items():
draw_bounding_box(key, val, width, height, draw)
# Display the image
image.show()
def main():
session = boto3.Session(profile_name='profile-name')
s3_connection = session.resource('s3')
client = session.client('textract', region_name='region')
bucket = 'bucket'
document = 'document'
process_expense_analysis(s3_connection, client, bucket, document)
if __name__ == "__main__":
main()
```
------
#### [ Java ]
The following example code displays the document and boxes around detected items.
In the function `main`, replace the values of `bucket` and `document` with the names of the Amazon S3 bucket and document image that you used in step 2.
```
package com.amazonaws.samples;
import java.awt.*;
import java.awt.image.BufferedImage;
import java.io.ByteArrayInputStream;
import java.io.IOException;
import java.util.List;
import java.util.concurrent.CompletableFuture;
import javax.imageio.ImageIO;
import javax.swing.*;
import software.amazon.awssdk.auth.credentials.AwsBasicCredentials;
import software.amazon.awssdk.auth.credentials.StaticCredentialsProvider;
import software.amazon.awssdk.core.ResponseBytes;
import software.amazon.awssdk.core.async.AsyncResponseTransformer;
import software.amazon.awssdk.regions.Region;
import software.amazon.awssdk.services.s3.*;
import software.amazon.awssdk.services.s3.model.GetObjectRequest;
import software.amazon.awssdk.services.s3.model.GetObjectResponse;
import software.amazon.awssdk.services.textract.TextractClient;
import software.amazon.awssdk.services.textract.model.AnalyzeExpenseRequest;
import software.amazon.awssdk.services.textract.model.AnalyzeExpenseResponse;
import software.amazon.awssdk.services.textract.model.BoundingBox;
import software.amazon.awssdk.services.textract.model.Document;
import software.amazon.awssdk.services.textract.model.ExpenseDocument;
import software.amazon.awssdk.services.textract.model.ExpenseField;
import software.amazon.awssdk.services.textract.model.LineItemFields;
import software.amazon.awssdk.services.textract.model.LineItemGroup;
import software.amazon.awssdk.services.textract.model.S3Object;
import software.amazon.awssdk.services.textract.model.Point;
/**
*
* Demo code to parse Textract AnalyzeExpense API
*
*/
public class TextractAnalyzeExpenseSample extends JPanel {
private static final long serialVersionUID = 1L;
BufferedImage image;
static AnalyzeExpenseResponse result;
public TextractAnalyzeExpenseSample(AnalyzeExpenseResponse documentResult, BufferedImage bufImage) throws Exception {
super();
result = documentResult; // Results of analyzeexpense summaryfields and lineitemgroups detection.
image = bufImage; // The image containing the document.
}
// Draws the image and text bounding box.
public void paintComponent(Graphics g) {
Graphics2D g2d = (Graphics2D) g; // Create a Java2D version of g.
// Draw the image.
g2d.drawImage(image, 0, 0, image.getWidth(this), image.getHeight(this), this);
// Iterate through summaryfields and lineitemgroups and display boundedboxes around lines of detected label and value.
List expenseDocuments = result.expenseDocuments();
for (ExpenseDocument expenseDocument : expenseDocuments) {
if (expenseDocument.hasSummaryFields()) {
DisplayAnalyzeExpenseSummaryInfo(expenseDocument);
List summaryfields = expenseDocument.summaryFields();
for (ExpenseField summaryfield : summaryfields) {
if (summaryfield.valueDetection() != null) {
ShowBoundingBox(image.getHeight(this), image.getWidth(this),
summaryfield.valueDetection().geometry().boundingBox(), g2d, new Color(0, 0, 0));
}
if (summaryfield.labelDetection() != null) {
ShowBoundingBox(image.getHeight(this), image.getWidth(this),
summaryfield.labelDetection().geometry().boundingBox(), g2d, new Color(0, 0, 0));
}
}
}
if (expenseDocument.hasLineItemGroups()) {
DisplayAnalyzeExpenseLineItemGroupsInfo(expenseDocument);
List lineitemgroups = expenseDocument.lineItemGroups();
for (LineItemGroup lineitemgroup : lineitemgroups) {
if (lineitemgroup.hasLineItems()) {
List lineItems = lineitemgroup.lineItems();
for (LineItemFields lineitemfield : lineItems) {
if (lineitemfield.hasLineItemExpenseFields()) {
List expensefields = lineitemfield.lineItemExpenseFields();
for (ExpenseField expensefield : expensefields) {
if (expensefield.valueDetection() != null) {
ShowBoundingBox(image.getHeight(this), image.getWidth(this),
expensefield.valueDetection().geometry().boundingBox(), g2d,
new Color(0, 0, 0));
}
if (expensefield.labelDetection() != null) {
ShowBoundingBox(image.getHeight(this), image.getWidth(this),
expensefield.labelDetection().geometry().boundingBox(), g2d,
new Color(0, 0, 0));
}
}
}
}
}
}
}
}
}
// Show bounding box at supplied location.
private void ShowBoundingBox(float imageHeight, float imageWidth, BoundingBox box, Graphics2D g2d, Color color) {
float left = imageWidth * box.left();
float top = imageHeight * box.top();
// Display bounding box.
g2d.setColor(color);
g2d.drawRect(Math.round(left), Math.round(top), Math.round(imageWidth * box.width()),
Math.round(imageHeight * box.height()));
}
private void ShowSelectedElement(float imageHeight, float imageWidth, BoundingBox box, Graphics2D g2d,
Color color) {
float left = (float) imageWidth * (float) box.left();
float top = (float) imageHeight * (float) box.top();
System.out.println(left);
System.out.println(top);
// Display bounding box.
g2d.setColor(color);
g2d.fillRect(Math.round(left), Math.round(top), Math.round(imageWidth * box.width()),
Math.round(imageHeight * box.height()));
}
// Shows polygon at supplied location
private void ShowPolygon(int imageHeight, int imageWidth, List points, Graphics2D g2d) {
g2d.setColor(new Color(0, 0, 0));
Polygon polygon = new Polygon();
// Construct polygon and display
for (Point point : points) {
polygon.addPoint((Math.round(point.x() * imageWidth)), Math.round(point.y() * imageHeight));
}
g2d.drawPolygon(polygon);
}
private void DisplayAnalyzeExpenseSummaryInfo(ExpenseDocument expensedocument) {
System.out.println(" ExpenseId : " + expensedocument.expenseIndex());
System.out.println(" Expense Summary information:");
if (expensedocument.hasSummaryFields()) {
List summaryfields = expensedocument.summaryFields();
for (ExpenseField summaryfield : summaryfields) {
System.out.println(" Page: " + summaryfield.pageNumber());
if (summaryfield.type() != null) {
System.out.println(" Expense Summary Field Type:" + summaryfield.type().text());
}
if (summaryfield.labelDetection() != null) {
System.out.println(" Expense Summary Field Label:" + summaryfield.labelDetection().text());
System.out.println(" Geometry");
System.out.println(" Bounding Box: "
+ summaryfield.labelDetection().geometry().boundingBox().toString());
System.out.println(
" Polygon: " + summaryfield.labelDetection().geometry().polygon().toString());
}
if (summaryfield.valueDetection() != null) {
System.out.println(" Expense Summary Field Value:" + summaryfield.valueDetection().text());
System.out.println(" Geometry");
System.out.println(" Bounding Box: "
+ summaryfield.valueDetection().geometry().boundingBox().toString());
System.out.println(
" Polygon: " + summaryfield.valueDetection().geometry().polygon().toString());
}
}
}
}
private void DisplayAnalyzeExpenseLineItemGroupsInfo(ExpenseDocument expensedocument) {
System.out.println(" ExpenseId : " + expensedocument.expenseIndex());
System.out.println(" Expense LineItemGroups information:");
if (expensedocument.hasLineItemGroups()) {
List lineitemgroups = expensedocument.lineItemGroups();
for (LineItemGroup lineitemgroup : lineitemgroups) {
System.out.println(" Expense LineItemGroupsIndexID :" + lineitemgroup.lineItemGroupIndex());
if (lineitemgroup.hasLineItems()) {
List lineItems = lineitemgroup.lineItems();
for (LineItemFields lineitemfield : lineItems) {
if (lineitemfield.hasLineItemExpenseFields()) {
List expensefields = lineitemfield.lineItemExpenseFields();
for (ExpenseField expensefield : expensefields) {
if (expensefield.type() != null) {
System.out.println(" Expense LineItem Field Type:" + expensefield.type().text());
}
if (expensefield.valueDetection() != null) {
System.out.println(
" Expense Summary Field Value:" + expensefield.valueDetection().text());
System.out.println(" Geometry");
System.out.println(" Bounding Box: "
+ expensefield.valueDetection().geometry().boundingBox().toString());
System.out.println(" Polygon: "
+ expensefield.valueDetection().geometry().polygon().toString());
}
if (expensefield.labelDetection() != null) {
System.out.println(
" Expense LineItem Field Label:" + expensefield.labelDetection().text());
System.out.println(" Geometry");
System.out.println(" Bounding Box: "
+ expensefield.labelDetection().geometry().boundingBox().toString());
System.out.println(" Polygon: "
+ expensefield.labelDetection().geometry().polygon().toString());
}
}
}
}
}
}
}
}
public static void main(String arg[]) throws Exception {
// Creates a default async client with credentials and AWS Region loaded from
// the
// environment
S3AsyncClient client = S3AsyncClient.builder().region(Region.US_EAST_1).build();
System.out.println("Creating the S3 Client");
// Start the call to Amazon S3, not blocking to wait for the result
CompletableFuture> responseFuture = client.getObject(
GetObjectRequest.builder().bucket("textractanalyzeexpense").key("input/sample-receipt.jpg").build(),
AsyncResponseTransformer.toBytes());
System.out.println("Successfully read the object");
// When future is complete (either successfully or in error), handle the
// response
CompletableFuture> operationCompleteFuture = responseFuture
.whenComplete((getObjectResponse, exception) -> {
if (getObjectResponse != null) {
// At this point, the file my-file.out has been created with the data
// from S3; let's just print the object version
// Convert this into Async call and remove the below block from here and put it
// outside
TextractClient textractclient = TextractClient.builder().region(Region.US_EAST_1).build();
AnalyzeExpenseRequest request = AnalyzeExpenseRequest.builder()
.document(
Document.builder().s3Object(S3Object.builder().name("YOURObjectName")
.bucket("YOURBucket").build()).build())
.build();
AnalyzeExpenseResponse result = textractclient.analyzeExpense(request);
System.out.print(result.toString());
ByteArrayInputStream bais = new ByteArrayInputStream(getObjectResponse.asByteArray());
try {
BufferedImage image = ImageIO.read(bais);
System.out.println("Successfully read the image");
JFrame frame = new JFrame("Expense Image");
frame.setDefaultCloseOperation(JFrame.EXIT_ON_CLOSE);
TextractAnalyzeExpense panel = new TextractAnalyzeExpense(result, image);
panel.setPreferredSize(new Dimension(image.getWidth(), image.getHeight()));
frame.setContentPane(panel);
frame.pack();
frame.setVisible(true);
} catch (IOException e) {
throw new RuntimeException(e);
} catch (Exception e) {
// TODO Auto-generated catch block
e.printStackTrace();
}
} else {
// Handle the error
exception.printStackTrace();
}
});
// We could do other work while waiting for the AWS call to complete in
// the background, but we'll just wait for "whenComplete" to finish instead
operationCompleteFuture.join();
}
}
```
------
#### [ Node.js ]
The following example code displays the document and boxes around detected items.
In the function `main`, replace the values of `bucket` and `photo` with the names of the Amazon S3 bucket and document that you used in step 2. Replace `profileName` with the name of a profile that can assume the role and `region` with the region in which you want to run the code.
```
// Import required AWS SDK clients and commands for Node.js
import { AnalyzeExpenseCommand } from "@aws-sdk/client-textract";
import { TextractClient } from "@aws-sdk/client-textract";
import {fromIni} from '@aws-sdk/credential-providers';
// Set the AWS Region.
const REGION = "region-name"; //e.g. "us-east-1"
const profileName = "profile-name";
// Create SNS service object.
const textractClient = new TextractClient({region: REGION,
credentials: fromIni({profile: profileName,}),
});
const bucket = 'bucket-name'
const photo = 'photo-name'
// Set params
const params = {
Document: {
S3Object: {
Bucket: bucket,
Name: photo
},
},
}
const process_text_detection = async () => {
try {
const aExpense = new AnalyzeExpenseCommand(params);
const response = await textractClient.send(aExpense);
//console.log(response)
response.ExpenseDocuments.forEach(doc => {
doc.LineItemGroups.forEach(items => {
items.LineItems.forEach(fields => {
fields.LineItemExpenseFields.forEach(expenseFields =>{
console.log(expenseFields)
})
}
)}
)
}
)
return response; // For unit tests.
} catch (err) {
console.log("Error", err);
}
}
process_text_detection()
```
------
1. This will provide you with the JSON output for the `AnalyzeExpense` operation.
## Analyzing Identity Documentation with Amazon Textract
To analyze identity documents, you use the AnalyzeID API operation, and pass a document file as input. `AnalyzeID` returns a JSON structure that contains the analyzed text. For more information, see [Analyzing Identity Documents](#how-it-works-identity).
You can provide an input document as an image byte array (base64-encoded image bytes), or as an Amazon S3 object. In this procedure, you upload an image file to your S3 bucket and specify the file name.
**To analyze an identity document (API)**
1. If you haven't already:
1. Give a user the `AmazonTextractFullAccess` and `AmazonS3ReadOnlyAccess` permissions. For more information, see [Step 1: Set Up an AWS Account and Create a User](#setting-up).
1. Install and configure the AWS CLI and the AWS SDKs. For more information, see [Step 2: Set Up the AWS CLI and AWS SDKs](#setup-awscli-sdk).
1. Upload an image that contains a document to your S3 bucket.
For instructions, see [Uploading Objects into Amazon S3](https://docs.aws.amazon.com/AmazonS3/latest/userguide/UploadingObjectsintoAmazonS3.html) in the *Amazon Simple Storage Service User Guide*.
1. Use the following examples to call the `AnalyzeID` operation.
------
#### [ AWS CLI ]
The following example takes in an input file from an S3 bucket and runs the `AnalyzeID` operation on it. In the following code, replace the value of `Bucket` with the name of your S3 bucket and the value of `Name` with the name of the file in your bucket. Replace `profile-name` with the name of a profile that can assume the role and `region` with the region in which you want to run the code.
```
aws textract analyze-id \
--document-pages '{"S3Object":{"Bucket":"{{bucket}}","Name":"{{name}}"}}' \
--profile {{profile-name}} \
--region {{region}}
```
You can also call the API with the front and back of a driver's license by adding another Amazon S3 object to the input.
```
aws textract analyze-id \
--document-pages '[{"S3Object":{"Bucket":"{{bucket}}","Name":"{{name front}}"}}, {"S3Object":{"Bucket":"{{bucket}}","Name":"{{name back}}"}}]' \
--profile {{profile-name}} \
--region {{region}}
```
If you are accessing the CLI on a Windows device, use double quotes instead of single quotes and escape the inner double quotes by backslash (\\) to address any parser errors you might encounter. For an example, see the following:
```
aws textract analyze-id --document-pages "[{\"S3Object\":{\"Bucket\":\"{{bucket}}\",\"Name\":\"{{name}}\"}}]" --region {{region}}
```
------
#### [ Python ]
The following example takes in an input file from an S3 bucket and runs the `AnalyzeID` operation on it, returning the detected key-value pairs. In the following code, replace the value of `bucket_name` with the name of your S3 bucket and the value of `file_name` with the name of the file in your bucket. Replace `profile-name` with the name of a profile that can assume the role and `region` with the region in which you want to run the code.
```
import boto3
def analyze_id(client, bucket_name, file_name):
# Analyze document
# process using S3 object
response = client.analyze_id(
DocumentPages=[{'S3Object': {'Bucket': bucket_name, 'Name': file_name}}])
for doc_fields in response['IdentityDocuments']:
for id_field in doc_fields['IdentityDocumentFields']:
for key, val in id_field.items():
if "Type" in str(key):
print("Type: " + str(val['Text']))
for key, val in id_field.items():
if "ValueDetection" in str(key):
print("Value Detection: " + str(val['Text']))
print()
def main():
session = boto3.Session(profile_name='profile-name')
client = session.client('textract', region_name='region')
bucket_name = "bucket"
file_name = "file"
analyze_id(client, bucket_name, file_name)
if __name__ == "__main__":
main()
```
------
#### [ Java ]
The following example takes in an input file from an S3 bucket and runs the `AnalyzeID` operation on it, returning the detected data. In the function main, replace the values of `s3bucket` and `sourceDoc` with the names of the Amazon S3 bucket and document image that you used in step 2. Replace the value of `credentialsProvider` with the name of your developer profile.
```
/*
Copyright Amazon.com, Inc. or its affiliates. All Rights Reserved.
SPDX-License-Identifier: Apache-2.0
*/
package com.amazonaws.samples;
import com.amazonaws.auth.profile.ProfileCredentialsProvider;
import com.amazonaws.regions.Regions;
import com.amazonaws.services.textract.AmazonTextractClient;
import com.amazonaws.services.textract.AmazonTextractClientBuilder;
import com.amazonaws.services.textract.model.*;
import java.util.ArrayList;
import java.util.List;
public class AppTest1 {
public static void main(String[] args) {
final String USAGE = "\n" +
"Usage:\n" +
" \n\n" +
"Where:\n" +
" s3bucket - the Amazon S3 bucket where the document is located. \n" +
" sourceDoc - the name of the document. \n";
if (args.length != 1) {
System.out.println(USAGE);
System.exit(1);
}
// set provider credentials
AWSCredentialsProvider credentialsProvider = new ProfileCredentialsProvider("default");
String s3bucket = "bucket-name"; //args[0];
String sourceDoc = "sourcedoc-name"; //args[1];
AmazonTextractClient textractClient = (AmazonTextractClient) AmazonTextractClientBuilder.standard().withCredentials(credentialsProvider)
.withRegion(Regions.US_EAST_1)
.build();
getDocDetails(textractClient, s3bucket, sourceDoc);
}
public static void getDocDetails(AmazonTextractClient textractClient, String s3bucket, String sourceDoc ) {
try {
S3Object s3 = new S3Object();
s3.setBucket(s3bucket);
s3.setName(sourceDoc);
com.amazonaws.services.textract.model.Document myDoc = new com.amazonaws.services.textract.model.Document();
myDoc.setS3Object(s3);
List list1 = new ArrayList();
list1.add(myDoc);
AnalyzeIDRequest idRequest = new AnalyzeIDRequest();
idRequest.setDocumentPages(list1);
AnalyzeIDResult result = textractClient.analyzeID(idRequest);
List docs = result.getIdentityDocuments();
for (IdentityDocument doc: docs) {
ListidFields = doc.getIdentityDocumentFields();
for (IdentityDocumentField field: idFields) {
System.out.println("Field type is "+ field.getType().getText());
System.out.println("Field value is "+ field.getValueDetection().getText());
}
}
} catch (Exception e) {
e.printStackTrace();
}
}
}
```
------
#### [ Java V2 ]
The following example takes in an input file from an S3 bucket and runs the `AnalyzeID` operation on it, returning the detected data. In the function main, replace the values of `s3bucket` and `sourceDoc` with the names of the S3 bucket and document image that you used in step 2.
Replace `profile-name` in the line that creates the `TextractClient` with the name of your developer profile.
```
import software.amazon.awssdk.auth.credentials.ProfileCredentialsProvider;
import software.amazon.awssdk.core.SdkBytes;
import software.amazon.awssdk.regions.Region;
import software.amazon.awssdk.services.textract.TextractClient;
import software.amazon.awssdk.services.textract.model.*;
import java.io.File;
import java.io.FileInputStream;
import java.io.FileNotFoundException;
import java.io.InputStream;
import java.util.ArrayList;
import java.util.Iterator;
import java.util.List;
// snippet-end:[textract.java2._analyze_doc.import]
import java.util.Optional;
import org.json.JSONObject;
/**
* Before running this Java V2 code example, set up your development environment, including your credentials.
*
* For more information, see the following documentation topic:
*
* https://docs.aws.amazon.com/sdk-for-java/latest/developer-guide/get-started.html
*/
public class DetectCelebrityVideo {
public static void main(String[] args) {
final String usage = "\n" +
"Usage:\n" +
" \n\n" +
"Where:\n" +
" bucketName - The name of the Amazon S3 bucket that contains the document. \n\n" +
" docName - The document name (must be an image, i.e., book.png). \n";
if (args.length != 2) {
System.out.println(usage);
System.exit(1);
}
String bucketName = args[0];
String docName = args[1];
Region region = Region.US_WEST_2;
TextractClient textractClient = TextractClient.builder()
.region(region)
.credentialsProvider(ProfileCredentialsProvider.create("default"))
.build();
analyzeID(textractClient, bucketName, docName);
textractClient.close();
}
// snippet-start:[textract.java2._analyze_doc.main]
public static void analyzeID(TextractClient textractClient, String bucketName, String docName) {
try {
S3Object s3Object = S3Object.builder()
.bucket(bucketName)
.name(docName)
.build();
// Create a Document object and reference the s3Object instance
Document myDoc = Document.builder()
.s3Object(s3Object)
.build();
AnalyzeIdRequest analyzeIdRequest = AnalyzeIdRequest.builder()
.documentPages(myDoc).build();
AnalyzeIdResponse analyzeId = textractClient.analyzeID(analyzeIdRequest);
// System.out.println(analyzeExpense.toString());
List Docs = analyzeId.identityDocuments();
for (IdentityDocument doc: Docs) {
System.out.println(doc);
}
} catch (TextractException e) {
System.err.println(e.getMessage());
System.exit(1);
}
}
// snippet-end:[textract.java2._analyze_doc.main]
}
```
------
1. This will provide you with the JSON output for the `AnalyzeID` operation.
# Processing Documents Asynchronously
You can use Amazon Textract to detect and analyze text in multipage documents in PDF or TIFF format, including invoices and receipts. Multipage document processing is an asynchronous operation, and it is useful for processing large, multipage documents. For example, a PDF file with over 1,000 pages takes a long time to process, but processing the PDF file asynchronously allows your application to complete other tasks while the operation completes.
This section describes how you can use Amazon Textract to asynchronously detect and analyze text on a multipage or single-page document. Multipage documents must be in PDF or TIFF format. Single-page documents processed with asynchronous operations can be in JPEG, PNG, TIFF or PDF format.
You can use Amazon Textract asynchronous operations for the following purposes:
+ Text detection – You can detect lines and words on a multipage document. The asynchronous operations are [StartDocumentTextDetection](https://docs.aws.amazon.com/textract/latest/APIReference/API_StartDocumentTextDetection.html) and [GetDocumentTextDetection](https://docs.aws.amazon.com/textract/latest/APIReference/API_GetDocumentTextDetection.html). For more information, see [Detecting Text](#how-it-works-detecting).
+ Text analysis – You can identify relationships between detected text on a multipage document. The asynchronous operations are [StartDocumentAnalysis](https://docs.aws.amazon.com/textract/latest/APIReference/API_StartDocumentAnalysis.html) and [GetDocumentAnalysis](https://docs.aws.amazon.com/textract/latest/APIReference/API_GetDocumentAnalysis.html). For more information, see [Analyzing Documents](#how-it-works-analyzing).
+ Expense analysis – You can identify data relationships on multipage invoices and receipts. Amazon Textract treats each invoice or a receipt page of a multi-page document as an individual receipt or an invoice. It does not retain the context from one page to another of a multi-page document. The asynchronous operations are [StartExpenseAnalysis](https://docs.aws.amazon.com/textract/latest/APIReference/API_StartExpenseAnalysis.html) and [GetExpenseAnalysis](https://docs.aws.amazon.com/textract/latest/APIReference/API_GetExpenseAnalysis.html). For more information, see [Analyzing Invoices and Receipts](#invoices-receipts).
+ Lending document analysis – You can classify and analyze lending documents using the Analyze Lending workflow, which classifies documents and then automatically sends the documents to the proper Amazon Textract operation for information extraction. You can start the asynchronous analysis of lending documents with `StartLendingAnalysis`, and retrieve the extracted information with `GetLendingAnalysis` or get a summary of the information with `GetLendingAnalysisSummary`. Analyze Lending returns the relevant information extracted from the documents, including detected signatures. You can also get the different types of documents in the submitted package, split by the logical boundaries for a given document type, if you use the `OutputConfig` feature.
**Topics**
+ [Calling Amazon Textract Asynchronous Operations](#api-async)
+ [Configuring Amazon Textract for Asynchronous Operations](#api-async-roles)
+ [Detecting or Analyzing Text in a Multipage Document](#async-analyzing-with-sqs)
+ [Using the Analyze Lending Workflow](#async-using-lending)
+ [Amazon Textract Results Notification](#async-notification-payload)
## Calling Amazon Textract Asynchronous Operations
Amazon Textract provides an asynchronous API that you can use to process multipage documents in PDF or TIFF format. You can also use asynchronous operations to process single-page documents that are in JPEG, PNG, TIFF, or PDF format.
The information in this topic uses text detection operations to show how you to use Amazon Textract asynchronous operations. You can use the same approach with the text analysis operations of [StartDocumentAnalysis](https://docs.aws.amazon.com/textract/latest/APIReference/API_StartDocumentAnalysis.html) and [GetDocumentAnalysis](https://docs.aws.amazon.com/textract/latest/APIReference/API_GetDocumentAnalysis.html). It also works the same with [StartExpenseAnalysis](https://docs.aws.amazon.com/textract/latest/APIReference/API_StartExpenseAnalysis.html) and [GetExpenseAnalysis](https://docs.aws.amazon.com/textract/latest/APIReference/API_GetExpenseAnalysis.html).
For an example, see [Detecting or Analyzing Text in a Multipage Document](#async-analyzing-with-sqs).
If you are analyzing lending documents, you can use the `StartLendingAnalysis` operation to classify document pages and send the classified pages to an Amazon Textract analysis operation. The pages are routed to analysis operations depending on their assigned class.
You can retreive results for individual pages by using the `GetLendingAnalysis` operation, or retrieve a summary of the analysis with `GetLendingAnalysisSummary`.
Amazon Textract asynchronously processes a document stored in an Amazon S3 bucket. You start processing by calling a `Start` operation, such as [StartDocumentTextDetection](https://docs.aws.amazon.com/textract/latest/APIReference/API_StartDocumentTextDetection.html). The completion status of the request is published to an Amazon Simple Notification Service (Amazon SNS) topic. To get the completion status from the Amazon SNS topic, you can use an Amazon Simple Queue Service (Amazon SQS) queue or an AWS Lambda function. After you have the completion status, you call a `Get` operation, such as [GetDocumentTextDetection](https://docs.aws.amazon.com/textract/latest/APIReference/API_GetDocumentTextDetection.html), to get the results of the request.
Results of asynchronous calls are encrypted and stored for 7 days in a Amazon Textract owned bucket by default, unless you specify an Amazon S3 bucket using an operation's `OutputConfig` argument. For information on how to let Amazon Textract send encrypted documents to your Amazon S3 bucket, see [Permissions for Output Configuration](#async-output-config).
The following table shows the corresponding Start and Get operations for the different types of asynchronous processing supported by Amazon Textract:
**Start/Get API Operations for Amazon Textract Asynchronous Operations**
| Processing Type | Start API | Get API |
| --- | --- | --- |
| Text Detection | StartDocumentTextDetection | GetDocumentTextDetection |
| Text Analysis | StartDocumentAnalysis | GetDocumentAnalysis |
| Expense Analysis | StartExpenseAnalysis | GetExpenseAnalysis |
| Lending Analysis | StartLendingAnalysis | GetLendingAnalysis, GetLendingAnalysisSummary |
For an example that uses AWS Lambda functions, see [Large scale document processing with Amazon Textract](https://github.com/aws-samples/amazon-textract-serverless-large-scale-document-processing).
The following diagram shows the process for detecting document text in a document image stored in an Amazon S3 bucket. In the diagram, an Amazon SQS queue gets the completion status from the Amazon SNS topic.

The process displayed by the preceeding diagram is the same for analyzing text and invoices/receipts. You start analyzing text by calling [StartDocumentAnalysis](https://docs.aws.amazon.com/textract/latest/APIReference/API_StartDocumentAnalysis.html) and start analyzing invoices/receipts by calling [StartExpenseAnalysis](https://docs.aws.amazon.com/textract/latest/APIReference/API_StartExpenseAnalysis.html) You get the results by calling [GetDocumentAnalysis](https://docs.aws.amazon.com/textract/latest/APIReference/API_GetDocumentAnalysis.html) or [GetExpenseAnalysis](https://docs.aws.amazon.com/textract/latest/APIReference/API_GetExpenseAnalysis.html) respectively.
### Starting Text Detection
You start an Amazon Textract text detection request by calling [StartDocumentTextDetection](https://docs.aws.amazon.com/textract/latest/APIReference/API_StartDocumentTextDetection.html). The following is an example of a JSON request that's passed by `StartDocumentTextDetection`.
```
{
"DocumentLocation": {
"S3Object": {
"Bucket": "bucket",
"Name": "image.pdf"
}
},
"ClientRequestToken": "DocumentDetectionToken",
"NotificationChannel": {
"SNSTopicArn": "arn:aws:sns:us-east-1:nnnnnnnnnn:topic",
"RoleArn": "arn:aws:iam::nnnnnnnnnn:role/roleTopic"
},
"JobTag": "Receipt"
}
```
The input parameter `DocumentLocation` provides the document file name and the Amazon S3 bucket to retrieve it from. `NotificationChannel` contains the Amazon Resource Name (ARN) of the Amazon SNS topic that Amazon Textract notifies when the text detection request finishes. The Amazon SNS topic must be in the same AWS Region as the Amazon Textract endpoint that you're calling. `NotificationChannel` also contains the ARN for a role that allows Amazon Textract to publish to the Amazon SNS topic. You give Amazon Textract publishing permissions to your Amazon SNS topics by creating an IAM service role. For more information, see [Configuring Amazon Textract for Asynchronous Operations](#api-async-roles).
You can also specify an optional input parameter, `JobTag`, that enables you to identify the job, or groups of jobs, in the completion status that's published to the Amazon SNS topic. For example, you can use `JobTag` to identify the type of document being processed, such as a tax form or receipt.
To prevent accidental duplication of analysis jobs, you can optionally provide an idempotent token, `ClientRequestToken`. If you supply a value for `ClientRequestToken`, the `Start` operation returns the same `JobId` for multiple identical calls to the `Start` operation, such as `StartDocumentTextDetection`. A `ClientRequestToken` token has a lifetime of 7 days. After 7 days, you can reuse it. If you reuse the token during the token lifetime, the following happens:
+ If you reuse the token with same `Start` operation and the same input parameters, the same `JobId` is returned. The job isn't performed again and Amazon Textract doesn't send a completion status to the registered Amazon SNS topic.
+ If you reuse the token with the same `Start` operation and a minor input parameter change, you get an `idempotentparametermismatchexception` (HTTP status code: 400) exception raised.
+ If you reuse the token with a different `Start` operation, the operation succeeds.
Another optional parameter available is `OutputConfig`, which lets you adjust where your output will be placed. By default, Amazon Textract will store the results internally, and can only be accessed by the Get API operations. With `OutputConfig` enabled, you can set the name of the bucket the output will be sent to, and the file prefix of the results, where you can download your results. Additionally, you can set the `KMSKeyID` parameter to a customer managed key to encrypt your output. Without this parameter set Amazon Textract will encrypt server-side using the AWS managed key for Amazon S3
**Note**
Before using this parameter, ensure you have the PutObject permission for the output bucket. Additionally, ensure you have the Decrypt, ReEncrypt, GenerateDataKey, and DescribeKey permissions for the AWS KMS key if you decide to use it.
The response to the `StartDocumentTextDetection` operation is a job identifier (`JobId`). Use `JobId` to track requests and get the analysis results after Amazon Textract has published the completion status to the Amazon SNS topic. The following is an example:
```
{"JobId":"270c1cc5e1d0ea2fbc59d97cb69a72a5495da75851976b14a1784ca90fc180e3"}
```
If you start too many jobs concurrently, calls to `StartDocumentTextDetection` raise a `LimitExceededException` exception (HTTP status code: 400) until the number of concurrently running jobs is below the Amazon Textract service limit.
If you find that LimitExceededException exceptions are raised with bursts of activity, consider using an Amazon SQS queue to manage incoming requests. Contact AWS Support if you find that your average number of concurrent requests can't be managed by an Amazon SQS queue and you're still receiving `LimitExceededException` exceptions.
### Getting the Completion Status of an Amazon Textract Analysis Request
Amazon Textract sends an analysis completion notification to the registered Amazon SNS topic. The notification includes the job identifier and the completion status of the operation in a JSON string. A successful text detection request has a `SUCCEEDED` status. For example, the following result shows the successful processing of a text detection job.
```
{
"JobId": "642492aea78a86a40665555dc375ee97bc963f342b29cd05030f19bd8fd1bc5f",
"Status": "SUCCEEDED",
"API": "StartDocumentTextDetection",
"JobTag": "Receipt",
"Timestamp": 1543599965969,
"DocumentLocation": {
"S3ObjectName": "document",
"S3Bucket": "bucket"
}
}
```
For more information, see [Amazon Textract Results Notification](#async-notification-payload).
To get the status information published to the Amazon SNS topic by Amazon Textract, use one of the following options:
+ **AWS Lambda** – You can subscribe an AWS Lambda function that you write to an Amazon SNS topic. The function is called when Amazon Textract notifies the Amazon SNS topic that the request has completed. Use a Lambda function if you want server-side code to process the results of a text detection request. For example, you might want to use server-side code to annotate the image or create a report on the detected text before returning the information to a client application.
+ **Amazon SQS** – You can subscribe an Amazon SQS queue to an Amazon SNS topic. You then poll the Amazon SQS queue to retrieve the completion status published by Amazon Textract when a text detection request completes. For more information, see [Detecting or Analyzing Text in a Multipage Document](#async-analyzing-with-sqs). Use an Amazon SQS queue if you want to call Amazon Textract operations only from a client application.
**Important**
We don't recommend getting the request completion status by repeatedly calling the Amazon Textract `Get` operation. This is because Amazon Textract throttles the `Get` operation if too many requests are made. If you're processing multiple documents at the same time, it's simpler and more efficient to monitor one SQS queue for the completion notification than to poll Amazon Textract for the status of each job individually.
If you have configured your account to receive a results notification from an Amazon Simple Notification Service (Amazon SNS) topic or through an Amazon SQS queue, you should ensure that your account is secure by limiting the scope of Amazon Textract's access to just the resources you are using. This can be done by attaching a trust policy to your IAM service role. For information on how to do this, see [Cross-service confused deputy prevention](https://docs.aws.amazon.com/textract/latest/dg/cross-service-confused-deputy-prevention.html).
### Getting Amazon Textract Text Detection Results
To get the results of a text detection request, first ensure that the completion status that's retrieved from the Amazon SNS topic is `SUCCEEDED`. Then call `GetDocumentTextDetection`, which passes the `JobId` value that's returned from `StartDocumentTextDetection`. The request JSON is similar to the following example:
```
{
"JobId": "270c1cc5e1d0ea2fbc59d97cb69a72a5495da75851976b14a1784ca90fc180e3",
"MaxResults": 10,
"SortBy": "TIMESTAMP"
}
```
`JobId` is the identifier for the text detection operation. Because text detection can generate large amounts of data, use `MaxResults` to specify the maximum number of results to return in a single `Get`operation. The default value for `MaxResults` is 1,000. If you specify a value greater than 1,000, only 1,000 results are returned. If the operation doesn't return all of the results, a pagination token for the next page is returned. To get the next page of results, specify the token in the `NextToken` parameter.
**Note**
Results can be retrieved only up to 7 days of job initialization time.
The `GetDocumentTextDetection` operation response JSON is similar to the following. The total number of pages that are detected is returned in `DocumentMetadata`. The detected text is returned in the `Blocks` array. For information about `Block` objects, see [Text Detection and Document Analysis Response Objects](#how-it-works-document-layout).
```
{
"DocumentMetadata": {
"Pages": 1
},
"JobStatus": "SUCCEEDED",
"Blocks": [
{
"BlockType": "PAGE",
"Geometry": {
"BoundingBox": {
"Width": 1.0,
"Height": 1.0,
"Left": 0.0,
"Top": 0.0
},
"Polygon": [
{
"X": 0.0,
"Y": 0.0
},
{
"X": 1.0,
"Y": 0.0
},
{
"X": 1.0,
"Y": 1.0
},
{
"X": 0.0,
"Y": 1.0
}
]
},
"Id": "64533157-c47e-401a-930e-7ca1bb3ac3fa",
"Relationships": [
{
"Type": "CHILD",
"Ids": [
"4297834d-dcb1-413b-8908-3b96866ebbb5",
"1d85ba24-2877-4d09-b8b2-393833d769e9",
"193e9c47-fd87-475a-ba09-3fda210d8784",
"bd8aeb62-961b-4b47-b78a-e4ed9eeecd0f"
]
}
],
"Page": 1
},
{
"BlockType": "LINE",
"Confidence": 53.301639556884766,
"Text": "ellooworio",
"Geometry": {
"BoundingBox": {
"Width": 0.9999999403953552,
"Height": 0.5365243554115295,
"Left": 0.0,
"Top": 0.46347561478614807
},
"Polygon": [
{
"X": 0.0,
"Y": 0.46347561478614807
},
{
"X": 0.9999999403953552,
"Y": 0.46347561478614807
},
{
"X": 0.9999999403953552,
"Y": 1.0
},
{
"X": 0.0,
"Y": 1.0
}
]
},
"Id": "4297834d-dcb1-413b-8908-3b96866ebbb5",
"Relationships": [
{
"Type": "CHILD",
"Ids": [
"170c3eb9-5155-4bec-8c44-173bba537e70"
]
}
],
"Page": 1
},
{
"BlockType": "LINE",
"Confidence": 89.15632629394531,
"Text": "He llo,",
"Geometry": {
"BoundingBox": {
"Width": 0.33642634749412537,
"Height": 0.49159330129623413,
"Left": 0.13885067403316498,
"Top": 0.17169663310050964
},
"Polygon": [
{
"X": 0.13885067403316498,
"Y": 0.17169663310050964
},
{
"X": 0.47527703642845154,
"Y": 0.17169663310050964
},
{
"X": 0.47527703642845154,
"Y": 0.6632899641990662
},
{
"X": 0.13885067403316498,
"Y": 0.6632899641990662
}
]
},
"Id": "1d85ba24-2877-4d09-b8b2-393833d769e9",
"Relationships": [
{
"Type": "CHILD",
"Ids": [
"516ae823-3bab-4f9a-9d74-ad7150d128ab",
"6bcf4ea8-bbe8-4686-91be-b98dd63bc6a6"
]
}
],
"Page": 1
},
{
"BlockType": "LINE",
"Confidence": 82.44834899902344,
"Text": "worlo",
"Geometry": {
"BoundingBox": {
"Width": 0.33182239532470703,
"Height": 0.3766750991344452,
"Left": 0.5091826915740967,
"Top": 0.23131252825260162
},
"Polygon": [
{
"X": 0.5091826915740967,
"Y": 0.23131252825260162
},
{
"X": 0.8410050868988037,
"Y": 0.23131252825260162
},
{
"X": 0.8410050868988037,
"Y": 0.607987642288208
},
{
"X": 0.5091826915740967,
"Y": 0.607987642288208
}
]
},
"Id": "193e9c47-fd87-475a-ba09-3fda210d8784",
"Relationships": [
{
"Type": "CHILD",
"Ids": [
"ed135c3b-35dd-4085-8f00-26aedab0125f"
]
}
],
"Page": 1
},
{
"BlockType": "LINE",
"Confidence": 88.50325775146484,
"Text": "world",
"Geometry": {
"BoundingBox": {
"Width": 0.35004907846450806,
"Height": 0.19635874032974243,
"Left": 0.527581512928009,
"Top": 0.30100569128990173
},
"Polygon": [
{
"X": 0.527581512928009,
"Y": 0.30100569128990173
},
{
"X": 0.8776305913925171,
"Y": 0.30100569128990173
},
{
"X": 0.8776305913925171,
"Y": 0.49736443161964417
},
{
"X": 0.527581512928009,
"Y": 0.49736443161964417
}
]
},
"Id": "bd8aeb62-961b-4b47-b78a-e4ed9eeecd0f",
"Relationships": [
{
"Type": "CHILD",
"Ids": [
"9e28834d-798e-4a62-8862-a837dfd895a6"
]
}
],
"Page": 1
},
{
"BlockType": "WORD",
"Confidence": 53.301639556884766,
"Text": "ellooworio",
"Geometry": {
"BoundingBox": {
"Width": 1.0,
"Height": 0.5365243554115295,
"Left": 0.0,
"Top": 0.46347561478614807
},
"Polygon": [
{
"X": 0.0,
"Y": 0.46347561478614807
},
{
"X": 1.0,
"Y": 0.46347561478614807
},
{
"X": 1.0,
"Y": 1.0
},
{
"X": 0.0,
"Y": 1.0
}
]
},
"Id": "170c3eb9-5155-4bec-8c44-173bba537e70",
"Page": 1
},
{
"BlockType": "WORD",
"Confidence": 88.46246337890625,
"Text": "He",
"Geometry": {
"BoundingBox": {
"Width": 0.15350718796253204,
"Height": 0.29955607652664185,
"Left": 0.13885067403316498,
"Top": 0.21856294572353363
},
"Polygon": [
{
"X": 0.13885067403316498,
"Y": 0.21856294572353363
},
{
"X": 0.292357861995697,
"Y": 0.21856294572353363
},
{
"X": 0.292357861995697,
"Y": 0.5181190371513367
},
{
"X": 0.13885067403316498,
"Y": 0.5181190371513367
}
]
},
"Id": "516ae823-3bab-4f9a-9d74-ad7150d128ab",
"Page": 1
},
{
"BlockType": "WORD",
"Confidence": 89.8501968383789,
"Text": "llo,",
"Geometry": {
"BoundingBox": {
"Width": 0.17724157869815826,
"Height": 0.49159327149391174,
"Left": 0.2980354428291321,
"Top": 0.17169663310050964
},
"Polygon": [
{
"X": 0.2980354428291321,
"Y": 0.17169663310050964
},
{
"X": 0.47527703642845154,
"Y": 0.17169663310050964
},
{
"X": 0.47527703642845154,
"Y": 0.6632899045944214
},
{
"X": 0.2980354428291321,
"Y": 0.6632899045944214
}
]
},
"Id": "6bcf4ea8-bbe8-4686-91be-b98dd63bc6a6",
"Page": 1
},
{
"BlockType": "WORD",
"Confidence": 82.44834899902344,
"Text": "worlo",
"Geometry": {
"BoundingBox": {
"Width": 0.33182239532470703,
"Height": 0.3766750991344452,
"Left": 0.5091826915740967,
"Top": 0.23131252825260162
},
"Polygon": [
{
"X": 0.5091826915740967,
"Y": 0.23131252825260162
},
{
"X": 0.8410050868988037,
"Y": 0.23131252825260162
},
{
"X": 0.8410050868988037,
"Y": 0.607987642288208
},
{
"X": 0.5091826915740967,
"Y": 0.607987642288208
}
]
},
"Id": "ed135c3b-35dd-4085-8f00-26aedab0125f",
"Page": 1
},
{
"BlockType": "WORD",
"Confidence": 88.50325775146484,
"Text": "world",
"Geometry": {
"BoundingBox": {
"Width": 0.35004907846450806,
"Height": 0.19635874032974243,
"Left": 0.527581512928009,
"Top": 0.30100569128990173
},
"Polygon": [
{
"X": 0.527581512928009,
"Y": 0.30100569128990173
},
{
"X": 0.8776305913925171,
"Y": 0.30100569128990173
},
{
"X": 0.8776305913925171,
"Y": 0.49736443161964417
},
{
"X": 0.527581512928009,
"Y": 0.49736443161964417
}
]
},
"Id": "9e28834d-798e-4a62-8862-a837dfd895a6",
"Page": 1
}
]
}
```
### Using an adapter
With Amazon Textract, you can use an adapter when calling the [StartDocumentAnalysis](https://docs.aws.amazon.com/textract/latest/APIReference/API_StartDocumentAnalysis.html) operation. To use an adapter, you must first create and train an adapter by using the Amazon Textract console. To apply your adapter, provide its ID when calling the [StartDocumentAnalysis](https://docs.aws.amazon.com/textract/latest/APIReference/API_StartDocumentAnalysis.html) API operation. When calling the [StartDocumentAnalysis](https://docs.aws.amazon.com/textract/latest/APIReference/API_StartDocumentAnalysis.html) operation, you can use up to one adapter per page.
```
"AdaptersConfig": {
"Adapters": [
{
"AdapterId": "2e9bf1c4aa31",
"Version": "1",
"Pages": [ "1" ]
}
]
}
```
## Configuring Amazon Textract for Asynchronous Operations
The following procedures show you how to configure Amazon Textract to use with an Amazon Simple Notification Service (Amazon SNS) topic and an Amazon Simple Queue Service (Amazon SQS) queue.
**Note**
If you're using these instructions to set up the [Detecting or Analyzing Text in a Multipage Document](#async-analyzing-with-sqs) example, you don't need to do steps 3 – 6. The example includes code to create and configure the Amazon SNS topic and Amazon SQS queue.
**To configure Amazon Textract**
1. Set up an AWS account to access Amazon Textract. For more information, see [Step 1: Set Up an AWS Account and Create a User](#setting-up).
Ensure that the user has at least the following permissions:
+ AmazonTextractFullAccess
+ AmazonS3ReadOnlyAccess
+ AmazonSNSFullAccess
+ AmazonSQSFullAccess
Additionally, insure that the user has permission to pass IAM roles to Amazon Textract. This is done through an IAM PassRole policy. A simple example of such a policy is below:
------
#### [ JSON ]
****
```
{
"Version":"2012-10-17",
"Statement": [
{
"Effect": "Allow",
"Action": "iam:PassRole",
"Resource": "*",
"Condition": {
"StringEquals": {"iam:PassedToService": "textract.amazonaws.com"}
}
}
]
}
```
------
1. Install and configure the required AWS SDK. For more information, see [Step 2: Set Up the AWS CLI and AWS SDKs](#setup-awscli-sdk).
1. [Create an Amazon SNS standard topic](https://docs.aws.amazon.com/sns/latest/dg/sns-tutorial-create-topic.html). Prepend the topic name with *AmazonTextract*. Note the topic Amazon Resource Name (ARN). Ensure that the topic is in the same Region as the AWS endpoint that you're using with your AWS account.
1. [Create an Amazon SQS standard queue](https://docs.aws.amazon.com/AWSSimpleQueueService/latest/SQSDeveloperGuide/sqs-create-queue.html) by using the [Amazon SQS console](https://console.aws.amazon.com/sqs/). Note the queue ARN.
1. [Subscribe the queue to the topic](https://docs.aws.amazon.com/AWSSimpleQueueService/latest/SQSDeveloperGuide/sqs-subscribe-queue-sns-topic.html) you created in step 3.
1. [Give permission to the Amazon SNS topic to send messages to the Amazon SQS queue](https://docs.aws.amazon.com/sns/latest/dg/subscribe-sqs-queue-to-sns-topic.html).
1. Create an IAM service role to give Amazon Textract access to your Amazon SNS topics. Note the Amazon Resource Name (ARN) of the service role. For more information, see [Giving Amazon Textract Access to Your Amazon SNS Topic](#api-async-roles-all-topics).
1. [ Add the following inline policy](https://docs.aws.amazon.com/IAM/latest/UserGuide/access_policies_manage-attach-detach.html#embed-inline-policy-console) to the IAM user that you created in step 1.
Give the inline policy a name.
1. You can now run the examples in [Detecting or Analyzing Text in a Multipage Document](#async-analyzing-with-sqs).
### Giving Amazon Textract Access to Your Amazon SNS Topic
Amazon Textract needs permission to send a message to your Amazon SNS topic when an asynchronous operation is complete. You use an IAM service role to give Amazon Textract access to the Amazon SNS topic.
When you create the Amazon SNS topic, you must prepend the topic name with **AmazonTextract**—for example, **AmazonTextractMyTopicName**.
1. Sign in to the IAM console ([https://console.aws.amazon.com/iam](https://console.aws.amazon.com/iam)).
1. In the navigation pane, choose **Roles**.
1. Choose **Create role**.
1. For **Select type of trusted entity**, choose **AWS service**.
1. For **Choose the service that will use this role**, choose **Textract**.
1. Choose **Next: Permissions**.
1. Verify that the **AmazonTextractServiceRole** policy has been included in the list of attached policies. To display the policy in the list, enter part of the policy name in the **Filter policies**.
1. Choose **Next: Tags**.
1. You don't need to add tags, so choose **Next: Review**.
1. In the **Review** section, for **Role name**, enter a name for the role (for example, `TextractRole`). In **Role description**, update the description for the role, and then choose **Create role**.
1. Choose the new role to open the role's details page.
1. In the **Summary**, copy the **Role ARN** value and save it.
1. Choose **Trust relationships**.
1. Choose **Edit trust relationship**, and edit the trust policy. Ensure that your trust policy includes conditions that limit the scope of permissions to just the required resources, as this will help prevent the confused deputy problem. For more details about this potential security issue, see [Cross-service confused deputy prevention](#cross-service-confused-deputy-prevention). In the example below, replace the {{red}} text with your AWS account ID.
------
#### [ JSON ]
****
```
{
"Version":"2012-10-17",
"Statement": {
"Sid": "ConfusedDeputyPreventionExamplePolicy",
"Effect": "Allow",
"Principal": {
"Service": "textract.amazonaws.com"
},
"Action": "sts:AssumeRole",
"Condition": {
"ArnLike": {
"aws:SourceArn":"arn:aws:textract:*:{{123456789012}}:*"
},
"StringEquals": {
"aws:SourceAccount": "{{123456789012}}"
}
}
}
}
```
------
1. Choose **Update Trust Policy**.
### Permissions for Output Configuration
You can have Amazon Textract send the results of asynchronous analysis operations to a designated Amazon S3 bucket by using the `OutputConfig` feature of asynchrnous API operations. If you are using the `OutputConfig` option for an asynchronous analysis operation to customize where the output of your operations is sent, additional configuration is required. You must let Amazon Textract decrypt your uploads and provide permissions for certain Amazon S3 operations.
**To Allow Decryption of S3 Bucket Uploads**
+ You will need to provide the appropriate Users with the correct Amazon S3 permissions.
Navigate to the Users section of the [https://console.aws.amazon.com/iam/](https://console.aws.amazon.com/iam/) and select the User you created in **Step 1** of the **To configure Amazon Textract** section above. Choose to "Add inline policy" to your User and attach a JSON policy that includes the `s3:GetObject`, and `s3:PutObject`, `s3:ListMultipartUploadParts`, `s3:ListBucketMultipartUploads`, and `s3:AbortMultipartUpload` operations. Your JSON may look like the following:
------
#### [ JSON ]
****
```
{
"Version":"2012-10-17",
"Statement": [
{
"Effect": "Allow",
"Action": [
"s3:Get*",
"s3:List*",
"s3:PutObject",
"s3:GetObject",
"s3-object-lambda:Get*",
"s3-object-lambda:List*",
"s3:ListMultipartUploadParts",
"s3:ListBucketMultipartUploads",
"s3:AbortMultipartUpload"
],
"Resource": "*"
}
]
}
```
------
**To Provide AWS KMS Key Permissions**
+ You must[add](https://docs.aws.amazon.com/kms/latest/developerguide/key-policy-modifying.html#key-policy-modifying-how-to-console-policy-view) permissions to your AWS Key Management Service key that will allow your service role to decrypt your uploads. The service role will need permission for `kms:GenerateDataKey` and `kms:Decrypt` actions. Ensure that the service role you created in **Step 7** in the **To configure Amazon Textract** section has a permissions policy that looks like the following example.
In the following example, replace `ARN from Step 7` with the ARN of your service role:
```
{
"Sid": "Decrypt only",
"Effect": "Allow",
"Principal": {
"AWS": "{{ARN from Step 7}}"
},
"Action": [
"kms:Decrypt",
"kms:ReEncrypt",
"kms:GenerateDataKey",
"kms:DescribeKey"
],
"Resource": "*"
}
```
## Detecting or Analyzing Text in a Multipage Document
This procedure shows you how to detect or analyze text in a multipage document by using Amazon Textract detection operations, a document stored in an Amazon S3 bucket, an Amazon SNS topic, and an Amazon SQS queue. Multipage document processing is an asynchronous operation. For more information, see [Calling Amazon Textract Asynchronous Operations](#api-async).
You can choose the type of processing that you want the code to do: text detection, text analysis, or expense analysis.
The processing results are returned in an array of [Block](https://docs.aws.amazon.com/textract/latest/APIReference/API_Block.html) objects, which differ depending on the type of processing you use.
To detect text in or analyze multipage documents, you do the following:
1. Create the Amazon SNS topic and the Amazon SQS queue.
1. Subscribe the queue the topic.
1. Give the topic permission to send messages to the queue.
1. Start processing the document. Use the appropriate operation for your chosen type of analysis:
+ [StartDocumentTextDetection](https://docs.aws.amazon.com/textract/latest/APIReference/API_StartDocumentTextDetection.html) for text detection tasks.
+ [StartDocumentAnalysis](https://docs.aws.amazon.com/textract/latest/APIReference/API_StartDocumentAnalysis.html) for text analysis tasks.
+ [StartExpenseAnalysis](https://docs.aws.amazon.com/textract/latest/APIReference/API_StartExpenseAnalysis.html) for expense analysis tasks.
1. Get the completion status from the Amazon SQS queue. The example code tracks the job identifier (`JobId`) that's returned by the `Start` operation. It only gets the results for matching job identifiers that are read from the completion status. This is important if other applications are using the same queue and topic. For simplicity, the example deletes jobs that don't match. Consider adding the deleted jobs to an Amazon SQS dead-letter queue for further investigation.
1. Get and display the processing results by calling the appropriate operation for your chosen type of analysis:
+ [GetDocumentTextDetection](https://docs.aws.amazon.com/textract/latest/APIReference/API_GetDocumentTextDetection.html) for text detection tasks.
+ [GetDocumentAnalysis](https://docs.aws.amazon.com/textract/latest/APIReference/API_GetDocumentAnalysis.html) for text analysis tasks.
+ [GetExpenseAnalysis](https://docs.aws.amazon.com/textract/latest/APIReference/API_GetExpenseAnalysis.html) for expense analysis tasks.
1. Delete the Amazon SNS topic and the Amazon SQS queue.
### Performing Asynchronous Operations
The example code for this procedure is provided in Java, Python, and the AWS CLI. Before you begin, install the appropriate AWS SDK. For more information, see [Step 2: Set Up the AWS CLI and AWS SDKs](#setup-awscli-sdk).
**To detect or analyze text in a multipage document**
1. Configure user access to Amazon Textract, and configure Amazon Textract access to Amazon SNS. For more information, see [Configuring Amazon Textract for Asynchronous Operations](#api-async-roles). To complete this procedure, you need a multipage document file in PDF format. Skip steps 3 – 6 because the example code creates and configures the Amazon SNS topic and Amazon SQS queue. If completing the CLI example, you don't need to set up an SQS queue.
1. Upload a multipage document file in PDF or TIFF format to your Amazon S3 bucket. (Single-page documents in JPEG, PNG, TIFF, or PDF format can also be processed).
For instructions, see [Uploading Objects into Amazon S3](https://docs.aws.amazon.com/AmazonS3/latest/userguide/UploadingObjectsintoAmazonS3.html) in the *Amazon Simple Storage Service User Guide*.
1. Use the following AWS SDK for Java, AWS SDK for Python (Boto3), or AWS CLI code to either detect text or analyze text in a multipage document. In the `main` function:
+ Replace the value of `roleArn` with the IAM role ARN that you saved in [Giving Amazon Textract Access to Your Amazon SNS Topic](#api-async-roles-all-topics).
+ Replace the values of `bucket` and `document` with the bucket and document file name that you specified in step 2.
+ Replace the value of the `type` input parameter of the `ProcessDocument` function with the type of processing that you want to do. Use `ProcessType.DETECTION` to detect text. Use `ProcessType.ANALYSIS` to analyze text.
+ For the Python example, replace the value of `region_name` with the region your client is operating in.
For the AWS CLI example, do the following:
+ When calling [StartDocumentTextDetection](https://docs.aws.amazon.com/textract/latest/APIReference/API_StartDocumentTextDetection.html), replace the value of `bucket-name` with the name of your S3 bucket, and replace `file-name` with the name of the file you specified in step 2. Specify the region of your bucket by replacing `region-name` with the name of your region. Take note that the CLI example does not make use of SQS.
+ When calling [GetDocumentTextDetection](https://docs.aws.amazon.com/textract/latest/APIReference/API_GetDocumentTextDetection.html) replace `job-id-number` with the `job-id` returned by [StartDocumentTextDetection](https://docs.aws.amazon.com/textract/latest/APIReference/API_StartDocumentTextDetection.html). Specify the region of your bucket by replacing `region-name` with the name of your region.
------
#### [ Java ]
Replace the value of `credentialsProvider` with the name of your developer profile.
```
import java.util.Arrays;
import java.util.HashMap;
import java.util.List;
import java.util.Map;
import com.amazonaws.auth.policy.Condition;
import com.amazonaws.auth.policy.Policy;
import com.amazonaws.auth.policy.Principal;
import com.amazonaws.auth.policy.Resource;
import com.amazonaws.auth.policy.Statement;
import com.amazonaws.auth.policy.Statement.Effect;
import com.amazonaws.auth.policy.actions.SQSActions;
import com.amazonaws.auth.profile.ProfileCredentialsProvider;
import com.amazonaws.services.sns.AmazonSNS;
import com.amazonaws.services.sns.AmazonSNSClientBuilder;
import com.amazonaws.services.sns.model.CreateTopicRequest;
import com.amazonaws.services.sns.model.CreateTopicResult;
import com.amazonaws.services.sqs.AmazonSQS;
import com.amazonaws.services.sqs.AmazonSQSClientBuilder;
import com.amazonaws.services.sqs.model.CreateQueueRequest;
import com.amazonaws.services.sqs.model.Message;
import com.amazonaws.services.sqs.model.QueueAttributeName;
import com.amazonaws.services.sqs.model.SetQueueAttributesRequest;
import com.amazonaws.services.textract.AmazonTextract;
import com.amazonaws.services.textract.AmazonTextractClientBuilder;
import com.amazonaws.services.textract.model.Block;
import com.amazonaws.services.textract.model.DocumentLocation;
import com.amazonaws.services.textract.model.DocumentMetadata;
import com.amazonaws.services.textract.model.GetDocumentAnalysisRequest;
import com.amazonaws.services.textract.model.GetDocumentAnalysisResult;
import com.amazonaws.services.textract.model.GetDocumentTextDetectionRequest;
import com.amazonaws.services.textract.model.GetDocumentTextDetectionResult;
import com.amazonaws.services.textract.model.NotificationChannel;
import com.amazonaws.services.textract.model.Relationship;
import com.amazonaws.services.textract.model.S3Object;
import com.amazonaws.services.textract.model.StartDocumentAnalysisRequest;
import com.amazonaws.services.textract.model.StartDocumentAnalysisResult;
import com.amazonaws.services.textract.model.StartDocumentTextDetectionRequest;
import com.amazonaws.services.textract.model.StartDocumentTextDetectionResult;
import com.fasterxml.jackson.databind.JsonNode;
import com.fasterxml.jackson.databind.ObjectMapper;;
public class DocumentProcessor {
private static String sqsQueueName=null;
private static String snsTopicName=null;
private static String snsTopicArn = null;
private static String roleArn= null;
private static String sqsQueueUrl = null;
private static String sqsQueueArn = null;
private static String startJobId = null;
private static String bucket = null;
private static String document = null;
private static AmazonSQS sqs=null;
private static AmazonSNS sns=null;
private static AmazonTextract textract = null;
public enum ProcessType {
DETECTION,ANALYSIS
}
public static void main(String[] args) throws Exception {
String document = "document";
String bucket = "bucket";
String roleArn="role";
// set provider credentials
AWSCredentialsProvider credentialsProvider = new ProfileCredentialsProvider("default");
sns = AmazonSNSClientBuilder.withCredentials(credentialsProvider)
.withRegion(Regions.US_EAST_1)
.build();
sqs= AmazonSQSClientBuilder.withCredentials(credentialsProvider)
.withRegion(Regions.US_EAST_1)
.build();
textract=AmazonTextractClientBuilder.withCredentials(credentialsProvider)
.withRegion(Regions.US_EAST_1)
.build();
CreateTopicandQueue();
ProcessDocument(bucket,document,roleArn,ProcessType.DETECTION);
DeleteTopicandQueue();
System.out.println("Done!");
}
// Creates an SNS topic and SQS queue. The queue is subscribed to the topic.
static void CreateTopicandQueue()
{
//create a new SNS topic
snsTopicName="AmazonTextractTopic" + Long.toString(System.currentTimeMillis());
CreateTopicRequest createTopicRequest = new CreateTopicRequest(snsTopicName);
CreateTopicResult createTopicResult = sns.createTopic(createTopicRequest);
snsTopicArn=createTopicResult.getTopicArn();
//Create a new SQS Queue
sqsQueueName="AmazonTextractQueue" + Long.toString(System.currentTimeMillis());
final CreateQueueRequest createQueueRequest = new CreateQueueRequest(sqsQueueName);
sqsQueueUrl = sqs.createQueue(createQueueRequest).getQueueUrl();
sqsQueueArn = sqs.getQueueAttributes(sqsQueueUrl, Arrays.asList("QueueArn")).getAttributes().get("QueueArn");
//Subscribe SQS queue to SNS topic
String sqsSubscriptionArn = sns.subscribe(snsTopicArn, "sqs", sqsQueueArn).getSubscriptionArn();
// Authorize queue
Policy policy = new Policy().withStatements(
new Statement(Effect.Allow)
.withPrincipals(Principal.AllUsers)
.withActions(SQSActions.SendMessage)
.withResources(new Resource(sqsQueueArn))
.withConditions(new Condition().withType("ArnEquals").withConditionKey("aws:SourceArn").withValues(snsTopicArn))
);
Map queueAttributes = new HashMap();
queueAttributes.put(QueueAttributeName.Policy.toString(), policy.toJson());
sqs.setQueueAttributes(new SetQueueAttributesRequest(sqsQueueUrl, queueAttributes));
System.out.println("Topic arn: " + snsTopicArn);
System.out.println("Queue arn: " + sqsQueueArn);
System.out.println("Queue url: " + sqsQueueUrl);
System.out.println("Queue sub arn: " + sqsSubscriptionArn );
}
static void DeleteTopicandQueue()
{
if (sqs !=null) {
sqs.deleteQueue(sqsQueueUrl);
System.out.println("SQS queue deleted");
}
if (sns!=null) {
sns.deleteTopic(snsTopicArn);
System.out.println("SNS topic deleted");
}
}
//Starts the processing of the input document.
static void ProcessDocument(String inBucket, String inDocument, String inRoleArn, ProcessType type) throws Exception
{
bucket=inBucket;
document=inDocument;
roleArn=inRoleArn;
switch(type)
{
case DETECTION:
StartDocumentTextDetection(bucket, document);
System.out.println("Processing type: Detection");
break;
case ANALYSIS:
StartDocumentAnalysis(bucket,document);
System.out.println("Processing type: Analysis");
break;
default:
System.out.println("Invalid processing type. Choose Detection or Analysis");
throw new Exception("Invalid processing type");
}
System.out.println("Waiting for job: " + startJobId);
//Poll queue for messages
List messages=null;
int dotLine=0;
boolean jobFound=false;
//loop until the job status is published. Ignore other messages in queue.
do{
messages = sqs.receiveMessage(sqsQueueUrl).getMessages();
if (dotLine++<40){
System.out.print(".");
}else{
System.out.println();
dotLine=0;
}
if (!messages.isEmpty()) {
//Loop through messages received.
for (Message message: messages) {
String notification = message.getBody();
// Get status and job id from notification.
ObjectMapper mapper = new ObjectMapper();
JsonNode jsonMessageTree = mapper.readTree(notification);
JsonNode messageBodyText = jsonMessageTree.get("Message");
ObjectMapper operationResultMapper = new ObjectMapper();
JsonNode jsonResultTree = operationResultMapper.readTree(messageBodyText.textValue());
JsonNode operationJobId = jsonResultTree.get("JobId");
JsonNode operationStatus = jsonResultTree.get("Status");
System.out.println("Job found was " + operationJobId);
// Found job. Get the results and display.
if(operationJobId.asText().equals(startJobId)){
jobFound=true;
System.out.println("Job id: " + operationJobId );
System.out.println("Status : " + operationStatus.toString());
if (operationStatus.asText().equals("SUCCEEDED")){
switch(type)
{
case DETECTION:
GetDocumentTextDetectionResults();
break;
case ANALYSIS:
GetDocumentAnalysisResults();
break;
default:
System.out.println("Invalid processing type. Choose Detection or Analysis");
throw new Exception("Invalid processing type");
}
}
else{
System.out.println("Document analysis failed");
}
sqs.deleteMessage(sqsQueueUrl,message.getReceiptHandle());
}
else{
System.out.println("Job received was not job " + startJobId);
//Delete unknown message. Consider moving message to dead letter queue
sqs.deleteMessage(sqsQueueUrl,message.getReceiptHandle());
}
}
}
else {
Thread.sleep(5000);
}
} while (!jobFound);
System.out.println("Finished processing document");
}
private static void StartDocumentTextDetection(String bucket, String document) throws Exception{
//Create notification channel
NotificationChannel channel= new NotificationChannel()
.withSNSTopicArn(snsTopicArn)
.withRoleArn(roleArn);
StartDocumentTextDetectionRequest req = new StartDocumentTextDetectionRequest()
.withDocumentLocation(new DocumentLocation()
.withS3Object(new S3Object()
.withBucket(bucket)
.withName(document)))
.withJobTag("DetectingText")
.withNotificationChannel(channel);
StartDocumentTextDetectionResult startDocumentTextDetectionResult = textract.startDocumentTextDetection(req);
startJobId=startDocumentTextDetectionResult.getJobId();
}
//Gets the results of processing started by StartDocumentTextDetection
private static void GetDocumentTextDetectionResults() throws Exception{
int maxResults=1000;
String paginationToken=null;
GetDocumentTextDetectionResult response=null;
Boolean finished=false;
while (finished==false)
{
GetDocumentTextDetectionRequest documentTextDetectionRequest= new GetDocumentTextDetectionRequest()
.withJobId(startJobId)
.withMaxResults(maxResults)
.withNextToken(paginationToken);
response = textract.getDocumentTextDetection(documentTextDetectionRequest);
DocumentMetadata documentMetaData=response.getDocumentMetadata();
System.out.println("Pages: " + documentMetaData.getPages().toString());
//Show blocks information
List blocks= response.getBlocks();
for (Block block : blocks) {
DisplayBlockInfo(block);
}
paginationToken=response.getNextToken();
if (paginationToken==null)
finished=true;
}
}
private static void StartDocumentAnalysis(String bucket, String document) throws Exception{
//Create notification channel
NotificationChannel channel= new NotificationChannel()
.withSNSTopicArn(snsTopicArn)
.withRoleArn(roleArn);
StartDocumentAnalysisRequest req = new StartDocumentAnalysisRequest()
.withFeatureTypes("TABLES","FORMS")
.withDocumentLocation(new DocumentLocation()
.withS3Object(new S3Object()
.withBucket(bucket)
.withName(document)))
.withJobTag("AnalyzingText")
.withNotificationChannel(channel);
StartDocumentAnalysisResult startDocumentAnalysisResult = textract.startDocumentAnalysis(req);
startJobId=startDocumentAnalysisResult.getJobId();
}
//Gets the results of processing started by StartDocumentAnalysis
private static void GetDocumentAnalysisResults() throws Exception{
int maxResults=1000;
String paginationToken=null;
GetDocumentAnalysisResult response=null;
Boolean finished=false;
//loops until pagination token is null
while (finished==false)
{
GetDocumentAnalysisRequest documentAnalysisRequest= new GetDocumentAnalysisRequest()
.withJobId(startJobId)
.withMaxResults(maxResults)
.withNextToken(paginationToken);
response = textract.getDocumentAnalysis(documentAnalysisRequest);
DocumentMetadata documentMetaData=response.getDocumentMetadata();
System.out.println("Pages: " + documentMetaData.getPages().toString());
//Show blocks, confidence and detection times
List blocks= response.getBlocks();
for (Block block : blocks) {
DisplayBlockInfo(block);
}
paginationToken=response.getNextToken();
if (paginationToken==null)
finished=true;
}
}
//Displays Block information for text detection and text analysis
private static void DisplayBlockInfo(Block block) {
System.out.println("Block Id : " + block.getId());
if (block.getText()!=null)
System.out.println("\tDetected text: " + block.getText());
System.out.println("\tType: " + block.getBlockType());
if (block.getBlockType().equals("PAGE") !=true) {
System.out.println("\tConfidence: " + block.getConfidence().toString());
}
if(block.getBlockType().equals("CELL"))
{
System.out.println("\tCell information:");
System.out.println("\t\tColumn: " + block.getColumnIndex());
System.out.println("\t\tRow: " + block.getRowIndex());
System.out.println("\t\tColumn span: " + block.getColumnSpan());
System.out.println("\t\tRow span: " + block.getRowSpan());
}
System.out.println("\tRelationships");
List relationships=block.getRelationships();
if(relationships!=null) {
for (Relationship relationship : relationships) {
System.out.println("\t\tType: " + relationship.getType());
System.out.println("\t\tIDs: " + relationship.getIds().toString());
}
} else {
System.out.println("\t\tNo related Blocks");
}
System.out.println("\tGeometry");
System.out.println("\t\tBounding Box: " + block.getGeometry().getBoundingBox().toString());
System.out.println("\t\tPolygon: " + block.getGeometry().getPolygon().toString());
List entityTypes = block.getEntityTypes();
System.out.println("\tEntity Types");
if(entityTypes!=null) {
for (String entityType : entityTypes) {
System.out.println("\t\tEntity Type: " + entityType);
}
} else {
System.out.println("\t\tNo entity type");
}
if(block.getBlockType().equals("SELECTION_ELEMENT")) {
System.out.print(" Selection element detected: ");
if (block.getSelectionStatus().equals("SELECTED")){
System.out.println("Selected");
}else {
System.out.println(" Not selected");
}
}
if(block.getPage()!=null)
System.out.println("\tPage: " + block.getPage());
System.out.println();
}
}
```
------
#### [ Java V2 ]
Replace the value of `profile-name` in the line that creates the `TextractClient` with the name of your developer profile.
```
import software.amazon.awssdk.auth.credentials.ProfileCredentialsProvider;
import software.amazon.awssdk.regions.Region;
import software.amazon.awssdk.services.textract.model.S3Object;
import software.amazon.awssdk.services.textract.TextractClient;
import software.amazon.awssdk.services.textract.model.StartDocumentAnalysisRequest;
import software.amazon.awssdk.services.textract.model.DocumentLocation;
import software.amazon.awssdk.services.textract.model.TextractException;
import software.amazon.awssdk.services.textract.model.StartDocumentAnalysisResponse;
import software.amazon.awssdk.services.textract.model.GetDocumentAnalysisRequest;
import software.amazon.awssdk.services.textract.model.GetDocumentAnalysisResponse;
import software.amazon.awssdk.services.textract.model.FeatureType;
import java.util.ArrayList;
import java.util.List;
// snippet-end:[textract.java2._start_doc_analysis.import]
/**
* Before running this Java V2 code example, set up your development environment, including your credentials.
*
* For more information, see the following documentation topic:
*
* https://docs.aws.amazon.com/sdk-for-java/latest/developer-guide/get-started.html
*/
public class StartDocumentAnalysis {
public static void main(String[] args) {
final String usage = "\n" +
"Usage:\n" +
" \n\n" +
"Where:\n" +
" bucketName - The name of the Amazon S3 bucket that contains the document. \n\n" +
" docName - The document name (must be an image, for example, book.png). \n";
if (args.length != 2) {
System.out.println(usage);
System.exit(1);
}
String bucketName = args[0];
String docName = args[1];
Region region = Region.US_EAST_1;
TextractClient textractClient = TextractClient.builder()
.region(region)
.credentialsProvider(ProfileCredentialsProvider.create("profile-name"))
.build();
String jobId = startDocAnalysisS3 (textractClient, bucketName, docName);
System.out.println("Getting results for job "+jobId);
String status = getJobResults(textractClient, jobId);
System.out.println("The job status is "+status);
textractClient.close();
}
// snippet-start:[textract.java2._start_doc_analysis.main]
public static String startDocAnalysisS3 (TextractClient textractClient, String bucketName, String docName) {
try {
List myList = new ArrayList<>();
myList.add(FeatureType.TABLES);
myList.add(FeatureType.FORMS);
S3Object s3Object = S3Object.builder()
.bucket(bucketName)
.name(docName)
.build();
DocumentLocation location = DocumentLocation.builder()
.s3Object(s3Object)
.build();
StartDocumentAnalysisRequest documentAnalysisRequest = StartDocumentAnalysisRequest.builder()
.documentLocation(location)
.featureTypes(myList)
.build();
StartDocumentAnalysisResponse response = textractClient.startDocumentAnalysis(documentAnalysisRequest);
// Get the job ID
String jobId = response.jobId();
return jobId;
} catch (TextractException e) {
System.err.println(e.getMessage());
System.exit(1);
}
return "" ;
}
private static String getJobResults(TextractClient textractClient, String jobId) {
boolean finished = false;
int index = 0 ;
String status = "" ;
try {
while (!finished) {
GetDocumentAnalysisRequest analysisRequest = GetDocumentAnalysisRequest.builder()
.jobId(jobId)
.maxResults(1000)
.build();
GetDocumentAnalysisResponse response = textractClient.getDocumentAnalysis(analysisRequest);
status = response.jobStatus().toString();
if (status.compareTo("SUCCEEDED") == 0)
finished = true;
else {
System.out.println(index + " status is: " + status);
Thread.sleep(1000);
}
index++ ;
}
return status;
} catch( InterruptedException e) {
System.out.println(e.getMessage());
System.exit(1);
}
return "";
}
// snippet-end:[textract.java2._start_doc_analysis.main]
}
```
------
#### [ AWS CLI ]
This AWS CLI command starts the asynchronous detection of text in a specified document. It returns a `job-id` that can be used to retreive the results of the detection.
```
aws textract start-document-text-detection --document-location
"{\"S3Object\":{\"Bucket\":\"{{bucket-name}}\",\"Name\":\"{{file-name}}\"}}" --region {{region-name}}
```
This AWS CLI command returns the results for an Amazon Textract asynchronous operation when provided with a `job-id`.
```
aws textract get-document-text-detection --region {{region-name}} --job-id {{job-id-number}}
```
If you are accessing the CLI on a Windows device, use double quotes instead of single quotes and escape the inner double quotes by backslash (i.e. \\) to address any parser errors you may encounter. For an example, see below
```
aws textract start-document-text-detection --document-location "{\"S3Object\":{\"Bucket\":\"{{bucket}}\",\"Name\":\"{{document}}\"}}" --region {{region-name}}
```
If you are analyzing a document with the StartDocumentAnalysis operation, you can provide values to the `feature-type` parameter. The following example demonstrates how to include the `QUERIES` value in the `feature-types` parameter and then provide a `Queries` object to the `queries-config` parameter.
```
aws textract start-document-analysis \
--document '{"S3Object":{"Bucket":"{{bucket}}","Name":"{{document}}"}}'\
--feature-types '["QUERIES"]' \
--queries-config '{"Queries":[{"Text":"{{Question}}"}]}'
```
------
#### [ Python ]
Replace `profile-name` in the line that creates the TextractClient with the name of your developer profile.
```
import boto3
import json
import sys
import time
class ProcessType:
DETECTION = 1
ANALYSIS = 2
class DocumentProcessor:
jobId = ''
region_name = ''
roleArn = ''
bucket = ''
document = ''
sqsQueueUrl = ''
snsTopicArn = ''
processType = ''
def __init__(self, role, bucket, document, region):
self.roleArn = role
self.bucket = bucket
self.document = document
self.region_name = region
self.textract = boto3.client('textract', region_name=self.region_name)
self.sqs = boto3.client('sqs', region_name=self.region_name)
self.sns = boto3.client('sns', region_name=self.region_name)
def ProcessDocument(self, type):
jobFound = False
self.processType = type
validType = False
# Determine which type of processing to perform
if self.processType == ProcessType.DETECTION:
response = self.textract.start_document_text_detection(
DocumentLocation={'S3Object': {'Bucket': self.bucket, 'Name': self.document}},
NotificationChannel={'RoleArn': self.roleArn, 'SNSTopicArn': self.snsTopicArn})
print('Processing type: Detection')
validType = True
# For document analysis, select which features you want to obtain with the FeatureTypes argument
if self.processType == ProcessType.ANALYSIS:
response = self.textract.start_document_analysis(
DocumentLocation={'S3Object': {'Bucket': self.bucket, 'Name': self.document}},
FeatureTypes=["TABLES", "FORMS"],
NotificationChannel={'RoleArn': self.roleArn, 'SNSTopicArn': self.snsTopicArn})
print('Processing type: Analysis')
validType = True
if validType == False:
print("Invalid processing type. Choose Detection or Analysis.")
return
print('Start Job Id: ' + response['JobId'])
dotLine = 0
while jobFound == False:
sqsResponse = self.sqs.receive_message(QueueUrl=self.sqsQueueUrl, MessageAttributeNames=['ALL'],
MaxNumberOfMessages=10)
if sqsResponse:
if 'Messages' not in sqsResponse:
if dotLine < 40:
print('.', end='')
dotLine = dotLine + 1
else:
print()
dotLine = 0
sys.stdout.flush()
time.sleep(5)
continue
for message in sqsResponse['Messages']:
notification = json.loads(message['Body'])
textMessage = json.loads(notification['Message'])
print(textMessage['JobId'])
print(textMessage['Status'])
if str(textMessage['JobId']) == response['JobId']:
print('Matching Job Found:' + textMessage['JobId'])
jobFound = True
self.GetResults(textMessage['JobId'])
self.sqs.delete_message(QueueUrl=self.sqsQueueUrl,
ReceiptHandle=message['ReceiptHandle'])
else:
print("Job didn't match:" +
str(textMessage['JobId']) + ' : ' + str(response['JobId']))
# Delete the unknown message. Consider sending to dead letter queue
self.sqs.delete_message(QueueUrl=self.sqsQueueUrl,
ReceiptHandle=message['ReceiptHandle'])
print('Done!')
def CreateTopicandQueue(self):
millis = str(int(round(time.time() * 1000)))
# Create SNS topic
snsTopicName = "AmazonTextractTopic" + millis
topicResponse = self.sns.create_topic(Name=snsTopicName)
self.snsTopicArn = topicResponse['TopicArn']
# create SQS queue
sqsQueueName = "AmazonTextractQueue" + millis
self.sqs.create_queue(QueueName=sqsQueueName)
self.sqsQueueUrl = self.sqs.get_queue_url(QueueName=sqsQueueName)['QueueUrl']
attribs = self.sqs.get_queue_attributes(QueueUrl=self.sqsQueueUrl,
AttributeNames=['QueueArn'])['Attributes']
sqsQueueArn = attribs['QueueArn']
# Subscribe SQS queue to SNS topic
self.sns.subscribe(
TopicArn=self.snsTopicArn,
Protocol='sqs',
Endpoint=sqsQueueArn)
# Authorize SNS to write SQS queue
policy = """{{
"Version": "2012-10-17",
"Statement":[
{{
"Sid":"MyPolicy",
"Effect":"Allow",
"Principal" : {{"AWS" : "*"}},
"Action":"SQS:SendMessage",
"Resource": "{}",
"Condition":{{
"ArnEquals":{{
"aws:SourceArn": "{}"
}}
}}
}}
]
}}""".format(sqsQueueArn, self.snsTopicArn)
response = self.sqs.set_queue_attributes(
QueueUrl=self.sqsQueueUrl,
Attributes={
'Policy': policy
})
def DeleteTopicandQueue(self):
self.sqs.delete_queue(QueueUrl=self.sqsQueueUrl)
self.sns.delete_topic(TopicArn=self.snsTopicArn)
# Display information about a block
def DisplayBlockInfo(self, block):
print("Block Id: " + block['Id'])
print("Type: " + block['BlockType'])
if 'EntityTypes' in block:
print('EntityTypes: {}'.format(block['EntityTypes']))
if 'Text' in block:
print("Text: " + block['Text'])
if block['BlockType'] != 'PAGE' and "Confidence" in str(block['BlockType']):
print("Confidence: " + "{:.2f}".format(block['Confidence']) + "%")
print('Page: {}'.format(block['Page']))
if block['BlockType'] == 'CELL':
print('Cell Information')
print('\tColumn: {} '.format(block['ColumnIndex']))
print('\tRow: {}'.format(block['RowIndex']))
print('\tColumn span: {} '.format(block['ColumnSpan']))
print('\tRow span: {}'.format(block['RowSpan']))
if 'Relationships' in block:
print('\tRelationships: {}'.format(block['Relationships']))
if ("Geometry") in str(block):
print('Geometry')
print('\tBounding Box: {}'.format(block['Geometry']['BoundingBox']))
print('\tPolygon: {}'.format(block['Geometry']['Polygon']))
if block['BlockType'] == 'SELECTION_ELEMENT':
print(' Selection element detected: ', end='')
if block['SelectionStatus'] == 'SELECTED':
print('Selected')
else:
print('Not selected')
if block["BlockType"] == "QUERY":
print("Query info:")
print(block["Query"])
if block["BlockType"] == "QUERY_RESULT":
print("Query answer:")
print(block["Text"])
def GetResults(self, jobId):
maxResults = 1000
paginationToken = None
finished = False
while finished == False:
response = None
if self.processType == ProcessType.ANALYSIS:
if paginationToken == None:
response = self.textract.get_document_analysis(JobId=jobId,
MaxResults=maxResults)
else:
response = self.textract.get_document_analysis(JobId=jobId,
MaxResults=maxResults,
NextToken=paginationToken)
if self.processType == ProcessType.DETECTION:
if paginationToken == None:
response = self.textract.get_document_text_detection(JobId=jobId,
MaxResults=maxResults)
else:
response = self.textract.get_document_text_detection(JobId=jobId,
MaxResults=maxResults,
NextToken=paginationToken)
blocks = response['Blocks']
print('Detected Document Text')
print('Pages: {}'.format(response['DocumentMetadata']['Pages']))
# Display block information
for block in blocks:
self.DisplayBlockInfo(block)
print()
print()
if 'NextToken' in response:
paginationToken = response['NextToken']
else:
finished = True
def GetResultsDocumentAnalysis(self, jobId):
maxResults = 1000
paginationToken = None
finished = False
while finished == False:
response = None
if paginationToken == None:
response = self.textract.get_document_analysis(JobId=jobId,
MaxResults=maxResults)
else:
response = self.textract.get_document_analysis(JobId=jobId,
MaxResults=maxResults,
NextToken=paginationToken)
# Get the text blocks
blocks = response['Blocks']
print('Analyzed Document Text')
print('Pages: {}'.format(response['DocumentMetadata']['Pages']))
# Display block information
for block in blocks:
self.DisplayBlockInfo(block)
print()
print()
if 'NextToken' in response:
paginationToken = response['NextToken']
else:
finished = True
def main():
roleArn = ''
bucket = ''
document = ''
region_name = ''
analyzer = DocumentProcessor(roleArn, bucket, document, region_name)
analyzer.CreateTopicandQueue()
analyzer.ProcessDocument(ProcessType.ANALYSIS)
analyzer.DeleteTopicandQueue()
if __name__ == "__main__":
main()
```
In order to use different features of the `AnalyzeDocument` operation, you provide the proper feature type to the `features-type` parameter. For example, to use the Queries feature, include the `QUERIES` value in the `feature-types` parameter and then provide a `Queries` object to the `queries-config` parameter. To query your document, replace the code block that makes a request to the `StartDocumentAnalysis` operation with the code block below, and enter your query.
```
if self.processType == ProcessType.ANALYSIS:
response = self.textract.start_document_analysis(
DocumentLocation={'S3Object': {'Bucket': self.bucket, 'Name': self.document}},
FeatureTypes=["TABLES", "FORMS", "QUERIES"],
QueriesConfig={'Queries':[
{'Text':'{}'.format("{{Enter query here}}")}
]},
NotificationChannel={'RoleArn': self.roleArn, 'SNSTopicArn': self.snsTopicArn})
```
------
#### [ Node.JS ]
In this example, replace the value of `roleArn` with the IAM role ARN that you saved in [Giving Amazon Textract Access to Your Amazon SNS Topic](#api-async-roles-all-topics). Replace the values of `bucket` and `document` with the bucket and document file name you specified in step 2 above. Replace the value of `processType` with the type of processing you'd like to use on the input document. Finally, replace the value of `REGION` with the region your client is operating in. Replace the value of `profileName` with the name of your developer profile.
```
// snippet-start:[sqs.JavaScript.queues.createQueueV3]
// Import required AWS SDK clients and commands for Node.js
import { CreateQueueCommand, GetQueueAttributesCommand, GetQueueUrlCommand,
SetQueueAttributesCommand, DeleteQueueCommand, ReceiveMessageCommand, DeleteMessageCommand } from "@aws-sdk/client-sqs";
import {CreateTopicCommand, SubscribeCommand, DeleteTopicCommand } from "@aws-sdk/client-sns";
import { SQSClient } from "@aws-sdk/client-sqs";
import { SNSClient } from "@aws-sdk/client-sns";
import { TextractClient, StartDocumentTextDetectionCommand, StartDocumentAnalysisCommand, GetDocumentAnalysisCommand, GetDocumentTextDetectionCommand, DocumentMetadata } from "@aws-sdk/client-textract";
import { stdout } from "process";
import {fromIni} from '@aws-sdk/credential-providers';
// Set the AWS Region.
const REGION = "region-name"; //e.g. "us-east-1"
const profileName = "profile-name";
// Create SNS service object.
const textractClient = new TextractClient({region: REGION,
credentials: fromIni({profile: profileName,}),
});
const sqsClient = new SQSClient({region: REGION,
credentials: fromIni({profile: profileName,}),
});
const snsClient = new SNSClient({region: REGION,
credentials: fromIni({profile: profileName,}),
});
// Set bucket and video variables
const bucket = "bucket-name";
const documentName = "document-name";
const roleArn = "role-arn"
const processType = "DETECTION"
var startJobId = ""
var ts = Date.now();
const snsTopicName = "AmazonTextractExample" + ts;
const snsTopicParams = {Name: snsTopicName}
const sqsQueueName = "AmazonTextractQueue-" + ts;
// Set the parameters
const sqsParams = {
QueueName: sqsQueueName, //SQS_QUEUE_URL
Attributes: {
DelaySeconds: "60", // Number of seconds delay.
MessageRetentionPeriod: "86400", // Number of seconds delay.
},
};
// Process a document based on operation type
const processDocumment = async (type, bucket, videoName, roleArn, sqsQueueUrl, snsTopicArn) =>
{
try
{
// Set job found and success status to false initially
var jobFound = false
var succeeded = false
var dotLine = 0
var processType = type
var validType = false
if (processType == "DETECTION"){
var response = await textractClient.send(new StartDocumentTextDetectionCommand({DocumentLocation:{S3Object:{Bucket:bucket, Name:videoName}},
NotificationChannel:{RoleArn: roleArn, SNSTopicArn: snsTopicArn}}))
console.log("Processing type: Detection")
validType = true
}
if (processType == "ANALYSIS"){
var response = await textractClient.send(new StartDocumentAnalysisCommand({DocumentLocation:{S3Object:{Bucket:bucket, Name:videoName}},
NotificationChannel:{RoleArn: roleArn, SNSTopicArn: snsTopicArn}}))
console.log("Processing type: Analysis")
validType = true
}
if (validType == false){
console.log("Invalid processing type. Choose Detection or Analysis.")
return
}
// while not found, continue to poll for response
console.log(`Start Job ID: ${response.JobId}`)
while (jobFound == false){
var sqsReceivedResponse = await sqsClient.send(new ReceiveMessageCommand({QueueUrl:sqsQueueUrl,
MaxNumberOfMessages:'ALL', MaxNumberOfMessages:10}));
if (sqsReceivedResponse){
var responseString = JSON.stringify(sqsReceivedResponse)
if (!responseString.includes('Body')){
if (dotLine < 40) {
console.log('.')
dotLine = dotLine + 1
}else {
console.log('')
dotLine = 0
};
stdout.write('', () => {
console.log('');
});
await new Promise(resolve => setTimeout(resolve, 5000));
continue
}
}
// Once job found, log Job ID and return true if status is succeeded
for (var message of sqsReceivedResponse.Messages){
console.log("Retrieved messages:")
var notification = JSON.parse(message.Body)
var rekMessage = JSON.parse(notification.Message)
var messageJobId = rekMessage.JobId
if (String(rekMessage.JobId).includes(String(startJobId))){
console.log('Matching job found:')
console.log(rekMessage.JobId)
jobFound = true
// GET RESUlTS FUNCTION HERE
var operationResults = await GetResults(processType, rekMessage.JobId)
//GET RESULTS FUMCTION HERE
console.log(rekMessage.Status)
if (String(rekMessage.Status).includes(String("SUCCEEDED"))){
succeeded = true
console.log("Job processing succeeded.")
var sqsDeleteMessage = await sqsClient.send(new DeleteMessageCommand({QueueUrl:sqsQueueUrl, ReceiptHandle:message.ReceiptHandle}));
}
}else{
console.log("Provided Job ID did not match returned ID.")
var sqsDeleteMessage = await sqsClient.send(new DeleteMessageCommand({QueueUrl:sqsQueueUrl, ReceiptHandle:message.ReceiptHandle}));
}
}
console.log("Done!")
}
}catch (err) {
console.log("Error", err);
}
}
// Create the SNS topic and SQS Queue
const createTopicandQueue = async () => {
try {
// Create SNS topic
const topicResponse = await snsClient.send(new CreateTopicCommand(snsTopicParams));
const topicArn = topicResponse.TopicArn
console.log("Success", topicResponse);
// Create SQS Queue
const sqsResponse = await sqsClient.send(new CreateQueueCommand(sqsParams));
console.log("Success", sqsResponse);
const sqsQueueCommand = await sqsClient.send(new GetQueueUrlCommand({QueueName: sqsQueueName}))
const sqsQueueUrl = sqsQueueCommand.QueueUrl
const attribsResponse = await sqsClient.send(new GetQueueAttributesCommand({QueueUrl: sqsQueueUrl, AttributeNames: ['QueueArn']}))
const attribs = attribsResponse.Attributes
console.log(attribs)
const queueArn = attribs.QueueArn
// subscribe SQS queue to SNS topic
const subscribed = await snsClient.send(new SubscribeCommand({TopicArn: topicArn, Protocol:'sqs', Endpoint: queueArn}))
const policy = {
Version: "2012-10-17",
Statement: [
{
Sid: "MyPolicy",
Effect: "Allow",
Principal: {AWS: "*"},
Action: "SQS:SendMessage",
Resource: queueArn,
Condition: {
ArnEquals: {
'aws:SourceArn': topicArn
}
}
}
]
};
const response = sqsClient.send(new SetQueueAttributesCommand({QueueUrl: sqsQueueUrl, Attributes: {Policy: JSON.stringify(policy)}}))
console.log(response)
console.log(sqsQueueUrl, topicArn)
return [sqsQueueUrl, topicArn]
} catch (err) {
console.log("Error", err);
}
}
const deleteTopicAndQueue = async (sqsQueueUrlArg, snsTopicArnArg) => {
const deleteQueue = await sqsClient.send(new DeleteQueueCommand({QueueUrl: sqsQueueUrlArg}));
const deleteTopic = await snsClient.send(new DeleteTopicCommand({TopicArn: snsTopicArnArg}));
console.log("Successfully deleted.")
}
const displayBlockInfo = async (block) => {
console.log(`Block ID: ${block.Id}`)
console.log(`Block Type: ${block.BlockType}`)
if (String(block).includes(String("EntityTypes"))){
console.log(`EntityTypes: ${block.EntityTypes}`)
}
if (String(block).includes(String("Text"))){
console.log(`EntityTypes: ${block.Text}`)
}
if (!String(block.BlockType).includes('PAGE')){
console.log(`Confidence: ${block.Confidence}`)
}
console.log(`Page: ${block.Page}`)
if (String(block.BlockType).includes("CELL")){
console.log("Cell Information")
console.log(`Column: ${block.ColumnIndex}`)
console.log(`Row: ${block.RowIndex}`)
console.log(`Column Span: ${block.ColumnSpan}`)
console.log(`Row Span: ${block.RowSpan}`)
if (String(block).includes("Relationships")){
console.log(`Relationships: ${block.Relationships}`)
}
}
console.log("Geometry")
console.log(`Bounding Box: ${JSON.stringify(block.Geometry.BoundingBox)}`)
console.log(`Polygon: ${JSON.stringify(block.Geometry.Polygon)}`)
if (String(block.BlockType).includes('SELECTION_ELEMENT')){
console.log('Selection Element detected:')
if (String(block.SelectionStatus).includes('SELECTED')){
console.log('Selected')
} else {
console.log('Not Selected')
}
}
}
const GetResults = async (processType, JobID) => {
var maxResults = 1000
var paginationToken = null
var finished = false
while (finished == false){
var response = null
if (processType == 'ANALYSIS'){
if (paginationToken == null){
response = textractClient.send(new GetDocumentAnalysisCommand({JobId:JobID, MaxResults:maxResults}))
}else{
response = textractClient.send(new GetDocumentAnalysisCommand({JobId:JobID, MaxResults:maxResults, NextToken:paginationToken}))
}
}
if(processType == 'DETECTION'){
if (paginationToken == null){
response = textractClient.send(new GetDocumentTextDetectionCommand({JobId:JobID, MaxResults:maxResults}))
}else{
response = textractClient.send(new GetDocumentTextDetectionCommand({JobId:JobID, MaxResults:maxResults, NextToken:paginationToken}))
}
}
await new Promise(resolve => setTimeout(resolve, 5000));
console.log("Detected Documented Text")
console.log(response)
//console.log(Object.keys(response))
console.log(typeof(response))
var blocks = (await response).Blocks
console.log(blocks)
console.log(typeof(blocks))
var docMetadata = (await response).DocumentMetadata
var blockString = JSON.stringify(blocks)
var parsed = JSON.parse(JSON.stringify(blocks))
console.log(Object.keys(blocks))
console.log(`Pages: ${docMetadata.Pages}`)
blocks.forEach((block)=> {
displayBlockInfo(block)
console.log()
console.log()
})
//console.log(blocks[0].BlockType)
//console.log(blocks[1].BlockType)
if(String(response).includes("NextToken")){
paginationToken = response.NextToken
}else{
finished = true
}
}
}
// DELETE TOPIC AND QUEUE
const main = async () => {
var sqsAndTopic = await createTopicandQueue();
var process = await processDocumment(processType, bucket, documentName, roleArn, sqsAndTopic[0], sqsAndTopic[1])
var deleteResults = await deleteTopicAndQueue(sqsAndTopic[0], sqsAndTopic[1])
}
main()
```
------
1. Run the code. The operation might take a while to finish. After it's finished, a list of blocks for detected or analyzed text is displayed.
## Using the Analyze Lending Workflow
To detect text in, or analyze multipage lending documents, using the Analyze Lending workflow, you do the following:
1. Create the Amazon SNS topic and the Amazon SQS queue.
1. Subscribe the queue the topic.
1. Give the topic permission to send messages to the queue.
1. Start processing the document. Call `StartLendingAnalysis` operation.
1. Get the completion status from the Amazon SQS queue. The example code tracks the job identifier (`JobId`) that's returned by the `Start` operation. The example code only gets the results for matching job identifiers that are read from the completion status. This is important if other applications are using the same queue and topic. For simplicity, the example code deletes jobs that don't match. Consider adding the deleted jobs to an Amazon SQS dead-letter queue for further investigation.
The results of the StartLendingAnalysis operation can be sent to an Amazon S3 bucket of your choice by using the OutputConfig feature. If you use this feature, you may have to do some additional configuration of your User and Service Role. For information on how to let Amazon Textract send encrypted documents to your Amazon S3 bucket, see [Permissions for Output Configuration](#async-output-config).
1. Get and display the processing results by calling the `GetLendingAnalysis` operation or the `GetLendingAnalysisSummary` operation.
1. Once you are finished processing documents, be sure to delete the Amazon SNS topic and the Amazon SQS queue. If you need to process additional documents, you can leave the Amazon SNS topic and Amazon SQS queue as they are and reuse them for the other documents.
### Performing Asynchronous Lending Analysis
The example code for this procedure is provided for Python and the AWS CLI. Before you begin, install the appropriate AWS SDK. For more information, see [Step 2: Set Up the AWS CLI and AWS SDKs](#setup-awscli-sdk).
1. Configure user access to Amazon Textract, and configure Amazon Textract access to Amazon SNS. For more information, see [Configuring Amazon Textract for Asynchronous Operations](https://docs.aws.amazon.com/en_us/textract/latest/dg/api-async-roles.html). To complete this procedure, you need a multipage document file in PDF format. You can skip steps 3 – 6 in the configuration instructions, because the example code creates and configures the Amazon SNS topic and Amazon SQS queue. If completing the CLI example, you don't need to set up an SQS queue.
1. Upload a multipage document file in PDF or TIFF format to your Amazon S3 bucket (you can also process single-page documents in JPEG, PNG, TIFF, or PDF formats). For instructions, see [Uploading Objects into Amazon S3](https://docs.aws.amazon.com/AmazonS3/latest/user-guide/UploadingObjectsintoAmazonS3.html)in the *Amazon Simple Storage Service User Guide*.
1. Use the following AWS SDK for Python (Boto3) or AWS CLI code to analyze text in a multipage lending document. In the main function:
+ Replace the value of `roleArn` with the IAM role ARN that you saved in [Giving Amazon Textract Access to Your Amazon SNS Topic](https://docs.aws.amazon.com/en_us/textract/latest/dg/api-async-roles.html#api-async-roles-all-topics).
+ Replace the values of `bucket` and `document` with the bucket and document file name that you previously specified in the proceeding Step 2.
+ Replace the value of the `type` input parameter of the `ProcessDocument` function with the type of processing that you want to use. For example, use `ProcessType.DETECTION` to detect text, or use `ProcessType.ANALYSIS` to analyze text.
+ For the Python example, replace the value of `region_name` with the region your client is operating in.
For the upcoming AWS CLI example code, do the following:
+ When calling the [StartLendingAnalysis](https://docs.aws.amazon.com/en_us/textract/latest/dg/API_StartLendingAnalysis.html) operation, replace the value of `bucket-name` with the name of your S3 bucket, and replace `FileName` with the name of the file you specified in step 2. Specify the region of your bucket by replacing `region-name` with the name of your region. Take note that the CLI example does not make use of SQS.
+ When calling the [GetLendingAnalysis](https://docs.aws.amazon.com/en_us/textract/latest/dg/API_GetLendingAnalysis.html) operation or the [GetLendingAnalysisSummary](https://docs.aws.amazon.com/en_us/textract/latest/dg/API_GetLendingAnalysisSummary.html) operation, replace `jobId` with the `jobId` returned by [StartLendingAnalysis](https://docs.aws.amazon.com/en_us/textract/latest/dg/API_StartLendingAnalysis.html). Specify the region of your bucket by replacing `region-name` with the name of your region.
1. Run the code for your chosen SDK or the AWS CLI.
The operation might take a while to finish. After it's finished, a list of blocks for detected or analyzed text is displayed by the follwing examples:
------
#### [ AWS CLI ]
To start the lending document analysis use the following CLI command. If you want to see splitted documents, use the `output-config` argument, otherwise you can remove it :
```
aws textract start-lending-analysis \
--document-location '{"S3Object":{"Bucket":"S3Bucket","Name":"FileName"}}' \
--output-config '{"S3Bucket": "S3Bucket", "S3Prefix": "S3Prefix"}' \
--kms-key-id '1234abcd-12ab-34cd-56ef-1234567890ab' \
--region 'region-name'
```
To get the results of the lending document analysis use the following CLI command. The `max-results` argument is optional, and if you don't want to limit the number of results returned you can remove it:
```
aws textract get-lending-analysis \
--job-id 'jobId' \
--region 'us-west-2' \
--max-results 30
```
To retrieve a summary of the results:
```
aws textract get-lending-analysis-summary \
--job-id 'jobId' \
--region 'us-west-2'
```
------
#### [ Python ]
```
import boto3
import json
import sys
import time
class DocumentProcessor:
def __init__(self, role, bucket, document, region):
self.roleArn = role
self.bucket = bucket
self.document = document
self.region_name = region
self.textract = boto3.client('textract', region_name=self.region_name)
self.sqs = boto3.client('sqs')
self.sns = boto3.client('sns')
def ProcessDocument(self):
jobFound = False
response = self.textract.start_lending_analysis(
DocumentLocation={'S3Object': {'Bucket': self.bucket, 'Name': self.document}},
NotificationChannel={'RoleArn': self.roleArn, 'SNSTopicArn': self.snsTopicArn})
print('Processing type: Analysis')
print('Start Job Id: ' + response['JobId'])
dotLine = 0
while jobFound == False:
sqsResponse = self.sqs.receive_message(QueueUrl=self.sqsQueueUrl, MessageAttributeNames=['ALL'],
MaxNumberOfMessages=10)
if sqsResponse:
if 'Messages' not in sqsResponse:
if dotLine < 40:
print('.', end='')
dotLine = dotLine + 1
else:
print()
dotLine = 0
sys.stdout.flush()
time.sleep(5)
continue
for message in sqsResponse['Messages']:
notification = json.loads(message['Body'])
textMessage = json.loads(notification['Message'])
print(textMessage['JobId'])
print(textMessage['Status'])
if str(textMessage['JobId']) == response['JobId']:
print('Matching Job Found:' + textMessage['JobId'])
jobFound = True
self.GetResults(textMessage['JobId'])
self.GetSummary(textMessage['JobId'])
self.sqs.delete_message(QueueUrl=self.sqsQueueUrl,
ReceiptHandle=message['ReceiptHandle'])
else:
print("Job didn't match:" +
str(textMessage['JobId']) + ' : ' + str(response['JobId']))
# Delete the unknown message. Consider sending to dead letter queue
self.sqs.delete_message(QueueUrl=self.sqsQueueUrl,
ReceiptHandle=message['ReceiptHandle'])
print('Done!')
def CreateTopicandQueue(self):
millis = str(int(round(time.time() * 1000)))
# Create SNS topic
snsTopicName = "AmazonTextractTopic" + millis
topicResponse = self.sns.create_topic(Name=snsTopicName)
self.snsTopicArn = topicResponse['TopicArn']
# create SQS queue
sqsQueueName = "AmazonTextractQueue" + millis
self.sqs.create_queue(QueueName=sqsQueueName)
self.sqsQueueUrl = self.sqs.get_queue_url(QueueName=sqsQueueName)['QueueUrl']
attribs = self.sqs.get_queue_attributes(QueueUrl=self.sqsQueueUrl,
AttributeNames=['QueueArn'])['Attributes']
sqsQueueArn = attribs['QueueArn']
# Subscribe SQS queue to SNS topic
self.sns.subscribe(
TopicArn=self.snsTopicArn,
Protocol='sqs',
Endpoint=sqsQueueArn)
# Authorize SNS to write SQS queue
policy = """{{
"Version":"2012-10-17",
"Statement":[
{{
"Sid":"MyPolicy",
"Effect":"Allow",
"Principal" : {{"AWS" : "*"}},
"Action":"sqs:*",
"Resource": "{}",
"Condition":{{
"ArnEquals":{{
"aws:SourceArn": "{}"
}}
}}
}}
]
}}""".format(sqsQueueArn, self.snsTopicArn)
response = self.sqs.set_queue_attributes(
QueueUrl=self.sqsQueueUrl,
Attributes={
'Policy': policy
})
def DeleteTopicandQueue(self):
self.sqs.delete_queue(QueueUrl=self.sqsQueueUrl)
self.sns.delete_topic(TopicArn=self.snsTopicArn)
# Display information about a block
def DisplayExtractInfo(self, response):
results = response['Results']
for page in results:
print("Page Classification: {}".format(page["PageClassification"]["PageType"]))
print("Page Number: {}".format(page["Page"]))
for extract in page["Extractions"]:
for fields, vals in extract['LendingDocument'].items():
for val in vals:
print("Document Type: {}".format(val['Type']))
detections = val['ValueDetections']
for i in detections:
print(i['Text'])
print('Geometry')
print('\tBounding Box: {}'.format(i['Geometry']['BoundingBox']))
print('\tPolygon: {}'.format(i['Geometry']['Polygon']))
def GetSummary(self, jobId):
maxResults = 1000
response = self.textract.get_lending_analysis_summary(JobId=jobId, MaxResults=maxResults)
doc_groups = response['DocumentGroups']
print("Summary info:")
for group in doc_groups:
print("Document type: " + group['Type'])
split_docs = group['SplitDocuments']
for doc in split_docs:
print(doc)
for idx, page in doc.items():
print(str(idx) + " - " + str(page))
def GetResults(self, jobId):
maxResults = 1000
paginationToken = None
finished = False
while finished == False:
response = None
if paginationToken == None:
response = self.textract.get_lending_analysis(JobId=jobId,
MaxResults=maxResults)
else:
response = self.textract.get_lending_analysis(JobId=jobId,
MaxResults=maxResults,
NextToken=paginationToken)
print('Detected Document Text')
print('Pages: {}'.format(response['DocumentMetadata']['Pages']))
self.DisplayExtractInfo(response)
if 'NextToken' in response:
paginationToken = response['NextToken']
else:
finished = True
def main():
roleArn = ''
bucket = ''
document = ''
region_name = ''
analyzer = DocumentProcessor(roleArn, bucket, document, region_name)
analyzer.CreateTopicandQueue()
analyzer.ProcessDocument()
analyzer.DeleteTopicandQueue()
if __name__ == "__main__":
main()
```
------
## Amazon Textract Results Notification
Amazon Textract sends the status of an analysis request to an Amazon Simple Notification Service (Amazon SNS) topic. To get the notification from an Amazon SNS topic, use an Amazon SQS queue or an AWS Lambda function. For more information, see [Calling Amazon Textract Asynchronous Operations](#api-async). For an example, see [Detecting or Analyzing Text in a Multipage Document](#async-analyzing-with-sqs).
The status message sent by Amazon Simple Notification Service to Amazon SQS has the following JSON format:
```
{
"JobId": "String",
"Status": "String",
"API": "String",
"JobTag": "String",
"Timestamp": Number,
"DocumentLocation": {
"S3ObjectName": "String",
"S3Bucket": "String"
}
}
```
This table describes the different parameters within an Amazon SNS status.
| Parameter | Description |
| --- | --- |
| JobId | The unique identifier that Amazon Textract assigns to the job. It matches a job identifier that's returned from a `Start` operation, such as [StartDocumentTextDetection](https://docs.aws.amazon.com/textract/latest/APIReference/API_StartDocumentTextDetection.html). |
| Status | The status of the job. Valid values are SUCCEEDED, FAILED, or ERROR. |
| API | The Amazon Textract operation used to analyze the input document, such as [StartDocumentTextDetection](https://docs.aws.amazon.com/textract/latest/APIReference/API_StartDocumentTextDetection.html) or [StartDocumentAnalysis](https://docs.aws.amazon.com/textract/latest/APIReference/API_StartDocumentAnalysis.html). |
| JobTag | The user-specified identifier for the job. You specify `JobTag` in a call to the `Start` operation, such as [StartDocumentTextDetection](https://docs.aws.amazon.com/textract/latest/APIReference/API_StartDocumentTextDetection.html). |
| Timestamp | The Unix timestamp that indicates when the job finished, returned in milliseconds. |
| DocumentLocation | Details about the document that was processed. Includes the file name and the Amazon S3 bucket that the file is stored in. |
If the value of "Status" in the Amazon SNS notification is "Failed", this indicates something has gone wrong with your analysis job. In this case, check for an error message returned by the Amazon Textract API operation and ensure your document matches the quotas specified by[Set Quotas in Amazon Textract](#limits-document)
# Customizing your Queries Responses
Amazon Textract lets you customize the output of its pretrained Queries feature using adapters. You can use the [Amazon Textract Console](https://console.aws.amazon.com/textract/) to create an adapter. This adapter can then be referenced when calling the [AnalyzeDocument](https://docs.aws.amazon.com/textract/latest/APIReference/API_AnalyzeDocument.html) and [StartDocumentAnalysis](https://docs.aws.amazon.com/textract/latest/APIReference/API_StartDocumentAnalysis.html) operations.
When you create an adapter using the console, you upload your own documents for the purposes of training the adapter and testing its performance. You also add queries to your documents and then annotate your documents by linking these queries to the correct response elements in your documents. Once you have created an adapter and annotated your documents, you can train the adapter, check its performance, and then use it when analyzing documents.
Adapters are modular components are added to the existing Amazon Textract deep learning model, extending its capabilities for the tasks it’s trained on. By fine-tuning a deep learning model with adapters, you can customize the output for document analysis tasks related to your specific use case.
To create and use an adapter, you must:
+ Upload sample documents for training
+ Designate the train and test datasets
+ Annotate your documents with queries and responses
+ Train the adapter
+ Get the AdapterId
+ Use the adapter when calling `AnalyzeDocument`
**Uploading sample documents**
To train the adapter, you must upload a set of sample documents representative of your use case. You can upload documents directly from your computer or an Amazon S3 bucket. For best results, provide as many documents for training as possible (up to a maximum of 2,500 pages training documents and 1000 test documents). Make sure that the documents represent all aspects of your use case. You must upload a minimum of five training and five testing documents.
**Designating training and test sets**
You must divide all of your documents into training and test sets. The training set is used to train the adapter. The adapter learns the patterns contained in these annotated documents. The test set is used to evaluate the adapter performance.
For more information on training and testing data, see [Preparing training and testing datasets](#textract-preparing-training-testing).
**Annotating documents with queries and responses**
When annotating your documents, you have two choices: You can auto-label your documents using the pretrained Queries feature and then edit the labels where needed. Alternatively, you can manually label responses for each of your document queries.
For more information on best practices for queries, see [Best Practices for Queries](https://docs.aws.amazon.com/en_us/textract/latest/dg/bestqueries.html).
**Train the adapter **
After you annotate the training data, you can initiate the training process for your adapter. Amazon Textract trains an adapter that's tailored to your documents. The adapter training takes 2-30 hours, depending on the size of the dataset and the AWS Region. When the training is complete, you can view the training status in the adapter details page. If the status is `training failed`, see [Debugging training failures](#textract-debugging-failures-adapters) to debug the failure.
**Evaluate the adapter**
After each round of adapter training, review the performance metrics in the AWS Management Console to determine how close the adapter is to your desired level of performance. You can then further improve your adapter’s accuracy for your documents by uploading a new batch of training documents or by reviewing annotations for documents that have low accuracy scores. After you create an improved version of the adapter, you can use the AWS Console to delete any earlier adapter versions that you no longer need.
For more information on evaluation metrics, see [Evaluating and improving your adapters](#textract-evaluating-improving-adapters).
**Get the AdapterId**
Once the adapter has been trained, you can get the unique ID for your adapter to use with the Amazon Textract document analysis API operations. Retrieve the AdapterId by using the [ListAdapterVersions](https://docs.aws.amazon.com/textract/latest/APIReference/API_ListAdapterVersions.html) API operation, or by using the AWS Management Console.
**Call the AnalyzeDocument API operation**
To apply your custom adapter, provide its ID when calling the [AnalyzeDocument](https://docs.aws.amazon.com/textract/latest/APIReference/API_AnalyzeDocument.html) or [StartDocumentAnalysis](https://docs.aws.amazon.com/textract/latest/APIReference/API_StartDocumentAnalysis.html) API operations. This enhances predictions on your documents. When calling API operations, you can use up to one adapter per page.
**Video demonstration and tutorial**
[](https://www.youtube.com/watch?v=we-bv-NXgL0?si=K1mDHrncKLz918ZC)
## Creating adapters
Before you can train an adapter, you must create an adapter. To do so, use the [CreateAdapter](https://docs.aws.amazon.com/textract/latest/APIReference/API_CreateAdapter.html) operation. After you create an adapter, get information about it with the [GetAdapter](https://docs.aws.amazon.com/textract/latest/APIReference/API_GetAdapter.html) operation. Configuration elements of adapters can be updated with the [UpdateAdapter](https://docs.aws.amazon.com/textract/latest/APIReference/API_UpdateAdapter.html) operation. Get a list of adapters with the [ListAdapters](https://docs.aws.amazon.com/textract/latest/APIReference/API_ListAdapters.html) operation. Delete an adapter you no longer need with the [DeleteAdapter](https://docs.aws.amazon.com/textract/latest/APIReference/API_DeleteAdapter.html) operation.
### Create an Adapter
To customize the Amazon Textract base model, create an adapter. To do so, use the [CreateAdapter](https://docs.aws.amazon.com/textract/latest/APIReference/API_CreateAdapter.html) operation. When calling `CreateAdapter,` you provide an AdapterName and FeatureType as an input. Currently Queries is the only feature type supported.
When creating an adapter you can also provide a Description, Tags, and a ClientRequestToken. Finally, you can choose whether the adapter should be auto-updated with the AutoUpdate argument. After creating an adapter, you can start training it on your own sample documents by using the [CreateAdapterVersion](https://docs.aws.amazon.com/textract/latest/APIReference/API_CreateAdapterVersion.html) operation.
To create an adapter with the Amazon Textract console:
+ Sign in to the Amazon Textract console.
+ Select **Custom Queries** from the left navigation panel.
+ Select **Create adapter**.
To create an adapter with the AWS CLI or AWS SDK:
+ If you haven't already done so, install and configure the AWS CLI and the AWS SDKs. For more information, see [Step 2: Set Up the AWS CLI and AWS SDKs](#setup-awscli-sdk).
+ Use the following code to create an adapter:
------
#### [ CLI ]
```
aws textract create-adapter \
--adapter-name "test-w2" \
--feature-types '["QUERIES"]' \
--description 'demo'
```
------
### Get adapter
You can retrieve configuration information for an adapter at any time by calling the [GetAdapter](https://docs.aws.amazon.com/textract/latest/APIReference/API_GetAdapter.html) operation and specifying an AdapterId. GetAdapter returns information on AdapterName, Description, CreationTime, AutoUpdate status, and FeatureTypes.
To see details for your adapter with the console:
+ Sign into the AWS console for Amazon Textract.
+ Select **Custom Queries** from the navigation panel on the left.
+ From the list of **Your adapters**, select the adapter you want to view the details for.
+ Review the details for the adapter on your Adapter details page.
To see details for your adapter with the CLI/SDK:
+ If you haven't already done so, install and configure the AWS CLI and the AWS SDKs. For more information, see [Step 2: Set Up the AWS CLI and AWS SDKs](#setup-awscli-sdk).
+ Use the following code to create an adapter:
------
#### [ CLI ]
```
aws textract get-adapter \
--adapter-id "abcdef123456"
```
------
### List adapters
You can list all of the adapters associated with your account by using the [ListAdapters](https://docs.aws.amazon.com/textract/latest/APIReference/API_ListAdapters.html) operation. You can filter the list of returned adapters by the date and time of creation by using the AfterCreationTime and BeforeCreationTime arguments. You can also set a number of maximum results to return using MaxResults.
To see a list of your adapters with the console:
+ Sign into the AWS console for Amazon Textract.
+ Select **Custom Queries** from the navigation panel on the left.
+ View your adapters in the list of your adapters.
To create an adapter with the CLI/SDK:
+ If you haven't already done so, install and configure the AWS CLI and the AWS SDKs. For more information, see [Step 2: Set Up the AWS CLI and AWS SDKs](#setup-awscli-sdk).
+ Use the following code to create an adapter:
------
#### [ CLI ]
```
aws textract list-adapters
```
------
### Update adapter
With Amazon Textract, you can update some configuration options of an adapter. Simultaneously, you can update any adapter versions associated with the adapter. To do this, call the [UpdateAdapter](https://docs.aws.amazon.com/textract/latest/APIReference/API_UpdateAdapter.html) operation and provide the operation with the AdapterId and configuration elements that you want to update. The AdapterName and FeatureTypes elements cannot be updated.
To update an adapter with the AWS CLI or AWS SDK:
+ If you haven't already done so, install and configure the AWS CLI and the AWS SDKs. For more information, see [Step 2: Set Up the AWS CLI and AWS SDKs](#setup-awscli-sdk).
+ Use the following code to create an adapter:
------
#### [ CLI ]
```
aws textract update-adapter \
--adapter-id 'abcdef123456' \
--description 'demo new'
```
------
### Delete an Adapter
You can delete a custom Amazon Textract adapter at any time by calling the [DeleteAdapter](https://docs.aws.amazon.com/textract/latest/APIReference/API_DeleteAdapter.html) API operation. You can delete an adapter by providing the DeleteAdapter operation with the AdapterId of the adapter that you want to delete. Invoke DeleteAdapter will delete all Adapter Versions associated with the Adapter ARN.
To delete an adapter with the console:
+ Sign in to the Amazon Textract console.
+ Select **Custom Queries** from the left navigation panel.
+ From the list of your adapters, select the adapter to delete.
+ Select **Delete** and follow the instructions to delete your adapter.
To create an adapter with the AWS CLI or AWS SDK:
+ If you haven't already done so, install and configure the AWS CLI and the AWS SDKs. For more information, see [Step 2: Set Up the AWS CLI and AWS SDKs](#setup-awscli-sdk).
+ Use the following code to create an adapter:
------
#### [ CLI ]
```
aws textract delete-adapter \
--adapter-id 'abcdef123456'
```
------
## Preparing training and testing datasets
**Training and Testing Datasets**
The training dataset is the basis for creating an adapter. You must provide an annotated training dataset to train an adapter. This training dataset consists of user uploaded document pages, queries, and annotated query answers. The model learns from this dataset to improve its performance on the type of documents you provide.
The testing dataset is used to evaluate the adapter’s performance. The testing dataset is created by using a slice of the original dataset that the model hasn’t seen before. This process assesses the adapter’s performance with new data, creating accurate measurements and metrics.
You must divide all of your documents into training and test sets. The training set is used to train the adapter. The adapter learns the patterns contained in these annotated documents. The test set is used to evaluate the adapter performance. If you upload fewer than 20 documents, split them equally between train and test. If you upload more than 20 documents, assign 70% of data to training and 30% to testing. When splitting documents in the AWS Management Console, you can let Amazon Textract automatically split your documents. Alternatively, you can manually divide your documents into training and testing sets.
**Dataset components**
Datasets contain the four following components, which you must prepare yourself or by using the AWS Management Console:
+ Images - Images can be JPEG, PNG, 1-page PDF, or 1-page TIFF. If you are submitting multipage documents, the AWS Management Console will visualize each page separately for annotation.
+ Annotation file - The annotation file follows the Amazon Textract Block structure, though it contains only QUERY and QUERY\_RESULT blocks.
+ Prelabeling files - This is the Block structure from the Amazon Textract current API response, pulled from the result of either the [DetectDocumentText](https://docs.aws.amazon.com/textract/latest/APIReference/API_DetectDocumentText.html) or [AnalyzeDocument](https://docs.aws.amazon.com/textract/latest/APIReference/API_AnalyzeDocument.html) operations. If you have already called Amazon Textract before and stored the result of the operation, you can provide the references to those results. Amazon Textract accepts multiple prelabeling files in case your document page has multiple response files exported from an asynchronous API.
+ Manifest file - A JSONL-based file where each line points to an annotation file, the prelabeling file, or an image or single-page PDF. Refer to this manifest file format when structuring your manifest file.
Manifest files are contain one or more JSON lines, with each line containing information for a single image. What follows is a single line in a manifest file:
```
{
"source-ref": "s3://textract-adapters-sample-bucket-129090f9e-d51c-4034-a732-48caa3b532e7/adapters/0000000000/assets/1003_3_1.png",
"source-ref-version": "uPNKaY_2I8dxj9Kp2sO0zDUt4q3MAJen",
"source-ref-metadata": {
"origin-ref": "s3://textract-adapters-sample-bucket-129090f9e-d51c-4034-a732-48caa3b532e7/adapters/0000000000/original_assets/1003_3.tiff",
"page-number": 1
},
"annotations-ref": "s3://textract-adapters-sample-bucket-129090f9e-d51c-4034-a732-48caa3b532e7/adapters/0000000000/annotations/1003_3_1.png.json",
"annotations-ref-version": "nwj_MC40zsAae_idwsdEa0r4ZQaVthGs",
"annotations-ref-metadata": {
"prelabeling-refs": [{
"prelabeling-ref": "s3://textract-adapters-sample-bucket-129090f9e-d51c-4034-a732-48caa3b532e7/adapters/0000000000/prelabels/fd958ee156b5b5de1ee6101dd05263120790836856774c871b877baa35e2f373/1"
"prelabeling-ref-version": "uPNKaY_2I8dxj9Kp2sO0zDUt4q3MAJen"
]},
"assignment": "TRAINING",
"include": true,
},
"schema-version": "1.0"
}
```
Note that the manifest file contains the following info:
+ **source-ref: ** (Required) The Amazon S3 location of the image or single page file. The format is "s3://BUCKET/OBJECT\_PATH".
+ **source-ref-version: ** (Optional) The Amazon S3 object version of the image or single page file.
+ **source-ref-metadata: ** (Optional) Metadata about the **source-ref** when this image of single page file should is part of a multipage document. This information is helpful when you want to evaluate the adapter on multipage documents. When not specified, we consider each **source-ref** as a standalone document.
+ *origin-ref: * (Required) The Amazon S3 location to the original multipage document.
+ *page-number: * (Required) Page number of the **source-ref** in the original document.
+ **annotations-ref: ** (Required) The Amazon S3 location of the customer performed annotations on the image. The format is "s3://BUCKET/OBJECT\_PATH".
+ **annotations-ref-metadata: ** (Required) Metadata about the annotations attribute. Holds prelabeling references, along with assignment type of the manifest line item, and if to include/exclude the document from training.
+ *prelabeling-refs: * (Required) An list of files from the Amazon Textract asynchronous API response of the source-ref file. Each file in prelabeling-refs should contain a Block property, with at most of 1000 blocks.
+ *prelabeling-ref * (Required) The Amazon S3 location of the automatic annotations on the image using the Amazon Textract API.
+ *prelabeling-ref-version * (Optional) The Amazon S3 object version of the prelabeling file.
+ *assignment: * (Required) Specify "TRAINING" if the image belongs to the training dataset. Otherwise, use "TESTING".
+ *include: * (Required) Specify true to include the line item for training. Otherwise, use false.
+ **schema-version: ** (Optional) Version of the manifest file. The valid value is 1.0.
For optimal accuracy improvements, see [Best practices for Amazon Textract Custom Queries](#best-practices-adapters).
**Annotating the documents with queries and responses**
When annotating your documents, you can choose to auto-label your documents using the pretrained Queries feature and then edit the labels where needed. Alternatively, you can manually label responses for each of your document queries.
When manually labeling your documents, Amazon Textract extracts the raw text from the document. After the raw text is extracted, you can use the AWS Management Console annotation interface to create queries for your documents. Link these queries to the relevant answers in your documents to establish a "ground truth" for training.
When auto-labeling your documents, you specify the appropriate queries for your document. When you finish adding queries to your documents, Amazon Textract attempts to extract the proper elements from your documents, generating annotations. You must then verify the accuracy of these annotations, correcting any that are incorrect. By linking queries to answers, you teach the model what information is important in your documents.
When creating queries, consider the types of questions you will have to ask to retrieve the relevant data in your documents. For more information about this response structure, see [Query Response Structures](https://docs.aws.amazon.com/en_us/textract/latest/dg/queryresponse.html). For more information on best practices for queries, see [Best Practices for Queries](https://docs.aws.amazon.com/en_us/textract/latest/dg/bestqueries.html).
You will need to train an adapter on representative samples of your documents. When you use the AWS Management Console for annotating the documents, the console prepares these files for you automatically.
## Training adapter versions
After you have created an adapter and created training and testing datasets, you can train a version of that adapter using the [CreateAdapterVersion](https://docs.aws.amazon.com/textract/latest/APIReference/API_CreateAdapterVersion.html) operation.
### Create adapter version
To customize the Amazon Textract base model to fit your specific use cases, create an adapter. After you create an adapter, you need to train the adapter. You can start training an adapter by calling the [CreateAdapterVersion](https://docs.aws.amazon.com/textract/latest/APIReference/API_CreateAdapterVersion.html) operation. You provide the operation with an AdapterId and use the DatasetConfig to specify an Amazon S3 bucket containing the dataset you want to train the adapter on. The manifest file you provide must follow a specific format. For more information, see [Preparing training and testing datasets](#textract-preparing-training-testing). You can also provide the operation with an optional KMSKeyId, optional ClientRequestToken, or any Tags to add to the adapter version.
Running this operation requires the appropriate IAM permissions. For a sample IAM policy, see [Permissions needed for CreateAdapterVersion](#security_iam_create-adapter-version).
To create a new adapter version with the console:
+ Sign in to the Amazon Textract console.
+ Select **Custom Queries** from the left navigation panel.
+ From the list of **Your adapters**, select the adapter.
+ On the adapter details page, select **Modify the dataset**.
+ Select the **Add documents** dropdown menu and add documents to the training dataset.
+ On the following page, choose how to add your training documents (by S3 bucket or directly from your computer).
+ Choose **Add documents** to finish adding your documents to the dataset.
+ Wait until the auto-labeling is complete.
+ Review the annotations by clicking** Review Annotations**.
+ Review each document, clicking “**Submit and next**”.
+ After you review all annotations, choose **Train adapter** to start training the new adapter.
The number of successful trainings that can be performed per month is limited per AWS account. Refer to [Set Quotas in Amazon Textract](#limits-quotas-explained) for more information regarding limits.
To create an adapter version with the AWS CLI or AWS SDK:
+ If you haven't already done so, install and configure the AWS CLI and the AWS SDKs. For more information, see [Step 2: Set Up the AWS CLI and AWS SDKs](#setup-awscli-sdk).
+ Use the following code to create a adapter:
------
#### [ CLI ]
```
aws textract create-adapter-version \
--adapter-id "012345678910" \
--dataset-config '{"ManifestS3Object": {"Bucket":"{{amzn-s3-demo-source-bucket}}","Name":"test/sample-manifest.jsonl"}}' \
--output-config '{"S3Bucket": "{{amzn-s3-demo-destination-bucket}}", "S3Prefix": "prefix-string"}'
```
------
## Evaluating and improving your adapters
Once you have finished the training process and created your adapter, it's important to evaluate how well the adapter is extracting information from your documents.
**Performance metrics**
Three metrics are provided in the Amazon Textract console to assist you in analyzing your adapter's performance:
1. Precision - Precision measures the percentage of extracted information (predictions) that are correct. The higher the precision rating, the fewer false positives there are.
1. Recall - Recall measures the percentage of total relevant items that are successfully identified and extracted by the model. The higher the recall value, the fewer false negatives there are.
1. F1 Score - The F1 score combines precision and recall into a single metric, providing a balanced measurement for overall extraction accuracy.
The values for these measurements range from 0 to 1, with 1 being perfect extraction.
These metrics are calculated by comparing the adapter's extractions to the "ground truth" annotations on the test set. By analyzing the F1, precision, and recall, you can determine where the adapter needs improvement.
For example, low precision means many of the model’s predictions are false positives, therefore the adapter is extracting irrelevant data. In contrast, a low recall value means that the model is missing relevant data. Using these insights, you can refine the training data and retrain the adapter to increase performance.
You can also check the performance of your model by testing it with new documents and queries that you specify. Use the **Try Adapter** option in the console to get predictions for these documents. This way, you can evaluate the adapter with your own test queries and documents and see real-world examples of how the adapter is performing.
You can also retrieve metrics for an adapter version by using the [GetAdapterVersion](https://docs.aws.amazon.com/textract/latest/APIReference/API_GetAdapterVersion.html) operation using an SDK or the CLI. Get a list of adapters that you want to retrieve metrics for by using the [ListAdapterVersions](https://docs.aws.amazon.com/textract/latest/APIReference/API_ListAdapterVersions.html) API operation. Delete an adapter you no longer need with the [DeleteAdapterVersion](https://docs.aws.amazon.com/textract/latest/APIReference/API_DeleteAdapterVersion.html) operation.
**Improving your model**
Adapter deployment is an iterative process, as you’ll likely need to retrain several times to reach your target level of accuracy. After you create and train your adapter, you’ll want to test and evaluate your adapter’s performance on various metrics and queries.
If your adapter’s accuracy is lacking in any area, add new examples of those documents to increase the adapter’s performance for those queries. Try to provide the adapter with additional, varied examples that reflect the cases where it struggles. Providing your adapter with representative, varied documents enables it to handle diverse real-world examples.
After adding new documents to your training set, retrain the adapter. Then re-evaluate on your test set and queries. Repeat this process until the adapter reaches your desired level of performance. Precision, recall, and F1 scores should gradually improve over successive training iterations.
### List adapter versions
An Amazon Textract adapter can have a number of different versions associated with it. In order to see which adapter versions associated with a given adapter, you can call the [ListAdapterVersions](https://docs.aws.amazon.com/textract/latest/APIReference/API_ListAdapterVersions.html) operation. The operation will return all versions of an adapter unless provided with filtering criteria using of the optional arguments such as AdapterId, AfterCreationTime, BeforeCreationTIme, Statuses, or MaxResults.
To see a list of your adapter versions with the console:
+ Sign in to the Amazon Textract console.
+ Select **Custom Queries** from the left navigation panel.
+ From the list of your adapters, select the adapter.
+ View the adapter versions in the **Adapter versions** box.
To create an adapter with the AWS CLI or AWS SDK:
+ If you haven't already done so, install and configure the AWS CLI and the AWS SDKs. For more information, see [Step 2: Set Up the AWS CLI and AWS SDKs](#setup-awscli-sdk).
+ Use the following code to create an adapter:
------
#### [ CLI ]
```
aws textract list-adapter-versions
```
------
### Get an Adapter version
You can retrieve configuration information and the current status of an adapter version by calling the [GetAdapterVersion](https://docs.aws.amazon.com/textract/latest/APIReference/API_GetAdapterVersion.html) operation. When calling GetAdapterVersion, specify the AdapterId and the AdapterVersion. This returns information about the specified adapter version so that you can check the current operational status and configuration options.
To see details for your adapter using the console:
+ Sign in to the Amazon Textract console.
+ Select **Custom Queries** from the left navigation panel.
+ From the list of your adapters, select the adapter.
+ Select the adapter version in the **Adapter versions** box.
To see details for your adapter using the AWS CLI or AWS SDK
+ If you haven't already done so, install and configure the AWS CLI and the AWS SDKs. For more information, see [Step 2: Set Up the AWS CLI and AWS SDKs](#setup-awscli-sdk).
+ Use the following code to create an adapter:
------
#### [ CLI ]
```
aws textract get-adapter-version \
--adapter-id "abcdef123456" \
--adapter-version "1"
```
------
### Delete adapter version
You can delete an adapter version you’re no longer using by calling [DeleteAdapterVersion](https://docs.aws.amazon.com/textract/latest/APIReference/API_DeleteAdapterVersion.html). To delete an adapter version you provide the DeleteAdapterVersion operation with both the adapter’s AdapterId and the specific AdapterVersion that you want to delete. Note that you cannot delete adapter versions with an "IN\_PROGRESS" status.
To delete an adapter version with the console:
+ Sign in to the Amazon Textract console.
+ Select **Custom Queries** from the left navigation panel.
+ From the list of your adapters, select the adapter.
+ Select **Delete** and follow the instructions.
+ Select the adapter version that you want to delete from the list of versions in the **Adapter** versions box.
+ Select **Delete** and follow the instructions to delete your adapter.
To delete an adapter with the AWS CLI or AWS SDK:
+ If you haven't already done so, install and configure the AWS CLI and the AWS SDKs. For more information, see [Step 2: Set Up the AWS CLI and AWS SDKs](#setup-awscli-sdk).
+ Use the following code to create an adapter:
------
#### [ CLI ]
```
aws textract delete-adapter-version \
--adapter-id "abcdef123456" \
--adapter-version "1"
```
------
## Debugging training failures
If you are notified on the adapter details page that training has failed, refer to the status message to understand the error and correct it. There are two types of errors: creation errors and file errors. Some status messages are returned in the console, while others are displayed in a validation file.
The validation file that is created alongside a training job contains information on the types of errors encountered when training. If the error message states that the error is a validation error ("Status message = Manifest file contains invalid records. Consult validation error file at OutputConfig path for more details."), refer to the validation file located in the S3 output bucket you chose during adapter training. The generated validation file is named `validation_errors.jsonl`. Each line in the file corresponds to a line in the manifest file, with errors yielded for each line in the manifest file that produces an error.
The following is a list of all creation errors and possible causes:
| | |
| --- |--- |
| Error name | Error description |
| CREATION\_ERROR | Manifest file contains invalid records. Consult validation error file at OutputConfig path for more details. |
| CREATION\_ERROR | No manifest file found. Ensure manifest file is provided. |
| CREATION\_ERROR | Unable to access manifest file in specified S3 bucket. |
| CREATION\_ERROR | Manifest file located in an unsupported cross-Region S3 bucket. |
| CREATION\_ERROR | Contents of manifest file are empty. |
| CREATION\_ERROR | The manifest file size exceeds the maximum supported size. |
| CREATION\_ERROR | The manifest file has too many training documents. |
| CREATION\_ERROR | The manifest file has too many testing documents. |
| CREATION\_ERROR | The manifest file has too few training documents. |
| CREATION\_ERROR | The manifest file has too few testing documents. |
| CREATION\_ERROR | The manifest file has too few training, and testing documents. |
| CREATION\_ERROR | The manifest file has too many training, and testing documents. |
| CREATION\_ERROR | The manifest file has invalid encoding. |
| CREATION\_ERROR | Manifest file contains more training records than allowed limits. |
| CREATION\_ERROR | Manifest file contains more testing records than allowed limits. |
| CREATION\_ERROR | Unable to access the specified KMS key. |
| CREATION\_ERROR | Unable to access the S3 output bucket. |
| CREATION\_ERROR | Amazon Textract does not support cross-Region Amazon S3 resources. |
The following is a list of file-related errors:
| | |
| --- |--- |
| Error name | Error description |
| ERROR\_PAGE\_COUNT\_EXCEEDS\_MAXIMUM | Number of pages for the same document exceeds maximum limit.(This happens when customer specified origin-ref and page\_number in source-ref metadata.) |
| ERROR\_INVALID\_FILE | The {source-ref\|annotations-ref\|prelabeling-refs} file(s) is invalid. Check S3 path and/or file properties. |
| ERROR\_INVALID\_JSON\_LINE | The JSON line format is invalid |
| ERROR\_MANIFEST\_JSON\_DECODE\_ERROR | The record is not a valid JSON object. |
| ERROR\_DUPLICATE\_SOURCE\_REF | A record with this source-ref already exists in the manifest. |
| ERROR\_IMAGE\_TOO\_LARGE | The image resolution is too large. |
| ERROR\_INVALID\_PAGE\_COUNT | The file is invalid. Expected number of pages to be 1. |
| ERROR\_INVALID\_IMAGE | Unsupported source reference file format. |
| ERROR\_INVALID\_PDF | Unsupported PDF file. |
| ERROR\_INVALID\_PDF\_PAGE\_TOO\_LARGE | Unsupported PDF file. PDF page exceeds max dimensions. |
| ERROR\_INVALID\_TIFF | Unsupported TIFF file. |
| ERROR\_INVALID\_TIFF\_COMPRESSION | Unsupported TIFF compression type. |
| ERROR\_INVALID\_ANNOTATIONS | Invalid annotation or prelabeling file. |
| ERROR\_INVALID\_ANNOTATIONS\_FILE\_FORMAT | Invalid annotations file format. |
| ERROR\_MISSING\_ANNOTATION\_BLOCKS | Missing {PAGE\|QUERY\|QUERY\_RESULT} block(s). |
| ERROR\_INVALID\_BLOCK | Invalid {QUERY\|QUERY\_RESULT} block(s) found. |
| ERROR\_FILE\_SIZE\_LIMIT\_EXCEEDED | The size of the {ref\_file\_type} file(s) exceeds the limit: {size\_limit} MB. |
| ERROR\_INVALID\_PERMISSIONS\_DATASET\_S3\_BUCKET | Unable to access the {ref\_file\_type} file(s). |
| ERROR\_FILE\_NOT\_FOUND | The {ref\_file\_type} file(s) is not found. |
| ERROR\_FILE\_NOT\_FOUND\_IN\_REGION | Amazon Textract does not support cross-Region Amazon S3 resources. |
| ERROR\_QUERY\_RESULT\_TEXT\_LENGTH\_LIMIT\_EXCEEDED | QUERY\_RESULT text length is greater than the maximum length. |
| ERROR\_QUERY\_PER\_PAGE\_LIMIT\_EXCEEDED | Number of QUERY blocks is greater than the maximum allowed. |
| ERROR\_INVALID\_DATA\_FORMAT | "Invalid data format in {filename}." |
| ERROR\_BLOCK\_LIMIT\_EXCEEDED | "Number of {block\_type} blocks is greater than the maximum allowed." |
| ERROR\_DUPLICATE\_ORIGIN\_REF\_PAGE\_NUMBER\_COMBINATION | "A record with this origin-ref and page-number already exists in the manifest." |
| ERROR\_INVALID\_BLOCK\_RELATIONSHIP | "Invalid block relationship(s) found." |
| ERROR\_DUPLICATED\_BLOCK\_ID | "Blocks Id should be unique." |
To see API error descriptions, see the *Amazon Textract API Reference* for the appropriate operation. If an error occurs when you try to create a new adapter with the [CreateAdapterVersion](https://docs.aws.amazon.com/textract/latest/APIReference/API_CreateAdapterVersion.html) operation, see the API Reference page. If an error occurs when using the Amazon Textract console, read the error pop-up for information on why the operation failed.
## Using Adapters during Inference
After creating an adapter, you are provided with an ID and version for your custom adapter. You can provide this ID and version to [AnalyzeDocument](https://docs.aws.amazon.com/textract/latest/APIReference/API_AnalyzeDocument.html) for synchronous document analysis, or the [StartDocumentAnalysis](https://docs.aws.amazon.com/textract/latest/APIReference/API_StartDocumentAnalysis.html) operation for asynchronous analysis. Providing the Adapter ID will automatically integrate the adapter into the analysis process and use it to enhance predictions for your documents.
This way, you can leverage the capabilities of `AnalyzeDocument` while customizing it to fit your needs. When multiple adapters must be applied to different pages in the same document, you can specify one or more adapter(s) and their respective adapter versions as part of the API request. You can use the `Page` parameter to specify which pages to apply an adapter to.
This is similar to how the `Page` parameter for Queries works. Note the following:
+ If a page is not specified, it is set to `["1"]` by default.
+ The following characters are valid in the parameter string: `1 2 3 4 5 6 7 8 9 - *`. Blank spaces are not valid.
+ When using \* to indicate all pages, it must be the only element in the list.
+ The `Page` parameter does not overlap across adapters. A page can only have one adapter applied to it.
See the following example:
```
AdaptersConfig={ 'Adapters': [ { 'AdapterId': ADAPTER_ID,'Version': '1',
'Pages': ["1-5"] }, { 'AdapterId': ADAPTER_ID, 'Version': '1', 'Pages':["6-*"] } ] })
```
## Custom Queries tutorial
This tutorial shows you how to create, train, evaluate, use, and manage adapters.
With adapters, you can improve the accuracy of the Amazon Textract API operations, customizing the model’s behavior to fit your own needs and use cases. After you create an adapter with this tutorial, you can use it when analyzing your own documents with the [AnalyzeDocument](https://docs.aws.amazon.com/textract/latest/APIReference/API_AnalyzeDocument.html)API operation, and also retrain the adapter for future improvements.
In this tutorial you’ll learn how to:
+ Create an adapter using the AWS Management Console.
+ Create a dataset for training your adapter.
+ Annotate your training data.
+ Train your adapter on your training dataset.
+ Review your adapter’s performance.
+ Retrain your adapter.
+ Use your adapter for document analysis.
+ Delete your adapter.
### Prerequisites
Before you begin, we recommend that you read [Creating adapters](#textract-creating-using-adapters).
You must also set up your AWS account and install and configure an AWS SDK. For the SDK setup instructions, see [Step 2: Set Up the AWS CLI and AWS SDKs](#setup-awscli-sdk).
### Create an adapter
Before you can train or use an adapter you must create one. To create an adapter:
1. Sign in to the AWS Management Console and open the [Amazon Textract console](https://console.aws.amazon.com/textract/).
1. In the left pane, choose Custom Queries. The Amazon Textract Custom Queries landing page is shown.

1. The Custom Queries landing page show you a list of all your adapters, and there is also a button to create an adapter. Choose **Create adapter** to create your adapter. The number of successful trainings that can be performed per month is limited per AWS account. Refer to [Set Quotas in Amazon Textract](#limits-quotas-explained) for more information regarding limits.

1. On the following page, enter the adapter name, choose whether to automatically update your adapter, and optionally add tags to it. Then, select **Create adapter**. When you choose 'auto-update' Amazon Textract will automatically update your adapter when the pretrained Queries feature is updated.
After you create your adapter, you will be able to see the details for that adapter, including adapter name and the Adapter ID. The presence of these details verifies that the adapter has successfully been created.
You can now create the datasets that will be used to train and test your adapter.
### Dataset creation
In this step, you create a training dataset and a test dataset by uploading images from your local computer or from an Amazon S3 bucket. For more information about datasets, see [Detecting Text](#how-it-works-detecting) [Preparing training and testing datasets](#textract-preparing-training-testing)
When uploading images from your local computer, you can upload up to 30 images at one time. If you have a large number of images to upload, consider creating the datasets by importing the images from an Amazon S3 bucket.
1. To start creating your dataset, choose your adapter from the list of adapters, and then choose **Create dataset**.

1. In the **Dataset configuration** section, choose either **Manual split** or **Autosplit**. With manual split, you can specify individual images as part of your training and testing datasets. If you choose Autosplit, it will define your training and testing sets automatically when you upload all of your images. Manual split is recommended for people who are training adapters for the first time. For now, choose **Autosplit**.

1. In the Training dataset details section, you can choose **Upload documents from your computer** or **Import documents from S3 bucket**. If you choose to import your documents from an Amazon S3 bucket, provide the path to the bucket and folder that contains your training images. If you upload your documents directly from your computer, note that you can only upload 30 documents at one time. For the purposes of this tutorial, choose Upload documents from your computer.
1. In the Test dataset details section, you can choose **Upload documents from your computer** or **Import documents from S3 bucket**. For the purposes of this tutorial, choose **Upload documents from your computer**.
1. Choose **Create dataset**.
1. After creating the dataset, you will be taken to a Dataset details page. The dataset details page shows you a list of all the documents in your entire dataset, and which part of the dataset (train or test) your document has been assigned to. View this under the **Dataset assigned to** column. You can also view the following:
+ Document name
+ Document status
+ Number of pages in the document
+ Document type
+ Document size
+ If the document is part of the training set or the testing set
1. Select **Add documents to dataset** and add at least five documents to both your training and testing datasets. If you previously selected Autosplit, you can add all the documents at once.
1. If you want to add more documents to your dataset, use the **Add documents** menu to do so.
Before you can start training your adapter, you need to annotate your training documents with Queries. This is required to create the "annotations-ref" entries of your manifest file. After you add all your documents to the training or testing set, you can start the annotation process.
### Annotation and verification
In this step, you assign Queries and labels to each document you uploaded to your training and test datasets. You link a Query to the relevant answers on a document page with the AWS Management Console annotation tool.
To assign queries and answers to your documents:
1. Select Create queries from the Adapter landing page.

1. Add a query by entering it in the text box.

1. To add more queries, choose Add new query. Queries can have a 'raw text' response or a 'binary - Yes/No' response. To created a query with a binary response use the advanced setting.

1. After creating your queries, you must assign labels to your documents. To set labels for your documents, select **Auto-labeling** or **Manual labeling**. Auto-labeling is recommended for your first time training the adapter. Select the **Auto-labelling** option, and then choose Start auto-labeling.

1. The auto-labeling process will take some time to complete. When it's done, you're notified that “Auto-labeling is now completed.” After the labeling process is complete, you must verify the accuracy of the labeling. Select **Verify documents** in the Adapter details panel on the Details page, and then choose **Start reviewing** from the Dataset page.

1. In the annotation tool, you can select individual documents and view individual pages within those documents. Under the “Review responses” section, select a query that was assigned to your document page. If the answer to the query is incorrect, you can edit the response by clicking the **Edit** button for the query.

For queries with Yes/No answers, select Yes, No, or Empty. Then, choose **Apply**.
When editing the OCR for the label assigned to a query, choose the provided response and then draw a bounding box around part of the document image. To do so, use the “B” shortcut key or the bounding box tool on the tool bar at the bottom of the annotation tool. Then, choose **Apply**.
If a query should have more than one response element (answer), you can add additional responses. To do so, select the query and then choose **Add a response**. You are then prompted to draw a bounding box on the area of the document that has the answer. Confirm that the label for your bounding box is correct.
To add a new query for the document page, choose **Add query**. If you add a query, you must specify the query you want to add and then draw a bounding box for the query label.
When you're done, choose **Submit and next** to proceed to the next document and the next set of queries and responses. Repeat until you review all of your queries and responses.
After you review and evaluate all your queries and responses, select **Submit and close**.
### Training
After you add all of your documents to the training set or the testing set and review the generated responses for your queries, you can train the adapter.

To train the adapter:
1. Start by clicking **Train adapter** on the Dataset management page.

1. While initiating the training process, you can specify an Amazon S3 bucket that will contain the output of your adapter training job. If you specify an Amazon S3 bucket location that doesn’t exist yet, the bucket path will be created for you. You can also add tags to your adapter to track it, and customize your encryption settings. Customize the adapter training to fit your needs and then choose **Train Adapter**.
1. On the following page, choose **Train Adapter** to confirm that you want to start the training process. This will create your first version of your adapter.
After the training process starts, you can monitor the training process status on the Adapter landing page.
You're notified when the training process completes. Then, you can evaluate the adapter’s performance by inspecting metrics.
### Evaluating adapter performance
To evaluate model performance, use the left navigation pane to select the adapter version to evaluate.

By examining your adapter’s metrics, you can determine how your adapter is performing on the documents in your dataset and the queries you have defined. You can see the F1 Score, Precision, and Recall for your adapter across different elements of the training data: queries, documents, and pages. To switch between performance for these elements, choose the different tabs below the metrics display pane.
You can also view baseline metrics at any time by toggling the **Switch to baseline metrics** switch.
The summary of your adapter version’s performance also contains some tips on how to improve your adapter’s performance. You can review these tips at any time to improve your adapter. For more information about how to manage and improve your adapter, see [Evaluating and improving your adapters](#textract-evaluating-improving-adapters).
To demo your adapter and see its performance on a document:
1. Choose **Try Adapter**.

1. On the **Try adapter** page, you can choose a document to analyze with your adapter. Select the **Choose document** button and browse to the document’s location on your device. Alternatively, drag and drop the document into the **Upload a document** pane.
After uploading a document, the Try Adapter page will update to display the results of the adapter’s analysis, including queries, query answers, and confidence levels. If you are satisfied with your adapter’s performance you can proceed to inference, using your adapter in a call to [AnalyzeDocument](https://docs.aws.amazon.com/textract/latest/APIReference/API_AnalyzeDocument.html) or [StartDocumentAnalysis](https://docs.aws.amazon.com/textract/latest/APIReference/API_StartDocumentAnalysis.html) . Otherwise, you can improve your adapter’s performance by retraining your adapter with additional documents.
### Improving an adapter
To improve your adapter’s performance:
1. Choose **Modify the dataset** on the Adapter details page.

1. On the Dataset overview page, select **Add documents**. To retrain your adapter, add at least five more documents to the training dataset.
1. You are notified that the documents are added to the dataset. Select **Start reviewing** to review the results of the auto-labeling process.
1. Review the queries and responses. After you review and approve all the annotations for the documents you added, choose **Submit and close**.
1. On the dataset management page, choose **Train adapter** to start training your adapter on all of the data in your training dataset, including the new training documents.
Every training job you run creates a new version of the adapter. Note the name of the new adapter version to be sure that you're evaluating the performance of the proper adapter version.
### Inference
After creating an adapter, you are provided with an ID for your custom adapter. You can provide this ID to the [AnalyzeDocument](https://docs.aws.amazon.com/textract/latest/APIReference/API_AnalyzeDocument.html) operation for synchronous document analysis, or the [StartDocumentAnalysis](https://docs.aws.amazon.com/textract/latest/APIReference/API_StartDocumentAnalysis.html) operation for asynchronous analysis.
Providing the Adapter ID automatically integrates the adapter into the analysis process and uses it to enhance predictions for your documents. This way, you can leverage the capabilities of AnalyzeDocument while customizing it to fit your needs.
For an example of how to run inference using your adapter and the AnalyzeDocument API operation, see [Analyzing Document Text with Amazon Textract](#analyzing-document-text).
When multiple adapters must be applied to different pages in the same document, you can specify one or more adapter(s) and their respective adapter versions as part of the API request. You can use the Page parameter to specify which pages to apply an adapter to.
Note the following:
This is similar to how the `Page` parameter for Queries works. Note the following:
+ If a page is not specified, it is set to `["1"]` by default.
+ The following characters are valid in the parameter string: `1 2 3 4 5 6 7 8 9 - *`. Blank spaces are not valid.
+ When using \* to indicate all pages, it must be the only element in the list.
+ The `Page` parameter does not overlap across adapters. A page can only have one adapter applied to it.
### Adapter management
The following steps are repeated iteratively (after initial training of your adapter):
+ Choose **Modify the dataset** on the Adapter details page of the Amazon Textract console.
+ Select **Add documents**.
+ Add at least five more documents to the training dataset to retrain your adapter.
+ You're notified that the documents have been added to the dataset. Select **Start reviewing** to review the results of the auto-labeling process.
+ Review the queries and responses. After you review and approve all the annotations for the new documents, select** Train adapter**.
+ Wait for the adapter to complete the new round of training, then check performance metrics for your new adapter version.
After you train your model to your target performance level, you can use your adapter for inference in your application.
Be sure to delete adapter versions that you no longer need. To delete an adapter:
+ Go to the Adapters landing page, select the adapter, and choose **Delete**.
+ Type **Delete** into the text box, and then choose **Delete**.
## Copying adapters
Adapter Versions can be copied from one AWS account to another within AWS Regions.
In order to copy an adapter, you must have created an adapter in the destination AWS account using the Console or API. You are not required to train an adapter version, but the meta data (Adapter name and description) for the adapter must exist. This is to ensure you/your organization have access to the destination account.
**Note**
Your source and destination AWS accounts must be in the same AWS region to successfully copy an adapter. Please check the account regions before attempting to copy.
Once you have created an adapter, submit a support ticket with the following details. You will need a support subscription before submitting the ticket:
```
Region: xxx
Source:
AWS Account:
Adapter ID:
Adapter Version:
Destination:
AWS Account:
Adapter ID:
```
Once the adapter is copied over, you can use the destination adapter ID and version to make inference calls. You can test the inference API output using the same set of queries you used to train the source adapter. The destination adapter will return the same results as the source adapter.
# Best Practices
Amazon Textract uses machine learning to read documents as a person would. It extracts text, tables, and forms from documents. Use the following best practices to get the best results from your documents.
## Provide an Optimal Input Document
A suitable input for an Amazon Textract operation is a single or multipage document. Some examples are a legal document, a form, an ID, or a letter. A form is a document with questions or prompts for a user to provide answers. Some examples are a patient registration form, a tax form, or an insurance claim form.
A document can be in JPEG, PNG, PDF, or TIFF format. With PDF and TIFF format files, you can process multipage documents. For information about how Amazon Textract represents documents as `Block` objects, see [Text Detection and Document Analysis Response Objects](#how-it-works-document-layout).
The following is an acceptable input document example.

For information about document limits, see [Quotas in Amazon Textract](#limits).
For Amazon Textract synchronous operations, you can use input documents that are stored in an Amazon S3 bucket, or you can pass base64-encoded image bytes. For more information, see [Calling Amazon Textract Synchronous Operations](#sync-calling). For asynchronous operations, you need to supply input documents in an Amazon S3 bucket. For more information, see [Calling Amazon Textract Asynchronous Operations](#api-async).
The following is a list of a few ways that you can optimize your input documents for better results.
+ Ensure that your document text is in a language that Amazon Textract supports. Currently, Amazon Textract supports English, Spanish, German, Italian, French, and Portuguese.
+ Provide a high quality image, ideally at least 150 DPI.
+ If your document is already in one of the file formats that Amazon Textract supports (PDF, TIFF, JPEG, and PNG), don't convert or downsample the document before uploading it to Amazon Textract.
For the best results when extracting text from tables in documents, ensure that:
+ Tables in your document are visually separated from surrounding elements on the page. For example, the table isn't overlaid onto an image or complex pattern.
+ Text within the table is upright. For example, the text isn't rotated relative to other text on the page.
When extracting text from tables, you might see inconsistent results when:
+ Merged table cells that span multiple columns.
+ Tables with cells, rows, or columns that are different from other parts of the same table.
We recommend using [text detection](#how-it-works-detecting) as a workaround.
## Use Confidence Scores
You should take into account the confidence scores returned by Amazon Textract API operations and the sensitivity of their use case. A confidence score is a number between 0 and 100 that indicates the probability that a given prediction is correct. It helps you make informed decisions about how you use the results.
In applications that are sensitive to detection errors (false positives), enforce a minimum confidence score threshold. The application should discard results below that threshold or flag situations as requiring a higher level of human scrutiny.
The optimal threshold depends on the application. For archival purposes, such as documenting handwritten notes, it might be as low as 50%. Business processes involving financial decisions might require thresholds of 90% or higher.
## Best Practices for Queries
### Example Queries
Download the [Example Queries document](samples/Example%20Queries.zip) to see examples of queries for common document types across mortgage, insurance, healthcare and tax industries.
### General Best Practices for Queries
### Extracting Cells from Tables
Construct a query that contains words from both row header and column header.
Examples, for the image below
Query 1: What date was the 2nd dose administered?
Answer 1: 2/8/2021
Query 2: Who is the manufacturer of the 1st dose?
Answer 2: Pfizer

### Extracting Tables using Queries
Extraction of entire tables or whole rows or columns of information using queries is not supported.
### Long Answers
Long answers increase response latency and can lead to timeouts. Try to ask questions that respond with answers to less than 100 words.
### Passing Only Hints
Passing only the the key name as the question will work when trying to extract standard key-value pairs from a form. We recommend framing full questions for all other extraction use cases.
Examples, for the image below
Query 1: Borrower's Name.
Answer 1: Carlos Salazar
Query 2: Social Security Number.
Answer 2: 999-99-9999

### General Phrasing of Questions
Where possible, use words from the document to construct the query.
+ While Queries tries to do acronym / synonym matching for some common industry terms (SSN vs Tax ID vs Social Security Number), using language directly from the document will in general improve results.
+ Example: If the document says “job progress”, try to avoid calling it using other variations like “ project progress” or “program progress” or “job status”
In general, ask a natural language question that starts with "What is / Where is / Who is..". The exception to this rule is when trying to extract standard key-value pairs in which case you can pass the key name as a query.
Avoid ill-formed or grammatically incorrect questions since these could result in unexpected answers.
+ Example of ill-formed Query: When?
+ Example of well formed Query: When was the first vaccine dose administered?
Be as specific as possible. Some examples follow.
+ When the document contains multiple sections (e. g. “Borrower” and “Co-Borrower”) and both sections have a field called SSN, ask: “What is the SSN for Borrower?” and “What is the SSN for Co-Borrower?”
+ When the document has multiple date related fields, be specific in the query language and ask “what is the date the document was signed on? or ”what is the the date of birth of the application“. Avoid asking ambiguous questions like ”What is the date?“
If you know the layout of the document beforehand, giving location hints improve accuracy of results. For example “What is the date at the top?” or ask “What is the date on the left?”, “What is the date at the bottom?
### Setting up Pages for Queries
When working with queries for multipage documents, you can use the `Page` parameter to specify which pages to look for the query answer on. What follows is a list of best practices for setting up Pages
+ If a page is not specified, it is set to `["1"]` by default.
+ The following characters are allowed in the parameter's string: `0 1 2 3 4 5 6 7 8 9 - *`. No whitespace is allowed.
+ When using \* to indicate all pages, it must be the only element in the list.
+ You can use page intervals, such as `[“1-3”, “1-1”, “4-*”]`. Where `*` indicates last page of document.
+ Specified pages must be greater than 0 and less than or equal to the number of pages in the document.
## Best Practices for Bulk Document Uploader
The Bulk Document Uploader is an AWS Management Console tool intended to help you quickly evaluate how Textract performs on a set of your own documents, without the need to write any code. You can use the Bulk Document Uploader to process as many as 150 documents with one of Textract’s features, instead of uploading and processing documents individually. You can bulk- upload documents directly from your computer or import documents from an existing Amazon S3 bucket.
The Bulk Document Uploader provides results that you can download later for offline review. Each downloadable zip file contains both the Textract JSON API response file and human-readable CSV files of the output. The output results are available for download for 7 days after processing. After 14 days, documents are cleared from the Submitted Documents panel.
## To use the Bulk Document Uploader, follow these steps:
1. Log in to the AWS Management Console and go to the Amazon Textract console.
1. Select the Bulk Document Uploader from the navigation pane.
1. Select the Upload Documents button.
1. Specify the source of your documents.
1. If you are using an Amazon S3 bucket for your documents, provide the S3 URL for the bucket and folder. If the folder you specified contains more than 150 documents, then only the top 150 documents listed in the S3 folder will be sent to Textract for processing.
1. If you are uploading documents from your local device, you can upload up to 50 documents at one time. To upload additional documents (up to the maximum of 150), click the Add Documents button after your initial documents are uploaded.
When uploading documents from your computer, your documents are uploaded to an Amazon S3 bucket that is created on your behalf. In the future, you can use the path to this S3 bucket to process the same set of documents .
1. Specify the Textract feature you want to use to process your documents. Select one Textract feature at a time to process your documents. You must create a separate request if you want to test more than one feature on your documents.
If you select the “AnalyzeDocument - Queries” feature, write the Queries you want to test against your documents. Queries are only applied to the first page of each uploaded document. Consult the Queries Best Practices section when constructing your queries.
1. Select the Start Processing button to submit the documents to Textract for processing.
1. You can track document status and download the output results of processed documents in the Submitted Documents panel. After documents are submitted to Textract for processing, they are displayed as a list in the Submitted Documents panel. Each document is processed individually. The following information is displayed for each document: Name, Status, Upload Date, Document Type, Textract Feature, and Size.
The Submitted Documents panel updates periodically, and you can manually refresh it to see if your processing is complete.
### Limits
The following limits apply when using the Bulk Document Uploader
+ Accepted File Formats: JPEG, PNG, PDF, and TIFF files. (JPEG 2000-encoded images within PDFs are supported)
+ File Size and Page Count Limits: JPEG and PNG files have a 10 MB size limit. PDF and TIFF files have a 500 MB limit.
+ PDF and TIFF files have a limit of 3,000 pages.
+ Up to 150 documents can be processed for each bulk processing request. To process more than 150 documents, submit multiple requests of up to 150 documents each by using the Bulk Document Uploader.
+ The AnalyzeLending and AnalyzeID API operations are not supported by the Bulk Document Uploader.
+ The Bulk Document Uploader incurs the same charges as regular Textract usage. For more information on Textract pricing, see [here](https://aws.amazon.com/textract/pricing/).
## Best practices for Amazon Textract Custom Queries
Amazon Textract lets you customize the output of its pretrained Queries feature by training and using an adapter for its base model. With Amazon Textract Custom Queries, you can use your own documents and train an adapter to customize the base model, while keeping control over your proprietary documents. When creating queries for your adapters, use the following best practices. For more information about adapters, see [Customizing your Queries Responses](#textract-using-adapters).
1. The sample data should contain layout variations and image variations that are representative of the documents to be used in production.
1. A minimum of five samples (per query level) are required for either training or testing. The more samples used for training, the better.
1. The annotated Queries should have a variety of answers. For example, if the answer to a query is 'Yes' or 'No,' the annotated samples should have occurrences of both 'Yes' and 'No,'
1. Composed queries should have logical meanings and structures. For example, to extract a payee name on the check, the query should be ‘Who is the payee?’ and not ‘What is the name?’.
1. If a value that needs to be extracted has an associated key, include the key in the query for better results. If there are keys that occur multiple times, use hierarchical questions such as ‘What is the first name under borrower?’ and ‘What is the first name under co-borrower?’
1. Maintain consistency in annotation style. If a field appears in multiple places on a document and you decide to annotate only one occurrence, follow the same guideline and annotate only one occurrence in all documents. Alternatively, if you choose to annotate all occurrences of a value, follow the same process for all documents.
1. Maintain consistency while annotating fields with spaces. If a field's value is ‘123 456 78’ and if you choose to annotate it as ‘12345678’ follow the same guideline for all documents. Do not change between annotating the value as ‘123 456 78’ and ‘12345678.’
1. Annotate the data across all pages within a document even though you might run inference on only a few of the pages. If annotating all the pages is not feasible, split the document and use only the pages that you are able to annotate in your dataset.
1. Custom Queries does not support questions related to signatures (such as, 'Is the document signed?'). To know if a document is signed, use the signatures feature in your API request.
1. When correcting responses from pre-labeling, you can make small modifications to the text presented in the documents, such as correcting a few character errors, or removing spaces and punctuation. But if text isn't shown in the documents, don't enter it as a response.
1. Use the exact query used in training for inference.
1. Provide pre-labeling results only for the `source-ref` page. If you have pre-labeling results with Blocks that aren't from the `source-ref` page, it might impact performance.
# Handling Connection Errors
An Amazon Textract operation can fail if you exceed the maximum number of transactions per second (TPS), causing the service to throttle your application, or when your connection drops. For example, if you make too many calls to Amazon Textract operations in a short period of time, it throttles your calls and sends a `ProvisionedThroughputExceededException` error in the operation response. For information about Amazon Textract TPS quotas, see [Amazon Textract Quotas](https://docs.aws.amazon.com/general/latest/gr/textract.html). To change a limit, you can access the Amazon Textract option in the Service Quotas console.
You can manage throttling and dropped connections by automatically retrying the operation. You can specify the number of retries by including the `Config` parameter when you create the Amazon Textract client. We recommend a retry count of 5. The AWS SDK retries an operation the specified number of times before failing and throwing an exception. For more information, see [Error Retries and Exponential Backoff in AWS](https://docs.aws.amazon.com/general/latest/gr/api-retries.html).
**Note**
Automatic retries work for both synchronous and asynchronous operations. Before specifying automatic retries, make sure you have the most recent version of the AWS SDK. For more information, see [Step 2: Set Up the AWS CLI and AWS SDKs](#setup-awscli-sdk).
The following example shows how to automatically retry Amazon Textract operations when you're processing multiple documents.
**Prerequisites**
+ If you haven't already:
1. Give a user the `AmazonTextractFullAccess` and `AmazonS3ReadOnlyAccess` permissions. For more information, see [Step 1: Set Up an AWS Account and Create a User](#setting-up).
1. Install and configure the AWS CLI and the AWS SDKs. For more information, see [Step 2: Set Up the AWS CLI and AWS SDKs](#setup-awscli-sdk).
**To automatically retry operations**
1. Upload multiple document images to your S3 bucket to run the Synchronous example. Upload a multi-page document to your S3 bucket and run `StartDocumentTextDetection` on it to run the Asynchronous example.
For instructions, see [Uploading Objects into Amazon S3](https://docs.aws.amazon.com/AmazonS3/latest/userguide/UploadingObjectsintoAmazonS3.html) in the *Amazon Simple Storage Service User Guide*.
1. The following examples demonstrate how to use the `Config` parameter to automatically retry an operation. The Synchronous example calls the `DetectDocumentText` operation, while the Asynchronous example calls the `GetDocumentTextDetection` operation.
------
#### [ Sync Example ]
Use the following examples to call the `DetectDocumentText` operation on the documents in your Amazon S3 bucket. In `main`, change the value of `bucket` to your S3 bucket. Change the value of `documents` to the names of the document images that you uploaded in step 2.
```
import boto3
from botocore.client import Config
# Documents
def process_multiple_documents(bucket, documents):
config = Config(retries = dict(max_attempts = 5))
# Amazon Textract client
textract = boto3.client('textract', config=config)
for documentName in documents:
print("\nProcessing: {}\n==========================================".format(documentName))
# Call Amazon Textract
response = textract.detect_document_text(
Document={
'S3Object': {
'Bucket': bucket,
'Name': documentName
}
})
# Print detected text
for item in response["Blocks"]:
if item["BlockType"] == "LINE":
print ('\033[94m' + item["Text"] + '\033[0m')
def main():
bucket = ""
documents = ["document-image-1.png",
"document-image-2.png", "document-image-3.png",
"document-image-4.png", "document-image-5.png" ]
process_multiple_documents(bucket, documents)
if __name__ == "__main__":
main()
```
------
#### [ Async Example ]
Use the following examples to call the `GetDocumentTextDetection` operation. It assumes you have already called `StartDocumentTextDetection` on the documents in your Amazon S3 bucket and obtained a `JobId`. In `main`, change the value of `bucket` to your S3 bucket and the value of `roleArn` to the Arn assigned to your Textract role. You'll also need to change the value of `document` to the name of your multi-page document in your Amazon S3 bucket. Finally, replace the value of `region_name` with the name of your region and provide the `GetResults` function with the name of your `jobId`.
```
import boto3
from botocore.client import Config
class DocumentProcessor:
jobId = ''
region_name = ''
roleArn = ''
bucket = ''
document = ''
sqsQueueUrl = ''
snsTopicArn = ''
processType = ''
def __init__(self, role, bucket, document, region):
self.roleArn = role
self.bucket = bucket
self.document = document
self.region_name = region
self.config = Config(retries = dict(max_attempts = 5))
self.textract = boto3.client('textract', region_name=self.region_name, config=self.config)
self.sqs = boto3.client('sqs')
self.sns = boto3.client('sns')
# Display information about a block
def DisplayBlockInfo(self, block):
print("Block Id: " + block['Id'])
print("Type: " + block['BlockType'])
if 'EntityTypes' in block:
print('EntityTypes: {}'.format(block['EntityTypes']))
if 'Text' in block:
print("Text: " + block['Text'])
if block['BlockType'] != 'PAGE':
print("Confidence: " + "{:.2f}".format(block['Confidence']) + "%")
print('Page: {}'.format(block['Page']))
if block['BlockType'] == 'CELL':
print('Cell Information')
print('\tColumn: {} '.format(block['ColumnIndex']))
print('\tRow: {}'.format(block['RowIndex']))
print('\tColumn span: {} '.format(block['ColumnSpan']))
print('\tRow span: {}'.format(block['RowSpan']))
if 'Relationships' in block:
print('\tRelationships: {}'.format(block['Relationships']))
print('Geometry')
print('\tBounding Box: {}'.format(block['Geometry']['BoundingBox']))
print('\tPolygon: {}'.format(block['Geometry']['Polygon']))
if block['BlockType'] == 'SELECTION_ELEMENT':
print(' Selection element detected: ', end='')
if block['SelectionStatus'] == 'SELECTED':
print('Selected')
else:
print('Not selected')
def GetResults(self, jobId):
maxResults = 1000
paginationToken = None
finished = False
while finished == False:
response = None
if paginationToken == None:
response = self.textract.get_document_text_detection(JobId=jobId,
MaxResults=maxResults)
else:
response = self.textract.get_document_text_detection(JobId=jobId,
MaxResults=maxResults,
NextToken=paginationToken)
blocks = response['Blocks']
print('Detected Document Text')
print('Pages: {}'.format(response['DocumentMetadata']['Pages']))
# Display block information
for block in blocks:
self.DisplayBlockInfo(block)
print()
print()
if 'NextToken' in response:
paginationToken = response['NextToken']
else:
finished = True
def main():
roleArn = 'role-arn'
bucket = 'bucket-name'
document = 'document-name'
region_name = 'region-name'
analyzer = DocumentProcessor(roleArn, bucket, document, region_name)
analyzer.GetResults("job-id")
if __name__ == "__main__":
main()
```
------
# Tutorials
[Block](https://docs.aws.amazon.com/textract/latest/APIReference/API_Block.html) objects that are returned from Amazon Textract operations contain the results of text detection and text analysis operations, such as [AnalyzeDocument](https://docs.aws.amazon.com/textract/latest/APIReference/API_AnalyzeDocument.html). The following Python tutorials show some of the different ways that you can use Block objects. For example, you can export table information to a comma-separated values (CSV) file.
The tutorials use synchronous Amazon Textract operations that return all results. If you want to use asynchronous operations such as [StartDocumentAnalysis](https://docs.aws.amazon.com/textract/latest/APIReference/API_StartDocumentAnalysis.html), you need to change the example code to accommodate multiple batches of returned `Block` objects. To make use of the asynchronous operations example, ensure that you have followed the instructions given at [Configuring Amazon Textract for Asynchronous Operations](#api-async-roles).
For examples that show you other ways to use Amazon Textract, see [Additional Code Samples](#other-examples).
**Topics**
+ [Prerequisites](#examples-prerequisites)
+ [Extracting Key-Value Pairs from a Form Document](#examples-extract-kvp)
+ [Exporting Tables into a CSV File](#examples-export-table-csv)
+ [Detecting text with an AWS Lambda function](#lambda)
+ [Extracting and Sending Text to AWS Comprehend for Analysis](#textract-to-comprehend)
+ [Additional Code Samples](#other-examples)
## Prerequisites
Before you can run the examples in this section, you have to configure your environment.
**To configure your environment**
1. Give a user the `AmazonTextractFullAccess` permissions. For more information, see [Step 1: Set Up an AWS Account and Create a User](#setting-up).
1. Install and configure the AWS CLI and the AWS SDKs. For more information, see [Step 2: Set Up the AWS CLI and AWS SDKs](#setup-awscli-sdk).
## Extracting Key-Value Pairs from a Form Document
The following Python example shows how to extract key-value pairs in form documents from [Block](https://docs.aws.amazon.com/textract/latest/APIReference/API_Block.html) objects that are stored in a map. Block objects are returned from a call to [AnalyzeDocument](https://docs.aws.amazon.com/textract/latest/APIReference/API_AnalyzeDocument.html). For more information, see [Form Data (Key-Value Pairs)](#how-it-works-kvp).
You use the following functions:
+ `get_kv_map` – Calls [AnalyzeDocument](https://docs.aws.amazon.com/textract/latest/APIReference/API_AnalyzeDocument.html), and stores the KEY and VALUE BLOCK objects in a map.
+ `get_kv_relationship` and `find_value_block` – Constructs the key-value relationships from the map.
**To extract key-value pairs from a form document**
1. Configure your environment. For more information, see [Prerequisites](#examples-prerequisites).
1. Save the following example code to a file named *textract\_python\_kv\_parser.py*. In the function `get_kv_map`, replace `profile-name` with the name of a profile that can assume the role and `region` with the region in which you want to run the code.
```
import boto3
import sys
import re
import json
from collections import defaultdict
def get_kv_map(file_name):
with open(file_name, 'rb') as file:
img_test = file.read()
bytes_test = bytearray(img_test)
print('Image loaded', file_name)
# process using image bytes
session = boto3.Session(profile_name='profile-name')
client = session.client('textract', region_name='region')
response = client.analyze_document(Document={'Bytes': bytes_test}, FeatureTypes=['FORMS'])
# Get the text blocks
blocks = response['Blocks']
# get key and value maps
key_map = {}
value_map = {}
block_map = {}
for block in blocks:
block_id = block['Id']
block_map[block_id] = block
if block['BlockType'] == "KEY_VALUE_SET":
if 'KEY' in block['EntityTypes']:
key_map[block_id] = block
else:
value_map[block_id] = block
return key_map, value_map, block_map
def get_kv_relationship(key_map, value_map, block_map):
kvs = defaultdict(list)
for block_id, key_block in key_map.items():
value_block = find_value_block(key_block, value_map)
key = get_text(key_block, block_map)
val = get_text(value_block, block_map)
kvs[key].append(val)
return kvs
def find_value_block(key_block, value_map):
for relationship in key_block['Relationships']:
if relationship['Type'] == 'VALUE':
for value_id in relationship['Ids']:
value_block = value_map[value_id]
return value_block
def get_text(result, blocks_map):
text = ''
if 'Relationships' in result:
for relationship in result['Relationships']:
if relationship['Type'] == 'CHILD':
for child_id in relationship['Ids']:
word = blocks_map[child_id]
if word['BlockType'] == 'WORD':
text += word['Text'] + ' '
if word['BlockType'] == 'SELECTION_ELEMENT':
if word['SelectionStatus'] == 'SELECTED':
text += 'X '
return text
def print_kvs(kvs):
for key, value in kvs.items():
print(key, ":", value)
def search_value(kvs, search_key):
for key, value in kvs.items():
if re.search(search_key, key, re.IGNORECASE):
return value
def main(file_name):
key_map, value_map, block_map = get_kv_map(file_name)
# Get Key Value relationship
kvs = get_kv_relationship(key_map, value_map, block_map)
print("\n\n== FOUND KEY : VALUE pairs ===\n")
print_kvs(kvs)
# Start searching a key value
while input('\n Do you want to search a value for a key? (enter "n" for exit) ') != 'n':
search_key = input('\n Enter a search key:')
print('The value is:', search_value(kvs, search_key))
if __name__ == "__main__":
file_name = sys.argv[1]
main(file_name)
```
1. At the command prompt, enter the following command. Replace `file` with the document image file that you want to analyze.
```
python textract_python_kv_parser.py {{file}}
```
1. When you're prompted, enter a key that's in the input document. If the code detects the key, it displays the key's value.
## Exporting Tables into a CSV File
These Python examples show how to export tables from an image of a document into a comma-separated values (CSV) file.
The example for synchronous document analysis collects table information from a call to [AnalyzeDocument](https://docs.aws.amazon.com/textract/latest/APIReference/API_AnalyzeDocument.html). The example for asynchronous document analysis makes a call to [StartDocumentAnalysis](https://docs.aws.amazon.com/textract/latest/APIReference/API_StartDocumentAnalysis.html) and then retrives the results from [GetDocumentAnalysis](https://docs.aws.amazon.com/textract/latest/APIReference/API_GetDocumentAnalysis.html) as `Block` objects.
Table information is returned as [Block](https://docs.aws.amazon.com/textract/latest/APIReference/API_Block.html) objects from a call to [AnalyzeDocument](https://docs.aws.amazon.com/textract/latest/APIReference/API_AnalyzeDocument.html). For more information, see [Tables](#how-it-works-tables). The `Block` objects are stored in a map structure that's used to export the table data into a CSV file.
------
#### [ Synchronous ]
In this example, you will use the functions:
+ `get_table_csv_results` – Calls [AnalyzeDocument](https://docs.aws.amazon.com/textract/latest/APIReference/API_AnalyzeDocument.html), and builds a map of tables that are detected in the document. Creates a CSV representation of all detected tables.
+ `generate_table_csv` – Generates the CSV file for an individual table.
+ `get_rows_columns_map` – Gets the rows and columns from the map.
+ `get_text` – Gets the text from a cell.
**To export tables into a CSV file**
1. Configure your environment. For more information, see [Prerequisites](#examples-prerequisites).
1. Save the following example code to a file named *textract\_python\_table\_parser.py*. In the function `get_table_csv_results`, replace `profile-name` with the name of a profile that can assume the role and `region` with the region in which you want to run the code.
```
import webbrowser, os
import json
import boto3
import io
from io import BytesIO
import sys
from pprint import pprint
def get_rows_columns_map(table_result, blocks_map):
rows = {}
scores = []
for relationship in table_result['Relationships']:
if relationship['Type'] == 'CHILD':
for child_id in relationship['Ids']:
cell = blocks_map[child_id]
if cell['BlockType'] == 'CELL':
row_index = cell['RowIndex']
col_index = cell['ColumnIndex']
if row_index not in rows:
# create new row
rows[row_index] = {}
# get confidence score
scores.append(str(cell['Confidence']))
# get the text value
rows[row_index][col_index] = get_text(cell, blocks_map)
return rows, scores
def get_text(result, blocks_map):
text = ''
if 'Relationships' in result:
for relationship in result['Relationships']:
if relationship['Type'] == 'CHILD':
for child_id in relationship['Ids']:
word = blocks_map[child_id]
if word['BlockType'] == 'WORD':
if "," in word['Text'] and word['Text'].replace(",", "").isnumeric():
text += '"' + word['Text'] + '"' + ' '
else:
text += word['Text'] + ' '
if word['BlockType'] == 'SELECTION_ELEMENT':
if word['SelectionStatus'] =='SELECTED':
text += 'X '
return text
def get_table_csv_results(file_name):
with open(file_name, 'rb') as file:
img_test = file.read()
bytes_test = bytearray(img_test)
print('Image loaded', file_name)
# process using image bytes
# get the results
session = boto3.Session(profile_name='profile-name')
client = session.client('textract', region_name='region')
response = client.analyze_document(Document={'Bytes': bytes_test}, FeatureTypes=['TABLES'])
# Get the text blocks
blocks=response['Blocks']
pprint(blocks)
blocks_map = {}
table_blocks = []
for block in blocks:
blocks_map[block['Id']] = block
if block['BlockType'] == "TABLE":
table_blocks.append(block)
if len(table_blocks) <= 0:
return " NO Table FOUND "
csv = ''
for index, table in enumerate(table_blocks):
csv += generate_table_csv(table, blocks_map, index +1)
csv += '\n\n'
return csv
def generate_table_csv(table_result, blocks_map, table_index):
rows, scores = get_rows_columns_map(table_result, blocks_map)
table_id = 'Table_' + str(table_index)
# get cells.
csv = 'Table: {0}\n\n'.format(table_id)
for row_index, cols in rows.items():
for col_index, text in cols.items():
col_indices = len(cols.items())
csv += '{}'.format(text) + ","
csv += '\n'
csv += '\n\n Confidence Scores % (Table Cell) \n'
cols_count = 0
for score in scores:
cols_count += 1
csv += score + ","
if cols_count == col_indices:
csv += '\n'
cols_count = 0
csv += '\n\n\n'
return csv
def main(file_name):
table_csv = get_table_csv_results(file_name)
output_file = 'output.csv'
# replace content
with open(output_file, "wt") as fout:
fout.write(table_csv)
# show the results
print('CSV OUTPUT FILE: ', output_file)
if __name__ == "__main__":
file_name = sys.argv[1]
main(file_name)
```
1. At the command prompt, enter the following command. Replace `file` with the name of the document image file that you want to analyze.
```
python textract_python_table_parser.py {{file}}
```
When you run the example, the CSV output is saved in a file named `output.csv`.
------
#### [ Asynchronous ]
In this example, you will use make use of two different scripts. The first script starts the process of asynchronoulsy analyzing documents with `StartDocumentAnalysis` and gets the `Block` information returned by `GetDocumentAnalysis`. The second script takes the returned `Block` information for each page, formats the data as a table, and saves the tables to a CSV file.
**To export tables into a CSV file**
1. Configure your environment. For more information, see [Prerequisites](#examples-prerequisites).
1. Ensure that you have followed the instructions given at see [Configuring Amazon Textract for Asynchronous Operations](#api-async-roles). The process documented on that page enables you to send and receive messages about the completion status of asynchronous jobs.
1. In the following code example, replace the value of `roleArn` with the Arn assigned to the role that you created in Step 2. Replace the value of `bucket` with the name of the S3 bucket containing your document. Replace the value of `document` with the name of the document in your S3 bucket. Replace the value of `region_name` with the name of your bucket's region.
Save the following example code to a file named *start\_doc\_analysis\_for\_table\_extraction.py.*.
```
import boto3
import time
class DocumentProcessor:
jobId = ''
region_name = ''
roleArn = ''
bucket = ''
document = ''
sqsQueueUrl = ''
snsTopicArn = ''
processType = ''
def __init__(self, role, bucket, document, region):
self.roleArn = role
self.bucket = bucket
self.document = document
self.region_name = region
self.textract = boto3.client('textract', region_name=self.region_name)
self.sqs = boto3.client('sqs')
self.sns = boto3.client('sns')
def ProcessDocument(self):
jobFound = False
response = self.textract.start_document_analysis(DocumentLocation={'S3Object': {'Bucket': self.bucket, 'Name': self.document}},
FeatureTypes=["TABLES", "FORMS"], NotificationChannel={'RoleArn': self.roleArn, 'SNSTopicArn': self.snsTopicArn})
print('Processing type: Analysis')
print('Start Job Id: ' + response['JobId'])
print('Done!')
def CreateTopicandQueue(self):
millis = str(int(round(time.time() * 1000)))
# Create SNS topic
snsTopicName = "AmazonTextractTopic" + millis
topicResponse = self.sns.create_topic(Name=snsTopicName)
self.snsTopicArn = topicResponse['TopicArn']
# create SQS queue
sqsQueueName = "AmazonTextractQueue" + millis
self.sqs.create_queue(QueueName=sqsQueueName)
self.sqsQueueUrl = self.sqs.get_queue_url(QueueName=sqsQueueName)['QueueUrl']
attribs = self.sqs.get_queue_attributes(QueueUrl=self.sqsQueueUrl,
AttributeNames=['QueueArn'])['Attributes']
sqsQueueArn = attribs['QueueArn']
# Subscribe SQS queue to SNS topic
self.sns.subscribe(TopicArn=self.snsTopicArn, Protocol='sqs', Endpoint=sqsQueueArn)
# Authorize SNS to write SQS queue
policy = """{{
"Version":"2012-10-17",
"Statement":[
{{
"Sid":"MyPolicy",
"Effect":"Allow",
"Principal" : {{"AWS" : "*"}},
"Action":"SQS:SendMessage",
"Resource": "{}",
"Condition":{{
"ArnEquals":{{
"aws:SourceArn": "{}"
}}
}}
}}
]
}}""".format(sqsQueueArn, self.snsTopicArn)
response = self.sqs.set_queue_attributes(
QueueUrl=self.sqsQueueUrl,
Attributes={
'Policy': policy
})
def main():
roleArn = 'role-arn'
bucket = 'bucket-name'
document = 'document-name'
region_name = 'region-name'
analyzer = DocumentProcessor(roleArn, bucket, document, region_name)
analyzer.CreateTopicandQueue()
analyzer.ProcessDocument()
if __name__ == "__main__":
main()
```
1. Run the code. The code will print a JobId. Copy this JobId down.
1. Wait for your job to finish processing, and after it has finished, copy the following code to a file named *get\_doc\_analysis\_for\_table\_extraction.py*. Replace the value of `jobId` with the Job ID you copied down earlier. Replace the value of `region_name` with the name of the region associated with your Textract role. Replace the value of `file_name` with the name you want to give the output CSV.
```
import boto3
from pprint import pprint
jobId = ''
region_name = ''
file_name = ''
textract = boto3.client('textract', region_name=region_name)
# Display information about a block
def DisplayBlockInfo(block):
print("Block Id: " + block['Id'])
print("Type: " + block['BlockType'])
if 'EntityTypes' in block:
print('EntityTypes: {}'.format(block['EntityTypes']))
if 'Text' in block:
print("Text: " + block['Text'])
if block['BlockType'] != 'PAGE':
print("Confidence: " + "{:.2f}".format(block['Confidence']) + "%")
def GetResults(jobId, file_name):
maxResults = 1000
paginationToken = None
finished = False
while finished == False:
response = None
if paginationToken == None:
response = textract.get_document_analysis(JobId=jobId, MaxResults=maxResults)
else:
response = textract.get_document_analysis(JobId=jobId, MaxResults=maxResults,
NextToken=paginationToken)
blocks = response['Blocks']
table_csv = get_table_csv_results(blocks)
output_file = file_name + ".csv"
# replace content
with open(output_file, "at") as fout:
fout.write(table_csv)
# show the results
print('Detected Document Text')
print('Pages: {}'.format(response['DocumentMetadata']['Pages']))
print('OUTPUT TO CSV FILE: ', output_file)
# Display block information
for block in blocks:
DisplayBlockInfo(block)
print()
print()
if 'NextToken' in response:
paginationToken = response['NextToken']
else:
finished = True
def get_rows_columns_map(table_result, blocks_map):
rows = {}
for relationship in table_result['Relationships']:
if relationship['Type'] == 'CHILD':
for child_id in relationship['Ids']:
try:
cell = blocks_map[child_id]
if cell['BlockType'] == 'CELL':
row_index = cell['RowIndex']
col_index = cell['ColumnIndex']
if row_index not in rows:
# create new row
rows[row_index] = {}
# get the text value
rows[row_index][col_index] = get_text(cell, blocks_map)
except KeyError:
print("Error extracting Table data - {}:".format(KeyError))
pass
return rows
def get_text(result, blocks_map):
text = ''
if 'Relationships' in result:
for relationship in result['Relationships']:
if relationship['Type'] == 'CHILD':
for child_id in relationship['Ids']:
try:
word = blocks_map[child_id]
if word['BlockType'] == 'WORD':
text += word['Text'] + ' '
if word['BlockType'] == 'SELECTION_ELEMENT':
if word['SelectionStatus'] == 'SELECTED':
text += 'X '
except KeyError:
print("Error extracting Table data - {}:".format(KeyError))
return text
def get_table_csv_results(blocks):
pprint(blocks)
blocks_map = {}
table_blocks = []
for block in blocks:
blocks_map[block['Id']] = block
if block['BlockType'] == "TABLE":
table_blocks.append(block)
if len(table_blocks) <= 0:
return " NO Table FOUND "
csv = ''
for index, table in enumerate(table_blocks):
csv += generate_table_csv(table, blocks_map, index + 1)
csv += '\n\n'
# In order to generate separate CSV file for every table, uncomment code below
#inner_csv = ''
#inner_csv += generate_table_csv(table, blocks_map, index + 1)
#inner_csv += '\n\n'
#output_file = file_name + "___" + str(index) + ".csv"
# replace content
#with open(output_file, "at") as fout:
# fout.write(inner_csv)
return csv
def generate_table_csv(table_result, blocks_map, table_index):
rows = get_rows_columns_map(table_result, blocks_map)
table_id = 'Table_' + str(table_index)
# get cells.
csv = 'Table: {0}\n\n'.format(table_id)
for row_index, cols in rows.items():
for col_index, text in cols.items():
csv += '{}'.format(text) + ","
csv += '\n'
csv += '\n\n\n'
return csv
response_blocks = GetResults(jobId, file_name)
```
1. Run the code.
After you have obtained you results, be sure to delete the associated SNS and SQS resources, or else you may accrue charges for them.
------
## Detecting text with an AWS Lambda function
AWS Lambda is a compute service that you can use to run code without provisioning or managing servers. You can call Amazon Textract API operations from within an AWS Lambda function. The following instructions show how to create a Lambda function in Python that calls [DetectDocumentText](https://docs.aws.amazon.com/textract/latest/APIReference/API_DetectDocumentText.html).
The Lambda function returns a list of [Block](https://docs.aws.amazon.com/textract/latest/APIReference/API_Block.html) objects with information about the detected words and lines of text. The instructions include example Python code that shows you how to call the Lambda function with a document supplied from an Amazon S3 bucket or your local computer. Images stored in Amazon S3 must be in single-page PDF or TIFF document format, or in JPEG or PNG format. Local images must be in single-page PDF or TIFF format. The Python code returns part of the JSON response for each Block type detected in the document.
For an example that uses Lambda functions to process documents at a large scale, see [Amazon Textract IDP CDK Constructs](https://github.com/aws-samples/amazon-textract-idp-cdk-constructs/) and [Use machine learning to automate and process documents at scale](https://s12d.com/aws-idp-scale-workshop).
**Topics**
+ [Step 1: Create an AWS Lambda function (console)](#example-lambda-create-function)
+ [Step 2: (Optional) Create a layer (console)](#example-lambda-create-layer)
+ [Step 3: Add Python code (console)](#example-lambda-add-code)
+ [Step 4: Try your Lambda function](#example-lambda-test)
### Step 1: Create an AWS Lambda function (console)
In this step, you create an empty AWS Lambda function and an IAM execution role that lets your function call the `DetectDocumentText` operation. If you are supplying documents from Amazon S3, this step also shows you how to grant access to the bucket that stores your documents.
Later you add the source code and optionally add a layer to the Lambda function.
**To create an AWS Lambda function (console)**
1. Sign in to the AWS Management Console and open the AWS Lambda console at [https://console.aws.amazon.com/lambda/](https://console.aws.amazon.com/lambda/).
1. Choose **Create function**. For more information, see [Create a Lambda Function with the Console](https://docs.aws.amazon.com/lambda/latest/dg/getting-started-create-function.html).
1. Choose the following options:
+ Choose **Author from scratch**.
+ Enter a value for **Function name**.
+ For **Runtime**, choose **Python 3.9**.
+ For **Architecture**, choose **x86\_64**.
1. Choose **Create function** to create the AWS Lambda function.
1. On the function page, choose the **Configuration** tab.
1. On the **Permissions** pane, under **Execution role**, choose the role name to open the role in the IAM console.
1. In the **Permissions** tab, choose **Add permissions** and then **Create inline policy**.
1. Choose the **JSON** tab and replace the policy with the following policy:
------
#### [ JSON ]
****
```
{
"Version":"2012-10-17",
"Statement": [
{
"Action": "textract:DetectDocumentText",
"Resource": "*",
"Effect": "Allow",
"Sid": "DetectDocumentText"
}
]
}
```
------
1. Choose **Review policy**.
1. Enter a name for the policy, for example *DetectDocumentText-access*.
1. Choose **Create policy**.
1. If you are storing documents for analysis in an Amazon S3 bucket, you must add an Amazon S3 access policy. To do this, repeat steps 7 to 11 in the AWS Lambda console and make the following changes.
1. For step 8, use the following policy. Replace {{bucket/folder path}} with the Amazon S3 bucket and folder path to the documents that you want to analyze.
------
#### [ JSON ]
****
```
{
"Version":"2012-10-17",
"Statement": [
{
"Sid": "S3Access",
"Effect": "Allow",
"Action": "s3:GetObject",
"Resource": "arn:aws:s3:::{{bucket/folder path}}/*"
}
]
}
```
------
1. For step 10, choose a different policy name, such as *S3Bucket-access*.
### Step 2: (Optional) Create a layer (console)
To run this example, you don't need to perform this step. The `DetectDocumentText` operation is included in the default Lambda Python environment as part of AWS SDK for Python (Boto3). If other parts of your Lambda function require recent AWS service updates that aren't in the default Lambda Python environment, then perform this step to add the most recent Boto3 SDK release as a layer to your function.
First, you create a zip file archive that contains the Boto3 SDK. Then, you create a layer and add the zip file archive to the layer. For more information, see [Using layers with your Lambda function](https://docs.aws.amazon.com/lambda/latest/dg/invocation-layers.html#invocation-layers-using).
**To create and add a layer (console)**
1. Open a command prompt and enter the following commands to create a deployment package with the most recent version of the AWS SDK.
```
pip install boto3 --target python/.
zip boto3-layer.zip -r python/
```
1. Note the name of the zip file (boto3-layer.zip), which you use in step 8 of this procedure.
1. Open the AWS Lambda console at [https://console.aws.amazon.com/lambda/](https://console.aws.amazon.com/lambda/).
1. In the navigation pane, choose **Layers**.
1. Choose **Create layer**.
1. Enter values for **Name** and **Description**.
1. For **Code entry type**, choose **Upload a .zip file** and select **Upload**.
1. In the dialog box, choose the zip file archive (boto3-layer.zip) that you created in step 1 of this procedure.
1. For **Compatible runtimes**, choose **Python 3.9**.
1. Choose **Create** to create the layer.
1. Choose the navigation pane menu icon.
1. In the navigation pane, choose **Functions**.
1. In the resources list, choose the function that you created previously in [Step 1: Create an AWS Lambda function (console)](#example-lambda-create-function).
1. Choose the **Code** tab.
1. In the **Layers** section, choose **Add a layer**.
1. Choose **Custom layers**.
1. In **Custom layers**, choose the layer name that you entered in step 6.
1. In **Version** choose the layer version, which should be 1.
1. Choose **Add**.
### Step 3: Add Python code (console)
In this step, you add Python code to your Lambda function by using the Lambda console code editor. The code detects text in a document with `DetectDocumentText` and returns a list of Block objects with information about the detected text. The document can be located in an Amazon S3 bucket or a local computer. Images stored in Amazon S3 must be single-page PDF or TIFF format documents or in JPEG or PNG format. Local images must be in single-page PDF or TIFF format.
**To add Python code (console)**
1. Navigate to the **Code** tab.
1. In the code editor, replace the code in **lambda\_function.py** with the following code:
```
# Copyright Amazon.com, Inc. or its affiliates. All Rights Reserved.
# SPDX-License-Identifier: Apache-2.0
"""
Purpose
An AWS lambda function that analyzes documents with Amazon Textract.
"""
import json
import base64
import logging
import boto3
from botocore.exceptions import ClientError
# Set up logging.
logger = logging.getLogger(__name__)
# Get the boto3 client.
textract_client = boto3.client('textract')
def lambda_handler(event, context):
"""
Lambda handler function
param: event: The event object for the Lambda function.
param: context: The context object for the lambda function.
return: The list of Block objects recognized in the document
passed in the event object.
"""
try:
# Determine document source.
if 'image' in event:
# Decode the image
image_bytes = event['image'].encode('utf-8')
img_b64decoded = base64.b64decode(image_bytes)
image = {'Bytes': img_b64decoded}
elif 'S3Object' in event:
image = {'S3Object':
{'Bucket': event['S3Object']['Bucket'],
'Name': event['S3Object']['Name']}
}
else:
raise ValueError(
'Invalid source. Only image base 64 encoded image bytes or S3Object are supported.')
# Analyze the document.
response = textract_client.detect_document_text(Document=image)
# Get the Blocks
blocks = response['Blocks']
lambda_response = {
"statusCode": 200,
"body": json.dumps(blocks)
}
except ClientError as err:
error_message = "Couldn't analyze image. " + \
err.response['Error']['Message']
lambda_response = {
'statusCode': 400,
'body': {
"Error": err.response['Error']['Code'],
"ErrorMessage": error_message
}
}
logger.error("Error function %s: %s",
context.invoked_function_arn, error_message)
except ValueError as val_error:
lambda_response = {
'statusCode': 400,
'body': {
"Error": "ValueError",
"ErrorMessage": format(val_error)
}
}
logger.error("Error function %s: %s",
context.invoked_function_arn, format(val_error))
return lambda_response
```
1. Choose **Deploy** to deploy your Lambda function.
### Step 4: Try your Lambda function
Now that you’ve created your Lambda function, you can invoke it to detect text in a document. In this step, you use Python code on your computer to pass a local document or a document in an Amazon S3 bucket to your Lambda function. Documents passed from a local computer must be smaller than 6291456 bytes. If your documents are larger, upload them to an Amazon S3 bucket and call the script with the Amazon S3 path to the image. For information about uploading image files to an Amazon S3 bucket, see [Uploading objects](https://docs.aws.amazon.com/AmazonS3/latest/userguide/upload-objects.html).
Make sure you run the code in the same [AWS Region](https://docs.aws.amazon.com/general/latest/gr/rande.html) in which you created the Lambda function. You can view the AWS Region for your Lambda function in the navigation bar of the function details page in the [Lambda console](https://console.aws.amazon.com/lambda/).
If the AWS Lambda function returns a timeout error, extend the timeout period for the Lambda function. For more information, see [Configuring function timeout (console)](https://docs.aws.amazon.com/lambda/latest/dg/configuration-function-common.html#configuration-timeout-console).
For more information about invoking a Lambda function from your code, see [Invoking AWS Lambda Functions](https://docs.aws.amazon.com/lambda/latest/dg/invoking-lambda-functions.html).
**To try your Lambda function**
1. If you haven't already done so, do the following:
1. Make sure that the user has `lambda:InvokeFunction` permission. You can use the following policy:
You can get the ARN for your Lambda function from the function overview in the [Lambda console](https://console.aws.amazon.com/lambda/).
To provide access, add permissions to your users, groups, or roles:
+ Users and groups in AWS IAM Identity Center:
Create a permission set. Follow the instructions in [Create a permission set](https://docs.aws.amazon.com/singlesignon/latest/userguide/howtocreatepermissionset.html) in the *AWS IAM Identity Center User Guide*.
+ Users managed in IAM through an identity provider:
Create a role for identity federation. Follow the instructions in [Create a role for a third-party identity provider (federation)](https://docs.aws.amazon.com/IAM/latest/UserGuide/id_roles_create_for-idp.html) in the *IAM User Guide*.
+ IAM users:
+ Create a role that your user can assume. Follow the instructions in [Create a role for an IAM user](https://docs.aws.amazon.com/IAM/latest/UserGuide/id_roles_create_for-user.html) in the *IAM User Guide*.
+ (Not recommended) Attach a policy directly to a user or add a user to a user group. Follow the instructions in [Adding permissions to a user (console)](https://docs.aws.amazon.com/IAM/latest/UserGuide/id_users_change-permissions.html#users_change_permissions-add-console) in the *IAM User Guide*.
1. Install and configure AWS SDK for Python. For more information, see [Step 2: Set Up the AWS CLI and AWS SDKs](#setup-awscli-sdk).
1. Save the following code to a file named `client.py`:
```
# Copyright Amazon.com, Inc. or its affiliates. All Rights Reserved.
# SPDX-License-Identifier: Apache-2.0
"""
Purpose
Test code for running the Amazon Textract Lambda
function example code.
"""
import argparse
import logging
import base64
import json
import io
import boto3
from botocore.exceptions import ClientError
from PIL import Image, ImageDraw
logger = logging.getLogger(__name__)
def analyze_image(function_name, image):
"""Analyzes a document with an AWS Lambda function.
:param image: The document that you want to analyze.
:return The list of Block objects in JSON format.
"""
lambda_client = boto3.client('lambda')
lambda_payload = {}
if image.startswith('s3://'):
logger.info("Analyzing document from S3 bucket: %s", image)
bucket, key = image.replace("s3://", "").split("/", 1)
s3_object = {
'Bucket': bucket,
'Name': key
}
lambda_payload = {"S3Object": s3_object}
else:
with open(image, 'rb') as image_file:
logger.info("Analyzing local document: %s ", image)
image_bytes = image_file.read()
data = base64.b64encode(image_bytes).decode("utf8")
lambda_payload = {"image": data}
# Call the lambda function with the document.
response = lambda_client.invoke(FunctionName=function_name,
Payload=json.dumps(lambda_payload))
return json.loads(response['Payload'].read().decode())
def add_arguments(parser):
"""
Adds command line arguments to the parser.
:param parser: The command line parser.
"""
parser.add_argument(
"function", help="The name of the AWS Lambda function that you want " \
"to use to analyze the document.")
parser.add_argument(
"image", help="The document that you want to analyze.")
def main():
"""
Entrypoint for script.
"""
try:
logging.basicConfig(level=logging.INFO,
format="%(levelname)s: %(message)s")
# Get command line arguments.
parser = argparse.ArgumentParser(usage=argparse.SUPPRESS)
add_arguments(parser)
args = parser.parse_args()
# Get analysis results.
result = analyze_image(args.function, args.image)
status = result['statusCode']
blocks = result['body']
blocks = json.loads(blocks)
if status == 200:
for block in blocks:
print('Type: ' + block['BlockType'])
if block['BlockType'] != 'PAGE':
print('Detected: ' + block['Text'])
print('Confidence: ' + "{:.2f}".format(block['Confidence']) + "%")
print('Id: {}'.format(block['Id']))
if 'Relationships' in block:
print('Relationships: {}'.format(block['Relationships']))
print('Bounding Box: {}'.format(block['Geometry']['BoundingBox']))
print('Polygon: {}'.format(block['Geometry']['Polygon']))
print()
print("Blocks detected: " + str(len(blocks)))
else:
print(f"Error: {result['statusCode']}")
print(f"Message: {result['body']}")
except ClientError as error:
logging.error(error)
print(error)
if __name__ == "__main__":
main()
```
1. Run the code. For the command line argument, supply the Lambda function name and the document that you want to analyze. You can supply a path to a local document, or you can use the Amazon S3 path to an document stored in an Amazon S3 bucket. For example:
```
python client.py {{function_name s3://bucket/path/document.jpg}}
```
If the document is in an Amazon S3 bucket. make sure that it is the same bucket that you specified previously in step 12 of [Step 1: Create an AWS Lambda function (console)](#example-lambda-create-function).
If successful, your code returns a partial JSON response for each Block type detected in the document.
## Extracting and Sending Text to AWS Comprehend for Analysis
Amazon Textract lets you include document text detection and analysis in your applications. With Amazon Textract you can extract text from a variety of different document types using both synchronous and asynchronous document processing. The extracted text can then be saved to a file or database, or sent to another AWS service for further processing.
In this tutorial you carry out a common end-to-end workflow. This workflow involves:
+ Processing numerous input documents with Amazon Textract
+ Providing the extracted text to Amazon Comprehend for analysis
+ Saving both the analyzed text and the analysis data to an Amazon Simple Storage Service (S3) bucket
You use the [AWS SDK for Python](https://aws.amazon.com/sdk-for-python/) for this tutorial. You can also see the AWS Documentation SDK examples [GitHub repo ](https://github.com/awsdocs/aws-doc-sdk-examples)for more Python tutorials.
### Prerequisites
Before you begin this tutorial, you’ll need to install Python and complete the steps required to [set up the Python AWS SDK](https://boto3.amazonaws.com/v1/documentation/api/latest/guide/quickstart.html). Beyond this, ensure that you have:
+ [Created an AWS account and an IAM role](https://docs.aws.amazon.com/rekognition/latest/dg/setting-up.html)
+ [Properly configured your AWS access credentials](https://docs.aws.amazon.com/cli/latest/userguide/cli-configure-quickstart.html)
+ [Created an Amazon S3 bucket](https://docs.aws.amazon.com/AmazonS3/latest/userguide/create-bucket-overview.html)
+ [ Configured Amazon Textract for Asynchronous processing](https://docs.aws.amazon.com/en_us/textract/latest/dg/api-async-roles.html), copying down the Amazon Resource Number (ARN) of the IAM role you configured for use with Amazon Textract
+ [Granted your IAM role access to Amazon Comprehend](https://docs.aws.amazon.com/comprehend/latest/dg/security-iam.html#security_iam_access-manage)
+ Selected a few documents for the purposes of text extraction/analysis and uploaded the document to Amazon S3. Ensure that the files you select for analysis are of the formats supported by Amazon Textract.
### Starting Asynchronous Document Text Detection
You can extract the text from your documents and then analyze the extracted text with a service like Amazon Comprehend. Textract supports the extraction of text from multipage documents through asynchronous operations, which are for processing large, multipage documents. Processing a PDF file asynchronously allows your application to complete other tasks while it waits for the process to complete. This section will demonstrate how to import your documents from an Amazon S3 bucket and provide them to Textract’s asynchronous text detection operation.
This tutorial assumes that you will be using Amazon S3 to store the files you want to extract text from. You’ll start by creating a class and functions that detect the text in your input documents. Your application will need to connect to the Textract client, as well as the Amazon SQS and Amazon SNS clients for the purposes of monitoring the completion status of the asynchronous job.
1. Start by writing the code to create an Amazon SNS topic and Amazon SQS queue.
The following code sample creates a `DocumentProcessor` class that connects to the three required services and then creates both an Amazon SQS queue and Amazon SNS topic. The Amazon SNS topic is used to provide information about the job completion status to an Amazon SQS queue, which will be polled to obtain the completion status of a job. There are also methods to delete the Amazon SQS queue and Amazon SNS topic once the job has been completed and the resources are no longer needed.
```
import boto3
import json
import sys
import time
class DocumentProcessor:
jobId = ''
region_name = ''
roleArn = ''
bucket = ''
document = ''
sqsQueueUrl = ''
snsTopicArn = ''
processType = ''
def __init__(self, role, bucket, document, region):
self.roleArn = role
self.bucket = bucket
self.document = document
self.region_name = region
# Instantiates necessary AWS clients
session = boto3.Session(profile_name='profile-name',
region_name='self.region_name')
self.textract = session.client('textract', region_name=self.region_name)
self.sqs = session.client('sqs', region_name=self.region_name)
self.sns = session.client('sns', region_name=self.region_name)
def CreateTopicandQueue(self):
millis = str(int(round(time.time() * 1000)))
# Create SNS topic
snsTopicName = "AmazonTextractTopic" + millis
topicResponse = self.sns.create_topic(Name=snsTopicName)
self.snsTopicArn = topicResponse['TopicArn']
# create SQS queue
sqsQueueName = "AmazonTextractQueue" + millis
self.sqs.create_queue(QueueName=sqsQueueName)
self.sqsQueueUrl = self.sqs.get_queue_url(QueueName=sqsQueueName)['QueueUrl']
attribs = self.sqs.get_queue_attributes(QueueUrl=self.sqsQueueUrl,
AttributeNames=['QueueArn'])['Attributes']
sqsQueueArn = attribs['QueueArn']
# Subscribe SQS queue to SNS topic
self.sns.subscribe(
TopicArn=self.snsTopicArn,
Protocol='sqs',
Endpoint=sqsQueueArn)
# Authorize SNS to write SQS queue
policy = """{{
"Version": "2012-10-17",
"Statement":[
{{
"Sid":"MyPolicy",
"Effect":"Allow",
"Principal" : {{"AWS" : "*"}},
"Action":"SQS:SendMessage",
"Resource": "{}",
"Condition":{{
"ArnEquals":{{
"aws:SourceArn": "{}"
}}
}}
}}
]
}}""".format(sqsQueueArn, self.snsTopicArn)
response = self.sqs.set_queue_attributes(
QueueUrl=self.sqsQueueUrl,
Attributes={
'Policy': policy
})
def DeleteTopicandQueue(self):
self.sqs.delete_queue(QueueUrl=self.sqsQueueUrl)
self.sns.delete_topic(TopicArn=self.snsTopicArn)
```
1. Write the code to call the `StartDocumentTextDetection` operation and get the results of the operation.
The `DocumentProcessor` class will also need methods to:
+ Call the `StartDocumentTextDetection` operation
+ Poll an Amazon SQS for the job completion status
+ Retrieve the results of the job once it is done processing
The following code creates the `ProcessDocument` and `GetResults` methods that call `StartDocumentTextDetection` and gets the extracted text, respectively.
```
def ProcessDocument(self):
# Checks if job found
jobFound = False
# Starts the text detection operation on the documents in the provided bucket
# Sends status to supplied SNS topic arn
response = self.textract.start_document_text_detection(
DocumentLocation={'S3Object': {'Bucket': self.bucket, 'Name': self.document}},
NotificationChannel={'RoleArn': self.roleArn, 'SNSTopicArn': self.snsTopicArn})
print('Processing type: Detection')
print('Start Job Id: ' + response['JobId'])
dotLine = 0
while jobFound == False:
sqsResponse = self.sqs.receive_message(QueueUrl=self.sqsQueueUrl, MessageAttributeNames=['ALL'],
MaxNumberOfMessages=10)
# Waits until messages are found in the SQS queue
if sqsResponse:
if 'Messages' not in sqsResponse:
if dotLine < 40:
print('.', end='')
dotLine = dotLine + 1
else:
print()
dotLine = 0
sys.stdout.flush()
time.sleep(5)
continue
# Checks for a completed job that matches the jobID in the response from
# StartDocumentTextDetection
for message in sqsResponse['Messages']:
notification = json.loads(message['Body'])
textMessage = json.loads(notification['Message'])
if str(textMessage['JobId']) == response['JobId']:
print('Matching Job Found:' + textMessage['JobId'])
jobFound = True
text_data = self.GetResults(textMessage['JobId'])
self.sqs.delete_message(QueueUrl=self.sqsQueueUrl,
ReceiptHandle=message['ReceiptHandle'])
return text_data
else:
print("Job didn't match:" +
str(textMessage['JobId']) + ' : ' + str(response['JobId']))
# Delete the unknown message. Consider sending to dead letter queue
self.sqs.delete_message(QueueUrl=self.sqsQueueUrl,
ReceiptHandle=message['ReceiptHandle'])
print('Done!')
# gets the results of the completed text detection job
# checks for pagination tokens to determine if there are multiple pages in the input doc
def GetResults(self, jobId):
maxResults = 1000
paginationToken = None
finished = False
while finished == False:
response = None
if paginationToken == None:
response = self.textract.get_document_text_detection(JobId=jobId,
MaxResults=maxResults)
else:
response = self.textract.get_document_text_detection(JobId=jobId,
MaxResults=maxResults,
NextToken=paginationToken)
blocks = response['Blocks']
# List to hold detected text
detected_text = []
# Display block information and add detected text to list
for block in blocks:
if 'Text' in block and block['BlockType'] == "LINE":
detected_text.append(block['Text'])
# If response contains a next token, update pagination token
if 'NextToken' in response:
paginationToken = response['NextToken']
else:
finished = True
return detected_text
```
1. Save the above code in a file called `detectFileAsync.py`.
You use this file in the next section to handle the detection of text in your input documents.
### Processing Your Documents and Sending the Text to Comprehend
Your application will use the class you created in the proceeding section to:
+ read documents from your Amazon S3 bucket
+ extract the text in those documents
+ send the text to Amazon Comprehend for analysis
You start by creating some functions that utilize Amazon Comprehend to analyze the text detected in your input documents. A common type of text analysis is sentiment analysis, which aims to capture the affect of a statement (whether it is positive, negative, or neutral). You can also carry out entity detection and key phrase detection on the data.
The code below takes in the detected text and invokes the `BatchDetectSentiment` operation from Amazon Comprehend in order to carry out sentiment analysis.
1. Write the code to carry out sentiment analysis on your detected text.
```
from detectFileAsync import DocumentProcessor
import boto3
import pandas as pd
# Detect sentiment
def sentiment_analysis(detected_text, lang):
comprehend = boto3.client("comprehend")
detect_sent_response = comprehend.batch_detect_sentiment(
TextList=detected_text, LanguageCode=lang)
# Lists to hold sentiment labels and sentiment scores
sentiments = []
pos_score = []
neg_score = []
neutral_score = []
mixed_score = []
# for all results add the Sentiment label and sentiment scores to lists
for res in detect_sent_response['ResultList']:
sentiments.append(res['Sentiment'])
print(res['SentimentScore'])
print(type(res['SentimentScore']))
for key, val in res['SentimentScore'].items():
if key == "Positive":
pos_score.append(val)
if key == "Negative":
neg_score.append(val)
if key == "Neutral":
neutral_score.append(val)
if key == "Mixed":
mixed_score.append(val)
return sentiments, pos_score, neg_score, neutral_score, mixed_score
```
You may also want to perform other analysis operations, such as entity detection or key phrase detection, on your detected text. You can write the functions to carry out these analysis operations on your text, just like you did for the proceeding sentiment analysis operation.
1. Write the code to carry out entity detection on your detected text.
```
# detect entities
def entity_detection(detected_text, lang):
comprehend = boto3.client("comprehend")
# convert and handle string here
# do string handling
detect_ent_response = comprehend.batch_detect_entities(
TextList=detected_text, LanguageCode=lang)
# To fold detected entities and entity types
ents = []
types = []
# Get detected entities and types from the response returned by Comprehend
for i in detect_ent_response['ResultList']:
if len(i['Entities']) == 0:
ents.append("N/A")
types.append("N/A")
else:
sentence_ents = []
sentence_types = []
for entities in i['Entities']:
sentence_ents.append(entities['Text'])
sentence_types.append(entities['Type'])
ents.append(sentence_ents)
types.append(sentence_types)
return ents, types
```
1. Write the code to carry out key phrase detection on your detected text.
```
# Detect key phrases
def key_phrases_detection(detected_text, lang):
comprehend = boto3.client("comprehend")
key_phrases = []
detect_phrases_response = comprehend.batch_detect_key_phrases(
TextList=detected_text, LanguageCode=lang)
for i in detect_phrases_response['ResultList']:
if len(i['KeyPhrases']) == 0:
key_phrases.append("N/A")
else:
phrases = []
for phrase in i['KeyPhrases']:
phrases.append(phrase['Text'])
key_phrases.append(phrases)
return key_phrases
```
You need to create a function that invokes all of the code you’ve created so far. The function will use the `DocumentProcessor` class you created in your `DetectAnalyzeFileAsync.py` file, and then save the detected text to a variable for input into the three functions utilizing Amazon Comprehend that you previously wrote. The function will also need to construct a Pandas dataframe, into which the detected text and analysis data will be inserted. Finally, the Pandas dataframe will be saved as a CSV file.
1. Write the code to process your input documents with Textract and pass the detected text to Comprehend.
```
def process_document(roleArn, bucket, document, region_name):
# Create analyzer class from DocumentProcessor, create a topic and queue, use Textract to get text,
# then delete topica and queue
analyzer = DocumentProcessor(roleArn, bucket, document, region_name)
analyzer.CreateTopicandQueue()
extracted_text = analyzer.ProcessDocument()
analyzer.DeleteTopicandQueue()
# detect dominant language
comprehend = boto3.client("comprehend")
response = comprehend.detect_dominant_language(Text=str(extracted_text[:10]))
print(response)
print(type(response))
lang = ""
for i in response['Languages']:
lang = i['LanguageCode']
print(lang)
# or you can enter language code below
# lang = "en"
print("Lines in detected text:" + str(len(extracted_text)))
sliced_list = []
start = 0
end = 24
while end < len(extracted_text):
sliced_list.append(extracted_text[start:end])
start += 25
end += 25
print(sliced_list)
# Create lists to hold analytics data, these will be turned into columns
all_sents = []
all_scores = []
all_ents = []
all_types = []
all_key_phrases = []
all_pos_ratings = []
all_neg_ratings = []
all_neutral_ratings = []
all_mixed_ratings = []
# For every slice, get sentiment analysis, entity detection and key phrases, append results to lists
for slice in sliced_list:
slice_labels, pos_ratings, neg_ratings, neutral_ratings, mixed_ratings = sentiment_analysis(slice, lang)
all_sents.append(slice_labels)
all_pos_ratings.append(pos_ratings)
all_neg_ratings.append(neg_ratings)
all_neutral_ratings.append(neutral_ratings)
all_mixed_ratings.append(mixed_ratings)
slice_ents, slice_types = entity_detection(slice, lang)
all_ents.append(slice_ents)
all_types.append(slice_types)
key_phrases = key_phrases_detection(slice, lang)
all_key_phrases.append(key_phrases)
# List comprehension to flatten multiple lists into a single list
extracted_text = [line for sublist in sliced_list for line in sublist]
all_sents = [sent for sublist in all_sents for sent in sublist]
all_scores = [score for sublist in all_scores for score in sublist]
all_ents = [ents for sublist in all_ents for ents in sublist]
all_types = [types for sublist in all_types for types in sublist]
all_key_phrases = [kp for sublist in all_key_phrases for kp in sublist]
all_mixed_ratings = [kp for sublist in all_mixed_ratings for kp in sublist]
all_pos_ratings = [kp for sublist in all_pos_ratings for kp in sublist]
all_neg_ratings = [kp for sublist in all_neg_ratings for kp in sublist]
all_neutral_ratings = [kp for sublist in all_neutral_ratings for kp in sublist]
print(len(extracted_text))
print(len(all_sents))
print(len(all_ents))
print(len(all_types))
print(len(all_key_phrases))
print("List of Recognized Entities:")
# Create dataframe and save as CSV
df = pd.DataFrame({'Sentences':extracted_text, 'Sentiment':all_sents, 'SentPosScore':all_pos_ratings,
'SentNegScore':all_neg_ratings, 'SentNeutralScore':all_neutral_ratings, 'SentMixedRatings':all_mixed_ratings,
'Entities':all_ents, 'EntityTypes':all_types,'KeyPhrases:':all_key_phrases})
analysis_results = str(document.replace(".","_") + "_" + "analysis" + ".csv")
df.to_csv(analysis_results, index=False)
print(df)
print("Data written to file!")
return extracted_text, analysis_results
```
1. Write the code to process your documents and upload the resulting data to S3. In the code sample below, replace the value of `roleArn` with the ARN of the role you configured for use with Amazon Textract. Replace the value of `region_name` with the region your account is operating in. Finally, replace the value `bucket_name` with the name of the S3 bucket containing your documents.
```
def main():
# Initialize S3 client and set RoleArn, region name, and bucket name
s3 = boto3.client("s3")
roleArn = ''
region_name = ''
bucket_name = ''
# initialize global corpus
full_corpus = []
# to hold all docs in bucket
docs_list = []
# loop through docs in bucket, get names of all docs
s3_resource = boto3.resource("s3")
bucket = s3_resource.Bucket(bucket_name)
for bucket_object in bucket.objects.all():
docs_list.append(bucket_object.key)
print(docs_list)
# For all the docs in the bucket, invoke document processing function,
# add detected text to corpus of all text in batch docs,
# and save CSV of comprehend analysis data and textract detected to S3
for i in docs_list:
detected_text, analysis_results = process_document(roleArn, bucket_name, i, region_name)
full_corpus.append(detected_text)
print("Uploading file: {}".format(str(analysis_results)))
name_of_file = str(analysis_results)
s3.upload_file(name_of_file, bucket_name, name_of_file)
# print the global corpus
print(full_corpus)
if __name__ == "__main__":
main()
```
1. Put the proceeding code in the section into a Python file and run it.
You have successfully extracted text using Amazon Textract, sent the text to Amazon Comprehend for analysis, and then saved the results in a Amazon S3 bucket.
## Additional Code Samples
The following table provides links to more Amazon Textract code examples.
| Example | Description |
| --- | --- |
| [Amazon Textract Code Samples](https://github.com/aws-samples/amazon-textract-code-samples) | Show various ways in which you can use Amazon Textract. |
| [Large scale document processing with Amazon Textract](https://github.com/aws-samples/amazon-textract-serverless-large-scale-document-processing) | Shows a serverless reference architecture that processes documents at a large scale. |
| [Amazon Textract Parser](https://github.com/aws-samples/amazon-textract-response-parser) | Shows how to parse the [Block](https://docs.aws.amazon.com/textract/latest/APIReference/API_Block.html) objects returned by Amazon Textract operations. |
| [Amazon Textract Documentation Code Examples](https://github.com/awsdocs/aws-doc-sdk-examples/tree/master/python/example_code/textract) | Code examples used in this guide. |
| [Textractor](https://github.com/aws-samples/amazon-textract-textractor) | Shows how to convert Amazon Textract output into multiple formats. |
| [Generate Searchable PDF documents with Amazon Textract](https://github.com/aws-samples/amazon-textract-searchable-pdf) | Shows how to create a searchable PDF document from different types of input documents such as JPG/PNG format images and scanned PDF documents. |
# Security in Amazon Textract
Cloud security at AWS is the highest priority. As an AWS customer, you benefit from a data center and network architecture that are built to meet the requirements of the most security-sensitive organizations.
Use the following topics to learn how to secure your Amazon Textract resources.
**Topics**
+ [Data Protection in Amazon Textract](#data-protection)
+ [Identity and Access Management for Amazon Textract](#security-iam)
+ [Logging and Monitoring](#textract_monitoring)
+ [Logging Amazon Textract API Calls with AWS CloudTrail](#logging-using-cloudtrail)
+ [Tagging resources](#tagging-adapters)
+ [Compliance Validation for Amazon Textract](#SERVICENAME-compliance)
+ [Resilience in Amazon Textract](#disaster-recovery-resiliency)
+ [Cross-service confused deputy prevention](#cross-service-confused-deputy-prevention)
+ [Infrastructure Security in Amazon Textract](#infrastructure-security)
+ [Configuration and Vulnerability Analysis in Amazon Textract](#vulnerability-analysis-and-management)
+ [Amazon Textract and interface VPC endpoints (AWS PrivateLink)](#vpc-interface-endpoints)
## Data Protection in Amazon Textract
The AWS [shared responsibility model](https://aws.amazon.com/compliance/shared-responsibility-model/) applies to data protection in Amazon Textract. As described in this model, AWS is responsible for protecting the global infrastructure that runs all of the AWS Cloud. You are responsible for maintaining control over your content that is hosted on this infrastructure. This content includes the security configuration and management tasks for the AWS services that you use. For more information about data privacy, see the [Data Privacy FAQ](https://aws.amazon.com/compliance/data-privacy-faq). For information about data protection in Europe, see the [AWS Shared Responsibility Model and GDPR](https://aws.amazon.com/blogs/security/the-aws-shared-responsibility-model-and-gdpr/) blog post on the *AWS Security Blog*.
For data protection purposes, we recommend that you protect AWS account credentials and set up individual users with AWS IAM Identity Center or AWS Identity and Access Management (IAM). That way, each user is given only the permissions necessary to fulfill their job duties. We also recommend that you secure your data in the following ways:
+ Use multi-factor authentication (MFA) with each account.
+ Use SSL/TLS to communicate with AWS resources. We recommend TLS 1.2 or later.
+ Set up API and user activity logging with AWS CloudTrail.
+ Use AWS encryption solutions, along with all default security controls within AWS services.
+ Use advanced managed security services such as Amazon Macie, which assists in discovering and securing sensitive data that is stored in Amazon S3.
+ If you require FIPS 140-2 validated cryptographic modules when accessing AWS through a command line interface or an API, use a FIPS endpoint. For more information about the available FIPS endpoints, see [Federal Information Processing Standard (FIPS) 140-2](https://aws.amazon.com/compliance/fips/).
We strongly recommend that you never put confidential or sensitive information, such as your customers' email addresses, into free-form text fields such as a `Name` field. This includes when you work with Amazon Textract or other AWS services using the console, API, AWS CLI, or AWS SDKs. Any data that you enter into free-form text fields may be picked up for inclusion in diagnostic logs. If you provide a URL to an external server, we strongly recommend that you do not include credentials information in the URL to validate your request to that server.
For more information about data protection, see the [AWS Shared Responsibility Model and GDPR](https://aws.amazon.com/blogs/security/the-aws-shared-responsibility-model-and-gdpr/) blog post on the *AWS Security Blog*.
### Internetwork Traffic Privacy
Amazon Textract communicates exclusively through HTTPS endpoints, which are supported in all Regions supported by Amazon Textract
### Custom Queries
Any content used for generating adapters is processed internally within Amazon Textract for the duration of the training. The content is encrypted at rest and in transit. The content is stored and processed in the AWS Region where you are training the adapter, and is deleted once training completes. By default, the content is encrypted using AWS owned AWS KMS keys. If a KMSKeyId is provided when creating an adapter version, the content is encrypted using the Customer managed CMK provided. Customer content (training images, prelabeling results, annotations) is not logged or retained even for debugging purposes.
### Encryption in Amazon Textract
Data encryption refers to protecting data while in transit and at rest. You can protect your data by using Amazon S3-Managed Keys or AWS KMS key at rest, alongside standard Transport Layer Security while in transit.
#### Encryption at Rest
The primary method of encrypting data in Amazon Textract is server-side encryption. Input documents passed from Amazon S3 buckets are encrypted by Amazon S3 and decrypted when you access them. As long as you authenticate your request and you have access permissions, there is no difference in the way you access encrypted or unencrypted objects. For example, if you share your objects using a presigned URL, that URL works the same way for both encrypted and unencrypted objects. Additionally, when you list objects in your bucket, the `List` API returns a list of all objects, regardless of whether they are encrypted.
Amazon Textract uses two mutually exclusive methods of server-side encryption.
**Server-Side Encryption with Amazon S3-Managed Keys (SSE-S3)**
When you use server-side encryption with Amazon S3-Managed Keys (SSE-S3), each object is encrypted with a unique key. As an additional safeguard, this method encrypts the key itself with a master key that it regularly rotates. Amazon S3 server-side encryption uses one of the strongest block ciphers available, 256-bit Advanced Encryption Standard (AES-256), to encrypt your data. For more information, see Protecting Data Using Server-Side Encryption with Amazon S3-Managed Encryption Keys (SSE-S3).
**Server-Side Encryption with KMS keys Stored in AWS Key Management Service (SSE-KMS)**
Server-side encryption with KMS keys stored in AWS Key Management Service (SSE-KMS) is similar to SSE-S3, but with some additional benefits and charges for using this service. There are separate permissions for the use of a KMS key that provides added protection against unauthorized access of your objects in Amazon S3. SSE-KMS also provides you with an audit trail that shows when your KMS key was used and by whom. Additionally, you can create and manage KMS keys or use AWS managed keys that are unique to you, your service, and your Region. For more information, see Protecting Data Using Server-Side Encryption with KMS keys Stored in AWS Key Management Service (SSE-KMS).
#### Encryption in Transit
For data in transit, Amazon Textract uses Transport Layer Security (TLS) to encrypt data sent between the service and the agent. Additionally, Amazon Textract uses VPC endpoints to send data between the various microservices used when Amazon Textract processes a document.
## Identity and Access Management for Amazon Textract
AWS Identity and Access Management (IAM) is an AWS service that helps an administrator securely control access to AWS resources. IAM administrators control who can be *authenticated* (signed in) and *authorized* (have permissions) to use Amazon Textract resources. IAM is an AWS service that you can use with no additional charge.
**Topics**
+ [Audience](#security_iam_audience)
+ [Authenticating With Identities](#security_iam_authentication)
+ [Managing Access Using Policies](#security_iam_access-manage)
+ [How Amazon Textract Works with IAM](#security_iam_service-with-iam)
+ [Amazon Textract Identity-Based Policy Examples](#security_iam_id-based-policy-examples)
+ [Troubleshooting Amazon Textract Identity and Access](#security_iam_troubleshoot)
### Audience
How you use AWS Identity and Access Management (IAM) differs based on your role:
+ **Service user** - request permissions from your administrator if you cannot access features (see [Troubleshooting Amazon Textract Identity and Access](#security_iam_troubleshoot))
+ **Service administrator** - determine user access and submit permission requests (see [How Amazon Textract Works with IAM](#security_iam_service-with-iam))
+ **IAM administrator** - write policies to manage access (see [Amazon Textract Identity-Based Policy Examples](#security_iam_id-based-policy-examples))
### Authenticating With Identities
Authentication is how you sign in to AWS using your identity credentials. You must be authenticated as the AWS account root user, an IAM user, or by assuming an IAM role.
You can sign in as a federated identity using credentials from an identity source like AWS IAM Identity Center (IAM Identity Center), single sign-on authentication, or Google/Facebook credentials. For more information about signing in, see [How to sign in to your AWS account](https://docs.aws.amazon.com/signin/latest/userguide/how-to-sign-in.html) in the *AWS Sign-In User Guide*.
For programmatic access, AWS provides an SDK and CLI to cryptographically sign requests. For more information, see [AWS Signature Version 4 for API requests](https://docs.aws.amazon.com/IAM/latest/UserGuide/reference_sigv.html) in the *IAM User Guide*.
#### AWS account root user
When you create an AWS account, you begin with one sign-in identity called the AWS account *root user* that has complete access to all AWS services and resources. We strongly recommend that you don't use the root user for everyday tasks. For tasks that require root user credentials, see [Tasks that require root user credentials](https://docs.aws.amazon.com/IAM/latest/UserGuide/id_root-user.html#root-user-tasks) in the *IAM User Guide*.
#### IAM Users and Groups
An *[IAM user](https://docs.aws.amazon.com/IAM/latest/UserGuide/id_users.html)* is an identity with specific permissions for a single person or application. We recommend using temporary credentials instead of IAM users with long-term credentials. For more information, see [Require human users to use federation with an identity provider to access AWS using temporary credentials](https://docs.aws.amazon.com/IAM/latest/UserGuide/best-practices.html#bp-users-federation-idp) in the *IAM User Guide*.
An [*IAM group*](https://docs.aws.amazon.com/IAM/latest/UserGuide/id_groups.html) specifies a collection of IAM users and makes permissions easier to manage for large sets of users. For more information, see [Use cases for IAM users](https://docs.aws.amazon.com/IAM/latest/UserGuide/gs-identities-iam-users.html) in the *IAM User Guide*.
#### IAM Roles
An *[IAM role](https://docs.aws.amazon.com/IAM/latest/UserGuide/id_roles.html)* is an identity with specific permissions that provides temporary credentials. You can assume a role by [switching from a user to an IAM role (console)](https://docs.aws.amazon.com/IAM/latest/UserGuide/id_roles_use_switch-role-console.html) or by calling an AWS CLI or AWS API operation. For more information, see [Methods to assume a role](https://docs.aws.amazon.com/IAM/latest/UserGuide/id_roles_manage-assume.html) in the *IAM User Guide*.
IAM roles are useful for federated user access, temporary IAM user permissions, cross-account access, cross-service access, and applications running on Amazon EC2. For more information, see [Cross account resource access in IAM](https://docs.aws.amazon.com/IAM/latest/UserGuide/access_policies-cross-account-resource-access.html) in the *IAM User Guide*.
### Managing Access Using Policies
You control access in AWS by creating policies and attaching them to AWS identities or resources. A policy defines permissions when associated with an identity or resource. AWS evaluates these policies when a principal makes a request. Most policies are stored in AWS as JSON documents. For more information about JSON policy documents, see [Overview of JSON policies](https://docs.aws.amazon.com/IAM/latest/UserGuide/access_policies.html#access_policies-json) in the *IAM User Guide*.
Using policies, administrators specify who has access to what by defining which **principal** can perform **actions** on what **resources**, and under what **conditions**.
By default, users and roles have no permissions. An IAM administrator creates IAM policies and adds them to roles, which users can then assume. IAM policies define permissions regardless of the method used to perform the operation.
#### Identity-Based Policies
Identity-based policies are JSON permissions policy documents that you attach to an identity (user, group, or role). These policies control what actions identities can perform, on which resources, and under what conditions. To learn how to create an identity-based policy, see [Define custom IAM permissions with customer managed policies](https://docs.aws.amazon.com/IAM/latest/UserGuide/access_policies_create.html) in the *IAM User Guide*.
Identity-based policies can be *inline policies* (embedded directly into a single identity) or *managed policies* (standalone policies attached to multiple identities). To learn how to choose between managed and inline policies, see [Choose between managed policies and inline policies](https://docs.aws.amazon.com/IAM/latest/UserGuide/access_policies-choosing-managed-or-inline.html) in the *IAM User Guide*.
#### Resource-Based Policies
Resource-based policies are JSON policy documents that you attach to a resource. Examples include IAM *role trust policies* and Amazon S3 *bucket policies*. In services that support resource-based policies, service administrators can use them to control access to a specific resource. You must [specify a principal](https://docs.aws.amazon.com/IAM/latest/UserGuide/reference_policies_elements_principal.html) in a resource-based policy.
Resource-based policies are inline policies that are located in that service. You can't use AWS managed policies from IAM in a resource-based policy.
#### Access Control Lists (ACLs)
Access control lists (ACLs) control which principals (account members, users, or roles) have permissions to access a resource. ACLs are similar to resource-based policies, although they do not use the JSON policy document format.
Amazon S3, AWS WAF, and Amazon VPC are examples of services that support ACLs. To learn more about ACLs, see [Access control list (ACL) overview](https://docs.aws.amazon.com/AmazonS3/latest/userguide/acl-overview.html) in the *Amazon Simple Storage Service Developer Guide*.
#### Other Policy Types
AWS supports additional policy types that can set the maximum permissions granted by more common policy types:
+ **Permissions boundaries** – Set the maximum permissions that an identity-based policy can grant to an IAM entity. For more information, see [Permissions boundaries for IAM entities](https://docs.aws.amazon.com/IAM/latest/UserGuide/access_policies_boundaries.html) in the *IAM User Guide*.
+ **Service control policies (SCPs)** – Specify the maximum permissions for an organization or organizational unit in AWS Organizations. For more information, see [Service control policies](https://docs.aws.amazon.com/organizations/latest/userguide/orgs_manage_policies_scps.html) in the *AWS Organizations User Guide*.
+ **Resource control policies (RCPs)** – Set the maximum available permissions for resources in your accounts. For more information, see [Resource control policies (RCPs)](https://docs.aws.amazon.com/organizations/latest/userguide/orgs_manage_policies_rcps.html) in the *AWS Organizations User Guide*.
+ **Session policies** – Advanced policies passed as a parameter when creating a temporary session for a role or federated user. For more information, see [Session policies](https://docs.aws.amazon.com/IAM/latest/UserGuide/access_policies.html#policies_session) in the *IAM User Guide*.
#### Multiple Policy Types
When multiple types of policies apply to a request, the resulting permissions are more complicated to understand. To learn how AWS determines whether to allow a request when multiple policy types are involved, see [Policy evaluation logic](https://docs.aws.amazon.com/IAM/latest/UserGuide/reference_policies_evaluation-logic.html) in the *IAM User Guide*.
### How Amazon Textract Works with IAM
Before you use IAM to manage access to Amazon Textract, you should understand what IAM features are available to use with Amazon Textract. To get a high-level view of how Amazon Textract and other AWS services work with IAM, see [AWS Services That Work with IAM](https://docs.aws.amazon.com/IAM/latest/UserGuide/reference_aws-services-that-work-with-iam.html) in the *IAM User Guide*.
**Topics**
+ [Amazon Textract Identity-Based Policies](#security_iam_service-with-iam-id-based-policies)
+ [Amazon Textract Resource-Based Policies](#security_iam_service-with-iam-resource-based-policies)
+ [Authorization Based on Amazon Textract Tags](#security_iam_service-with-iam-tags)
+ [Amazon Textract IAM Roles](#security_iam_service-with-iam-roles)
#### Amazon Textract Identity-Based Policies
With IAM identity-based policies, you can specify allowed or denied actions and resources and the conditions under which actions are allowed or denied. Amazon Textract supports specific actions, resources, and condition keys. To learn about all of the elements that you use in a JSON policy, see [IAM JSON Policy Elements Reference](https://docs.aws.amazon.com/IAM/latest/UserGuide/reference_policies_elements.html) in the *IAM User Guide*.
##### Actions
Administrators can use AWS JSON policies to specify who has access to what. That is, which **principal** can perform **actions** on what **resources**, and under what **conditions**.
The `Action` element of a JSON policy describes the actions that you can use to allow or deny access in a policy. Include actions in a policy to grant permissions to perform the associated operation.
Asynchronous actions in Amazon Textract require two action permissions to be given, one for Start actions and one for Get actions. Additionally, if you are using an Amazon S3 bucket to pass documents, you will need to grant your account read access.
In Amazon Textract, all policy actions start with: `textract:`. For example, to grant someone permission to run an Amazon Textract operation with the Amazon Textract `AnalyzeDocument` operation, you include the `textract:AnalyzeDocument` action in their policy. Policy statements must include either an `Action` or `NotAction` element. Amazon Textract defines its own set of actions that describe tasks that you can perform with this service.
To specify multiple actions in a single statement, separate them with commas as follows.
```
"Action": [
"textract:action1",
"textract:action2"
```
You can specify multiple actions using wildcards (\*). For example, to specify all actions that begin with the word `Describe`, include the following action.
```
"Action": "textract:Describe*"
```
For a list of Amazon Textract actions, see [Actions Defined by Amazon Textract](https://docs.aws.amazon.com/IAM/latest/UserGuide/list_amazontextract.html#amazontextract-actions-as-permissions) in the *IAM User Guide*.
##### Resources
Administrators can use AWS JSON policies to specify who has access to what. That is, which **principal** can perform **actions** on what **resources**, and under what **conditions**.
The `Resource` JSON policy element specifies the object or objects to which the action applies. As a best practice, specify a resource using its [Amazon Resource Name (ARN)](https://docs.aws.amazon.com/IAM/latest/UserGuide/reference-arns.html). For actions that don't support resource-level permissions, use a wildcard (\*) to indicate that the statement applies to all resources.
```
"Resource": "*"
```
For actions that supports resource-level permission, such as the [AnalyzeDocument](https://docs.aws.amazon.com/textract/latest/APIReference/API_AnalyzeDocument.html) and [GetAdapter](https://docs.aws.amazon.com/textract/latest/APIReference/API_GetAdapter.html)operations, use the ARN to indicate the resources:
```
"Resource": [
# Adapter ARN
"arn:aws:textract:::/adapters/",
# Adapter version ARN
"arn:aws:textract:::/adapters//versions/",
# Use wildcard to indicate all versions under an adapter
"arn:aws:textract:::/adapters//versions/*"
]
```
##### Condition Keys
Administrators can use AWS JSON policies to specify who has access to what. That is, which **principal** can perform **actions** on what **resources**, and under what **conditions**.
The `Condition` element specifies when statements execute based on defined criteria. You can create conditional expressions that use [condition operators](https://docs.aws.amazon.com/IAM/latest/UserGuide/reference_policies_elements_condition_operators.html), such as equals or less than, to match the condition in the policy with values in the request. To see all AWS global condition keys, see [AWS global condition context keys](https://docs.aws.amazon.com/IAM/latest/UserGuide/reference_policies_condition-keys.html) in the *IAM User Guide*.
Amazon Textract does not provide any service-specific condition keys, but it does support using some global condition keys. For a list of all AWS global condition keys, see [AWS Global Condition Context Keys](https://docs.aws.amazon.com/IAM/latest/UserGuide/reference_policies_condition-keys.html) in the *IAM User Guide*.
##### Examples
To view examples of Amazon Textract identity-based policies, see [Amazon Textract Identity-Based Policy Examples](#security_iam_id-based-policy-examples).
#### Amazon Textract Resource-Based Policies
Amazon Textract does not support resource-based policies.
#### Authorization Based on Amazon Textract Tags
Amazon Textract resources supports tagging resources and controlling access based on tags. You can use the [TagResource](https://docs.aws.amazon.com/STS/latest/APIReference/API_TagResource.html), [UntagResource](https://docs.aws.amazon.com/STS/latest/APIReference/API_UntagResource.html), and [ListTagsForResource](https://docs.aws.amazon.com/STS/latest/APIReference/API_ListTagsForResource.html) operations to manage resource tags.
For access control based on tags, you can refer to [AccessTags](https://docs.aws.amazon.com/IAM/latest/UserGuide/access_tags.html).
#### Amazon Textract IAM Roles
An [IAM role](https://docs.aws.amazon.com/IAM/latest/UserGuide/id_roles.html) is an entity within your AWS account that has specific permissions.
##### Using Temporary Credentials with Amazon Textract
You can use temporary credentials to sign in with federation, assume an IAM role, or to assume a cross-account role. You obtain temporary security credentials by calling AWS STS API operations such as [AssumeRole](https://docs.aws.amazon.com/STS/latest/APIReference/API_AssumeRole.html) or [GetFederationToken](https://docs.aws.amazon.com/STS/latest/APIReference/API_GetFederationToken.html).
Amazon Textract supports using temporary credentials.
##### Service-Linked Roles
[Service-linked roles](https://docs.aws.amazon.com/IAM/latest/UserGuide/id_roles_terms-and-concepts.html#iam-term-service-linked-role) allow AWS services to access resources in other services to complete an action on your behalf. Service-linked roles appear in your IAM account and are owned by the service. An IAM administrator can view but not edit the permissions for service-linked roles.
Amazon Textract does not support service-linked roles.
**Note**
Because Amazon Textract does not support service-linked roles, it does not support AWS service principals. For more information about service principals, see [AWS service principals](https://docs.aws.amazon.com/IAM/latest/UserGuide/reference_policies_elements_principal.html#principal-services) in the *IAM User Guide*.
##### Service Roles
This feature allows a service to assume a [service role](https://docs.aws.amazon.com/IAM/latest/UserGuide/id_roles_terms-and-concepts.html#iam-term-service-role) on your behalf. This role allows the service to access resources in other services to complete an action on your behalf. Service roles appear in your IAM account and are owned by the account. This means that an IAM administrator can change the permissions for this role. However, doing so might break the functionality of the service.
Amazon Textract supports service roles.
If you are using a service role, you should ensure that your account is secure by limiting the scope of Amazon Textract access to only the resources that you're using. To do this, attach a trust policy to your IAM service role. For more information, see [Cross-service confused deputy prevention](https://docs.aws.amazon.com/textract/latest/dg/cross-service-confused-deputy-prevention.html).
### Amazon Textract Identity-Based Policy Examples
By default, users and roles don't have permission to create or modify Amazon Textract resources. They also can't perform tasks using the AWS Management Console, AWS CLI, or AWS API. An administrator must create IAM policies that grant users and roles permission to perform specific API operations on the specified resources they need. The administrator then grants a user access to a role via temporary security credentials.
To learn how to create an IAM identity-based policy using these example JSON policy documents, see [Creating Policies on the JSON Tab](https://docs.aws.amazon.com/IAM/latest/UserGuide/access_policies_create.html#access_policies_create-json-editor) in the *IAM User Guide*.
**Topics**
+ [Policy Best Practices](#security_iam_service-with-iam-policy-best-practices)
+ [Allow Users to View Their Own Permissions](#security_iam_id-based-policy-examples-view-own-permissions)
+ [Giving Access to Synchronous Operations in Amazon Textract](#security_iam_sync-actions)
+ [Giving Access to Asynchronous Operations in Amazon Textract](#security_iam_async-actions)
+ [Giving access to specific adapters in inference operations in Amazon Textract](#security_iam_adapter-inference)
+ [Disallow user to use adapters in inference operations](#security_iam_disallow-inference)
+ [Allow user to only use a specific group of adapters in inference operations, or no adapters](#security_iam_adapter-groups)
#### Policy Best Practices
Identity-based policies determine whether someone can create, access, or delete Amazon Textract resources in your account. These actions can incur costs for your AWS account. When you create or edit identity-based policies, follow these guidelines and recommendations:
+ **Get started with AWS managed policies and move toward least-privilege permissions** – To get started granting permissions to your users and workloads, use the *AWS managed policies* that grant permissions for many common use cases. They are available in your AWS account. We recommend that you reduce permissions further by defining AWS customer managed policies that are specific to your use cases. For more information, see [AWS managed policies](https://docs.aws.amazon.com/IAM/latest/UserGuide/access_policies_managed-vs-inline.html#aws-managed-policies) or [AWS managed policies for job functions](https://docs.aws.amazon.com/IAM/latest/UserGuide/access_policies_job-functions.html) in the *IAM User Guide*.
+ **Apply least-privilege permissions** – When you set permissions with IAM policies, grant only the permissions required to perform a task. You do this by defining the actions that can be taken on specific resources under specific conditions, also known as *least-privilege permissions*. For more information about using IAM to apply permissions, see [ Policies and permissions in IAM](https://docs.aws.amazon.com/IAM/latest/UserGuide/access_policies.html) in the *IAM User Guide*.
+ **Use conditions in IAM policies to further restrict access** – You can add a condition to your policies to limit access to actions and resources. For example, you can write a policy condition to specify that all requests must be sent using SSL. You can also use conditions to grant access to service actions if they are used through a specific AWS service, such as CloudFormation. For more information, see [ IAM JSON policy elements: Condition](https://docs.aws.amazon.com/IAM/latest/UserGuide/reference_policies_elements_condition.html) in the *IAM User Guide*.
+ **Use IAM Access Analyzer to validate your IAM policies to ensure secure and functional permissions** – IAM Access Analyzer validates new and existing policies so that the policies adhere to the IAM policy language (JSON) and IAM best practices. IAM Access Analyzer provides more than 100 policy checks and actionable recommendations to help you author secure and functional policies. For more information, see [Validate policies with IAM Access Analyzer](https://docs.aws.amazon.com/IAM/latest/UserGuide/access-analyzer-policy-validation.html) in the *IAM User Guide*.
+ **Require multi-factor authentication (MFA)** – If you have a scenario that requires IAM users or a root user in your AWS account, turn on MFA for additional security. To require MFA when API operations are called, add MFA conditions to your policies. For more information, see [ Secure API access with MFA](https://docs.aws.amazon.com/IAM/latest/UserGuide/id_credentials_mfa_configure-api-require.html) in the *IAM User Guide*.
For more information about best practices in IAM, see [Security best practices in IAM](https://docs.aws.amazon.com/IAM/latest/UserGuide/best-practices.html) in the *IAM User Guide*.
#### Allow Users to View Their Own Permissions
This example shows how you might create a policy that allows IAM users to view the inline and managed policies that are attached to their user identity. This policy includes permissions to complete this action on the console or programmatically using the AWS CLI or AWS API.
```
{
"Version": "2012-10-17",
"Statement": [
{
"Sid": "ViewOwnUserInfo",
"Effect": "Allow",
"Action": [
"iam:GetUserPolicy",
"iam:ListGroupsForUser",
"iam:ListAttachedUserPolicies",
"iam:ListUserPolicies",
"iam:GetUser"
],
"Resource": ["arn:aws:iam::*:user/${aws:username}"]
},
{
"Sid": "NavigateInConsole",
"Effect": "Allow",
"Action": [
"iam:GetGroupPolicy",
"iam:GetPolicyVersion",
"iam:GetPolicy",
"iam:ListAttachedGroupPolicies",
"iam:ListGroupPolicies",
"iam:ListPolicyVersions",
"iam:ListPolicies",
"iam:ListUsers"
],
"Resource": "*"
}
]
}
```
#### Giving Access to Synchronous Operations in Amazon Textract
This example policy grants access to the synchronous actions in Amazon Textract to an IAM user in your AWS account.
```
"Version": "2012-10-17",
"Statement": [
{
"Effect": "Allow",
"Action": [
"textract:DetectDocumentText",
"textract:AnalyzeDocument"
],
"Resource": "*"
}
]
```
#### Giving Access to Asynchronous Operations in Amazon Textract
The following example policy gives an IAM user on your AWS account access to all asynchronous operations used in Amazon Textract.
------
#### [ JSON ]
****
```
{
"Version":"2012-10-17",
"Statement": [
{
"Effect": "Allow",
"Action": [
"textract:StartDocumentTextDetection",
"textract:StartDocumentAnalysis",
"textract:GetDocumentTextDetection",
"textract:GetDocumentAnalysis"
],
"Resource": "*"
}
]
}
```
------
#### Giving access to specific adapters in inference operations in Amazon Textract
Although you can use `*` to access all resources in inference operations, you can control a user's access to specific adapters.
#### Disallow user to use adapters in inference operations
#### Allow user to only use a specific group of adapters in inference operations, or no adapters
Tag the specific adapters that you want to control by using the `TagResource` operation. The following example controls access to adapters tagged with `{"env":"prod"}`.
##### Allow user to manage adapter and versions
##### Permissions needed for CreateAdapterVersion
In addition to `"textract:CreateAdapterVersion"` permission, the caller identity also needs Amazon S3 and AWS Key Management Service (AWS KMS) permission to your training data in Amazon S3 and the KMS key used to encrypt your data.
### Troubleshooting Amazon Textract Identity and Access
Use the following information to help you diagnose and fix common issues that you might encounter when working with Amazon Textract and IAM.
**Topics**
+ [I Am Not Authorized to Perform an Action in Amazon Textract](#security_iam_troubleshoot-no-permissions)
+ [I Am Not Authorized to Perform iam:PassRole](#security_iam_troubleshoot-passrole)
+ [I Want to Allow People Outside of My AWS Account to Access My Amazon Textract Resources](#security_iam_troubleshoot-cross-account-access)
#### I Am Not Authorized to Perform an Action in Amazon Textract
If the AWS Management Console tells you that you're not authorized to perform an action, then you must contact your administrator for assistance. Your administrator is the person that provided you with your username and password.
The following example error occurs when the `mateojackson` IAM user tries to run `DetectDocumentText` on a test image but does not have `textract:DetectDocumentText` permissions.
```
User: arn:aws:iam::123456789012:user/mateojackson is not authorized to perform: textract:DetectDocumentText on resource: textimage.png
```
In this case, Mateo asks their administrator to update their policies to allow access to the `textimage.png` resource using the `textract:DetectDocumentText` action.
#### I Am Not Authorized to Perform iam:PassRole
If you receive an error that you're not authorized to perform the `iam:PassRole` action, your policies must be updated to allow you to pass a role to Amazon Textract.
Some AWS services allow you to pass an existing role to that service instead of creating a new service role or service-linked role. To do this, you must have permissions to pass the role to the service.
The following example error occurs when an IAM user named `marymajor` tries to use the console to perform an action in Amazon Textract. However, the action requires the service to have permissions that are granted by a service role. Mary does not have permissions to pass the role to the service.
```
User: arn:aws:iam::123456789012:user/marymajor is not authorized to perform: iam:PassRole
```
In this case, Mary's policies must be updated to allow her to perform the `iam:PassRole` action.
If you need help, contact your AWS administrator. Your administrator is the person who provided you with your sign-in credentials.
#### I Want to Allow People Outside of My AWS Account to Access My Amazon Textract Resources
You can create a role that users in other accounts or people outside of your organization can use to access your resources. You can specify who is trusted to assume the role. For services that support resource-based policies or access control lists (ACLs), you can use those policies to grant people access to your resources.
To learn more, consult the following:
+ To learn whether Amazon Textract supports these features, see [How Amazon Textract Works with IAM](#security_iam_service-with-iam).
+ To learn how to provide access to your resources across AWS accounts that you own, see [Providing access to an IAM user in another AWS account that you own](https://docs.aws.amazon.com/IAM/latest/UserGuide/id_roles_common-scenarios_aws-accounts.html) in the *IAM User Guide*.
+ To learn how to provide access to your resources to third-party AWS accounts, see [Providing access to AWS accounts owned by third parties](https://docs.aws.amazon.com/IAM/latest/UserGuide/id_roles_common-scenarios_third-party.html) in the *IAM User Guide*.
+ To learn how to provide access through identity federation, see [Providing access to externally authenticated users (identity federation)](https://docs.aws.amazon.com/IAM/latest/UserGuide/id_roles_common-scenarios_federated-users.html) in the *IAM User Guide*.
+ To learn the difference between using roles and resource-based policies for cross-account access, see [Cross account resource access in IAM](https://docs.aws.amazon.com/IAM/latest/UserGuide/access_policies-cross-account-resource-access.html) in the *IAM User Guide*.
## Logging and Monitoring
To monitor Amazon Textract, use Amazon CloudWatch. This section provides information on how to set up monitoring for Amazon Textract. It also provides reference content for Amazon Textract metrics.
**Topics**
+ [Monitoring Amazon Textract](#textract-monitoring)
+ [CloudWatch Metrics for Amazon Textract](#cloudwatch-metricsdim)
### Monitoring Amazon Textract
With CloudWatch, you can get metrics for individual Amazon Textract operations or global Amazon Textract metrics for your account. You can use metrics to track the health of your Amazon Textract–based solution, and set up alarms to notify you when one or more metrics fall outside a defined threshold. For example, you can see metrics for the number of server errors that have occurred. You can also see metrics for the number of times a specific Amazon Textract operation has succeeded. To see metrics, you can use [Amazon CloudWatch](https://console.aws.amazon.com/cloudwatch/), the [AWS CLI](https://docs.aws.amazon.com/AmazonCloudWatch/latest/cli/), or the [CloudWatch API](https://docs.aws.amazon.com/AmazonCloudWatch/latest/APIReference/).
#### Using CloudWatch Metrics for Amazon Textract
To use metrics, you must specify the following information:
+ The metric dimension or no dimension. A *dimension* is a name-value pair that helps you to uniquely identify a metric. Amazon Textract has one dimension, named *Operation*. It provides metrics for a specific operation. If you don't specify a dimension, the metric is scoped to all Amazon Textract operations within your account.
+ The metric name, such as `UserErrorCount`.
You can get monitoring data for Amazon Textract by using the AWS Management Console, the AWS CLI, or the CloudWatch API. You can also use the CloudWatch API through one of the Amazon AWS Software Development Kits (SDKs) or the CloudWatch API tools. The console displays a series of graphs based on the raw data from the CloudWatch API. Depending on your needs, you might prefer to use either the graphs displayed in the console or retrieved from the API.
#####
The following list shows some common uses for the metrics. These are suggestions to get you started, not a comprehensive list.
| How Do I? | Relevant Metrics |
| --- | --- |
| How do I know if my application has reached the maximum number of requests per second? | Monitor the `Sum` statistic of the `ThrottledCount` metric. |
| How can I monitor the request errors? | Use the `Sum` statistic of the `UserErrorCount` metric. |
| How can I find the total number of requests? | Use the `SampleCount` statistic of the `ResponseTime` metric. This includes any request that results in an error. If you want to see only successful operation calls, use the `SuccessfulRequestCount` metric. |
| How can I monitor the latency of Amazon Textract operation calls? | Use the `ResponseTime` metric. |
You must have the appropriate CloudWatch permissions to monitor Amazon Textract with CloudWatch. For more information, see [Authentication and Access Control for Amazon CloudWatch](https://docs.aws.amazon.com/AmazonCloudWatch/latest/monitoring/auth-and-access-control-cw.html).
#### Access Amazon Textract Metrics
The following examples show how to access Amazon Textract metrics using the CloudWatch console, the AWS CLI, and the CloudWatch API.
**To view metrics (console)**
1. Open the CloudWatch console at [https://console.aws.amazon.com/cloudwatch/](https://console.aws.amazon.com/cloudwatch).
1. Choose **Metrics**, choose the **All Metrics** tab, and then choose **Amazon Textract**.
1. Choose **By operation**, and then choose a metric.
For example, choose the **StartDocumentAnalysis** metric to measure how many times asynchronous document analysis has been started.
1. Choose a value for the date range. The metric count displayed in the graph.
**To view metrics for successful `StartDocumentAnalysis` operation calls that have been made over a period of time (CLI)**
+ Open the AWS CLI and enter the following command:
```
aws cloudwatch get-metric-statistics \
--metric-name SuccessfulRequestCount \
--start-time 2019-02-01T00:00:00Z \
--period 3600 \
--end-time 2019-03-01T00:00:00Z \
--namespace AWS/Textract \
--dimensions Name=Operation,Value=StartDocumentAnalysis \
--statistics Sum
```
This example shows the successful `StartDocumentAnalysis` operation calls made over a period of time. For more information, see [get-metric-statistics](https://docs.aws.amazon.com/cli/latest/reference/get-metric-statistics.html).
**To access metrics (CloudWatch API)**
+ Call `[GetMetricStatistics](https://docs.aws.amazon.com/AmazonCloudWatch/latest/APIReference/API_GetMetricStatistics.html)`. For more information, see the [Amazon CloudWatch API Reference](https://docs.aws.amazon.com/AmazonCloudWatch/latest/APIReference/).
#### Create an Alarm
You can create a CloudWatch alarm that sends an Amazon Simple Notification Service (Amazon SNS) message when the alarm changes state. An alarm watches a single metric over a time period that you specify. It performs one or more actions based on the value of the metric relative to a given threshold over a number of time periods. The action is a notification sent to an Amazon SNS topic or an Auto Scaling policy.
Alarms invoke actions for sustained state changes only. CloudWatch alarms don't invoke actions simply because they are in a particular state. The state must have changed and have been maintained for a specified number of time periods.
**To set an alarm (console)**
1. Sign in to the AWS Management Console and open the CloudWatch console at [https://console.aws.amazon.com/cloudwatch/](https://console.aws.amazon.com/cloudwatch/).
1. In the navigation pane, choose **Alarms**, and choose **Create Alarm**. This opens the **Create Alarm Wizard**.
1. Choose **Select metric**.
1. In the **All metrics** tab, choose **Textract**.
1. Choose **By Operation**, and then choose a metric.
For example, choose **StartDocumentAnalysis** to set an alarm for a maximum number of asynchronous document analysis operations.
1. Choose the **Graphed metrics** tab.
1. For **Statistic**, choose **Sum**.
1. Choose **Select metric**.
1. Fill in the **Name** and **Description**. For **Whenever**, choose **>=**, and enter a maximum value of your choice.
1. If you want CloudWatch to send you email when the alarm state is reached, for **Whenever this alarm:**, choose ** State is ALARM**. To send alarms to an existing Amazon SNS topic, for **Send notification to:**, choose an existing SNS topic. To set the name and email addresses for a new email subscription list, choose **New list**. CloudWatch saves the list and displays it in the field so you can use it to set future alarms.
**Note**
If you use **New list** to create a new Amazon SNS topic, the email addresses must be verified before the intended recipients receive notifications. Amazon SNS sends email only when the alarm enters an alarm state. If this alarm state change happens before the email addresses are verified, intended recipients don't receive a notification.
1. Choose **Create Alarm**.
**To set an alarm (AWS CLI)**
+ Open the AWS CLI and enter the following command. Change the value of the `alarm-actions` parameter to reference an Amazon SNS topic that you previously created.
```
aws cloudwatch put-metric-alarm \
--alarm-name StartDocumentAnalysisUserErrors \
--alarm-description "Alarm when more than 10 StartDocumentAnalysys user errors occur within 5 minutes" \
--metric-name UserErrorCount \
--namespace AWS/Textract \
--statistic Sum \
--period 300 \
--threshold 10 \
--comparison-operator GreaterThanThreshold \
--evaluation-periods 1 \
--unit Count \
--dimensions Name=Operation,Value=StartDocumentAnalysis \
--alarm-actions arn:aws:sns:us-east-1:111111111111:alarmtopic
```
This example shows how to create an alarm for when more than 10 user errors occur within 5 minutes for calls to `StartDocumentAnalysis`. For more information, see [put-metric-alarm](https://docs.aws.amazon.com/cli/latest/reference/put-metric-alarm.html).
**To set an alarm (CloudWatch API)**
+ Call `[PutMetricAlarm](https://docs.aws.amazon.com/AmazonCloudWatch/latest/APIReference/API_PutMetricAlarm.html)`. For more information, see *[Amazon CloudWatch API Reference](https://docs.aws.amazon.com/AmazonCloudWatch/latest/APIReference/)*.
### CloudWatch Metrics for Amazon Textract
This section contains information about the Amazon CloudWatch metrics and the *Operation* dimension that are available for Amazon Textract.
You can also see an aggregate view of Amazon Textract metrics from the Amazon Textract console.
#### CloudWatch Metrics for Amazon Textract
The following table summarizes the Amazon Textract metrics.
| Metric | Description |
| --- | --- |
| SuccessfulRequestCount | The number of successful requests. The response code range for a successful request is 200 to 299.
Unit: Count
Valid statistics: `Sum,Average` |
| ThrottledCount | The number of throttled requests. Amazon Textract throttles a request when it receives more requests than the limit of transactions per second set for your account. If the limit set for your account is frequently exceeded, you can request a limit increase. To change a limit, select the Amazon Textract option in the Service Quotas console.
Unit: Count
Valid statistics: `Sum,Average` |
| ResponseTime | The time in milliseconds for Amazon Textract to compute the response.
Units:1. Count for `Data Samples` statistics
2. Milliseconds for `Average` statistics
Valid statistics: `Data Samples,Average`The `ResponseTime` metric isn't included in the Amazon Textract metric pane. |
| ServerErrorCount | The number of server errors. The response code range for a server error is 500 to 599.
Unit: Count
Valid statistics: `Sum,Average` |
| UserErrorCount | The number of user errors (invalid parameters, invalid image, no permission, and so on). The response code range for a user error is 400 to 499.
Unit: Count
Valid statistics: `Sum,Average` |
#### CloudWatch Dimension for Amazon Textract
To retrieve operation-specific metrics, use the `AWS/Textract` namespace and provide an operation dimension. For more information about dimensions, see [Dimensions](https://docs.aws.amazon.com/AmazonCloudWatch/latest/monitoring/cloudwatch_concepts.html#Dimension) in the *Amazon CloudWatch User Guide*.
## Logging Amazon Textract API Calls with AWS CloudTrail
Amazon Textract is integrated with AWS CloudTrail, a service that provides a record of actions taken by a user, role, or an AWS service in Amazon Textract. CloudTrail captures all API calls for Amazon Textract as events. The calls captured include calls from the Amazon Textract console and code calls to the Amazon Textract API operations.
If you create a trail, you can enable continuous delivery of CloudTrail events to an Amazon S3 bucket, including events for Amazon Textract. If you don't configure a trail, you can still view the most recent events in the CloudTrail console in **Event history**. Using the information collected by CloudTrail, you can determine the request that was made to Amazon Textract, the IP address that the request was made from, who made the request, when it was made, and additional details.
To learn more about CloudTrail, see the [AWS CloudTrail User Guide](https://docs.aws.amazon.com/awscloudtrail/latest/userguide/).
### Amazon Textract Information in CloudTrail
CloudTrail is enabled on your AWS account when you create the account. When activity occurs in Amazon Textract, that activity is recorded in a CloudTrail event along with other AWS service events in **Event history**. You can view, search, and download recent events in your AWS account. For more information, see [Viewing Events with CloudTrail Event History](https://docs.aws.amazon.com/awscloudtrail/latest/userguide/view-cloudtrail-events.html).
For an ongoing record of events in your AWS account, including events for Amazon Textract, create a trail. A *trail* enables CloudTrail to deliver log files to an Amazon S3 bucket. By default, when you create a trail in the console, the trail applies to all AWS Regions. The trail logs events from all Regions in the AWS partition and delivers the log files to the Amazon S3 bucket that you specify. Additionally, you can configure other AWS services to further analyze and act upon the event data that's collected in CloudTrail logs. For more information, see the following:
+ [Overview for Creating a Trail](https://docs.aws.amazon.com/awscloudtrail/latest/userguide/cloudtrail-create-and-update-a-trail.html)
+ [CloudTrail Supported Services and Integrations](https://docs.aws.amazon.com/awscloudtrail/latest/userguide/cloudtrail-aws-service-specific-topics.html#cloudtrail-aws-service-specific-topics-integrations)
+ [Configuring Amazon SNS Notifications for CloudTrail](https://docs.aws.amazon.com/awscloudtrail/latest/userguide/getting_notifications_top_level.html)
+ [Receiving CloudTrail Log Files from Multiple Regions](https://docs.aws.amazon.com/awscloudtrail/latest/userguide/receive-cloudtrail-log-files-from-multiple-regions.html) and [Receiving CloudTrail Log Files from Multiple Accounts](https://docs.aws.amazon.com/awscloudtrail/latest/userguide/cloudtrail-receive-logs-from-multiple-accounts.html)
All Amazon Textract operations are logged by CloudTrail and are documented in the [API Reference](https://docs.aws.amazon.com/textract/latest/dg/API_Operations.html). For example, calls to the `DetectDocumentText`, `AnalyzeDocument`, and `GetDocumentText` actions generate entries in the CloudTrail log files.
Every event or log entry contains information about who generated the request. The identity information helps you determine the following:
+ Whether the request was made with root or user credentials.
+ Whether the request was made with temporary security credentials for a role or federated user.
+ Whether the request was made by another AWS service.
For more information, see the [CloudTrail userIdentity Element](https://docs.aws.amazon.com/awscloudtrail/latest/userguide/cloudtrail-event-reference-user-identity.html).
#### Request Parameters and Response Fields That Aren't Logged
For privacy purposes, certain request parameters and response fields aren't logged—for example, request image bytes or response bounding box information. Amazon S3 bucket names and file names supplied in request parameters are provided in CloudTrail log entries. No information about image bytes passed in a request is provided in a CloudTrail log. The following table shows the input parameters and response parameters that aren't logged for each Amazon Textract operation.
| Operation | Request Parameters | Response Fields |
| --- | --- | --- |
| AnalyzeDocument | `Bytes` | All |
| DetectDocumentText | `Bytes` | All |
| StartDocumentAnalysis | None | None |
| GetDocumentAnalysis | None | All |
| StartDocumentTextDetection | None | None |
| GetDocumentTextDetection | None | All |
### Understanding Amazon Textract Log File Entries
A trail is a configuration that enables delivery of events as log files to an Amazon S3 bucket that you specify. CloudTrail log files contain one or more log entries. An event represents a single request from any source and includes information about the requested operation, the date and time of the operation, request parameters, and so on. CloudTrail log files aren't an ordered stack trace of the public API calls, so they don't appear in any specific order.
The following example shows a CloudTrail log entry that demonstrates the `AnalyzeDocument` operation. The image bytes for the input `document` and the analysis results (`responseElements`) aren't logged.
```
{
"eventVersion": "1.05",
"userIdentity": {
"type": "IAMUser",
"principalId": "AIDACKCEVSQ6C2EXAMPLE",
"arn": "arn:aws:iam::111111111111:user/janedoe",
"accountId": "111111111111",
"accessKeyId": "AIDACKCEVSQ6C2EXAMPLE",
"userName": "janedoe"
},
"eventTime": "2019-04-03T23:56:31Z",
"eventSource": "textract.amazonaws.com",
"eventName": "AnalyzeDocument",
"awsRegion": "us-east-1",
"sourceIPAddress": "198.51.100.0",
"userAgent": "",
"requestParameters": {
"document": {},
"featureTypes": [
"TABLES"
]
},
"responseElements": null,
"requestID": "e387676b-d1f0-4ea7-85d6-f5a344052dce",
"eventID": "c5db79ce-e4ea-4401-8517-784481d559f7",
"eventType": "AwsApiCall",
"recipientAccountId": "111111111111"
}
```
The following example shows a CloudTrail log entry for the `StartDocumentAnalysis` operation. The log entry includes the Amazon S3 bucket name and image file name in `documentLocation`. The log also includes the operation response.
```
{
"Records": [
{
"eventVersion": "1.05",
"userIdentity": {
"type": "IAMUser",
"principalId": "AIDACKCEVSQ6C2EXAMPLE",
"arn": "arn:aws:iam::111111111111:user/janedoe",
"accountId": "11111111111",
"accessKeyId": "AKIAIOSFODNN7EXAMPLE",
"userName": "janedoe"
},
"eventTime": "2019-04-04T01:42:24Z",
"eventSource": "textract.amazonaws.com",
"eventName": "StartDocumentAnalysis",
"awsRegion": "us-east-1",
"sourceIPAddress": "198.51.100.0",
"userAgent": "",
"requestParameters": {
"documentLocation": {
"s3Object": {
"bucket": "bucket",
"name": "document.png"
}
},
"featureTypes": [
"TABLES"
]
},
"responseElements": {
"jobId": "f3c718b444fa603d5d625ab967008f4b620d4650c9db8ca1cae01ef7efe51373"
},
"requestID": "9ae352e8-9de1-41ad-b77b-85aa348c2e82",
"eventID": "f741bca0-c3cb-4805-82ea-baf76439deef",
"eventType": "AwsApiCall",
"recipientAccountId": "111111111111"
}
]
}
```
## Tagging resources
With Amazon Textract, you can tag resources like adapters for the purposes of managing secure access. To tag resources, use an AWS SDK or the AWS CLI. The topics in this section demonstrate how to manage your tags using the CLI.
### Tag resource
Amazon Textract resources like adapters can be tagged using the [TagResource](https://docs.aws.amazon.com/textract/latest/APIReference/API_TagResource.html) operation. Tags can help you organize and categorize your resources. You can also use them to scope user permissions by granting a user permission to access or change only resources with certain tag values. To tag a resource, use the `TagResource` operation and specify a list of tags as key-value pairs.
To tag a resource with the AWS CLI or AWS SDK:
+ If you haven't already done so, install and configure the AWS CLI and the AWS SDKs. For more information, see [Step 2: Set Up the AWS CLI and AWS SDKs](#setup-awscli-sdk).
+ Use the following code to create an adapter:
------
#### [ CLI ]
```
aws textract tag-resource --resource-arn arn:aws:textract:us-east-1:000000000000:/adapters/a1b2c3d4e5c6 --tags Tag=Key
```
------
### List tags for resource
Amazon Textract resources like adapters can be tagged using the [TagResource](https://docs.aws.amazon.com/textract/latest/APIReference/API_TagResource.html) operation. You can list all the tags associated with a resource by using the [ListTagsForResource](https://docs.aws.amazon.com/textract/latest/APIReference/API_ListTagsForResource.html) operation and providing the Amazon Resource Name (ARN) associated with the resource that you want to retrieve tags for.
To list tags for a resource with the AWS CLI or AWS SDK:
+ If you haven't already done so, install and configure the AWS CLI and the AWS SDKs. For more information, see [Step 2: Set Up the AWS CLI and AWS SDKs](#setup-awscli-sdk).
+ Use the following code to create an adapter:
------
#### [ CLI ]
```
aws textract list-tags-for-resource --region us-east-1 --resource-arn arn:aws:textract:us-east-1:000000000000:/adapters/a1b2c3d4e5c6 \
{
"Tags": {
"Tag": "Key"
}
}
```
------
### Untag resource
Amazon Textract resources like adapters can be tagged using the [TagResource](https://docs.aws.amazon.com/textract/latest/APIReference/API_TagResource.html) operation. You can remove any tags you no longer need from a resource by using the [UntagResource](https://docs.aws.amazon.com/textract/latest/APIReference/API_UntagResource.html) operation. When calling `UntagResource`, provide the Amazon Resource Name (ARN) of the resource that you want to remove tags from. Also include a list of the tag-specific key values that you want to remove from the resource.
To untag a resource with the AWS CLI or AWS SDK:
+ If you haven't already done so, install and configure the AWS CLI and the AWS SDKs. For more information, see [Step 2: Set Up the AWS CLI and AWS SDKs](#setup-awscli-sdk).
+ Use the following code to create an adapter:
------
#### [ CLI ]
```
aws textract untag-resource --region us-east-1 arn:aws:textract:us-east-1:000000000000:/adapters/a1b2c3d4e5c6 --tag-keys Tag
```
------
## Compliance Validation for Amazon Textract
Third-party auditors assess the security and compliance of Amazon Textract as part of multiple AWS compliance programs. These include HIPAA, SOC, ISO, and PCI.
**Note**
If you are processing data through Textract service that is subject to PCI DSS compliance then you must opt out your account by contacting AWS Support and following the process provided to you.
For a list of AWS services in scope of specific compliance programs, see [AWS Services in Scope by Compliance Program](https://aws.amazon.com/compliance/services-in-scope/). For general information, see [AWS Compliance Programs](https://aws.amazon.com/compliance/programs/).
You can download third-party audit reports using AWS Artifact. For more information, see [Downloading Reports in AWS Artifact](https://docs.aws.amazon.com/artifact/latest/ug/downloading-documents.html).
Your compliance responsibility when using Amazon Textract is determined by the sensitivity of your data, your company's compliance objectives, and applicable laws and regulations. AWS provides the following resources to help with compliance:
+ [Security and Compliance Quick Start Guides](https://aws.amazon.com/quickstart/?awsf.quickstart-homepage-filter=categories%23security-identity-compliance) – These deployment guides discuss architectural considerations and provide steps for deploying security- and compliance-focused baseline environments on AWS.
+ [Architecting for HIPAA Security and Compliance Whitepaper ](https://docs.aws.amazon.com/whitepapers/latest/architecting-hipaa-security-and-compliance-on-aws/architecting-hipaa-security-and-compliance-on-aws.html) – This whitepaper describes how companies can use AWS to create HIPAA-compliant applications.
+ [AWS Compliance Resources](https://aws.amazon.com/compliance/resources/) – This collection of workbooks and guides might apply to your industry and location.
+ [Evaluating Resources with Rules](https://docs.aws.amazon.com/config/latest/developerguide/evaluate-config.html) in the *AWS Config Developer Guide* – The AWS Config service assesses how well your resource configurations comply with internal practices, industry guidelines, and regulations.
+ [AWS Security Hub CSPM](https://docs.aws.amazon.com/securityhub/latest/userguide/what-is-securityhub.html) – This AWS service provides a comprehensive view of your security state within AWS. The security hub helps you check your compliance with security industry standards and best practices.
## Resilience in Amazon Textract
The AWS global infrastructure is built around AWS Regions and Availability Zones. AWS Regions provide multiple physically separated and isolated Availability Zones, which are connected with low-latency, high-throughput, and highly redundant networking. With Availability Zones, you can design and operate applications and databases that automatically fail over between zones without interruption. Availability Zones are more highly available, fault tolerant, and scalable than traditional single or multiple data center infrastructures.
For more information about AWS Regions and Availability Zones, see [AWS Global Infrastructure](https://aws.amazon.com/about-aws/global-infrastructure/).
**Note**
Cross region transfer of data is not permitted due to the General Data Protection Regulation (GDPR).
## Cross-service confused deputy prevention
In AWS, cross-service impersonation can occur when one service (the *calling service*) calls another service (the *called service*). The calling service can be manipulated to act on another customer's resources even though it shouldn't have the proper permissions, resulting in the confused deputy problem.
To prevent this, AWS provides tools that help you protect your data for all services with service principals that have been given access to resources in your account.
We recommend using the [`aws:SourceArn`](https://docs.aws.amazon.com/IAM/latest/UserGuide/reference_policies_condition-keys.html#condition-keys-sourcearn) and [`aws:SourceAccount`](https://docs.aws.amazon.com/IAM/latest/UserGuide/reference_policies_condition-keys.html#condition-keys-sourceaccount) global condition context keys in resource policies to limit the permissions that Amazon Textract gives another service to the resource.
If the value of `aws:SourceArn` does not contain the account ID, such as an Amazon S3 bucket ARN, you must use both keys to limit permissions. If you use both keys and the `aws:SourceArn` value contains the account ID, the `aws:SourceAccount` value and the account in the `aws:SourceArn` value must use the same account ID when used in the same policy statement.
Use `aws:SourceArn` if you want only one resource to be associated with the cross-service access. Use `aws:SourceAccount` if you want to allow any resource in that account to be associated with the cross-service use.
The value of `aws:SourceArn` must be the ARN of the resource used by Textract, which is specified with the following format: `arn:aws:rekognition:region:account:resource`.
The recommended approach to the confused deputy problem is to use the `aws:SourceArn` global condition context key with the full resource ARN.
If you don't know the full ARN of the resource or if you are specifying multiple resources, use the `aws:SourceArn` key with wildcard characters (`*`) for the unknown portions of the ARN. For example, `arn:aws:{{textract}}:*:111122223333:*`.
In order to protect against the confused deputy problem, carry out the following steps:
1. In the navigation pane of the IAM console choose the **Roles** option. The console will display the roles for your current account.
1. Choose the name of the role that you want to modify. The role you modify should have the **AmazonTextractServiceRole** permissions policy. Select the **Trust relationships** tab.
1. Choose **Edit trust policy**.
1. On the **Edit trust policy** page, replace the default JSON policy with a policy that utilizes one or both of the `aws:SourceArn` and `aws:SourceAccount` global condition context keys. See the following example policies.
1. Choose **Update policy**.
The following examples are trust policies that show how you can use the `aws:SourceArn` and `aws:SourceAccount` global condition context keys in Amazon Textract to prevent the confused deputy problem.
You can specify multiple accounts in both the `SourceAccount` and `SourceArn` condition. Be sure to specify the ID of any trusted account in both conditions.
If you are working with Amazon Textract's asynchronous operations, you could use a policy like the following in your IAM role. In the example below, replace the red replaceable text with the IDs of the accounts calling the API operations (your account ID and the IDs of any other trusted accounts):
------
#### [ JSON ]
****
```
{
"Version":"2012-10-17",
"Statement": {
"Sid": "ConfusedDeputyPreventionExamplePolicy",
"Effect": "Allow",
"Principal": {
"Service": "textract.amazonaws.com"
},
"Action": "sts:AssumeRole",
"Condition": {
"ArnLike": {
"aws:SourceArn":["arn:aws:textract:*:{{123456789012}}:*","arn:aws:textract:*:{{111122223333}}:*"]
},
"StringEquals": {
"aws:SourceAccount": ["{{123456789012}}", "{{111122223333}}"]
}
}
}
}
```
------
## Infrastructure Security in Amazon Textract
As a managed service, Amazon Textract is protected by AWS global network security. For information about AWS security services and how AWS protects infrastructure, see [AWS Cloud Security](https://aws.amazon.com/security/). To design your AWS environment using the best practices for infrastructure security, see [Infrastructure Protection](https://docs.aws.amazon.com/wellarchitected/latest/security-pillar/infrastructure-protection.html) in *Security Pillar AWS Well‐Architected Framework*.
You use AWS published API calls to access Amazon Textract through the network. Clients must support the following:
+ Transport Layer Security (TLS). We require TLS 1.2 and recommend TLS 1.3.
+ Cipher suites with perfect forward secrecy (PFS) such as DHE (Ephemeral Diffie-Hellman) or ECDHE (Elliptic Curve Ephemeral Diffie-Hellman). Most modern systems such as Java 7 and later support these modes.
## Configuration and Vulnerability Analysis in Amazon Textract
Configuration and IT controls are a shared responsibility between AWS and you, our customer. For more information, see the AWS [shared responsibility model](https://aws.amazon.com/compliance/shared-responsibility-model/).
## Amazon Textract and interface VPC endpoints (AWS PrivateLink)
You can establish a private connection between your VPC and Amazon Textract by creating an *interface VPC endpoint*. Interface endpoints are powered by [AWS PrivateLink](https://aws.amazon.com/privatelink), a technology that enables you to privately access Amazon Textract APIs without an internet gateway, NAT device, VPN connection, or AWS Direct Connect connection. Instances in your VPC don't need public IP addresses to communicate with Amazon Textract APIs. Traffic between your VPC and Amazon Textract does not leave the AWS network.
Each interface endpoint is represented by one or more [Elastic Network Interfaces](https://docs.aws.amazon.com/AWSEC2/latest/UserGuide/using-eni.html) in your subnets.
For more information, see [Interface VPC endpoints (AWS PrivateLink)](https://docs.aws.amazon.com/vpc/latest/userguide/vpce-interface.html) in the *Amazon VPC User Guide*.
### Considerations for Amazon Textract VPC endpoints
Before you set up an interface VPC endpoint for Amazon Textract, ensure that you review [Interface endpoint properties and limitations](https://docs.aws.amazon.com/vpc/latest/userguide/vpce-interface.html#vpce-interface-limitations) in the *Amazon VPC User Guide*.
Amazon Textract supports making calls to all of its API actions from your VPC.
### Creating an interface VPC endpoint for Amazon Textract
You can create a VPC endpoint for the Amazon Textract service using either the Amazon VPC console or the AWS Command Line Interface (AWS CLI). For more information, see [Creating an interface endpoint](https://docs.aws.amazon.com/vpc/latest/userguide/vpce-interface.html#create-interface-endpoint) in the *Amazon VPC User Guide*.
Create a VPC endpoint for Amazon Textract using the following service name:
+ com.amazonaws.{{region}}.textract - For creating an endpoint for most Amazon Textract operations.
+ com.amazonaws.{{region}}.textract-fips - For creating an endpoint for Amazon Textract that complies with the Federal Information Processing Standard (FIPS) Publication 140-2 US government standard.
If you enable private DNS for the endpoint, you can make API requests to Amazon Textract using its default DNS name for the Region, for example, `textract.us-east-1.amazonaws.com`.
For more information, see [Accessing a service through an interface endpoint](https://docs.aws.amazon.com/vpc/latest/userguide/vpce-interface.html#access-service-though-endpoint) in the *Amazon VPC User Guide*.
### Creating a VPC endpoint policy for Amazon Textract
You can attach an endpoint policy to your VPC endpoint that controls access to Amazon Textract. The policy specifies the following information:
+ The principal that can perform actions.
+ The actions that can be performed.
+ The resources on which actions can be performed.
For more information, see [Controlling access to services with VPC endpoints](https://docs.aws.amazon.com/vpc/latest/userguide/vpc-endpoints-access.html) in the *Amazon VPC User Guide*.
**Example: VPC endpoint policy for Amazon Textract actions**
The following is an example of an endpoint policy for Amazon Textract. When attached to an endpoint, this policy grants access to the listed Amazon Textract actions for all principals on all resources.
This example policy allows access to only the operations `DetectDocumentText` and `AnalyzeDocument`. Users can still call Amazon Textract operations from outside the VPC Endpoint.
```
"Statement":[
{
"Principal":"*",
"Effect":"Allow",
"Action":[
"textract:DetectDocumentText",
"textract:AnalyzeDocument",
],
"Resource":"*"
}
]
}
```
# API Reference
The [API reference documentation](https://docs.aws.amazon.com/textract/latest/APIReference/Welcome.html) is now a separate guide.
# Quotas in Amazon Textract
The following sections provide information about quotas, formerly referred to as limits, when using Amazon Textract. There are two kinds of quotas. *Set quotas*, which can be viewed in the section [Set Quotas in Amazon Textract](#limits-document), cannot be changed. *Default quotas*, discussed in the section [Default Quotas](#limits-quotas-explained), can be viewed or changed via the [Service quotas console](https://console.aws.amazon.com/servicequotas). You can also view the current Amazon Textract default quotas on the [Amazon Textract endpoints and service quotas](https://docs.aws.amazon.com/general/latest/gr/textract.html).
## Set Quotas in Amazon Textract
The following is a list of set quotas in Amazon Textract, which cannot be changed. For information about limitations in default quotas you can change, see the section [Default Quotas in Amazon Textract.](#limits-quotas-explained)
| Limit | Description |
| --- | --- |
| Accepted File Formats | Operations support JPEG, PNG, PDF, and TIFF files. (JPEG 2000-encoded images within PDFs are supported). Textract does not support XFA based PDFs. |
| File Size and Page Count Limits | For synchronous operations, JPEG, PNG, PDF, and TIFF files have a limit of 10 MB in memory. PDF and TIFF files also have a limit of 1 page. For asynchronous operations, JPEG and PNG files have a limit of 10 MB in memory. PDF and TIFF files have a limit of 500 MB in memory and a limit of 3,000 pages. |
| PDF Specific Limits | The maximum height and width is 40 inches and 9000 points. PDFs cannot be password protected. PDFs can contain JPEG 2000 formatted images. |
| Document Rotation and Image Size | Amazon Textract supports all in-plane document rotations, for example 45-degree in-plane rotation.
Amazon Textract supports images with a resolution less than or equal to 10000 pixels on all sides. |
| Query Specific Limits | Amazon Textract supports up to 15 queries per page for synchronous operations and up to 30 queries per page for asynchronous operations. |
| Text Alignment | Text can be text aligned horizontally within the document. Horizontally arrayed text can be read regardless of the degree of rotation of a document. Amazon Textract does not support vertical text (text written vertically, as is common in languages like Japanese and Chinese) alignment within the document. |
| Languages | Amazon Textract supports English, French, German, Italian, Portuguese, and Spanish text detection. Amazon Textract will not return the language detected in its output. Query detection is only available in English document detection. |
| Character Size | The minimum height for text to be detected is 15 pixels. At 150 DPI, this would be the same as 8 point font. |
| Character Type | Amazon Textract supports both handwritten and printed character recognition. Handwritten character recognition is only supported in English. |
| Characters | Amazon Textract detects the following characters:+ a-z
+ A-Z
+ 0-9
+ ä Ä ö Ö ü Ü ç Ç é É â Â ê Ê î Î ô Ô û Û à À è È ù Ù ë Ë ï Ï ü Ü á Á é É í Í ó Ó ú Ú ü Ü ñ Ñ ì Ì ò Ò ã Ã õ Õ
+ \! " \# $ % ' & ( ) \* \+ , - . / : ; = ? @ [ \\ ] ^ \_ ` { \| } \~ > < ° € £ ¥ ₹ ß ẞ ¿ ¡ € £ ¥ ₹ ø Ø œ Œ © ® ™ § ¹ ² ³ ' |
| AnalyzeID Specific Limits | AnalyzeID only supports US passports, and US driver's licenses. |
| Adapter Specific Limits | + Accepted dataset configuration for adapter training - Training: 5-2500, Test: 5-1000,
+ Training/testing file format and size: JPG, PNG, PDF, TIFF.
+ Maximum size of training/testing file is 10MB.
+ Maximum size of annotation/pre-labeling file is 25MB.
+ Maximum length of pre-labeling file array is 15.
+ Max query response length - 128 characters
+ Max number of queries per page - 30 |
## Modifying Default Quotas in Amazon Textract
Your console account has default quotas for Amazon Textract operations. These are a set of Region-specific quotas that you can modify. Default quotas can be viewed or changed via the Service Quotas console. You can also view the current Amazon Textract default quotas on the [Amazon Textract endpoints and service quotas](https://docs.aws.amazon.com/general/latest/gr/textract.html).
### Types of Quotas
There are two types of quotas for Amazon Textract.
+ Transactions Per Second (TPS) (Synchronous and Asynchronous)
+ Concurrent Jobs (Asynchronous Only)
+ Adapters
#### TPS
TPS quotas determine how often you can request that Textract process a new document. TPS quotas are unique to API, Synchronous or Asynchronous operations, and Region.
##### Synchronous TPS
Synchronous operations are used for processing single-page documents and receiving near real-time responses for Textract include AnalyzeDocument, DetectDocumentText, AnalyzeExpense, and AnalyzeID. For more information, see [Processing Documents Synchronously](#sync).
For the following Synchronous APIs, Maximum Transactions Per Second (TPS) describes the maximum number of transactions (API calls) you can perform with your account in a given region:
+ AnalyzeDocument
+ DetectDocumentText
+ AnalyzeExpense
+ AnalyzeID
##### Asynchronous TPS
Amazon Textract provides non-real time, asynchronous operations for the processing of larger, multipage documents. There are two types of asynchronous processing operations: Start operations and Get operations. Start operations are used to request that Textract process a document, while Get operations are used to obtain the status and results of document processing. Quotas for both Start and Get operations are measured in TPS. For more information about asynchronous processing, see [Processing Documents Asynchronously](#async).
For the following, Start and Get APIs, Maximum Transactions Per Second (TPS) describes the maximum number of transactions (API calls) you can perform with your account in a given region:
###### Start
+ StartDocumentAnalysis
+ StartDocumentTextDetection
+ StartExpenseAnalysis
###### Get
+ GetDocumentAnalysis
+ GetDocumentTextDetection
+ GetExpenseAnalysis
#### Concurrent Jobs
Concurrent job limit defines how many jobs can be run in parallel at a given time. The Concurrent Job limits apply only to asynchronous operations, and is unique to individual operations.
The following APIs have quotas defining the Maximum Number of Concurrent Jobs that your account can create in a given region:
+ AnalyzeDocument
+ DetectDocumentText
+ DetectDocumentExpense
#### Adapters
The Adapter Quotas define the following limits for adapter training. Use the Service Quotas console to raise a service quota increase request.
+ Maximum number of adapters - Total number of adapters allowed. You can have a several adapter versions under a single adapter
+ Maximum AdapterVersions created per month - Number of successful adapter versions that can be created per AWS account per month. This will be reset at the start of every month.
+ Maximum in-progress AdapterVersions (analogous to adapter training) per account.
### Calculate quota increase
Amazon Textract has a product specific [Service Quotas Calculator](https://console.aws.amazon.com/textract/home#/quotaCalculator) to estimate your quota needs. You can use the Textract Service Quotas Calculator to estimate the quota values that will satisfy your use case. It is accessible from the Amazon Textract console. This section will outline the process of calculating a quota to suit your needs with the Quotas Calculator.
**To use the Textract Service Quotas Calculator**
1. **Selecting Regions**

Select your account's region
The service calculator can estimate quotas in any region, and different regions have different default quotas. As such, make sure you match your account's region to the region you're calculating for. If you want to calculate a quota for a different region, change your account's region in the console first.
1. **Processing type**

Select *Synchronous* or *Asynchronous*.
Synchronous and Asynchronous operations have different limits in Amazon Textract. Determine which type of operation that you intend to use the most, and select that operation type for calculations. Generally, synchronous operations are used for single page document processing, where asynchronous processing covers multipage documents.
For example, if your use case is processing single page customer receipts, you'll select Synchronous
1. **Use case type**

Select the operation best suited for your use case.
Different operations extract different kinds of data, so select the operation most suited to your use case. For more information on the data extracted by different operations, see [Identifying Your Amazon Textract Use Case](#how-it-works).
For example, if your use case is primarily related to processing receipts, you'll select *Expense Analysis* from the list of operations.
1. **Usage values**
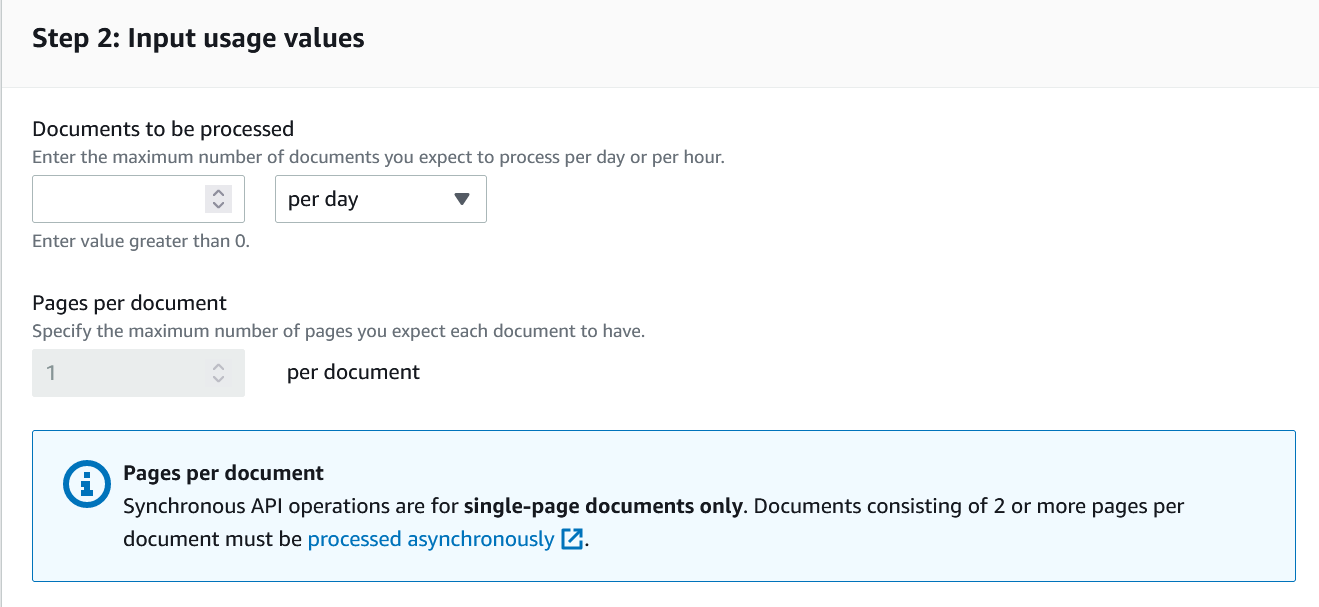
Specify your usage values.
When determining requirements, keep in mind whether your type of operation. For Synchronous operations, specify the maximum number of pages you want to process in a given timeframe, either hours or days.
**Note**
For asynchronous operations you also can enter the expected number of hours processing will require, and the average number of pages in the processed documents.
For example, if you process an average of a million receipts a day, you'll enter 1,000,000 into the *Documents to be processed tab* to estimate the quota value needed.
1. **Review results**

Check step 3 of the calculator page and review the calculator's output. The calculator pulls your current quotas information and compares them to the quotas required for your use case. This will tell you if your current quotas are too low for your processing needs. If this is the case, you can click on the link provided by the calculator which will directly link you to a quota increase request for the operation you estimated for in the region you selected in Service quotas.
**Note**
If you are calculating for asynchronous, you will see multiple quotas estimated. You will need to click the link for each quota to request an increase for each one, if an increase is required.
Following with our example throughout these steps, you would require a TPS of 12 to process all one million receipts in a day. As such, you'll need to request an increase from the default TPS of 5.
### Best Practices for Service Quota Increase Requests
When requesting an increase to a default quota, there are several recommended best practices to follow. These include smooth spiky traffic, configuring retries, and configuring exponential backoff and jitters.
+ Estimate your optimal quota values using the Textract Service Quota Calculator.
+ Smoothening spiky traffic. Spiky traffic affects throughput. To get maximum throughput for the allotted transactions per second (TPS), use a queueing serverless architecture or another mechanism to “smooth” traffic so it is more consistent.
+ Configure retries. Follow the guidelines at [Error handling](https://docs.aws.amazon.com/textract/latest/dg/handling-errors.html) to configure retries for the errors that allow them
+ Configure exponential backoff and jitter. By configuring exponential backoff and jitter for retries, you can improve throughput. See [Error retries and exponential backoff in AWS.](https://docs.aws.amazon.com/general/latest/gr/api-retries.html)
+ Start with samples that apply best practices, like the [IDP CDK Samples](https://github.com/aws-samples/amazon-textract-idp-cdk-stack-samples) using [CDK Constructs](https://github.com/aws-samples/amazon-textract-idp-cdk-constructs).
### Change Default Quota
As an alternative to raising a request directly from the calculator, you can also use the Service quotas console. This can be done from the [Service quotas console](https://console.aws.amazon.com/servicequotas), and may be processed automatically. Under some circumstances, such as a particularly large increase, the request will be processed manually and additional information may be required.
**To raise a service quota increase request**
1. Log in to Management Console and navigate to the [Service quotas console](https://console.aws.amazon.com/servicequotas) and select “Textract” under services
1. Select the desired quota and click “Request Quota Increase” on the subsequent page
1. Enter in the desired quota value and click “Request”. If you used the Service Quotas Calculator, you can copy the quota value from your calculations into the request.
1. After requesting a quota increase, refresh the page to see the quota status update.
**Note**
Some increases in quota values may need manual review.
### Quota Modification Effects
The following table lists the different types of quotas and the effects modifying them will have.
| Quota Value to Increase | Effect of Increase |
| --- | --- |
| Synchronous operation TPS | Increases how often you can request that Textract process a new document using a given synchronous operation, measured in transactions per second |
| Asynchronous Start operation TPS | Increases how often you can request that Textract begin the asynchronous processing of an input document, measured in transactions per second |
| Asynchronous Get operation TPS | Increases how often you can request that Textract return the results of a given asynchronous analysis job, measured in transactions per second |
| Asynchronous Concurrent jobs | Increases the total number of documents that you can have processing in parallel. |
# Document History for Amazon Textract
The following table describes important changes in each release of the *Amazon Textract Developer Guide*. For notification about updates to this documentation, you can subscribe to an RSS feed.
+ **Latest documentation update:** May 4th, 2022
| Change | Description | Date |
| --- |--- |--- |
| [Queries Support Added](#document-history) | Amazon Textract now supports the use of queries alongside the AnalyzeDocument and GetDocumentAnalysis operations. | April 21, 2022 |
| [Confused Deputy](#document-history) | Have included pages detailing how to secure and prevent the Confused Deputy problem in Amazon Textract. | March 29, 2022 |
| [Update for table detection and analysis](#document-history) | Amazon Textract now supports merged cells and column headers for table responses. | March 16, 2022 |
| [Integrating code examples from AWS Docs SDK Code Examples GitHub repo](#document-history) | Amazon Textract guide now contains additional code examples. Renamed previous examples section to Tutorials. | January 30, 2022 |
| [One Page PDF Support](#document-history) | Amazon Textract now supports synchronous processing of single page PDF documents and supports PDF documents containing JPEG 2000 encoded images. | January 14, 2022 |
| [Identity Document Support](#document-history) | Amazon Textract now supports synchronous extraction of data from identity documents. | December 1, 2021 |
| [AnalyzeExpense Async and TIFF Support Added](#document-history) | Amazon Textract now supports the asynchronous analysis of invoice and receipt documents, as well as the use of TIFF files. | October 26, 2021 |
| [Privatelink Support Added](#document-history) | Amazon Textract now supports Amazon Virtual Private Cloud Endpoints via AWS PrivateLink. | October 4, 2021 |
| [AnalyzeExpense Added](#document-history) | Amazon Textract now supports the synchronous analysis of invoice and receipt documents using the AnalyzeExpense API. | July 27, 2021 |
| [Text Detection Improvements](#document-history) | Amazon Textract now has accuracy enhancements for the handwriting extraction feature. | July 8, 2021 |
| [Form Extraction Update](#document-history) | Amazon Textract now has accuracy enhancements for the forms extraction feature. | June 23, 2021 |
| [Table Extraction Update](#document-history) | Amazon Textract now has accuracy enhancements for the detection of outer boundaries, row and column boundaries, and content of tables. | April 8, 2021 |
| [Augmented AI Support](#document-history) | Amazon Textract now supports Amazon Augmented AI for implementing human review. | December 3, 2019 |
| [New service and guide](#document-history) | Amazon Textract is now available for general use. | May 29, 2019 |
| [Support for selection elements](#document-history) | Amazon Textract can now detect selection elements (radio buttons and check boxes). | April 24, 2019 |
| [Release of Amazon Textract](#document-history) | This is the first release of the documentation for Amazon Textract. | November 28, 2018 |