Deploying an ASP.NET Core 2.0 App to Amazon ECS (Fargate) (Legacy)
Important
This documentation refers to legacy services and features. For updated guides and content, see the AWS .NET deployment tool
This section describes how to use the Publish Container to AWS wizard, provided as part of the Toolkit for Visual Studio, to deploy a containerized ASP.NET Core 2.0 application targeting Linux through Amazon ECS using the Fargate launch type. Because a web application is meant to run continuously, it will be deployed as a service.
Before you publish your container
Before using the Publish Container to AWS wizard to deploy your ASP.NET Core 2.0 application:
-
Install Docker
. You have a few different installation options including Docker for Windows . -
In Visual Studio, create (or open) a project for an ASP.NET Core 2.0 containerized app targeting Linux.
Accessing the Publish Container to AWS wizard
To deploy an ASP.NET Core 2.0 containerized application targeting Linux, right-click the project in the Solution Explorer and select Publish Container to AWS.

You can also select Publish Container to AWS on the Visual Studio Build menu.
Publish Container to AWS Wizard
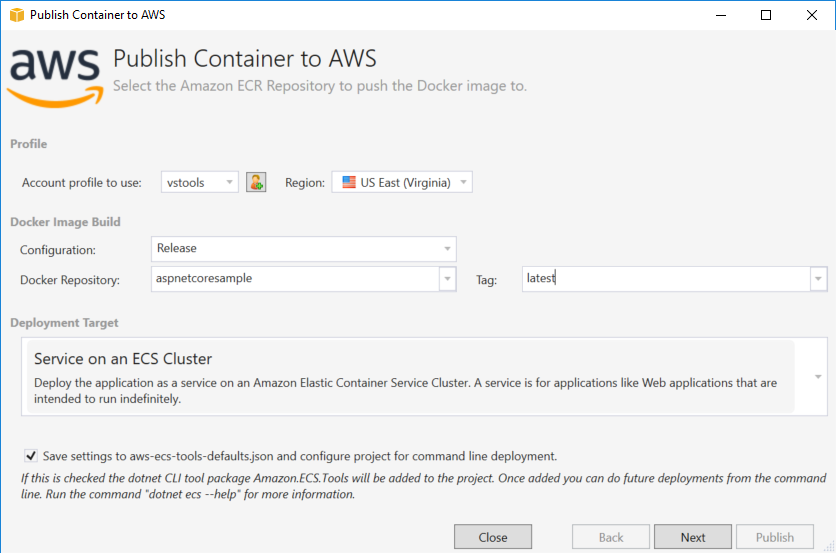
Account profile to use - Select an account profile to use.
Region - Choose the deployment region. Profile and region are used to set up your deployment environment resources and to select the default Docker registry.
Configuration - Select the Docker image build configuration.
Docker Repository - Choose an existing Docker repository or type in the name of a new repository and it will be created. This is the repository the build container is pushed to.
Tag - Select an existing tag or type in the name of a new tag. Tags can track important details like version, options or other unique configuration elements of the Docker container.
Deployment Target - Select Service on an ECS Cluster. Use this deployment option when your application is meant to be long-running (like an ASP.NET web application).
Save settings to aws-docker-tools-defaults.json and
configure project for command line deployment - Check this option if you want
the flexibility of deploying from the command line. Use dotnet ecs deploy from
your project directory to deploy and dotnet ecs publish the container.
Launch Configuration page
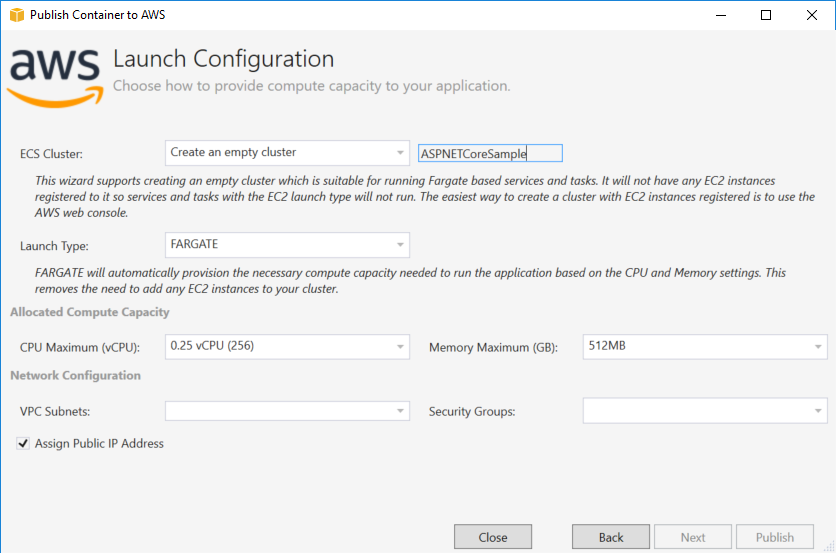
ECS Cluster - Pick the cluster that will run your Docker image. If you choose to create an empty cluster, provide a name for your new cluster.
Launch Type - Choose FARGATE.
CPU Maximum (vCPU) - Choose the maximum amount of compute capacity needed for your application. To see allowed ranges of CPU and Memory values, see task size.
Memory Maximum (GB) - Select the maximum amount of memory available to your application.
VPC Subnets - Choose one or more subnets under a single VPC. If you choose more than one subnet, your tasks will be distributed across them. This can improve availability. For more information, see default VPC and default subnets.
Security Groups - Choose a security group.
A security group acts as a firewall for associated Amazon EC2 instances, controlling both inbound and outbound traffic at the instance level.
Default security groups are configured to allow inbound traffic from instances assigned to the same security group and all outbound IPv4 traffic. You need outbound allowed so the service can reach the container repository.
Assign Public IP Address - Check this to make your task accessible from the internet.
Service Configuration page

Service - Select one of the services in the drop-down to deploy your container into an existing service. Or choose Create New to create a new service. Service names must be unique within a cluster, but you can have similarly named services in multiple clusters within a region or across multiple regions.
Number of Tasks - The number of tasks to deploy and keep running on your cluster. Each task is one instance of your container.
Minimum Healthy Percent - The percentage of tasks that
must remain in RUNNING state during a deployment rounded up to the nearest
integer.
Maximum Percent - The percentage of tasks that are allowed
in the RUNNING or PENDING state during a deployment rounded down
to the nearest integer.
Application Load Balancer page
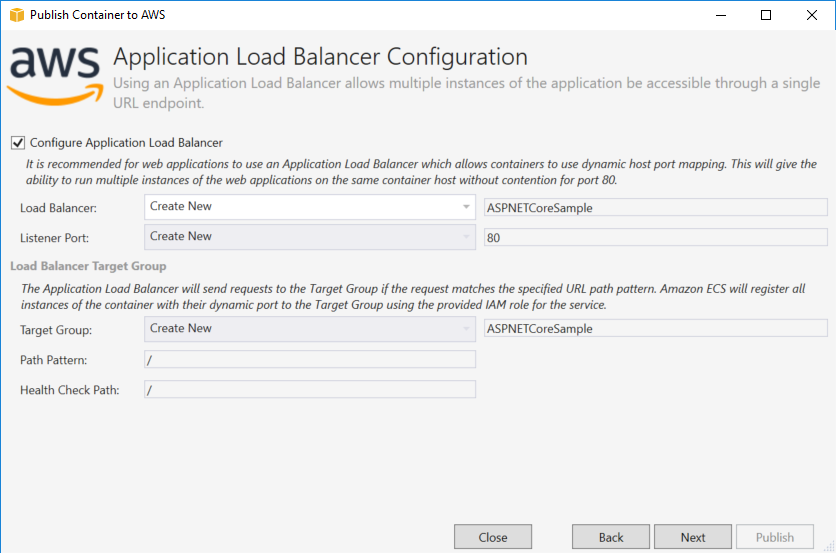
Configure Application Load Balancer - Check to configure an application load balancer.
Load Balancer - Select an existing load balancer or choose Create New and type in the name for the new load balancer.
Listener Port - Select an existing listener port or choose
Create New and type in a port number. The default, port
80, is appropriate for most web applications.
Target Group - Select the target group Amazon ECS will register the tasks to the service to.
Path Pattern - The load balancer will use path-based
routing. Accept the default / or provide a different pattern. The path pattern
is case-sensitive, can be up to 128 characters in length, and contains a select set of characters.
Health Check Path - The ping path that is the destination
on the targets for health checks. By default, it is /. Enter a different path
if needed. If the path you enter is invalid, the health check will fail and it will be
considered unhealthy.
If you deploy multiple services, and each service will be deployed to a different path or location, you will need custom check paths.
Task Definition page

Task Definition - Select an existing task definition or choose Create New and type in the new task definition name.
Container - Select an existing container or choose Create New and type in the new container name.
Task Role - Select an IAM role that has the credentials your app needs to access AWS Services. This is how credentials are passed in to your application. See how to specify AWS security credentials for your application.
Task Execution Role - Select a role with permissions to pull private images and publish logs. AWS Fargate will use it on your behalf.
Port Mapping - Choose the port number on the container that is bound to the automatically assigned host port.
Environment Variables - Add, modify, or delete environment variables for the container. You can modify it to suit your deployment.
When you are satisfied with the configuration, click Publish to begin the deployment process.
Publishing Container to AWS

Events are displayed during deployment. The wizard is automatically closed on successful completion. You can override this by unchecking the box at the bottom of the page.
You can find the URL of your new instances in the AWS Explorer. Expand Amazon ECS and Clusters, then click on your cluster.
