Using AWS Directory Service for Microsoft Active Directory
You can use AWS Transfer Family to authenticate your file transfer end users using AWS Directory Service for Microsoft Active Directory. It enables seamless migration of file transfer workflows that rely on Active Directory authentication without changing end users’ credentials or needing a custom authorizer.
With AWS Managed Microsoft AD, you can securely provide Directory Service users and groups access over SFTP, FTPS, and FTP for data stored in Amazon Simple Storage Service (Amazon S3) or Amazon Elastic File System (Amazon EFS). If you use Active Directory to store your users’ credentials, you now have an easier way to enable file transfers for these users.
You can provide access to Active Directory groups in AWS Managed Microsoft AD in your on-premises
environment or in the AWS Cloud using Active Directory connectors. You can give users that
are already configured in your Microsoft Windows environment, either in the AWS Cloud or
in their on-premises network, access to an AWS Transfer Family server that uses AWS Managed Microsoft AD for
identity. The AWS storage blog contains a post that details a solution for using Active
Directory with Transfer Family: Simplify Active Directory authentication with a custom identity provider for
AWS Transfer Family
Note
-
AWS Transfer Family does not support Simple AD.
-
Transfer Family does not support cross-region Active Directory configurations: we only support Active Directory integrations that are in the same region as that of the Transfer Family server.
-
Transfer Family does not support using either AWS Managed Microsoft AD or AD Connector to enable multi-factor authentication (MFA) for your existing RADIUS-based MFA infrastructure.
-
AWS Transfer Family does not support replicated regions of Managed Active Directory.
To use AWS Managed Microsoft AD, you must perform the following steps:
-
Create one or more AWS Managed Microsoft AD directories using the Directory Service console.
-
Use the Transfer Family console to create a server that uses AWS Managed Microsoft AD as its identity provider.
-
Set up AWS Directory using an Active Directory Connector.
-
Add access from one or more of your Directory Service groups.
-
Although not required, we recommend that you test and verify user access.
Topics
Before you start using AWS Directory Service for Microsoft Active Directory
Note
AWS Transfer Family has a default limit of 100 Active Directory groups per server. If your
use case requires more than 100 groups, consider using a custom identity provider
solution as described in Simplify Active Directory authentication with a custom identity provider for
AWS Transfer Family
Provide a unique identifier for your AD groups
Before you can use AWS Managed Microsoft AD, you must provide a unique identifier for each group in your Microsoft AD directory. You can use the security identifier (SID) for each group to do this. The users of the group that you associate have access to your Amazon S3 or Amazon EFS resources over the enabled protocols using AWS Transfer Family.
Use the following Windows PowerShell command to retrieve the SID for a group,
replacing YourGroupName with the name of the group.
Get-ADGroup -Filter {samAccountName -like "YourGroupName*"} -Properties * | Select SamAccountName,ObjectSid
Note
If you are using AWS Directory Service as your identity provider, and if
userPrincipalName and SamAccountName have
different values, AWS Transfer Family accepts the value in SamAccountName.
Transfer Family does not accept the value specified in
userPrincipalName.
Add Directory Service permissions to your role
You also need Directory Service API permissions to use AWS Directory Service as your identity provider. The following permissions are required or suggested:
-
ds:DescribeDirectoriesis required for Transfer Family to look up the directory -
ds:AuthorizeApplicationis required to add authorization for Transfer Family -
ds:UnauthorizeApplicationis suggested to remove any resources that are provisionally created, in case something goes wrong during the server creation process
Add these permissions to the role you are using for creating your Transfer Family servers. For more details on these permissions, see Directory Service API permissions: Actions, resources, and conditions reference.
Working with Active Directory realms
When you are considering how to have your Active Directory users access AWS Transfer Family servers, keep in mind the user's realm, and their group's realm. Ideally, the user's realm and their group's realm should match. That is, both the user and the group are in the default realm, or both are in the trusted realm. If this is not the case, the user cannot be authenticated by Transfer Family.
You can test the user to ensure the configuration is correct. For details, see Testing users. If there is a problem with the user/group realm, you receive the error,
No associated access found for user's groups.
Choosing AWS Managed Microsoft AD as your identity provider
This section describes how to use AWS Directory Service for Microsoft Active Directory with a server.
To use AWS Managed Microsoft AD with Transfer Family
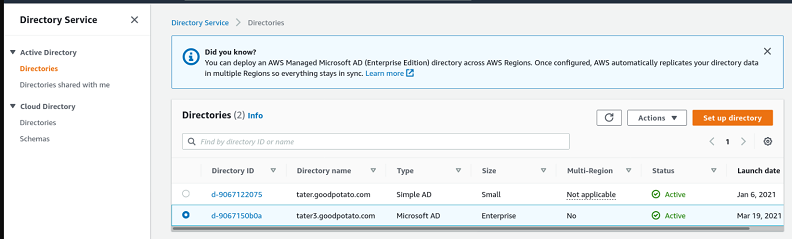
Sign in to the AWS Management Console and open the Directory Service console at https://console.aws.amazon.com/directoryservicev2/
. Use the Directory Service console to configure one or more managed directories. For more information, see AWS Managed Microsoft AD in the Directory Service Admin Guide.
-
Open the AWS Transfer Family console at https://console.aws.amazon.com/transfer/
, and choose Create server. -
On the Choose protocols page, choose one or more protocols from the list.
Note
If you select FTPS, you must provide the AWS Certificate Manager certificate.
-
For Choose an identity provider, choose AWS Directory Service.
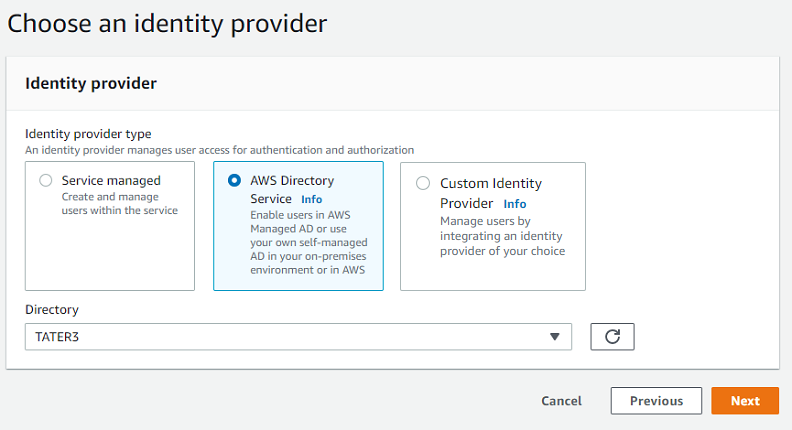
-
The Directory list contains all the managed directories that you have configured. Choose a directory from the list, and choose Next.
Note
-
Cross-Account and Shared directories are not supported for AWS Managed Microsoft AD.
-
To set up a server with Directory Service as your identity provider, you need to add some Directory Service permissions. For details, see Before you start using AWS Directory Service for Microsoft Active Directory.
-
-
To finish creating the server, use one of the following procedures:
In those procedures, continue with the step that follows choosing an identity provider.
Important
You can't delete a Microsoft AD directory in Directory Service if you used it in a Transfer Family server. You must delete the server first, and then you can delete the directory.
Connecting to on-prem Microsoft Active Directory
This section describes how to set up an AWS Directory using an AD Connector
To set up your AWS Directory using AD Connector
-
Open the Directory Service
console and select Directories. -
Select Set up directory.
-
For directory type, choose AD Connector.
-
Select a directory size, select Next, then select your VPC and Subnets.
-
Select Next, then fill in the fields as follows:
-
Directory DNS name: enter the domain name you are using for your Microsoft Active Directory.
-
DNS IP addresses: enter you Microsoft Active Directory IP addresses.
-
Server account username and password: enter the details for the service account to use.
-
-
Complete the screens to create the directory service.
The next step is to create a Transfer Family server with the SFTP protocol, and the identity provider type of AWS Directory Service. From Directory drop down list, select the directory you added in the previous procedure.
Granting access to groups
After you create the server, you must choose which groups in the directory should have access to upload and download files over the enabled protocols using AWS Transfer Family. You do this by creating an access.
Note
AWS Transfer Family has a default limit of 100 Active Directory groups per server. If your
use case requires more than 100 groups, consider using a custom identity provider
solution as described in Simplify Active Directory authentication with a custom identity provider for
AWS Transfer Family
Note
Users must belong directly to the group to which you are granting access. For example, assume that Bob is a user and belongs to groupA, and groupA itself is included in groupB.
-
If you grant access to groupA, Bob is granted access.
-
If you grant access to groupB (and not to groupA), Bob does not have access.
To grant access to a group
-
Open the AWS Transfer Family console at https://console.aws.amazon.com/transfer/
. -
Navigate to your server details page.
-
In the Accesses section, choose Add access.
-
Enter the SID for the AWS Managed Microsoft AD directory that you want to have access to this server.
Note
For information about how to find the SID for your group, see Before you start using AWS Directory Service for Microsoft Active Directory.
-
For Access, choose an AWS Identity and Access Management (IAM) role for the group.
-
In the Policy section, choose a policy. The default setting is None.
-
For Home directory, choose an Amazon S3 bucket that corresponds to the group's home directory.
Note
You can limit the portions of the bucket that users see by creating a session policy. For example, to limit users to their own folder under the
/filetestdirectory, enter the following text in the box./filetest/${transfer:UserName}To learn more about creating a session policy, see Creating a session policy for an Amazon S3 bucket.
-
Choose Add to create the association.
-
Choose your server.
-
Choose Add access.
-
Enter the SID for the group.
Note
For information about how to find the SID, see Before you start using AWS Directory Service for Microsoft Active Directory.
-
-
Choose Add access.
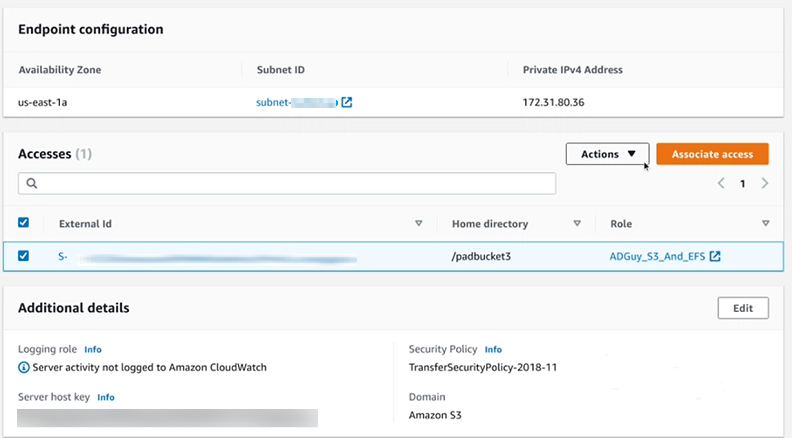
In the Accesses section, the accesses for the server are listed.
Testing users
You can test whether a user has access to the AWS Managed Microsoft AD directory for your server.
Note
A user must be in exactly one group (an external ID) that is listed in the Access section of the Endpoint configuration page. If the user is in no groups, or is in more than a single group, that user is not granted access.
To test whether a specific user has access
-
On the server details page, choose Actions, and then choose Test.
-
For Identity provider testing, enter the sign-in credentials for a user that is in one of the groups that has access.
-
Choose Test.
You see a successful identity provider test, showing that the selected user has been granted access to the server.

If the user belongs to more than one group that has access, you receive the following response.
"Response":"",
"StatusCode":200,
"Message":"More than one associated access found for user's groups."
Deleting server access for a group
To delete server access for a group
-
On the server details page, choose Actions, and then choose Delete Access.
-
In the dialog box, confirm that you want to remove access for this group.
When you return to the server details page, you see that the access for this group is no longer listed.
Connecting to the server using SSH (Secure Shell)
After you configure your server and users, you can connect to the server using SSH and use the fully qualified username for a user that has access.
sftpuser@active-directory-domain@vpc-endpoint
For example:
transferuserexample@mycompany.com@vpce-0123456abcdef-789xyz.vpc-svc-987654zyxabc.us-east-1.vpce.amazonaws.com.
This format targets the search of the federation, limiting the search of a potentially large Active Directory.
Note
You can specify the simple username. However, in this case, the Active Directory code has to search all the directories in the federation. This might limit the search, and authentication might fail even if the user should have access.
After authenticating, the user is located in the home directory that you specified when you configured the user.
Connecting AWS Transfer Family to a self-managed Active Directory using forests and trusts
Directory Service has the following options available to connect to a self-managed Active Directory:
-
One-way forest trust (outgoing from AWS Managed Microsoft AD and incoming for on-premises Active Directory) works only for the root domain.
-
For child domains, you can use either of the following:
-
Use two-way trust between AWS Managed Microsoft AD and on-premises Active Directory
-
Use one-way external trust to each child domain.
-
When connecting to the server using a trusted domain, the user needs to specify the
trusted domain, for example
transferuserexample@.mycompany.com
