Use predefined steps
When you're creating a workflow, you can choose to add one of the following predefined steps discussed in this topic. You can also choose to add your own custom file-processing steps. For more information, see Use custom file-processing steps.
Topics
Copy file
A copy file step creates a copy of the uploaded file in a new Amazon S3 location. Currently, you can use a copy file step only with Amazon S3.
The following copy file step copies files into the test
folder in amzn-s3-demo-destination-bucket.
If the copy file step is not the first step of your workflow, you can specify the File location. By specifying the file location, you can copy either the file that was used in the previous step or the original file that was uploaded. You can use this feature to make multiple copies of the original file while keeping the source file intact for file archival and records retention. For an example, see Example tag and delete workflow.

Provide the bucket and key details
You must provide the bucket name and a key for the destination of the copy
file step. The key can be either a path name or a file name. Whether the key is
treated as a path name or a file name is determined by whether you end the key
with the forward slash (/) character.
If the final character is /, your file is copied to the folder,
and its name does not change. If the final character is alphanumeric, your
uploaded file is renamed to the key value. In this case, if a file with that
name already exists, the behavior depends on the setting for the
Overwrite existing field.
-
If Overwrite existing is selected, the existing file is replaced with the file being processed.
-
If Overwrite existing is not selected, nothing happens, and the workflow processing stops.
Tip
If concurrent writes are executed on the same file path, it may result in unexpected behavior when overwriting files.
For example, if your key value is test/, your uploaded files are
copied to the test folder. If your key value is
test/today, (and Overwrite existing is
selected) every file you upload is copied to a file named
today in the test folder, and each
succeeding file overwrites the previous one.
Note
Amazon S3 supports buckets and objects, and there is no hierarchy. However, you can use prefixes and delimiters in object key names to imply a hierarchy and organize your data in a way similar to folders.
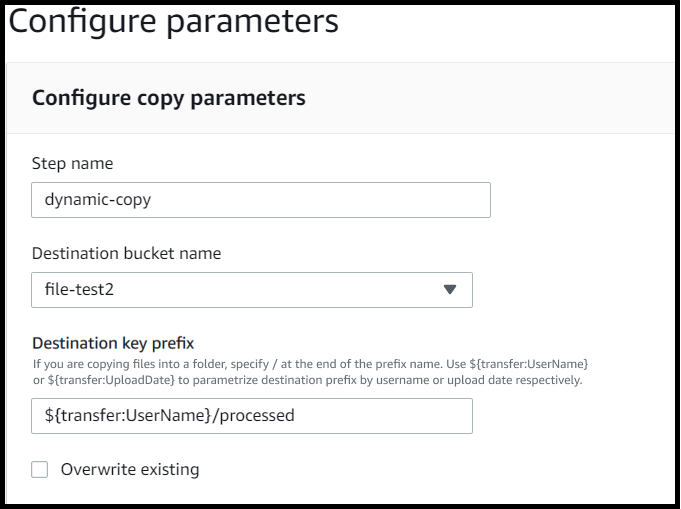
Use a named variable in a copy file step
In a copy file step, you can use a variable to dynamically copy your files
into user-specific folders. Currently, you can use
${transfer:UserName} or ${transfer:UploadDate} as
a variable to copy files to a destination location for the given user who's
uploading files, or based on the current date.
In the following example, if the user richard-roe uploads a file,
it gets copied into the
amzn-s3-demo-destination-bucket/richard-roe/processed/
folder. If the user mary-major uploads a file, it gets copied into
the amzn-s3-demo-destination-bucket/mary-major/processed/
folder.
Similarly, you can use ${transfer:UploadDate} as a variable to
copy files to a destination location named for the current date. In the
following example, if you set the destination to
${transfer:UploadDate}/processed on February 1, 2022, files
uploaded are copied into the
amzn-s3-demo-destination-bucket/2022-02-01/processed/
folder.

You can also use both of these variables together, combining their
functionality. For example, you could set the Destination key
prefix to
folder/${transfer:UserName}/${transfer:UploadDate}/,
which would created nested folders, for example
folder/marymajor/2023-01-05/.
IAM permissions for copy step
To allow a copy step to succeed, make sure the execution role for your workflow contains the following permissions.
{
            "Sid": "ListBucket",
            "Effect": "Allow",
            "Action": "s3:ListBucket",
            "Resource": [
                "arn:aws:s3:::amzn-s3-demo-destination-bucket"
            ]
        },
        {
            "Sid": "HomeDirObjectAccess",
            "Effect": "Allow",
            "Action": [
                "s3:PutObject",
                "s3:GetObject",
                "s3:DeleteObjectVersion",
                "s3:DeleteObject",
                "s3:GetObjectVersion"
            ],
            "Resource": "arn:aws:s3:::amzn-s3-demo-destination-bucket/*"
        }
Note
The s3:ListBucket permission is only necessary if you do not
select Overwrite existing. This permission checks your
bucket to see if a file with the same name already exists. If you have
selected Overwrite existing, the workflow doesn't need
to check for the file, and can just write it.
If your Amazon S3 files have tags, you need to add one or two permissions to your IAM policy.
-
Add
s3:GetObjectTaggingfor an Amazon S3 file that isn't versioned. -
Add
s3:GetObjectVersionTaggingfor an Amazon S3 file that is versioned.
Decrypt file
The AWS storage blog has a post that describes how to simply decrypt files without writing any code using Transfer Family Managed workflows,
Encrypt and decrypt files with PGP and AWS Transfer Family
Supported symmetric encryption algorithms
For PGP decryption, Transfer Family supports symmetric encryption algorithms that are used to encrypt the actual file data within PGP files.
-
For detailed information about supported symmetric encryption algorithms, see PGP symmetric encryption algorithms.
-
For information about PGP key pair algorithms used with these symmetric algorithms, see PGP key pair algorithms.
Use PGP decryption in your workflow
Transfer Family has built-in support for Pretty Good Privacy (PGP) decryption. You can use PGP decryption on files that are uploaded over SFTP, FTPS, or FTP to Amazon Simple Storage Service (Amazon S3) or Amazon Elastic File System (Amazon EFS).
To use PGP decryption, you must create and store the PGP private keys that will be used for decryption of your files. Your users can then encrypt files by using corresponding PGP encryption keys before uploading the files to your Transfer Family server. After you receive the encrypted files, you can decrypt those files in your workflow. For a detailed tutorial, see Setting up a managed workflow for decrypting a file.
For information about supported PGP algorithms and recommendations, see PGP encryption and decryption algorithms.
To use PGP decryption in your workflow
-
Identify a Transfer Family server to host your workflow, or create a new one. You need to have the server ID before you can store your PGP keys in AWS Secrets Manager with the correct secret name.
-
Store your PGP key in AWS Secrets Manager under the required secret name. For details, see Manage PGP keys. Workflows can automatically locate the correct PGP key to be used for decryption based on the secret name in Secrets Manager.
Note
When you store secrets in Secrets Manager, your AWS account incurs charges. For information about pricing, see AWS Secrets Manager Pricing
. -
Encrypt a file by using your PGP key pair. (For a list of supported clients, see Supported PGP clients.) If you are using the command line, run the following command. To use this command, replace
username@example.comtestfile.txtgpg -e -rusername@example.comtestfile.txtImportant
When encrypting files for use with AWS Transfer Family workflows, always ensure you specify a non-anonymous recipient using the
-rparameter. Anonymous encryption (without specifying a recipient) can cause decryption failures in the workflow because the system won't be able to identify which key to use for decryption. Debugging information for this issue is available at Troubleshoot anonymous recipient encryption issues. -
Upload the encrypted file to your Transfer Family server.
-
Configure a decryption step in your workflow. For more information, see Add a decryption step.
Add a decryption step
A decryption step decrypts an encrypted file that was uploaded to Amazon S3 or Amazon EFS as part of your workflow. For details about configuring decryption, see Use PGP decryption in your workflow.
When you create your decryption step for a workflow, you must specify the destination for the decrypted files. You must also select whether to overwrite existing files if a file already exists at the destination location. You can monitor the decryption workflow results and get audit logs for each file in real time by using Amazon CloudWatch Logs.
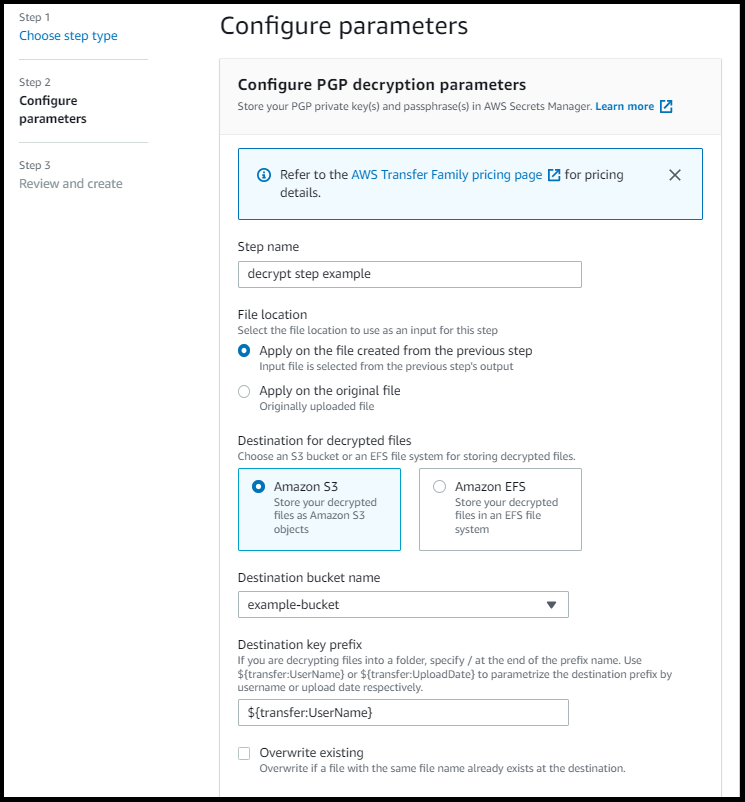
After you choose the Decrypt file type for your step, the Configure parameters page appears. Fill in the values for the Configure PGP decryption parameters section.
The available options are as follows:
-
Step name – Enter a descriptive name for the step.
-
File location – By specifying the file location, you can decrypt either the file that was used in the previous step or the original file that was uploaded.
Note
This parameter is not available if this step is the first step of the workflow.
-
Destination for decrypted files – Choose an Amazon S3 bucket or an Amazon EFS file system as the destination for the decrypted file.
-
If you choose Amazon S3, you must provide a destination bucket name and a destination key prefix. To parameterize the destination key prefix by username, enter
${transfer:UserName}for Destination key prefix. Similarly, to parameterize the destination key prefix by upload date, enter${Transfer:UploadDate}for Destination key prefix. -
If you choose Amazon EFS, you must provide a destination file system and path.
Note
The storage option that you choose here must match the storage system that's used by the Transfer Family server with which this workflow is associated. Otherwise, you will receive an error when you attempt to run this workflow.
-
-
Overwrite existing – If you upload a file, and a file with the same filename already exists at the destination, the behavior depends on the setting for this parameter:
-
If Overwrite existing is selected, the existing file is replaced with the file being processed.
-
If Overwrite existing is not selected, nothing happens, and the workflow processing stops.
Tip
If concurrent writes are executed on the same file path, it may result in unexpected behavior when overwriting files.
-
The following screenshot shows an example of the options that you might choose for your decrypt file step.
IAM permissions for decrypt step
To allow a decrypt step to succeed, make sure the execution role for your workflow contains the following permissions.
{
            "Sid": "ListBucket",
            "Effect": "Allow",
            "Action": "s3:ListBucket",
            "Resource": [
                "arn:aws:s3:::amzn-s3-demo-destination-bucket"
            ]
        },
        {
            "Sid": "HomeDirObjectAccess",
            "Effect": "Allow",
            "Action": [
                "s3:PutObject",
                "s3:GetObject",
                "s3:DeleteObjectVersion",
                "s3:DeleteObject",
                "s3:GetObjectVersion"
            ],
            "Resource": "arn:aws:s3:::amzn-s3-demo-destination-bucket/*"
        },
        {
            "Sid": "Decrypt",
            "Effect": "Allow",
            "Action": [
                "secretsmanager:GetSecretValue",
            ],
            "Resource": "arn:aws:secretsmanager:region:account-id:secret:aws/transfer/*"
        }
Note
The s3:ListBucket permission is only necessary if you do not
select Overwrite existing. This permission checks your
bucket to see if a file with the same name already exists. If you have
selected Overwrite existing, the workflow doesn't need
to check for the file, and can just write it.
If your Amazon S3 files have tags, you need to add one or two permissions to your IAM policy.
-
Add
s3:GetObjectTaggingfor an Amazon S3 file that isn't versioned. -
Add
s3:GetObjectVersionTaggingfor an Amazon S3 file that is versioned.
Tag file
To tag incoming files for further downstream processing, use a tag step. Enter the value of the tag that you would like to assign to the incoming files. Currently, the tag operation is supported only if you are using Amazon S3 for your Transfer Family server storage.
The following example tag step assigns scan_outcome and
clean as the tag key and value, respectively.

To allow a tag step to succeed, make sure the execution role for your workflow contains the following permissions.
{
            "Sid": "Tag",
            "Effect": "Allow",
            "Action": [
                "s3:PutObjectTagging",
                "s3:PutObjectVersionTagging"
            ],
            "Resource": [
                "arn:aws:s3:::amzn-s3-demo-bucket/*"
            ]
}
Note
If your workflow contains a tag step that runs before either a copy or decrypt step, you need to add one or two permissions to your IAM policy.
-
Add
s3:GetObjectTaggingfor an Amazon S3 file that isn't versioned. -
Add
s3:GetObjectVersionTaggingfor an Amazon S3 file that is versioned.
Delete file
To delete a processed file from a previous workflow step or to delete the originally uploaded file, use a delete file step.

To allow a delete step to succeed, make sure the execution role for your workflow contains the following permissions.
{
            "Sid": "Delete",
            "Effect": "Allow",
            "Action": [
                "s3:DeleteObjectVersion",
                "s3:DeleteObject"
            ],
            "Resource": "arn:aws:secretsmanager:region:account-ID:secret:aws/transfer/*"
        }
Named variables for workflows
For copy and decrypt steps, you can use a variable to dynamically perform actions. Currently, AWS Transfer Family supports the following named variables.
-
Use
${transfer:UserName}to copy or decrypt files to a destination based on the user who's uploading the files. -
Use
${transfer:UploadDate}to copy or decrypt files to a destination location based on the current date.
Example tag and delete workflow
The following example illustrates a workflow that tags incoming files that need to be processed by a downstream application, such as a data analytics platform. After tagging the incoming file, the workflow then deletes the originally uploaded file to save on storage costs.

