Getting started with Network Access Analyzer
You can use Network Access Analyzer to understand network access to resources in your virtual private clouds (VPCs). You can get started with Network Access Analyzer using one of the Amazon created Network Access Scopes.
Tasks
Note
Network Access Analyzer evaluates network paths only within the account and Region from which you run the analysis.
Step 1: Analyze your network
To get started quickly, use one of the Network Access Scopes provided by Amazon or create a Network Access Scope using a built-in template. Note that it can take a few minutes to complete the analysis.
To analyze a Network Access Scope
-
Open the Network Manager console at https://console.aws.amazon.com/networkmanager/home
. -
In the navigation pane, choose Network Access Analyzer.
-
If you are using Network Access Analyzer for the first time, choose Get Started.
-
Select one of the Amazon created Network Access Scopes:
-
All-IGW-Ingress (Amazon created) – Identifies inbound paths from internet gateways to network interfaces.
-
AWS-IGW-Egress (Amazon created) – Identifies outbound paths from network interfaces to internet gateways.
-
AWS-VPC-Ingress (Amazon created) – Identifies inbound paths from internet gateways, peering connections, VPC endpoints, VPNs, and transit gateways to VPCs.
-
AWS-VPC-Egress (Amazon created) – Identifies outbound paths from VPCs to internet gateways, peering connections, VPC endpoints, VPNs, and transit gateways.
-
-
Choose Analyze.
-
Wait for the analysis to complete and then go to Step 2: Review your findings.
Alternatively, you can get started by creating a Network Access Scope using a built-in template or an empty template.
To create a Network Access Scope
-
Open the Network Manager console at https://console.aws.amazon.com/networkmanager/home
. -
In the navigation pane, choose Network Access Analyzer.
-
Choose Create Network Access Scope.
-
Select a built-in template and then choose Next.
-
(Optional) Add a match condition.
-
(Optional) Add an exclusion condition.
-
(Optional) To add a tag, choose Add new tag and then enter the tag key and tag value.
-
Choose Next and then choose Create Network Access Scope.
-
Select your Network Access Scope and choose Analyze. Wait for the analysis to complete and then go to Step 2: Review your findings.
Step 2: Review your findings
After your analysis is complete, you can review the results.
To review your findings
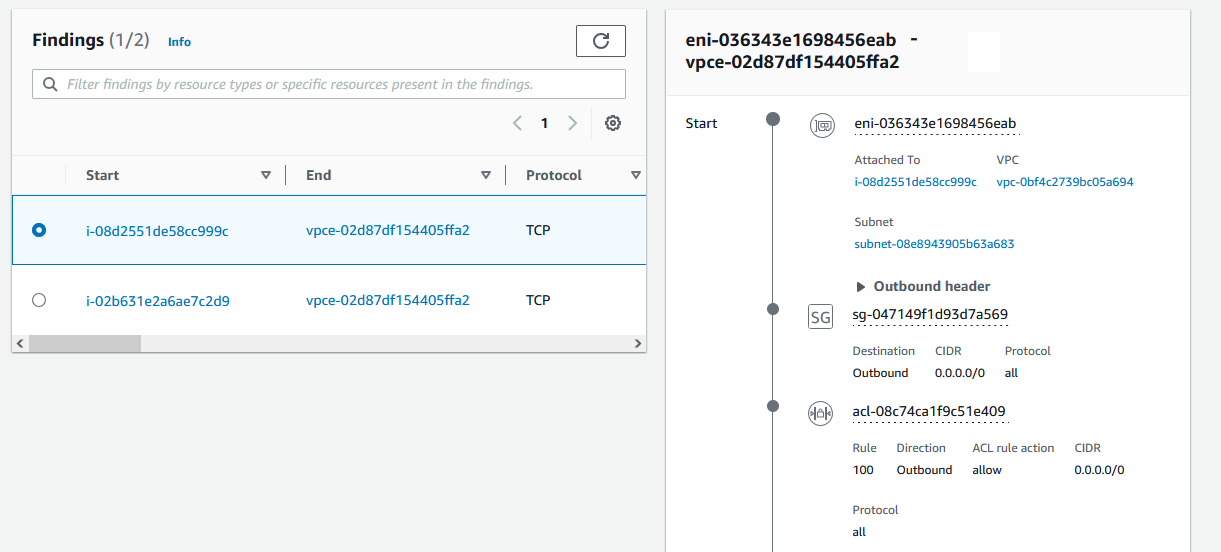
Choose the Latest analysis tab. If the analysis produces any findings, Last analysis result is Findings detected, as shown in the following figure. Otherwise, Last analysis result is No findings detected.

If there are findings detected, the Findings pane has the potential network paths identified by the Network Access Scope. You can add filters based on the resources present in the findings. For example, you can filter by resource type.
Select a finding to view its details. This information helps you understand the network configurations that produced the finding. For example, you can see the network ACL that applies to traffic that is destined for the internet.
Step 3: Delete a Network Access Scope (Optional)
If you no longer need a Network Access Scope, you can delete it. This action can't be undone.
To delete a Network Access Scope
-
On the Network Access Scopes page, select the check box next to the Network Access Scope.
-
Choose the Actions button and then choose Delete Network Access Scope.
-
When prompted for confirmation, enter
Delete. -
Choose Delete.
