Amazon VPC attachments in AWS Transit Gateway
An Amazon Virtual Private Cloud (VPC) attachment to a transit gateway allows you to route traffic to and from one or more VPC subnets. When you attach a VPC to a transit gateway, you must specify one subnet from each Availability Zone to be used by the transit gateway to route traffic. Specifying one subnet from an Availability Zone enables traffic to reach resources in every subnet in that Availability Zone.
Limits
-
When you attach a VPC to a transit gateway, any resources in Availability Zones where there is no transit gateway attachment cannot reach the transit gateway. If there is a route to the transit gateway in a subnet route table, traffic is forwarded to the transit gateway only when the transit gateway has an attachment in a subnet in the same Availability Zone.
-
A transit gateway does not support DNS resolution for custom DNS names of attached VPCs set up using private hosted zones in Amazon Route 53. To configure name resolution for private hosted zones for all VPCs attached to a transit gateway, see Centralized DNS management of hybrid cloud with Amazon Route 53 and AWS Transit Gateway
. -
A transit gateway doesn't support routing between VPCs with identical CIDRs, or if a CIDR in a range overlaps a CIDR in an attached VPC. If you attach a VPC to a transit gateway and its CIDR is identical to, or overlaps with, the CIDR of another VPC that's already attached to the transit gateway, the routes for the newly attached VPC aren't propagated to the transit gateway route table.
-
You can't create an attachment for a VPC subnet that resides in a Local Zone. However, you can configure your network so that subnets in the Local Zone can connect to a transit gateway through the parent Availability Zone. For more information, see Connect Local Zone subnets to a transit gateway.
-
You can't create a transit gateway attachment using IPv6-only subnets. Transit gateway attachment subnets must also support IPv4 addresses.
-
A transit gateway must have at least one VPC attachment before that transit gateway can be added to a route table.
VPC attachment lifecycle
A VPC attachment goes through various stages, starting when the request is initiated. At each stage, there may be actions that you can take, and at the end of its lifecycle, the VPC attachment remains visible in the Amazon Virtual Private Cloud Console and in API or command line output, for a period of time.
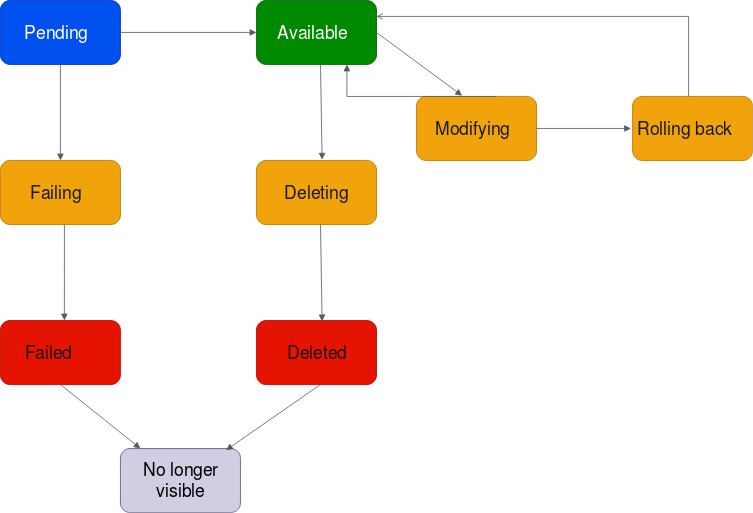
The following diagram shows the states an attachment can go through in a single account configuration, or a cross-account configuration that has Auto accept shared attachments turned on.
-
Pending: A request for a VPC attachment has been initiated and is in the provisioning process. At this stage, the attachment can fail, or can go to
available. -
Failing: A request for a VPC attachment is failing. At this stage, the VPC attachment goes to
failed. -
Failed: The request for the VPC attachment has failed. While in this state, it cannot be deleted. The failed VPC attachment remains visible for 2 hours, and then is no longer visible.
-
Available: The VPC attachment is available, and traffic can flow between the VPC and the transit gateway. At this stage, the attachment can go to
modifying, or go todeleting. -
Deleting: A VPC attachment that is in the process of being deleted. At this stage, the attachment can go to
deleted. -
Deleted: An
availableVPC attachment has been deleted. While in this state, the VPC attachment cannot be modified. The VPC attachment remains visible for 2 hours, and then is no longer visible. -
Modifying: A request has been made to modify the properties of the VPC attachment. At this stage, the attachment can go to
available, or go torolling back. -
Rolling back: The VPC attachment modification request cannot be completed, and the system is undoing any changes that were made. At this stage, the attachment can go to
available.
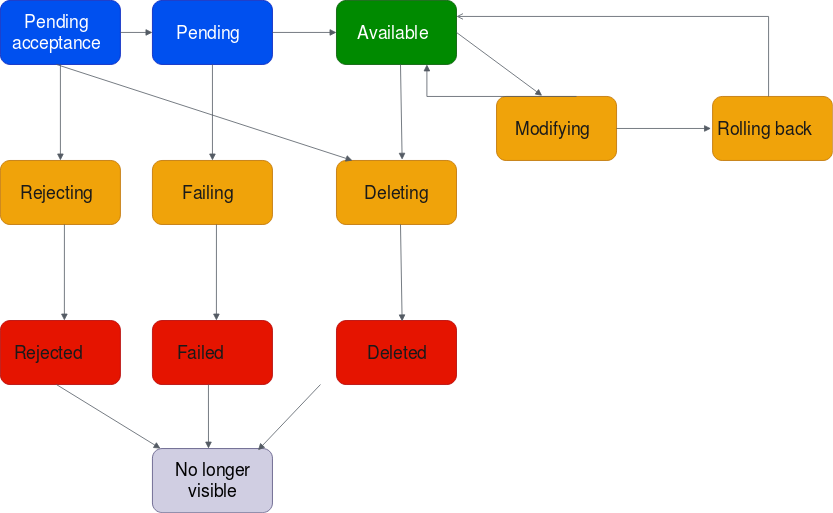
The following diagram shows the states an attachment can go through in a cross-account configuration that has Auto accept shared attachments turned off.
-
Pending-acceptance: The VPC attachment request is awaiting acceptance. At this stage, the attachment can go to
pending, torejecting, or todeleting. -
Rejecting: A VPC attachment that is in the process of being rejected. At this stage, the attachment can go to
rejected. -
Rejected: A
pending
                    acceptance
VPC attachment has been rejected. While in this state, the VPC attachment cannot be modified. The VPC attachment remains visible for 2 hours, and then is no longer visible. -
Pending: The VPC attachment has been accepted and is in the provisioning process. At this stage, the attachment can fail, or can go to
available. -
Failing: A request for a VPC attachment is failing. At this stage, the VPC attachment goes to
failed. -
Failed: The request for the VPC attachment has failed. While in this state, it cannot be deleted. The failed VPC attachment remains visible for 2 hours, and then is no longer visible.
-
Available: The VPC attachment is available, and traffic can flow between the VPC and the transit gateway. At this stage, the attachment can go to
modifying, or go todeleting. -
Deleting: A VPC attachment that is in the process of being deleted. At this stage, the attachment can go to
deleted. -
Deleted: An
availableorpending acceptanceVPC attachment has been deleted. While in this state, the VPC attachment cannot be modified. The VPC attachment remains visible 2 hours, and then is no longer visible. -
Modifying: A request has been made to modify the properties of the VPC attachment. At this stage, the attachment can go to
available, or go torolling back. -
Rolling back: The VPC attachment modification request cannot be completed, and the system is undoing any changes that were made. At this stage, the attachment can go to
available.
Appliance mode
If you plan to configure a stateful network appliance in your VPC, you can enable appliance mode support for the VPC attachment in which the appliance is located when you create an attachment. This ensures that AWS Transit Gateway uses the same Availability Zone for that VPC attachment for the lifetime of the flow of traffic between a source and destination. It also allows a transit gateway to send traffic to any Availability Zone in the VPC as long as there is a subnet association in that zone. While appliance mode is only supported on VPC attachments, the network flow can come from any other transit gateway attachment type, including VPC, VPN, and Connect attachments. Appliance mode also works for network flows that have sources and destinations across different AWS Regions. Network flows can potentially be rebalanced across different Availability Zones if you don't initially enable appliance mode but later edit the attachment configuration to enable it. You can enable or disable appliance mode using either the console or the command line or API.
Appliance mode in AWS Transit Gateway optimizes traffic routing by considering the source and destination Availability Zones when determining the path through an appliance mode VPC. This approach enhances efficiency and reduces latency. The behavior varies depending on the specific configuration and traffic patterns. The following are example scenarios.
Scenario 1: Intra-Availability Zone Traffic Routing via Appliance VPC
When traffic flows from source Availability Zone us-east-1a to destination Availability Zone us-east-1a, with Appliance Mode VPC attachments in both us-east-1a and us-east-1b, Transit Gateway selects a network interface from us-east-1a within the appliance VPC. This Availability Zone is maintained for the entire duration of the traffic flow between source and destination.
Scenario 2: Inter-Availability Zone Traffic Routing via Appliance VPC
For traffic flowing from source Availability Zone us-east-1a to destination Availability Zone us-east-1b, with Appliance Mode VPC attachments in both us-east-1a and us-east-1b, Transit Gateway uses a flow hash algorithm to select either us-east-1a or us-east-1b in the appliance VPC. The chosen Availability Zone is used consistently for the lifetime of the flow.
Scenario 3: Routing traffic through an appliance VPC without Availability Zone data
When traffic originates from source Availability Zone us-east-1a to a destination without Availability Zone information (e.g., internet-bound traffic), with Appliance Mode VPC attachments in both us-east-1a and us-east-1b, Transit Gateway selects a network interface from us-east-1a within the appliance VPC.
Scenario 4: Routing traffic through an appliance VPC in an Availability Zone distinct from either the source or destination
When traffic flows from source Availability Zone us-east-1a to destination Availability Zone us-east-1b, with Appliance Mode VPC attachments in different Availability Zone example us-east-1c and us-east-1d, Transit Gateway uses a flow hash algorithm to select either us-east-1c or us-east-1d in the appliance VPC. The chosen Availability Zone is used consistently for the lifetime of the flow.
Note
Appliance mode is only supported for VPC attachments. Ensure that route propagation is enabled for a route table associated with an appliance VPC attachment.
Security group referencing
You can use this feature to simplify security group management and control of instance-to-instance traffic across VPCs that are attached to the same transit gateway. You can cross-reference security groups in inbound rules only. Outbound security rules do not support security group referencing. There are no additional costs associated with enabling or using security group referencing.
Security group referencing support can be configured for both transit gateways and transit gateway VPC attachments and will only work if it has been enabled for both a transit gateway and its VPC attachments.
Limitations
The following limitations apply when using security group referencing with a VPC attachment.
Security group referencing is not supported across transit gateway peering connections. Both VPCs must be attached to the same transit gateway.
Security group referencing is not supported for VPC attachments in the availability zone use1-az3.
Security group referencing is not supported for PrivateLink endpoints. We recommend using IP CIDR-based security rules as an alternative.
Security group referencing works for Elastic File System (EFS) as long as an allow all egress security group rule is configured for the EFS interfaces in the VPC.
For Local Zone connectivity via a transit gateway, only the following Local Zones are supported: us-east-1-atl-2a, us-east-1-dfw-2a, us-east-1-iah-2a, us-west-2-lax-1a, us-west-2-lax-1b, us-east-1-mia-2a, us-east-1-chi-2a, and us-west-2-phx-2a.
-
We recommend disabling this feature at the VPC attachment level for VPCs with subnets in unsupported Local Zones, AWS Outposts, and AWS Wavelength Zones, as it might cause service disruption.
-
If you have an inspection VPC, then security group referencing through the transit gateway does not work across AWS Gateway Load Balancer or an AWS Network Firewall.
Tasks
