This whitepaper is for historical reference only. Some content might be outdated and some links might not be available.
Deployment steps
Step 1. Sign in to your AWS account
-
Sign in to your AWS account at https://aws.amazon.com
with an IAM user that has the necessary permissions. For details, see Infrastructure preparation and planning. -
Ensure that your AWS account is configured correctly, as discussed in Infrastructure preparation and planning.

Sign in to Amazon RDS for SQL Server
-
At this stage you need to define the Amazon VPC which will be linked to the SDDC during the onboarding phase. If you intend to use an existing VPC, skip Step 2 and continue from Step 3 to create a private subnet for ENI connectivity.
Step 2. Create a new VPC
-
Ensure the AWS Region displayed in the upper-right corner of the navigation bar is the correct Region in which you intend to deploy your VMware Cloud on AWS SDDC.
-
Open the Amazon VPC console at https://console.aws.amazon.com/vpc/
. -
In the navigation pane, choose Your VPCs > VPCs.

From the Amazon VPC Console, choose Your VPCs > VPCs
-
Choose Create VPC.

Choose Create VPC
-
Enter the VPC details:
-
Name tag — Optionally provide a name for your VPC. This creates a tag with a key of Name and the value that you specify.
-
IPv4 CIDR block — Specify an IPv4 CIDR block for the VPC. The smallest CIDR block you can specify is
/26, and the largest is/16. AWS recommends that you specify a CIDR block from the private (non-publicly routable) IP address ranges as specified in RFC 1918. For example, 10.0.0.0/16, or192.168.0.0/16. -
Tenancy — Default.

Enter the VPC details and choose Create VPC
-
-
Choose Create VPC.
-
Choose Close.
Step 3. Create a private subnet for the ENI
In this step, you will create a private subnet for each Availability Zone where you want to deploy VMware Cloud on AWS.
Note
A subnet with no internet gateway attached is recommended unless there is valid reason to do otherwise.
Add subnets to the VPC. You will add three subnets in different Availability Zones.
-
Open the Amazon VPC console at https://console.aws.amazon.com/vpc/
. -
In the navigation pane, choose Subnets.

Choose Subnets
-
Choose Create Subnet.

Choose Create subnet
-
In the Create Subnetdialog box, do the following:
-
For Name tag, type an identifiable name such as “SDDC ENI private subnet”.
-
For Availability Zone, choose the first Availability Zone in the list.
-
For CIDR block, type the CIDR block to use for the subnet.
-
Choose Create.

Enter subnet settings and choose Create subnet
-
-
Repeat steps 2 and 3 to create subnets for each remaining Availability Zone in the Region.
-
In this example, you have three subnets attached to the VPC.

The three subnets attached to the VPC
You are now ready to activate your VMware Cloud on AWS service.
Step 4. Activate VMware Cloud on AWS
The following steps require activation to the VMware Cloud on AWS. This step can be skipped if already completed.
During the process of purchasing VMware Cloud on AWS, you specify an email contact for your Organization on the order form submitted to AWS. After the purchase is processed, AWS sends a welcome email to the email addresses specified.
-
After receiving the Welcome letter from AWS, choose the Activate Service link to be redirected to the VMware Cloud on AWS portal.

Choose Activate Service
Important
The welcome email is sent from no-reply-vmware-cloud-on-aws@amazon.com. Ensure the email wasn’t processed by corporate spam filter.
VMware Cloud on AWS accounts are based on an Organization name and ID. The very first user will need a valid VMware Customer Connect account. This account is used to create an Organization (Name and ID), and the initial user used is set up as the Organization Owner.
-
Log in using the VMware Customer Connect credentials previously supplied to AWS.
-
Review the terms and conditions for service usage, then select the check box to accept.
-
Choose Next to successfully complete the account activation. You will be redirected to the VMware Cloud on AWS console via https://vmc.vmware.com
. -
Create an Organization linked to the VMware Customer Connect account. Each Organization corresponds to a group or line of business subscribed to VMware Cloud on AWS.

Create an Organization linked to the VMware Customer Connect account
-
Enter the Organization name and address to provide a logical distinction for the organization. In the example below,
AWSTestOrg01is used for the organization name.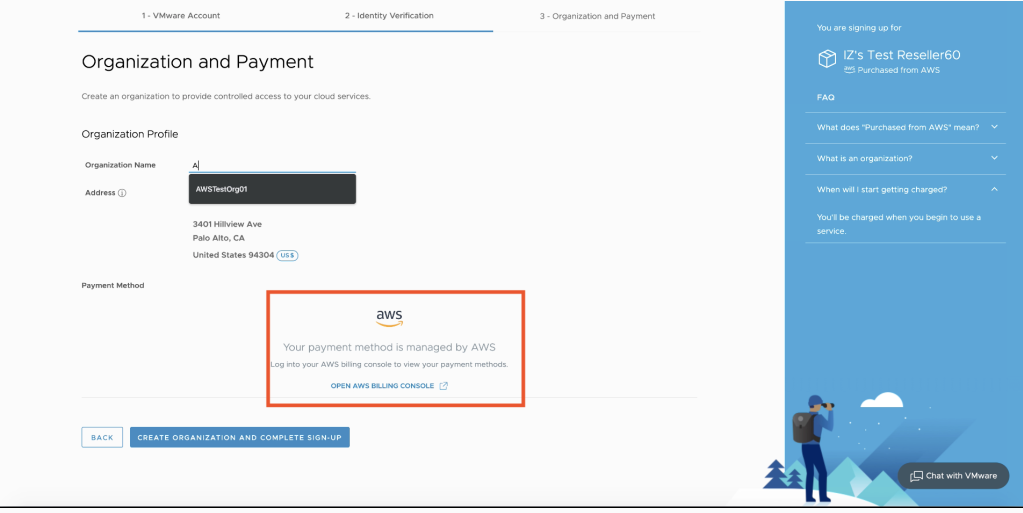
Enter the Organization name
-
Choose Create Organization and complete sign-up to successfully complete the process.
Note
This organization has no relationship to AWS Organizations. Each organization has one or more Organization Owners, who have access to all the resources and services of the Organization and can invite users to the account.
Step 5. Identity and Access Management
Just as it is a best practice to limit access to the vSphere Client, it is also a best practice to limit access to the Cloud Services and SDDC console. Users requiring access to the vSphere Client do not necessarily require access to the Cloud Services and SDDC console. Only users who are responsible for the entire SDDC or NSX components (such as VPN or firewall) should have access.
Within the newly created organization, there are two types of Organization Roles – Organization Owner and Organization Member. As the creator of the Organization, the initial user used is setup as the Organization Owner. This means you can add, remove, and modify users as well as access to VMware Cloud Services. There can be multiple owners. Organization Members can access Cloud Services, but cannot add, remove, or modify users.
Within the Cloud Services Console, you can assign specific service roles to Organization members.
For example, the VMware Cloud on AWS service enables you to assign Administrator, Administrator (Delete Restricted), NSX Cloud Auditor, and NSX Cloud Administrator roles.

Two types of role-based access roles
Federation
An enterprise using VMware Cloud Services can set up federation with a corporate domain. This enables you to use your Organization’s single sign-on and identity source to sign in to VMware Cloud Services. You can then set up multi-factor authentication as part of federation access policy settings.
Using federated identity management enables you to control authentication to your Organization and services by assigning Organization and service roles to your enterprise groups.
To set up a federated identity with the VMware Identity Manager
service you will need the
VMware
Identity Manager connector
