This guide provides documentation for the AWS version of Wickr. If you're using the on-premises version of Wickr, see Enterprise Administration Guide.
Team directory
You can view current Wickr users and modify their details in the User section of the AWS Management Console for Wickr.
View users
Complete the following procedure to view users registered to your Wickr network.
-
Open the AWS Management Console for Wickr at https://console.aws.amazon.com/wickr/
. -
On the Networks page, choose the Admin link, to navigate to Wickr Admin Console for that network.
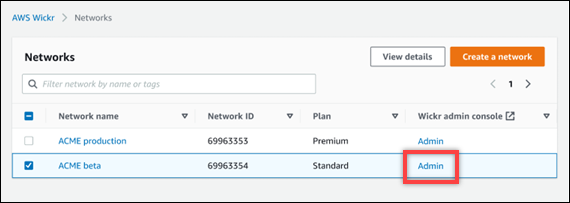
You're redirected to the Wickr Admin Console for a specific network.

-
In the navigation pane of the Wickr Admin Console, choose User, and then choose Team Directory.
The Team Directory page displays users registered to your Wickr network, including their name, email address, assigned security group, and current status. For current users, you can view their devices, edit their details, suspend, delete, and switch them to another Wickr network.
Create users
Complete the following procedure to create a user.
-
Open the AWS Management Console for Wickr at https://console.aws.amazon.com/wickr/
. -
On the Networks page, choose the Admin link, to navigate to Wickr Admin Console for that network.
You're redirected to the Wickr Admin Console for a specific network.
-
In the navigation pane of the Wickr Admin Console, choose User, and then choose Team Directory.
-
Choose Create new user.
-
In the form that appears, enter the user's first name, last name, country code, phone number, and email address. Email address is the only field that is required. Be sure to choose the appropriate security group for the user. Wickr will send an invitation email to the address you specify for the user.
-
Choose Create.
An email is sent to the user. The email provides download links for the Wickr client applications, and a link to register for Wickr. As users register for Wickr using the link in the email, their status in the Wickr team directory will change from Pending to Active.
Edit users
Complete the following procedure to edit a user.
-
Open the AWS Management Console for Wickr at https://console.aws.amazon.com/wickr/
. -
On the Networks page, choose the Admin link, to navigate to Wickr Admin Console for that network.
You're redirected to the Wickr Admin Console for a specific network.
-
In the navigation pane of the Wickr Admin Console, choose User, and then choose Team Directory.
-
Choose the vertical ellipsis icon next to the name of the user that you want to delete.
-
You can choose one of the following options:
-
Devices — View the devices that the user has configured with the Wickr client.
-
Edit — Edit the user details, such as their name, country code, phone number (optional), and assigned security group.
-
Suspend — Suspend the user so that they cannot sign in to your Wickr network in the Wickr client. When you suspend a user who is currently signed in to your Wickr network in the client, that user is automatically signed out.
-
Delete — Delete the user from your Wickr network.
-
Delete users
Complete the following procedure to delete a user.
-
Open the AWS Management Console for Wickr at https://console.aws.amazon.com/wickr/
. -
On the Networks page, choose the Admin link, to navigate to Wickr Admin Console for that network.
You're redirected to the Wickr Admin Console for a specific network.
-
In the navigation pane of the Wickr Admin Console, choose User, and then choose Team Directory.
-
Choose the vertical ellipsis icon next to the name of the user that you want to delete.
-
Choose Delete to delete the user.
When you delete a user, that user is no longer able to sign in to your Wickr network in the Wickr client.
