Configure a VPC for WorkSpaces
WorkSpaces launches your WorkSpaces in a virtual private cloud (VPC).
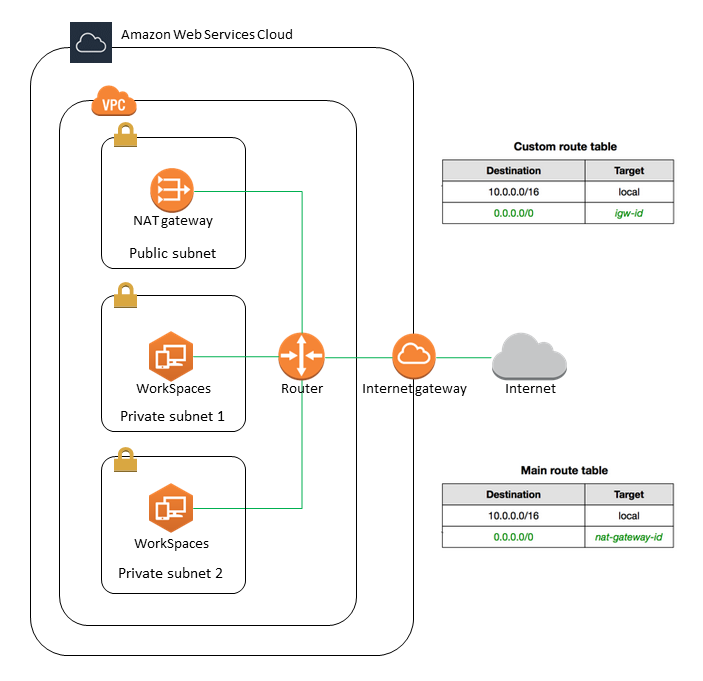
You can create a VPC with two private subnets for your WorkSpaces and a NAT gateway in a public subnet. Alternatively, you can create a VPC with two public subnets for your WorkSpaces and associate a public IP address or Elastic IP address with each WorkSpace.
For more information about VPC design considerations, see
Best Practices for VPCs and Networking in Amazon WorkSpaces Deployments
Contents
Requirements
Your VPC's subnets must reside in different Availability Zones in the Region where you're launching WorkSpaces. Availability Zones are distinct locations that are engineered to be isolated from failures in other Availability Zones. By launching instances in separate Availability Zones, you can protect your applications from the failure of a single location. Each subnet must reside entirely within one Availability Zone and cannot span zones.
Note
Amazon WorkSpaces is available in a subset of the Availability Zones in each supported Region. To determine which Availability Zones you can use for the subnets of the VPC that you're using for WorkSpaces, see Availability Zones for Amazon WorkSpaces.
Configure a VPC with private subnets and a NAT gateway
If you use AWS Directory Service to create an AWS Managed Microsoft or a Simple AD, we recommend that you configure the VPC with one public subnet and two private subnets. Configure your directory to launch your WorkSpaces in the private subnets. To provide internet access to WorkSpaces in a private subnet, configure a NAT gateway in the public subnet.
To create a VPC with one public subnet and two private subnets
-
Open the Amazon VPC console at https://console.aws.amazon.com/vpc/
. -
Choose Create VPC.
-
Under Resources to create, choose VPC and more.
-
For Name tag auto-generation, enter a name for the VPC.
-
To configure the subnets, do the following:
-
For Number of Availability Zones, choose 1 or 2, depending on your needs.
-
Expand Customize AZs and choose your Availability Zones. Otherwise, AWS selects them for you. To make an appropriate selection, see Availability Zones for Amazon WorkSpaces.
-
For Number of public subnets, ensure that you have one public subnet per Availability Zone.
-
For Number of private subnets, ensure that you have at least one private subnet per Availability Zone.
-
Enter a CIDR block for each subnet. For more information, see Subnet sizing in the Amazon VPC User Guide.
-
-
For NAT gateways, choose 1 per AZ.
-
Choose Create VPC.
IPv6 CIDR blocks
You can associate IPv6 CIDR blocks with your VPC and subnets. However, if you configure your subnets to automatically assign IPv6 addresses to instances launched in the subnet, then you cannot use Graphics bundles. (You can use Graphics.g4dn, GraphicsPro.g4dn, and GraphicsPro bundles, however.) This restriction arises from a hardware limitation of previous-generation instance types that do not support IPv6.
To work around this issue, you can temporarily disable the auto-assign IPv6 addresses setting on the WorkSpaces subnets before launching Graphics bundles, and then reenable this setting (if needed) after launching Graphics bundles so that any other bundles receive the desired IP addresses.
By default, the auto-assign IPv6 addresses setting is disabled. To check this setting from the Amazon VPC console, in the navigation pane, choose Subnets. Select the subnet, and choose Actions, Modify auto-assign IP settings.
Configure a VPC with public subnets
If you prefer, you can create a VPC with two public subnets. To provide internet access to WorkSpaces in public subnets, configure the directory to assign Elastic IP addresses automatically or manually assign an Elastic IP address to each WorkSpace.
Step 1: Create a VPC
Create a VPC with one public subnet as follows.
To create the VPC
-
Open the Amazon VPC console at https://console.aws.amazon.com/vpc/
. -
Choose Create VPC.
-
Under Resources to create, choose VPC and more.
-
For Name tag auto-generation, enter a name for the VPC.
-
To configure the subnets, do the following:
-
For Number of Availability Zones, choose 2.
-
Expand Customize AZs and choose your Availability Zones. Otherwise, AWS selects them for you. To make an appropriate selection, see Availability Zones for Amazon WorkSpaces.
-
For Number of public subnets, choose 2.
-
For Number of private subnets, choose 0.
-
Enter a CIDR block for each public subnet. For more information, see Subnet sizing in the Amazon VPC User Guide.
-
-
Choose Create VPC.
IPv6 CIDR blocks
You can associate an IPv6 CIDR block with your VPC and subnets. However, if you configure your subnets to automatically assign IPv6 addresses to instances launched in the subnet, then you cannot use Graphics bundles. (You can use GraphicsPro bundles, however.) This restriction arises from a hardware limitation of previous-generation instance types that do not support IPv6.
To work around this issue, you can temporarily disable the auto-assign IPv6 addresses setting on the WorkSpaces subnets before launching Graphics bundles, and then reenable this setting (if needed) after launching Graphics bundles so that any other bundles receive the desired IP addresses.
By default, the auto-assign IPv6 addresses setting is disabled. To check this setting from the Amazon VPC console, in the navigation pane, choose Subnets. Select the subnet, and choose Actions, Modify auto-assign IP settings.
Step 2: Assign public IP addresses to your WorkSpaces
You can assign public IP addresses to your WorkSpaces automatically or manually. To use automatic assignment, see Configure automatic public IP addresses. To assign public IP addresses manually, use the following procedure.
For a video tutorial about how to assign an Elastic IP address to a WorkSpace, see the
AWS Knowledge Center video
How do I associate an Elastic IP Address with a WorkSpace?
To assign a public IP address to a WorkSpace manually
-
Open the WorkSpaces console at https://console.aws.amazon.com/workspaces/
. -
In the navigation pane, choose WorkSpaces.
-
Expand the row (choose the arrow icon) for the WorkSpace and note the value of WorkSpace IP. This is the primary private IP address of the WorkSpace.
-
Open the Amazon EC2 console at https://console.aws.amazon.com/ec2/
. -
In the navigation pane, choose Elastic IPs. If you do not have an available Elastic IP address, choose Allocate Elastic IP address and choose Amazon's pool of IPv4 addresses or Customer owned pool of IPv4 addresses, and then choose Allocate. Make note of the new IP address.
-
In the navigation pane, choose Network Interfaces.
-
Select the network interface for your WorkSpace. To find the network interface for your WorkSpace, enter the WorkSpace IP value (which you noted earlier) in the search box, and then press Enter. The WorkSpace IP value matches the primary private IPv4 address for the network interface. Note that the VPC ID of the network interface matches the ID of your WorkSpaces VPC.
-
Choose Actions, Manage IP Addresses. Choose Assign new IP, and then choose Yes, Update. Make note of the new IP address.
-
Choose Actions, Associate Address.
-
On the Associate Elastic IP Address page, choose an Elastic IP address from Address. For Associate to private IP address, specify the new private IP address, and then choose Associate Address.
