Step 5: Use the AWS Schema Conversion Tool to Convert the Oracle Schema to Aurora MySQL
Before you migrate data to Aurora MySQL, you convert the Oracle schema to an Aurora MySQL schema. This video covers all the steps of this process
To convert an Oracle schema to an Aurora MySQL schema using AWS Schema Conversion Tool (AWS SCT), do the following:
-
Launch AWS SCT. In AWS SCT, choose File, then choose New Project. Create a new project named
DMSDemoProject, specify the Location of the project folder, and then choose OK. -
Choose Add source to add a source Oracle database to your project, then choose Oracle, and choose Next.
-
Enter the following information, and then choose Test Connection.
For This Parameter Do This Connection name
Enter
Amazon RDS for Oracle. AWS SCT displays this name in the tree in the left panel.Type
Choose SID.
Server name
Use the OracleJDBCConnectionString value you used to connect to the Oracle DB instance, but remove the JDBC prefix information. For example, a sample connection string you use with SQL Workbench/J might be "jdbc:oracle:thin:@do1xa4grferti8y.cqiw4tcs0mg7.us-west-2.rds.amazonaws.com:1521:ORCL". For AWS SCT Server name, you remove "jdbc:oracle:thin:@//" and ":1521" to use just the server name: "do1xa4grferti8y.cqiw4tcs0mg7.us-west-2.rds.amazonaws.com"
Server port
Enter
1521.Oracle SID
Enter
ORCL.User name
Enter
oraadmin.Password
Enter the password for the admin user that you assigned when creating the Oracle DB instance using the AWS CloudFormation template.

-
Choose OK to close the alert box, then choose Connect to close the dialog box and to connect to the Oracle DB instance.
-
Choose Add target to add a target Amazon Aurora MySQL database to your project, then choose Amazon Aurora (MySQL compatible), and choose Next.
-
Enter the following information and then choose Test Connection.
For This Parameter Do This Connection name
Enter
Aurora MySQL. AWS SCT displays this name in the tree in the right panel.Server name
Use the AuroraJDBCConnectionString value you used to connect to the Aurora MySQL DB instance, but remove the JDBC prefix information and the port suffix. For example, a sample connection string you use with SQL Workbench/J might be "jdbc:mysql://dmsdemo-auroracluster-1u1ogdfg35v.cluster-cqiw4tcs0mg7.us-west-2.rds.amazonaws.com:3306". For AWS SCT Server name, you remove "jdbc:mysql://" and ":3306" to use just the server name: "dmsdemo-auroracluster-1u1ogdfg35v.cluster-cqiw4tcs0mg7.us-west-2.rds.amazonaws.com"
Server port
Enter
3306.User name
Enter
auradmin.Password
Enter the password for the admin user that you assigned when creating the Oracle DB instance using the AWS CloudFormation template.
-
Choose OK to close the alert box, then choose Connect to connect to the Amazon Aurora MySQL DB instance.
-
In the tree in the left panel, select only the HR schema. In the tree in the right panel, select your target Aurora MySQL database. Choose Create mapping.

-
Choose Main view. In the tree in the left panel, right-click the HR schema and choose Create report.
-
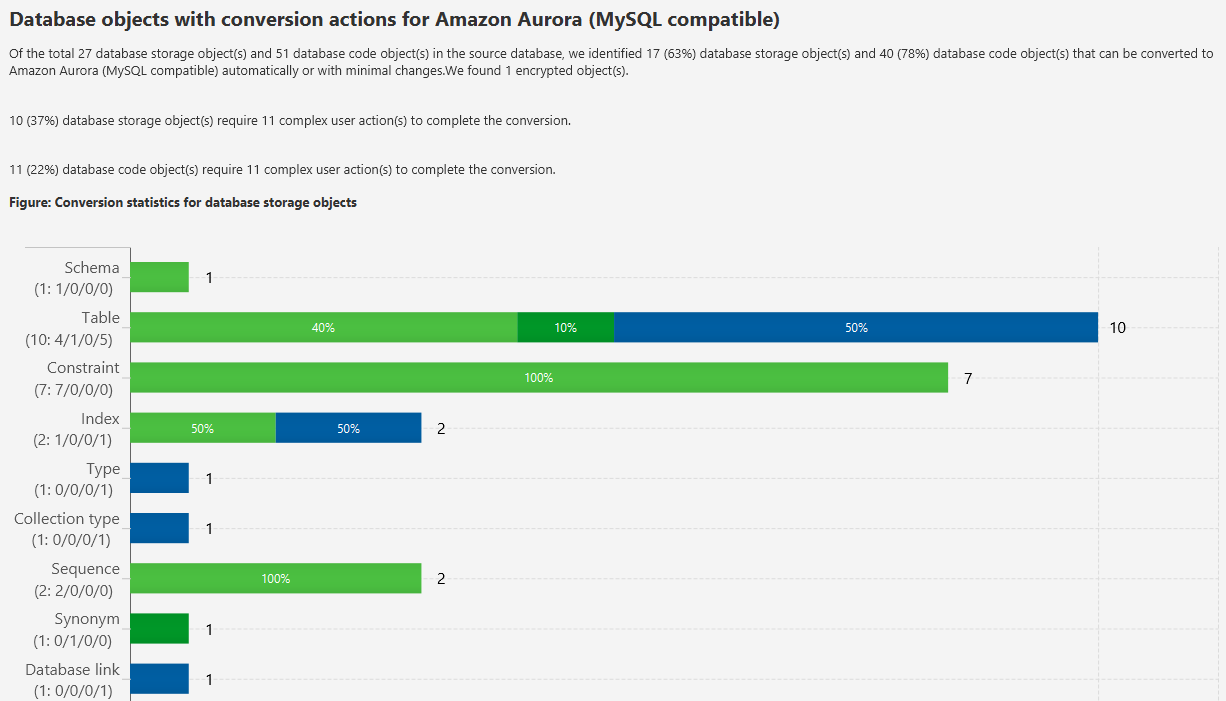
Check the report and the action items it suggests. The report discusses the type of objects that can be converted by using AWS SCT, along with potential migration issues and actions to resolve these issues. For this walkthrough, you should see something like the following:

You can optionally save the report as .csv or .pdf format for later analysis.
-
Choose Action Items, and review any recommendations that you see.
-
In the tree in the left panel, right-click the HR schema and then choose Convert schema.
-
Choose Yes for the confirmation message. AWS SCT then converts your schema to the target database format.
-
In the tree in the right panel, choose the converted hr schema, and then choose Apply to database to apply the schema scripts to the target Aurora MySQL instance.
-
Choose the hr schema, and then choose Refresh from Database to refresh from the target database.
The database schema has now been converted and imported from source to target.