Activating, deactivating and editing predefined or custom actions
You can activate, deactivate and edit actions available in the default post-launch actions settings. Activating an action in the default settings, adds the action as activated to newly added servers. Likewise, deactivating it, adds it as a non-active action to newly added servers. Source servers already created with this action are not affected by changes in the default settings.
Editing an action in the default settings, adds the edited action to newly added servers. Servers already created with the action before the edit, are not updated with the changes present in any edit to the default settings that was made after their creation. Changes to actions on an existing source server can be made from the Source server details page, by going to the Post-launch settings tab and performing the change there.
To be able to activate, create, deactivate, edit, or delete a custom action and to activate, deactivate or edit predefined actions, make sure the post-launch actions are activated in the default settings.
Activate, deactivate or edit a post-launch action
To activate, deactivate or edit a post launch action in the default post-launch actions settings, go to Settings → Default post-launch actions. If Post-launch actions settings shows Post-launch actions to be Active, you can edit any action defined in the default settings.
Locate the action you want to edit in the Actions card view, or use the search field to filter the actions by name.

Click on the action’s card to select it, and then click on the Edit button.

To activate the action, make sure the Activate this action setting is checked and click the Save button. To deactivate, make sure the Activate this action setting is un-checked and click the Save button.
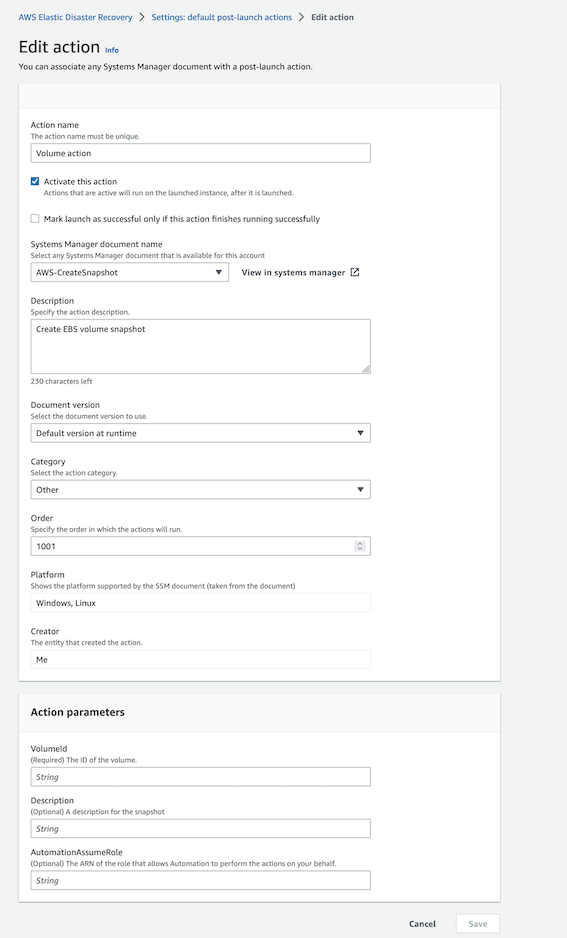
The edit page allows to change the value of some of the parameters for both pre-defined actions and custom actions. Some parameters can only be edited if the action is a custom action. See below for specific information.
The parameters that appear on the edit page:
Action name – Editable for custom actions. The name of the action in AWS DRS, which should be intuitive, meaningful and unique in this AWS account and region.
Activate this action – Use this checkbox to activate or deactivate the action by default. Newly added source servers will have the action set to active or not active according to the value this field had when the source server was added.
Mark launch as successful only if this action finishes running successfully – This checkbox will dictate whether or not the launch will be marked as successful, based on the successful run of this action. Instances launches will still progress normally regardless of the success of the action.
System Manager document name – Editable for custom actions. Select any Systems Manager document that is available to be used in this account.
View in Systems Manager – Click to open System Managers and view additional information about the document.
Description – Editable for custom actions. Add a description or keep the default.
Document version – Editable for custom actions. Select which SSM document version to run. AWS DRS can run a default version, the latest version, or a specific version, according to your preferences.
Category – Editable for custom actions. Select from various available categories including monitoring, validation, security and more.
Order – Specify the order in which the actions will run. The lower the number, the earlier the action will run. Values allowed are between 2 and 10,000. The numbers must be unique but don’t need to be consecutive.
Platform – Not editable. Taken from the SSM document and reports which Operating System platform (Windows/Linux) is supported by the action.
Creator – Not editable. Who created the action. For custom actions, the default is always This account.
The Action parameters change according to the specific SSM document that is selected. Note that for the instance ID parameter, you can choose to use the launch instance ID, in which case, AWS DRS will dynamically populate the value. Some predefined actions, where applicable allow to use a dynamically populated value for the volumes. This value will be dynamically populated by AWS DRS with the volumes of the instance being launched.
After making the required changes, click Save, to save the changes and Cancel to abort them.