本文属于机器翻译版本。若本译文内容与英语原文存在差异,则一律以英文原文为准。
将具有集群功能的 Node.js Express 应用程序部署到 Elastic Beanstalk
本教程将引导您使用 Elastic Beanstalk 命令行界面 (EB CLI) 将示例应用程序部署到 Elastic Beanstalk,然后更新应用程序以使用 Express 框架、Amazon 和集群。 ElastiCache
注意
此示例创建了 AWS 资源,您可能需要为此付费。有关 AWS 定价的更多信息,请参阅https://aws.amazon.com/pricing/
先决条件
本教程需要以下先决条件:
-
Node.js 运行时
-
默认 Node.js 程序包管理器软件 npm
-
Express 命令行生成器
-
Elastic Beanstalk 命令行界面 (EB CLI)
有关安装列出的前三个组件和设置本地开发环境的详细信息,请参阅 为 Elastic Beanstalk 设置 Node.js 开发环境。在本教程中,您无需安装 AWS 适用于 Node.js 的 SDK,参考主题中也提到了这一点。
有关安装和配置 EB CLI 的详细信息,请参阅 使用安装脚本安装 EB CLI(推荐) 和 配置 EB CLI。
创建 Elastic Beanstalk 环境
您的应用程序目录
本教程为应用程序源包使用名为 nodejs-example-express-elasticache 的目录。为本教程创建 nodejs-example-express-elasticache 目录。
~$ mkdir nodejs-example-express-elasticache注意
本章中的每个教程都为应用程序源包使用自己的目录。该目录名称与教程使用的示例应用程序的名称相匹配。
将您当前的工作目录更改为 nodejs-example-express-elasticache。
~$ cd nodejs-example-express-elasticache现在,让我们设置运行 Node.js 平台和示例应用程序的 Elastic Beanstalk 环境。我们将使用 Elastic Beanstalk 命令行界面(EB CLI)。
要为您的应用程序配置 EB CLI 存储库,并创建运行 Node.js 平台的 Elastic Beanstalk 环境
-
使用 eb init 命令创建存储库。
~/nodejs-example-express-elasticache$eb init --platformnode.js--region<region>此命令在名为
.elasticbeanstalk的文件夹中创建配置文件,该配置文件指定用于为您的应用程序创建环境的设置;并创建以当前文件夹命名的 Elastic Beanstalk 应用程序。 -
使用 eb create 命令创建运行示例应用程序的环境。
~/nodejs-example-express-elasticache$eb create --samplenodejs-example-express-elasticache此命令使用 Node.js 平台的默认设置以及以下资源来创建负载均衡环境:
-
EC2 实例 — 配置为在您选择的平台上运行 Web 应用程序的亚马逊弹性计算云 (Amazon EC2) 虚拟机。
各平台运行一组特定软件、配置文件和脚本以支持特定的语言版本、框架、Web 容器或其组合。大多数平台使用 Apache 或 NGINX 作为 Web 应用程序前的反向代理,向其转发请求、提供静态资产以及生成访问和错误日志。
-
实例安全组 — 配置为允许端口 80 上的入站流量的 Amazon EC2 安全组。此资源允许来自负载均衡器的 HTTP 流量到达运行您的 Web 应用程序的 EC2 实例。默认情况下,其他端口不允许流量进入。
-
负载均衡器 – 配置为向运行您的应用程序的实例分配请求的 Elastic Load Balancing 负载均衡器。负载均衡器还使您无需将实例直接公开在 Internet 上。
-
负载均衡器安全组-配置为允许端口 80 上的入站流量的 Amazon EC2 安全组。利用此资源,HTTP 流量可从 Internet 到达负载均衡器。默认情况下,其他端口不允许流量进入。
-
Auto Scaling 组 – 配置为在实例终止或不可用时替换实例的 Auto Scaling 组。
-
Amazon S3 存储桶 – 使用 Elastic Beanstalk 时创建的源代码、日志和其他构件的存储位置。
-
Amazon CloudWatch CloudWatch 警报 — 两个警报,用于监控环境中实例的负载,并在负载过高或过低时触发。警报触发后,您的 Auto Scaling 组会扩展或收缩以进行响应。
-
AWS CloudFormation 堆栈 — Elastic AWS CloudFormation Beanstalk 用于在您的环境中启动资源并传播配置更改。这些资源在您可通过 AWS CloudFormation 控制台
查看的模板中定义。 -
域名-以表单形式路由到您的 Web 应用程序的域名
subdomain。region.elasticbeanstalk.com。域安全
为增强 Elastic Beanstalk 应用程序的安全性,已将 elasticbeanstalk.com 域注册到 公共后缀列表(PSL)
。 如果您需要在 Elastic Beanstalk 应用程序的默认域名中设置敏感 Cookie,我们建议您使用带有前缀
__Host-的 Cookie 来提高安全性。这种做法可以保护您的域免遭跨站点请求伪造(CSRF)攻击。要了解更多信息,请参阅 Mozilla 开发者网络中的 Set-Cookie页面。
-
-
当环境创建完成后,使用 eb open 命令在默认浏览器中打开环境 URL。
~/nodejs-example-express-elasticache$eb open
您现在已经使用示例应用程序创建了 Node.js Elastic Beanstalk 环境。您可以使用自己的应用程序对其进行更新。接下来,我们会更新示例应用程序,以使用 Express 框架。
更新应用程序以使用 Express
更新 Elastic Beanstalk 环境中的示例应用程序以使用 Express 框架。
您可以从 nodejs-example-express-elasticache.zip 下载最终源代码。
更新您的应用程序以使用 Express
在创建具有示例应用程序的环境后,可将其更新为自己的应用程序。在此过程中,首先运行 express 和 npm install 命令,以在您的应用程序目录中设置 Express 框架。
-
运行
express命令。这将生成package.json、app.js,以及几个目录。~/nodejs-example-express-elasticache$express在系统提示您是否要继续时,键入
y。注意
如果 express 命令不起作用,则您可能没有按照前面的先决条件部分所述安装 Express 命令行生成器。或者,可能需要设置本地计算机的目录路径设置才能运行 express 命令。有关设置开发环境的详细步骤,请参阅先决条件部分,以便您可以继续学习本教程。
-
设置本地依赖项。
~/nodejs-example-express-elasticache$npm install -
(可选)验证 Web 应用程序服务器已启动。
~/nodejs-example-express-elasticache$npm start您应该可以看到类似于如下所示的输出内容:
> nodejs@0.0.0 start /home/local/user/node-express
> node ./bin/www
默认情况下,服务器在端口 3000 上运行。要测试,请在另一个终端中运行
curl http://localhost:3000,或在本地计算机上打开浏览器并输入 URL 地址http://localhost:3000。按 Ctrl+C 以停止该服务器。
-
将
nodejs-example-express-elasticache/app.js重命名为nodejs-example-express-elasticache/express-app.js。~/nodejs-example-express-elasticache$mvapp.js express-app.js -
将
nodejs-example-express-elasticache/express-app.js中的行var app = express();更新为以下内容:var app = module.exports = express(); -
在本地计算机上,使用以下代码创建一个名为
nodejs-example-express-elasticache/app.js的文件。/** * Module dependencies. */ const express = require('express'), session = require('express-session'), bodyParser = require('body-parser'), methodOverride = require('method-override'), cookieParser = require('cookie-parser'), fs = require('fs'), filename = '/var/nodelist', app = express(); let MemcachedStore = require('connect-memcached')(session); function setup(cacheNodes) { app.use(bodyParser.raw()); app.use(methodOverride()); if (cacheNodes.length > 0) { app.use(cookieParser()); console.log('Using memcached store nodes:'); console.log(cacheNodes); app.use(session({ secret: 'your secret here', resave: false, saveUninitialized: false, store: new MemcachedStore({ 'hosts': cacheNodes }) })); } else { console.log('Not using memcached store.'); app.use(session({ resave: false, saveUninitialized: false, secret: 'your secret here' })); } app.get('/', function (req, resp) { if (req.session.views) { req.session.views++ resp.setHeader('Content-Type', 'text/html') resp.send(`You are session: ${req.session.id}. Views: ${req.session.views}`) } else { req.session.views = 1 resp.send(`You are session: ${req.session.id}. No views yet, refresh the page!`) } }); if (!module.parent) { console.log('Running express without cluster. Listening on port %d', process.env.PORT || 5000) app.listen(process.env.PORT || 5000) } } console.log("Reading elastic cache configuration") // Load elasticache configuration. fs.readFile(filename, 'UTF8', function (err, data) { if (err) throw err; let cacheNodes = [] if (data) { let lines = data.split('\n'); for (let i = 0; i < lines.length; i++) { if (lines[i].length > 0) { cacheNodes.push(lines[i]) } } } setup(cacheNodes) }); module.exports = app; -
将
nodejs-example-express-elasticache/bin/www文件的内容替换为以下内容:#!/usr/bin/env node /** * Module dependencies. */ const app = require('../app'); const cluster = require('cluster'); const debug = require('debug')('nodejs-example-express-elasticache:server'); const http = require('http'); const workers = {}, count = require('os').cpus().length; function spawn() { const worker = cluster.fork(); workers[worker.pid] = worker; return worker; } /** * Get port from environment and store in Express. */ const port = normalizePort(process.env.PORT || '3000'); app.set('port', port); if (cluster.isMaster) { for (let i = 0; i < count; i++) { spawn(); } // If a worker dies, log it to the console and start another worker. cluster.on('exit', function (worker, code, signal) { console.log('Worker ' + worker.process.pid + ' died.'); cluster.fork(); }); // Log when a worker starts listening cluster.on('listening', function (worker, address) { console.log('Worker started with PID ' + worker.process.pid + '.'); }); } else { /** * Create HTTP server. */ let server = http.createServer(app); /** * Event listener for HTTP server "error" event. */ function onError(error) { if (error.syscall !== 'listen') { throw error; } const bind = typeof port === 'string' ? 'Pipe ' + port : 'Port ' + port; // handle specific listen errors with friendly messages switch (error.code) { case 'EACCES': console.error(bind + ' requires elevated privileges'); process.exit(1); break; case 'EADDRINUSE': console.error(bind + ' is already in use'); process.exit(1); break; default: throw error; } } /** * Event listener for HTTP server "listening" event. */ function onListening() { const addr = server.address(); const bind = typeof addr === 'string' ? 'pipe ' + addr : 'port ' + addr.port; debug('Listening on ' + bind); } /** * Listen on provided port, on all network interfaces. */ server.listen(port); server.on('error', onError); server.on('listening', onListening); } /** * Normalize a port into a number, string, or false. */ function normalizePort(val) { const port = parseInt(val, 10); if (isNaN(port)) { // named pipe return val; } if (port >= 0) { // port number return port; } return false; } -
使用 eb deploy 命令将更改部署到您的 Elastic Beanstalk 环境。
~/nodejs-example-express-elasticache$eb deploy -
您的环境将在几分钟后进行更新。在环境变为绿色并准备就绪后,刷新 URL 以验证环境是否工作。您应看到一个显示“欢迎使用 Express”的网页。
您可以访问运行应用程序的 EC2 实例的日志。有关访问日志的说明,请参阅在 Elastic Beanstalk 环境中查看来自亚马逊 EC2 实例的日志。
接下来,让我们更新 Express 应用程序以使用亚马逊 ElastiCache。
更新您的 Express 应用程序以使用亚马逊 ElastiCache
-
在本地计算机上的源包顶级目录中,创建
.ebextensions目录。在此示例中,我们使用的是nodejs-example-express-elasticache/.ebextensions。 -
使用以下代码段创建配置文件
nodejs-example-express-elasticache/.ebextensions/elasticache-iam-with-script.config。有关配置文件的更多信息,请参阅Node.js 配置命名空间。此配置文件会创建一个 IAM 用户(该用户拥有发现 ElastiCache 节点所需的权限),只要缓存发生变化就向某个文件写入数据。您也可以从 nodejs-example-express-elasticache.zip 中复制该文件。有关 ElastiCache属性的更多信息,请参阅例如: ElastiCache。注意
YAML 依赖一致的缩进。当替换示例配置文件中的内容时,应匹配缩进级别,并且确保您的文本编辑器使用空格而不是字符来进行缩进。
Resources: MyCacheSecurityGroup: Type: 'AWS::EC2::SecurityGroup' Properties: GroupDescription: "Lock cache down to webserver access only" SecurityGroupIngress: - IpProtocol: tcp FromPort: Fn::GetOptionSetting: OptionName: CachePort DefaultValue: 11211 ToPort: Fn::GetOptionSetting: OptionName: CachePort DefaultValue: 11211 SourceSecurityGroupName: Ref: AWSEBSecurityGroup MyElastiCache: Type: 'AWS::ElastiCache::CacheCluster' Properties: CacheNodeType: Fn::GetOptionSetting: OptionName: CacheNodeType DefaultValue: cache.t2.micro NumCacheNodes: Fn::GetOptionSetting: OptionName: NumCacheNodes DefaultValue: 1 Engine: Fn::GetOptionSetting: OptionName: Engine DefaultValue: redis VpcSecurityGroupIds: - Fn::GetAtt: - MyCacheSecurityGroup - GroupId AWSEBAutoScalingGroup : Metadata : ElastiCacheConfig : CacheName : Ref : MyElastiCache CacheSize : Fn::GetOptionSetting: OptionName : NumCacheNodes DefaultValue: 1 WebServerUser : Type : AWS::IAM::User Properties : Path : "/" Policies: - PolicyName: root PolicyDocument : Statement : - Effect : Allow Action : - cloudformation:DescribeStackResource - cloudformation:ListStackResources - elasticache:DescribeCacheClusters Resource : "*" WebServerKeys : Type : AWS::IAM::AccessKey Properties : UserName : Ref: WebServerUser Outputs: WebsiteURL: Description: sample output only here to show inline string function parsing Value: | http://`{ "Fn::GetAtt" : [ "AWSEBLoadBalancer", "DNSName" ] }` MyElastiCacheName: Description: Name of the elasticache Value: Ref : MyElastiCache NumCacheNodes: Description: Number of cache nodes in MyElastiCache Value: Fn::GetOptionSetting: OptionName : NumCacheNodes DefaultValue: 1 files: "/etc/cfn/cfn-credentials" : content : | AWSAccessKeyId=`{ "Ref" : "WebServerKeys" }` AWSSecretKey=`{ "Fn::GetAtt" : ["WebServerKeys", "SecretAccessKey"] }` mode : "000400" owner : root group : root "/etc/cfn/get-cache-nodes" : content : | # Define environment variables for command line tools export AWS_ELASTICACHE_HOME="/home/ec2-user/elasticache/$(ls /home/ec2-user/elasticache/)" export AWS_CLOUDFORMATION_HOME=/opt/aws/apitools/cfn export PATH=$AWS_CLOUDFORMATION_HOME/bin:$AWS_ELASTICACHE_HOME/bin:$PATH export AWS_CREDENTIAL_FILE=/etc/cfn/cfn-credentials export JAVA_HOME=/usr/lib/jvm/jre # Grab the Cache node names and configure the PHP page aws cloudformation list-stack-resources --stack `{ "Ref" : "AWS::StackName" }` --region `{ "Ref" : "AWS::Region" }` --output text | grep MyElastiCache | awk '{print $4}' | xargs -I {} aws elasticache describe-cache-clusters --cache-cluster-id {} --region `{ "Ref" : "AWS::Region" }` --show-cache-node-info --output text | grep '^ENDPOINT' | awk '{print $2 ":" $3}' > `{ "Fn::GetOptionSetting" : { "OptionName" : "NodeListPath", "DefaultValue" : "/var/www/html/nodelist" } }` mode : "000500" owner : root group : root "/etc/cfn/hooks.d/cfn-cache-change.conf" : "content": | [cfn-cache-size-change] triggers=post.update path=Resources.AWSEBAutoScalingGroup.Metadata.ElastiCacheConfig action=/etc/cfn/get-cache-nodes runas=root sources : "/home/ec2-user/elasticache" : "https://elasticache-downloads.s3.amazonaws.com/AmazonElastiCacheCli-latest.zip" commands: make-elasticache-executable: command: chmod -R ugo+x /home/ec2-user/elasticache/*/bin/* packages : "yum" : "aws-apitools-cfn" : [] container_commands: initial_cache_nodes: command: /etc/cfn/get-cache-nodes -
在您的本地计算机上,使用以下代码段创建配置文件
nodejs-example-express-elasticache/.ebextensions/elasticache_settings.config进行配置 ElastiCache。option_settings: "aws:elasticbeanstalk:customoption": CacheNodeType: cache.t2.micro NumCacheNodes: 1 Engine: memcached NodeListPath: /var/nodelist -
在本地计算机上,使用以下代码段替换
nodejs-example-express-elasticache/express-app.js。此文件会从磁盘读取节点列表 (/var/nodelist) 并配置 Express,以便在节点存在的情况下将memcached用作会话存储。您的文件应类似以下内容。/** * Module dependencies. */ var express = require('express'), session = require('express-session'), bodyParser = require('body-parser'), methodOverride = require('method-override'), cookieParser = require('cookie-parser'), fs = require('fs'), filename = '/var/nodelist', app = module.exports = express(); var MemcachedStore = require('connect-memcached')(session); function setup(cacheNodes) { app.use(bodyParser.raw()); app.use(methodOverride()); if (cacheNodes) { app.use(cookieParser()); console.log('Using memcached store nodes:'); console.log(cacheNodes); app.use(session({ secret: 'your secret here', resave: false, saveUninitialized: false, store: new MemcachedStore({'hosts': cacheNodes}) })); } else { console.log('Not using memcached store.'); app.use(cookieParser('your secret here')); app.use(session()); } app.get('/', function(req, resp){ if (req.session.views) { req.session.views++ resp.setHeader('Content-Type', 'text/html') resp.write('Views: ' + req.session.views) resp.end() } else { req.session.views = 1 resp.end('Refresh the page!') } }); if (!module.parent) { console.log('Running express without cluster.'); app.listen(process.env.PORT || 5000); } } // Load elasticache configuration. fs.readFile(filename, 'UTF8', function(err, data) { if (err) throw err; var cacheNodes = []; if (data) { var lines = data.split('\n'); for (var i = 0 ; i < lines.length ; i++) { if (lines[i].length > 0) { cacheNodes.push(lines[i]); } } } setup(cacheNodes); }); -
在本地计算机上,使用以下内容更新
package.json:"dependencies": { "cookie-parser": "~1.4.4", "debug": "~2.6.9", "express": "~4.16.1", "http-errors": "~1.6.3", "jade": "~1.11.0", "morgan": "~1.9.1", "connect-memcached": "*", "express-session": "*", "body-parser": "*", "method-override": "*" } -
运行 npm install。
~/nodejs-example-express-elasticache$npm install -
部署更新的应用程序。
~/nodejs-example-express-elasticache$eb deploy -
您的环境将在几分钟后进行更新。在环境变为绿色并准备就绪后,验证代码是否正常。
-
查看 A mazon CloudWatch 控制台
以查看您的 ElastiCache 指标。要查看您的 ElastiCache 指标,请在左侧窗格中选择指标,然后搜索CurrItems。选择 ElastiCache > 缓存节点指标,然后选择您的缓存节点以查看缓存中的项目数量。 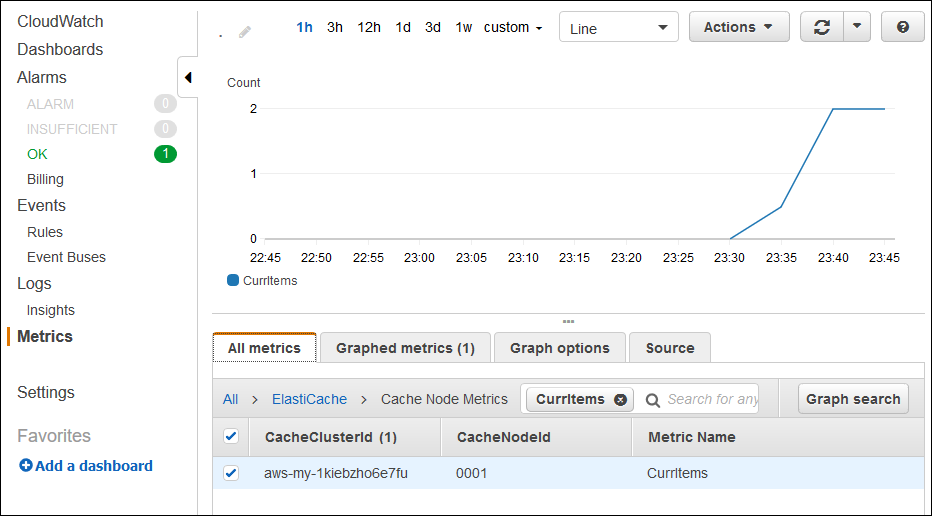
注意
确保您查看的是您的应用程序所部署到的相同地区。
如果您将应用程序 URL 复制并粘贴到其他 Web 浏览器中并刷新页面,则应该会在 5 分钟后看到您的 CurrItem 计数上升。
-
制作日志的快照。有关检索日志的更多信息,请参阅在 Elastic Beanstalk 环境中查看来自亚马逊 EC2 实例的日志。
-
检查日志文件包中的文件
/var/log/nodejs/nodejs.log。您应看到类似如下所示的内容:Using memcached store nodes: [ 'aws-my-1oys9co8zt1uo.1iwtrn.0001.use1.cache.amazonaws.com:11211' ]
-
清理
如果不再希望运行您的应用程序,您可通过终止环境并删除应用程序进行清除。
请使用 eb terminate 命令终止环境并使用 eb delete 命令删除应用程序。
终止环境
从您在其中创建本地存储库的目录中,运行 eb terminate。
$ eb terminate此过程可能耗时数分钟。成功终止环境后,Elastic Beanstalk 会立即显示一条消息。
