本文属于机器翻译版本。若本译文内容与英语原文存在差异,则一律以英文原文为准。
使用 C2C(云到云)连接器
C2C 连接器管理请求和响应消息的翻译,并支持托管集成与第三方供应商云之间的通信。它促进了对不同设备类型、平台和协议的统一控制,从而可以加载和管理第三方设备。
以下过程列出了使用 C2C 连接器的步骤。
使用 C2C 连接器的步骤:
-
CreateCloudConnector
配置连接器以启用托管集成与第三方供应商云之间的双向通信。
设置连接器时,请提供以下详细信息:
-
名称:为连接器选择一个描述性名称。
-
描述:简要概述连接器的用途和功能。
-
AWS Lambda ARN:指定为连接器供电的 AWS Lambda 函数的亚马逊资源名称 (ARN)。
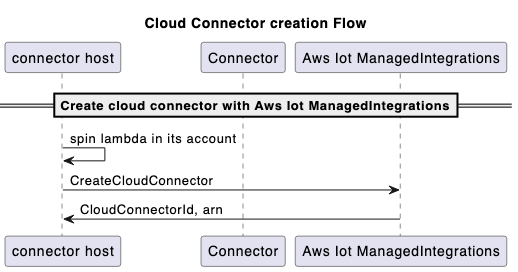
构建和部署与第三方供应商通信的 AWS Lambda 函数 APIs 以创建连接器。接下来,在托管集成中调用 CreateCloudConnectorAPI,并提供 AWS Lambda 函数 ARN 进行注册。确保该 AWS Lambda 函数部署在托管集成中创建连接器的同一个 AWS 账户中。系统将为您分配一个唯一的连接器 ID 来识别集成。
CreateCloudConnector API 请求和响应示例:
Request:

{
    "Name": "CreateCloudConnector",
    "Description": "Testing for C2C",
    "EndpointType": "LAMBDA",
    "EndpointConfig": {
        "lambda": {
            "arn": "arn:aws:lambda:us-east-1:xxxxxx:function:TestingConnector"
        }
    },
    "ClientToken": "abc"
}

Response:

{
    "Id": "string"
}
创作流程:
注意
根据需要使用GetCloudConnectorUpdateCloudConnector、DeleteCloudConnector、和 ListCloudConnectors APIs ,执行此过程。
-
-
CreateConnectorDestination
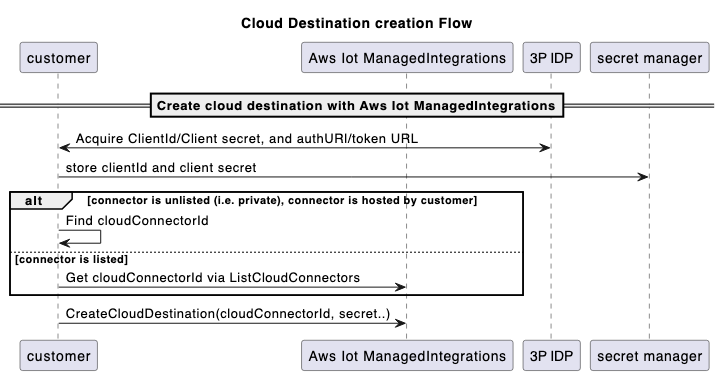
配置目标以提供连接器与第三方供应商云建立安全连接所需的设置和身份验证凭据。使用 Destinations 将您的第三方身份验证凭据注册到托管集成,例如 OAuth 2.0 授权详细信息,包括授权 URL、身份验证方案以及其中凭据的位置 AWS Secrets Manager。
先决条件
在创建之前 ConnectorDestination,您必须:
调用 CreateCloudConnectorAPI 创建连接器。在 CreateConnectorDestinationAPI API 调用中使用该函数返回的 ID。
检索连接
tokenUrl器的 3P 平台的。(你可以用 authCod e 兑换 AccessT oken)。检索连接器的 3P 平台的 authURL。(最终用户可以使用其用户名和密码进行身份验证)。
在账户的密钥管理器中使用
clientId和clientSecret(来自 3P 平台)。
CreateConnectorDestination API 请求和响应示例:
Request:

{
    "Name": "CreateConnectorDestination",
    "Description": "CreateConnectorDestination",
    "AuthType": "OAUTH",
    "AuthConfig": {
        "oAuth": {
            "authUrl": "https://xxxx.com/oauth2/authorize",
            "tokenUrl": "https://xxxx/oauth2/token",
            "scope": "testScope",
            "tokenEndpointAuthenticationScheme": "HTTP_BASIC",
            "oAuthCompleteRedirectUrl": "about:blank",
            "proactiveRefreshTokenRenewal": {
                "enabled": false,
                "DaysBeforeRenewal": 30
            }
        }
    },
    "CloudConnectorId": "<connectorId>", // The connectorID instance from response of Step 1.
    "SecretsManager": {
        "arn": "arn:aws:secretsmanager:*****:secret:*******",
        "versionId": "********"
    },
    "ClientToken": "***"
}

Response:

{
    "Id":"string"
}
云目标创建流程:
注意
根据需要使用GetCloudConnectorUpdateCloudConnector、DeleteCloudConnector、和 ListCloudConnectors APIs ,执行此过程。
-
CreateAccountAssociation
关联表示最终用户的第三方云账户与连接器目标之间的关系。在创建关联并将最终用户与托管集成关联后,他们的设备可通过唯一的关联 ID 进行访问。这种集成支持三个关键功能:发现设备、发送命令和接收事件。
先决条件
在创建之前,AccountAssociation您必须完成以下操作:
调用 CreateConnectorDestinationAPI 创建目的地。该函数返回的 ID 将用于 CreateAccountAssociationAPI 调用。
调用 CreateAccountAssociation API。
CreateAccountAssociation API 请求和响应示例:
Request:

{
    "Name": "CreateAccountAssociation",
    "Description": "CreateAccountAssociation",
    "ConnectorDestinationId": "<destinationId>", //The destinationID from destination creation.
    "ClientToken": "***"
}

Response:

{
    "Id":"string"
}
注意
根据需要使用GetCloudConnectorUpdateCloudConnector、DeleteCloudConnector、和 ListCloudConnectors APIs ,执行此过程。
AccountAssociation的状态是从GetAccountAssociation和ListAccountAssociations APIs中查询的。这些 APIs 显示了协会的状况。StartAccountAssociationRefreshAPI 允许在刷新令牌到期时刷新AccountAssociation状态。
-
设备发现
每个托管事物都与设备特定的详细信息相关联,例如其序列号和数据模型。数据模型描述了设备的功能,表明它是灯泡、开关、恒温器还是其他类型的设备。要发现 3P 设备并为该 3P 设备创建 ManagedThing,必须按顺序执行以下步骤。
-
调用 StartDeviceDiscoveryAPI 开始设备发现过程。
StartDeviceDiscovery API 请求和响应示例:
Request: { "DiscoveryType": "CLOUD", "AccountAssociationId": "*****", "ClientToken": "abc" } Response: { "Id": "string", "StartedAt": number } -
调用 GetDeviceDiscoveryAPI 来检查发现过程的状态。
-
调用 ListDiscoveredDevicesAPI 列出发现的设备。
ListDiscoveredDevices API 请求和响应示例:
Request: //Empty body Response: { "Items": [ { "Brand": "string", "ConnectorDeviceId": "string", "ConnectorDeviceName": "string", "DeviceTypes": [ "string" ], "DiscoveredAt": number, "ManagedThingId": "string", "Model": "string", "Modification": "string" } ], "NextToken": "string" } -
调用 CreateManagedThingAPI 从发现列表中选择要导入到托管集成的设备。
CreateManagedThing API 请求和响应示例:
Request: { "Role": "DEVICE", "AuthenticationMaterial": "CLOUD:XXXX:<connectorDeviceId1>", "AuthenticationMaterialType": "DISCOVERED_DEVICE", "Name": "sample-device-name" "ClientToken": "xxx" } Response: { "Arn": "string", // This is the ARN of the managedThing "CreatedAt": number, "Id": "string" } -
调用 GetManagedThingAPI 来查看这个新创建的
managedThing。状态将是UNASSOCIATED。 -
调用 RegisterAccountAssociationAPI
managedThing将其与特定关联accountAssociation。成功的 RegisterAccountAssociationAPI 结束后,ASSOCIATED状态会managedThing发生变化。RegisterAccountAssociation API 请求和响应示例:
Request:

{
    "AccountAssociationId": "string",
    "DeviceDiscoveryId": "string",
    "ManagedThingId": "string"
}

Response:

{
    "AccountAssociationId": "string",
    "DeviceDiscoveryId": "string",
    "ManagedThingId": "string"
}
-
-
向 3P 设备发送命令
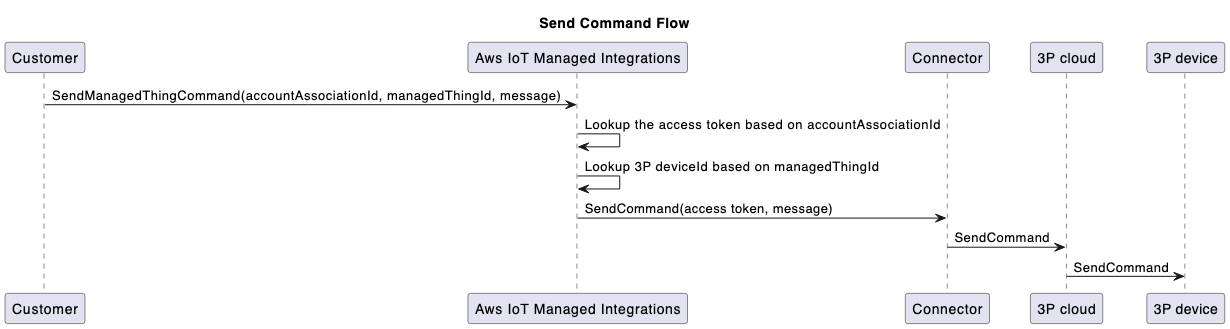
要控制新上线的设备,请使用 SendManagedThingCommandAPI,使用先前创建的关联 ID 和基于设备支持的功能的控制操作。连接器使用账户关联过程中存储的凭据向第三方云进行身份验证并调用操作的相关 API 调用。
SendManagedThingCommand API 请求和响应示例:
Request:

{
    "AccountAssociationId": "string",
    "ConnectorAssociationId": "string",
    "Endpoints": [
       {
          "capabilities": [
             {
                "actions": [
                   {
                      "actionTraceId": "string",
                      "name": "string",
                      "parameters": JSON value,
                      "ref": "string"
                   }
                ],
                "id": "string",
                "name": "string",
                "version": "string"
             }
          ],
          "endpointId": "string"
       }
    ]
}

Response:

{
   "TraceId": "string"
}
向 3P 设备流程发送命令:
-
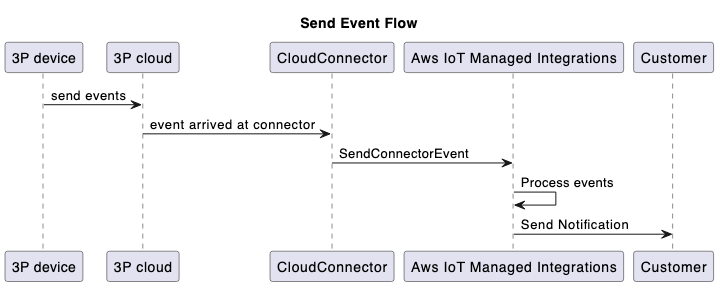
连接器向托管集成发送事件
SendConnectorEventAPI 捕获从连接器到托管集成的四种类型的事件,由 O peration Type 参数的以下枚举值表示:
-
D@@ EVICE_COMMAND_RESPONSE:连接器为响应命令而发送的异步响应。
-
DEV@@ ICE_DISCO VERY:为了响应设备发现过程,连接器使用 API 将发现的设备列表发送给托管集成。SendConnectorEvent
-
DEVICE_EVENT:发送收到的设备事件。
-
D@@ EVICE_COMMAND_REQUEST:从设备发起的命令请求。例如,WebRTC工作流程。
连接器还可以使用带有可选
userId参数的 SendConnectorEventAPI 转发设备事件。-
对于带有以下内容的设备事件
userId:SendConnectorEvent API 请求和响应示例:
Request: { "UserId": "*****", "Operation": "DEVICE_EVENT", "OperationVersion": "1.0", "StatusCode": 200, "ConnectorId": "****", "ConnectorDeviceId": "***", "TraceId": "***", "MatterEndpoint": { "id": "**", "clusters": [{ ..... } }] } } Response: { "ConnectorId": "string" } -
对于没有
userId:的设备事件SendConnectorEvent API 请求和响应示例:
Request:

{
    "Operation": "DEVICE_EVENT",
    "OperationVersion": "1.0",
    "StatusCode": 200,
    "ConnectorId": "*****",
    "ConnectorDeviceId": "****",
    "TraceId": "****",
    "MatterEndpoint": {
        "id": "**",
        "clusters": [{
            ....
        }]
    }
}

Response:

{
    "ConnectorId": "string"
}
要删除特定账户关联
managedThing和账户关联之间的关联,请使用注销机制:DeregisterAccountAssociation API 请求和响应示例:
Request:

{
    "AccountAssociationId": "****",
    "ManagedThingId": "****"
}

Response:

HTTP/1.1 200 // Empty body
发送事件流:
-
-
将连接器状态更新为 “已上市”,使其对其他托管集成客户可见
默认情况下,连接器是私有的,只有创建连接器的 AWS 账户才能看见。您可以选择让其他托管集成客户看到连接器。
要与其他用户共享您的连接器,请使用连接器详细信息页面 AWS Management Console 上的 “设为可见” 选项,将您的连接器 ID 提交给以 AWS 供审核。一旦获得批准,该连接器便可供所有托管集成用户使用。 AWS 区域此外,您可以 IDs 通过修改连接器关联 AWS Lambda 功能的访问策略来限制对特定 AWS 账户的访问权限。为确保您的连接器可供其他客户使用,请管理您的 Lambda 函数从其他 AWS 账户到可见连接器的 IAM 访问权限。
在将连接器设置为其他托管集成客户可见之前,请查看管理连接器共享和访问权限的 AWS 服务 条款和组织政策。
