本文属于机器翻译版本。若本译文内容与英语原文存在差异,则一律以英文原文为准。
步骤 1:在 OpsWorks Stacks 中创建堆栈、层和实例
重要
该 AWS OpsWorks Stacks 服务于 2024 年 5 月 26 日终止,新客户和现有客户均已禁用。我们强烈建议客户尽快将其工作负载迁移到其他解决方案。如果您对迁移有疑问,请通过 re AWS : Post 或通过 Pre
要使用 OpsWorks Stacks 作为管道的部署提供商,必须首先在层中拥有堆栈、层和至少一个实例。尽管您可以按照 Linux 堆栈入门或 Windows 堆栈入门中的说明在堆栈中创建堆栈,但为了节省时间,此示例使用 AWS CloudFormation 模板创建基于 Linux 的 Chef 11.10 堆栈、层和实例。 OpsWorks 通过本模板创建的实例运行 Amazon Linux 2016.03,实例类型为 c3.large。
重要
AWS CloudFormation 模板必须存储在与 Amazon S3 存储桶相同的区域并在其中运行,您随后可将应用程序上传到 Amazon S3 存储桶,也可在中创建管道 CodePipeline。目前,仅 CodePipeline 支持美国东部(弗吉尼亚州北部)区域 (us-ea OpsWorks st-1) 中的 Stacks 提供商。本演练中的全部资源都应在美国东部(弗吉尼亚州北部)区域中创建。
如果堆栈创建失败,您可能即将达到您账户允许的最大 IAM 角色数。如果您的账户无法启动实例类型为 c3.large 的实例,堆栈创建也可能会失败。例如,如果您使用的是 AWS
Free Tier,您可能会收到一条错误,如 Root device type: must be included in
EBS。如果您的账户对允许创建的实例类型有限制,例如 AWS Free Tier所施加的限制,请尝试将模板实例块中的InstanceType参数值更改为您的账户可以使用的实例类型。
使用创建堆栈、层和实例 AWS CloudFormation
-
将以下 AWS CloudFormation 模板复制到新的纯文本文档中。将文件保存到本地计算机上方便的位置,然后将其命名为 NewOpsWorksStack.templat e 或其他便于使用的名称。
{
  "AWSTemplateFormatVersion": "2010-09-09",
  "Mappings": {
    "Region2Principal": {
      "us-east-1": {
        "EC2Principal": "ec2.amazonaws.com",
        "OpsWorksPrincipal": "opsworks.amazonaws.com"
      },
      "us-west-2": {
        "EC2Principal": "ec2.amazonaws.com",
        "OpsWorksPrincipal": "opsworks.amazonaws.com"
      },
      "us-west-1": {
        "EC2Principal": "ec2.amazonaws.com",
        "OpsWorksPrincipal": "opsworks.amazonaws.com"
      },
      "eu-west-1": {
        "EC2Principal": "ec2.amazonaws.com",
        "OpsWorksPrincipal": "opsworks.amazonaws.com"
      },
      "ap-southeast-1": {
        "EC2Principal": "ec2.amazonaws.com",
        "OpsWorksPrincipal": "opsworks.amazonaws.com"
      },
      "ap-northeast-1": {
        "EC2Principal": "ec2.amazonaws.com",
        "OpsWorksPrincipal": "opsworks.amazonaws.com"
      },
      "ap-northeast-2": {
        "EC2Principal": "ec2.amazonaws.com",
        "OpsWorksPrincipal": "opsworks.amazonaws.com"
      },
      "ap-southeast-2": {
        "EC2Principal": "ec2.amazonaws.com",
        "OpsWorksPrincipal": "opsworks.amazonaws.com"
      },
      "sa-east-1": {
        "EC2Principal": "ec2.amazonaws.com",
        "OpsWorksPrincipal": "opsworks.amazonaws.com"
      },
      "cn-north-1": {
        "EC2Principal": "ec2.amazonaws.com.cn",
        "OpsWorksPrincipal": "opsworks.amazonaws.com.cn"
      },
      "eu-central-1": {
        "EC2Principal": "ec2.amazonaws.com",
        "OpsWorksPrincipal": "opsworks.amazonaws.com"
      }
    }
  },
  "Parameters": {
    "EC2KeyPairName": {
	  "Type": "String",
	  "Description": "The name of an existing EC2 key pair that allows you to use SSH to connect to the OpsWorks instance."
	 }
  },
  "Resources": {
	"CPOpsDeploySecGroup": {
	  "Type": "AWS::EC2::SecurityGroup",
	  "Properties": {
	    "GroupDescription" : "Lets you manage OpsWorks instances deployed to by CodePipeline"
	  }
	},
	"CPOpsDeploySecGroupIngressHTTP": {
	  "Type": "AWS::EC2::SecurityGroupIngress",
	  "Properties" : {
	    "IpProtocol" : "tcp",
        "FromPort" : "80",
        "ToPort" : "80",
        "CidrIp" : "0.0.0.0/0",
		"GroupId": {
		  "Fn::GetAtt": [
		    "CPOpsDeploySecGroup", "GroupId"
		  ]
		}
      }
	},
	"CPOpsDeploySecGroupIngressSSH": {
	  "Type": "AWS::EC2::SecurityGroupIngress",
	  "Properties" : {
	    "IpProtocol" : "tcp",
        "FromPort" : "22",
        "ToPort" : "22",
        "CidrIp" : "0.0.0.0/0",
		"GroupId": {
		  "Fn::GetAtt": [
		    "CPOpsDeploySecGroup", "GroupId"
		  ]
		}
	  }
	},
	"MyStack": {
      "Type": "AWS::OpsWorks::Stack",
      "Properties": {
        "Name": {
          "Ref": "AWS::StackName"
        },
        "ServiceRoleArn": {
          "Fn::GetAtt": [
            "OpsWorksServiceRole",
            "Arn"
          ]
        },
		"ConfigurationManager" : { "Name": "Chef","Version": "11.10" },
		"DefaultOs": "Amazon Linux 2016.03",
        "DefaultInstanceProfileArn": {
          "Fn::GetAtt": [
            "OpsWorksInstanceProfile",
            "Arn"
          ]
        }
      }
    },
    "MyLayer": {
      "Type": "AWS::OpsWorks::Layer",
      "Properties": {
        "StackId": {
          "Ref": "MyStack"
        },
        "Name": "MyLayer",
        "Type": "php-app",
		"Shortname": "mylayer",
        "EnableAutoHealing": "true",
        "AutoAssignElasticIps": "false",
        "AutoAssignPublicIps": "true",
		"CustomSecurityGroupIds": [
		  {
		    "Fn::GetAtt": [
              "CPOpsDeploySecGroup", "GroupId"
		    ]
          }
        ]
      },
      "DependsOn": [
        "MyStack",
        "CPOpsDeploySecGroup"
      ]
    },
    "OpsWorksServiceRole": {
      "Type": "AWS::IAM::Role",
      "Properties": {
        "AssumeRolePolicyDocument": {
          "Statement": [
            {
              "Effect": "Allow",
              "Principal": {
                "Service": [
                  {
                    "Fn::FindInMap": [
                      "Region2Principal",
                      {
                        "Ref": "AWS::Region"
                      },
                      "OpsWorksPrincipal"
                    ]
                  }
                ]
              },
              "Action": [
                "sts:AssumeRole"
              ]
            }
          ]
        },
        "Path": "/",
        "Policies": [
          {
            "PolicyName": "opsworks-service",
            "PolicyDocument": {
              "Statement": [
                {
                  "Effect": "Allow",
                  "Action": [
                    "ec2:*",
                    "iam:PassRole",
                    "cloudwatch:GetMetricStatistics",
                    "elasticloadbalancing:*"
                  ],
                  "Resource": "*"
                }
              ]
            }
          }
        ]
      }
    },
    "OpsWorksInstanceProfile": {
      "Type": "AWS::IAM::InstanceProfile",
      "Properties": {
        "Path": "/",
        "Roles": [
          {
            "Ref": "OpsWorksInstanceRole"
          }
        ]
      }
    },
    "OpsWorksInstanceRole": {
      "Type": "AWS::IAM::Role",
      "Properties": {
        "AssumeRolePolicyDocument": {
          "Statement": [
            {
              "Effect": "Allow",
              "Principal": {
                "Service": [
                  {
                    "Fn::FindInMap": [
                      "Region2Principal",
                      {
                        "Ref": "AWS::Region"
                      },
                      "EC2Principal"
                    ]
                  }
                ]
              },
              "Action": [
                "sts:AssumeRole"
              ]
            }
          ]
        },
        "Path": "/",
		"Policies": [
          {
            "PolicyName": "s3-get",
            "PolicyDocument": {
              "Version": "2012-10-17",
              "Statement": [
                {
                  "Effect": "Allow",
                  "Action": [
                    "s3:GetObject"
                  ],
                  "Resource": "*"
                }
              ]
            }
          }
        ]
      }
    },
    "myinstance": {
      "Type": "AWS::OpsWorks::Instance",
      "Properties": {
        "LayerIds": [
          {
            "Ref": "MyLayer"
          }
        ],
        "StackId": {
          "Ref": "MyStack"
        },
        "InstanceType": "c3.large",
        "SshKeyName": {
		  "Ref": "EC2KeyPairName"
		}
      }
    }
  },
  "Outputs": {
    "StackId": {
      "Description": "Stack ID for the newly created AWS OpsWorks stack",
      "Value": {
        "Ref": "MyStack"
      }
    }
  }
}
登录 AWS Management Console 并在 https://console.aws.amazon.com/cloudformat
ion 上打开 AWS CloudFormation 控制台。 -
在 AWS CloudFormation 主页上,选择创建堆栈。
-
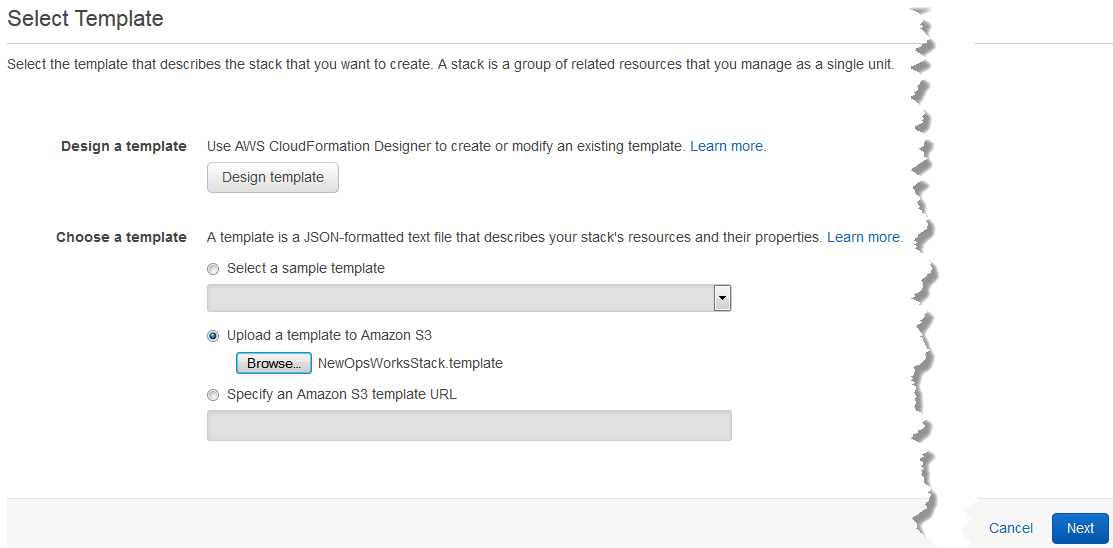
在 Select Template 页面上的 Choose a template 区域中,选择 Upload a template to Amazon S3,然后选择 Browse。
-
浏览到您在步骤 1 中保存的 AWS CloudFormation 模板,然后选择 “打开”。在 Select Template 页面上,选择 Next。
-
在 “指定详细信息” 页面上,命名堆MyStack栈或您的账户独有的任意堆栈名称。如果您选择了不同的堆栈名称,请更改整个演练中该堆栈的名称。
-
在 “参数” 区域中,提供您要在创建 OpsWorks 堆栈实例后用于访问堆栈实例的 EC2 密钥对的名称。选择下一步。
-
在选项页面上,选择下一步。(此演练不必执行此页面上的设置。)
-
您在本演练中使用的 AWS CloudFormation 模板创建 IAM 角色、实例配置文件和实例。
重要
在选择 “创建” 之前,请选择 “成本” 以估算使用此模板创建资源可能产生的费用。 AWS
如果可以接受创建 IAM 资源,请选择我承认此模板可能导致 AWS CloudFormation 创建 IAM 资源复选框,然后选择创建。如果创建 IAM 资源不可行,您将无法继续此过程。
-
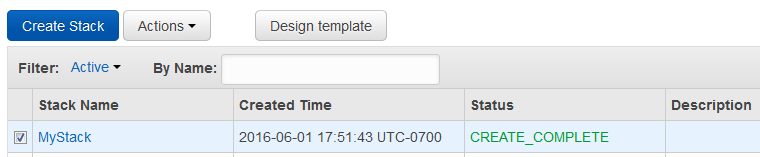
在 AWS CloudFormation 控制面板上,您可以查看创建堆栈的进度。请在 Status 列显示 CREATE_COMPLETE 之后再继续下一步。
验证堆栈中的 OpsWorks 堆栈创建
打开 OpsWorks 控制台,网址为https://console.aws.amazon.com/opsworks/
。 -
在 OpsWorks 堆栈控制面板上,查看您创建的堆栈。

-
打开堆栈,并查看层和实例。请注意,图层和实例是使用 AWS CloudFormation 模板中提供的名称和其他元数据创建的。现在,您已可以将应用程序上传到 Amazon S3 存储桶。
