本文為英文版的機器翻譯版本,如內容有任何歧義或不一致之處,概以英文版為準。
從現有資源建立堆疊
本主題說明如何透過在範本中描述現有 AWS 資源來建立堆疊。若要改為掃描現有資源,並自動產生範本,讓您用來將現有資源匯入 CloudFormation 或複寫新帳戶中的資源,請參閱 使用 IaC 產生器從現有資源產生範本。
先決條件
開始之前,您必須準備好以下項目:
-
描述您在新堆疊中所需所有資源的範本。在本機或 Amazon S3 儲存貯體中儲存範本。
-
對於您要匯入的每個資源,請包含下列項目:
-
定義資源目前組態的屬性和屬性值。
-
資源的唯一識別符,例如資源名稱。如需詳細資訊,請參閱資源識別符。
-
範例 範本
在此演練中,我們假設您使用下列名為 的範例範本TemplateToImport.json,指定在 CloudFormation 外部建立的兩個 DynamoDB 資料表。 ServiceTable和 GamesTable是匯入的目標。
注意
此範本僅做為範例。若要將其用於您自己的測試目的,請將範例資源取代為您帳戶中的資源。
{
    "AWSTemplateFormatVersion": "2010-09-09",
    "Description": "Import test",
    "Resources": {
        "ServiceTable": {
            "Type": "AWS::DynamoDB::Table",
            "DeletionPolicy": "Retain",
            "Properties": {
                "TableName": "Service",
                "AttributeDefinitions": [
                    {
                        "AttributeName": "key",
                        "AttributeType": "S"
                    }
                ],
                "KeySchema": [
                    {
                        "AttributeName": "key",
                        "KeyType": "HASH"
                    }
                ],
                "ProvisionedThroughput": {
                    "ReadCapacityUnits": 5,
                    "WriteCapacityUnits": 1
                }
            }
        },
        "GamesTable": {
            "Type": "AWS::DynamoDB::Table",
            "DeletionPolicy": "Retain",
            "Properties": {
                "TableName": "Games",
                "AttributeDefinitions": [
                    {
                        "AttributeName": "key",
                        "AttributeType": "S"
                    }
                ],
                "KeySchema": [
                    {
                        "AttributeName": "key",
                        "KeyType": "HASH"
                    }
                ],
                "ProvisionedThroughput": {
                    "ReadCapacityUnits": 5,
                    "WriteCapacityUnits": 1
                }
            }
        }
    }
}
使用 從現有資源建立堆疊 AWS Management Console
登入 AWS Management Console ,並在 https://https://console.aws.amazon.com/cloudformation
開啟 AWS CloudFormation 主控台。 -
在 Stacks (堆疊) 頁面上,選擇 Create stack (建立堆疊),然後選擇 With existing resources (import resources) (使用現有資源 (匯入資源))。

-
請閱讀 Import overview (匯入概觀) 頁面,以取得您在此操作期間必須提供的項目清單。然後選擇下一步。
-
在 Specify template (指定範本) 頁面上,使用以下其中一種方法提供您的範本,然後選擇 Next (下一步)。
-
選擇 Amazon S3 URL,然後在文字方塊中為您的範本指定 URL。
-
選擇 Upload a template file (上傳範本檔案),然後瀏覽您的範本。
-
-
在 Identify resources (識別資源) 頁面上,識別每個目標資源。如需詳細資訊,請參閱資源識別符。
-
在 Identifer property (識別碼屬性) 下方,選擇資源識別碼類型。例如,
AWS::DynamoDB::Table資源可以使用TableName屬性進行識別。 -
在 Identifer value (識別碼值) 下方,輸入實際的屬性值。例如,範例範本中
GamesTable資源的TableName是Games -
選擇下一步。
-
-
在 Specify stack details (識別堆疊詳細資訊) 頁面上,修改任何參數,然後選擇 Next (下一步)。這會自動建立變更集合。
重要
如果您修改了啟動建立、更新或刪除操作的現有參數,匯入操作便會失敗。
-
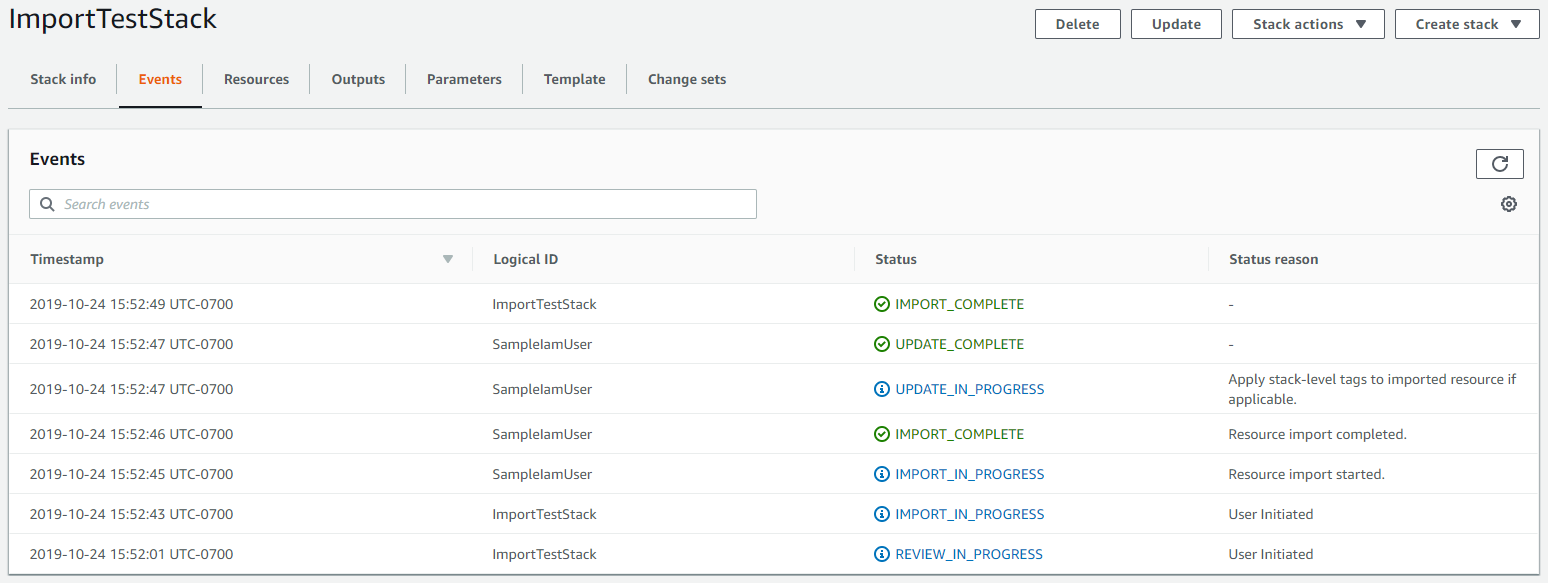
在 Review
stack-name(檢閱 stack-name) 頁面上,確認您正在匯入正確的資源,然後選擇 Import resources (匯入資源)。這會自動執行在最後一個步驟中建立的變更集合。隨即會顯示新堆疊 Stack details (堆疊詳細資訊) 頁面的 Events (事件) 窗格。
-
(選用) 在 堆疊上執行漂移偵測,確認範本和匯入資源的實際組態相符。如需偵測偏離的詳細資訊,請參閱 在整個 CloudFormation 堆疊上偵測偏離。
-
(選用) 如果您匯入的資源與其預期的範本組態不相符,請修正範本組態,或是直接更新資源。在本演練中,我們會修正範本組態,使其與資源的實際組態相符。
-
針對受影響的資源還原匯入操作。
-
再次將匯入目標新增至您的範本,確認範本組態與實際組態相符。
-
使用修改後的範本重複步驟 2 到 8,再次匯入資源。
-
使用 AWS CLI從現有資源建立堆疊
-
若要了解哪些屬性可識別範本中的每個資源類型,請執行 get-template-summary命令,指定範本的 S3 URL。例如,
AWS::DynamoDB::Table資源可以使用TableName屬性進行識別。針對範例範本中的GamesTable資源,TableName的值是Games。在下一個步驟中,您將需要此資訊。aws cloudformation get-template-summary \ --template-urlhttps://amzn-s3-demo-bucket.s3.us-west-2.amazonaws.com/TemplateToImport.json如需詳細資訊,請參閱資源識別符。
-
以下列 JSON 字串格式撰寫來自範本的實際資源清單及其唯一識別符。
[{"ResourceType":"AWS::DynamoDB::Table","LogicalResourceId":"GamesTable","ResourceIdentifier":{"TableName":"Games"}},{"ResourceType":"AWS::DynamoDB::Table","LogicalResourceId":"ServiceTable","ResourceIdentifier":{"TableName":"Service"}}]您也可以在組態檔案中指定 JSON 格式參數。
例如,若要匯入
ServiceTable和GamesTable,您可以建立包含下列組態的ResourcesToImport.txt檔案。[ { "ResourceType":"AWS::DynamoDB::Table", "LogicalResourceId":"GamesTable", "ResourceIdentifier":{ "TableName":"Games" } }, { "ResourceType":"AWS::DynamoDB::Table", "LogicalResourceId":"ServiceTable", "ResourceIdentifier":{ "TableName":"Service" } } ] -
若要建立變更集,請使用下列create-change-set命令並取代預留位置文字。對於
--change-set-type選項,請指定值為IMPORT。對於--resources-to-import選項,請將範例 JSON 字串取代為您剛建立的實際 JSON 字串。aws cloudformation create-change-set \ --stack-nameTargetStack--change-set-nameImportChangeSet\ --change-set-typeIMPORT\ --template-urlhttps://amzn-s3-demo-bucket.s3.us-west-2.amazonaws.com/TemplateToImport.json\ --resources-to-import'[{"ResourceType":"AWS::DynamoDB::Table","LogicalResourceId":"GamesTable","ResourceIdentifier":{"TableName":"Games"}},{"ResourceType":"AWS::DynamoDB::Table","LogicalResourceId":"ServiceTable","ResourceIdentifier":{"TableName":"Service"}}]'注意
--resources-to-import不支援內嵌 YAML。JSON 字串中逸出引號的需求會因終端機而有所不同。如需詳細資訊,請參閱AWS Command Line Interface 《 使用者指南》中的在字串內使用引號。或者,您可以使用檔案 URL 做為
--resources-to-import選項的輸入,如下列範例所示。--resources-to-importfile://ResourcesToImport.txt -
檢閱變更集合,確認您將匯入正確的資源。
aws cloudformation describe-change-set \ --change-set-nameImportChangeSet--stack-nameTargetStack -
若要啟動變更集並匯入資源,請使用下列execute-change-set命令並取代預留位置文字。成功完成操作
(IMPORT_COMPLETE)後,資源便已順利匯入。aws cloudformation execute-change-set \ --change-set-nameImportChangeSet--stack-nameTargetStack -
(選用) 在
IMPORT_COMPLETE堆疊上執行漂移偵測,確認範本和匯入資源的實際組態相符。如需偵測偏離的詳細資訊,請參閱 在個別堆疊資源上偵測偏離。-
在指定的堆疊上執行偏離偵測。
aws cloudformation detect-stack-drift --stack-nameTargetStack如果成功,此命令會傳回下列範例輸出。
{ "Stack-Drift-Detection-Id" : "624af370-311a-11e8-b6b7-500cexample" } -
檢視指定堆疊偏離偵測 ID 的偏離偵測操作進度。
aws cloudformation describe-stack-drift-detection-status \ --stack-drift-detection-id624af370-311a-11e8-b6b7-500cexample -
檢視已檢查指定堆疊中漂移之資源的漂移資訊。
aws cloudformation describe-stack-resource-drifts --stack-nameTargetStack
-
-
(選用) 如果您匯入的資源與其預期的範本組態不相符,請修正範本組態,或是直接更新資源。在本演練中,我們會修正範本組態,使其與資源的實際組態相符。
-
針對受影響的資源還原匯入操作。
-
再次將匯入目標新增至您的範本,確認範本組態與實際組態相符。
-
使用修改過的範本重複步驟 3 – 6,以再次匯入資源。
-
