本文為英文版的機器翻譯版本,如內容有任何歧義或不一致之處,概以英文版為準。
範例:建立 AWS Lambda 函數的 AWS CodeCommit 觸發
您可以為 CodeCommit 儲存庫建立觸發,讓儲存庫中的事件叫用 Lambda 函數。在此範例中,您會建立 Lambda 函數,傳回用於將儲存庫複製到 Amazon CloudWatch 日誌的 URL。
建立 Lambda 函式
當您使用 Lambda 主控台建立函數時,您也可以為 Lambda 函數建立 CodeCommit 觸發。下列步驟包含 Lambda 函數範例。範例以兩種語言提供:JavaScript 和 Python。函數會傳回用於將儲存庫複製到 CloudWatch 日誌的 URLs。
使用 Lambda 藍圖建立 Lambda 函數
登入 AWS 管理主控台 ,並在 https://https://console.aws.amazon.com/lambda/
開啟 AWS Lambda 主控台。 -
在 Lambda 函數頁面上,選擇建立函數。(如果您之前未使用 Lambda,請選擇立即開始使用。)
-
在 Create function (建立函數) 頁面上,選擇 Author from scratch (從頭開始撰寫)。在 Function Name (函數名稱) 中,提供函數的名稱,例如
MyLambdaFunctionforCodeCommit。在 Runtime (執行時間) 中,選擇您想要用來寫入函數的語言,然後選擇 Create function (建立函數)。 -
在 Configuration (組態) 索引標籤上,選擇 Add trigger (新增觸發條件)。
-
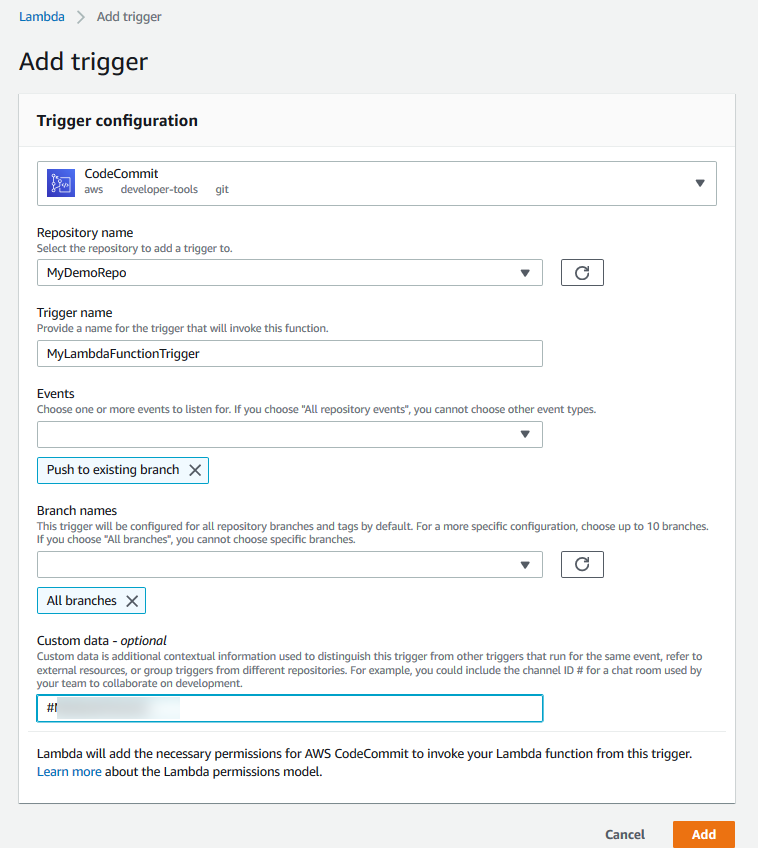
在 Trigger configuration (觸發條件組態) 中,從服務下拉式清單選擇 CodeCommit。

-
在儲存庫名稱中,選擇您要設定使用 Lambda 函數來回應儲存庫事件之觸發條件的儲存庫名稱。
-
在 Trigger name (觸發名稱) 中,輸入觸發的名稱 (例如,
MyLambdaFunctionTrigger)。 -
在事件中,選擇觸發 Lambda 函數的儲存庫事件。如果您選擇 All repository events (所有儲存庫事件),則無法選擇其他任何事件。如果您想要選擇事件子集,請清除 All repository events (所有儲存庫事件),然後從清單中選擇您要的事件。例如,如果您希望觸發僅在使用者在 AWS CodeCommit 儲存庫中建立標籤或分支時執行,請移除所有儲存庫事件,然後選擇建立分支或標籤。
-
如果您希望將觸發套用至儲存庫的所有分支,請在 Branches (分支) 中選擇 All branches (所有分支)。否則,選擇 Specific branches (特定分支)。依預設會新增儲存庫的預設分支。您可以保留此分支,或從清單中刪除此分支。從儲存庫分支清單中,最多選擇十個分支名稱。
-
(選用) 在自訂資料中,輸入您想要包含在 Lambda 函數中的資訊 (例如,開發人員用來討論儲存庫中開發的 IRC 頻道名稱)。此欄位是字串。無法用於傳遞任何動態參數。
選擇新增。
-
-
在 Configuration (組態) 頁面的 Function Code (函數程式碼) 上,在「程式碼項目類型」中選擇「以內嵌方式編輯程式碼」。在 Runtime (執行時間) 中選擇 Node.js。如果您想要建立範例 Python 函數,請選擇 Python。
-
在 Code entry type (程式碼輸入類型) 中,選擇 Edit code inline (以內嵌方式編輯程式碼),然後將 hello world 程式碼換成以下兩個範例其中一個。
適用於 Node.js:
import {
  CodeCommitClient,
  GetRepositoryCommand,
} from "@aws-sdk/client-codecommit";

const codecommit = new CodeCommitClient({ region: "your-region" });

/**
 * @param {{ Records: { codecommit: { references: { ref: string }[] }, eventSourceARN: string  }[]} event
 */
export const handler = async (event) => {
  // Log the updated references from the event
  const references = event.Records[0].codecommit.references.map(
    (reference) => reference.ref,
  );
  console.log("References:", references);

  // Get the repository from the event and show its git clone URL
  const repository = event.Records[0].eventSourceARN.split(":")[5];
  const params = {
    repositoryName: repository,
  };

  try {
    const data = await codecommit.send(new GetRepositoryCommand(params));
    console.log("Clone URL:", data.repositoryMetadata.cloneUrlHttp);
    return data.repositoryMetadata.cloneUrlHttp;
  } catch (error) {
    console.error("Error:", error);
    throw new Error(
      `Error getting repository metadata for repository ${repository}`,
    );
  }
};
適用於 Python:
import json import boto3 codecommit = boto3.client("codecommit") def lambda_handler(event, context): # Log the updated references from the event references = { reference["ref"] for reference in event["Records"][0]["codecommit"]["references"] } print("References: " + str(references)) # Get the repository from the event and show its git clone URL repository = event["Records"][0]["eventSourceARN"].split(":")[5] try: response = codecommit.get_repository(repositoryName=repository) print("Clone URL: " + response["repositoryMetadata"]["cloneUrlHttp"]) return response["repositoryMetadata"]["cloneUrlHttp"] except Exception as e: print(e) print( "Error getting repository {}. Make sure it exists and that your repository is in the same region as this function.".format( repository ) ) raise e -
在許可索引標籤的執行角色中,選擇要在 IAM 主控台中開啟的角色。編輯附加的政策,針對您想要使用觸發條件的存放庫新增
GetRepository許可。
檢視儲存庫中 Lambda AWS CodeCommit 函數的觸發
建立 Lambda 函數之後,您可以在其中檢視和測試觸發條件 AWS CodeCommit。測試觸發會執行函數以回應您指定的儲存庫事件。
檢視和測試 Lambda 函數的觸發
-
在 https://https://console.aws.amazon.com/codesuite/codecommit/home
開啟 CodeCommit 主控台。 -
在 Repositories (儲存庫) 中,選擇儲存庫以檢視其中的觸發。
-
在儲存庫的導覽窗格中,選擇 Settings (設定),然後選擇 Triggers (觸發)。
-
檢閱儲存庫的觸發清單。您應該會看到您在 Lambda 主控台中建立的觸發。從清單中選擇它,然後選擇 Test trigger (測試觸發)。此選項會嘗試以有關儲存庫的範例資料來叫用函數,包括儲存庫最新的遞交 ID。(如果不存在遞交歷史記錄,則會產生由零組成的範例值。) 這可協助您確認您已正確設定 AWS CodeCommit 和 Lambda 函數之間的存取。
-
為了進一步驗證觸發的功能,請進行遞交並推送至您已設定觸發的儲存庫。您應該會在 Lambda 主控台的監控索引標籤上看到 Lambda 函數的回應。從 Monitoring (監控) 標籤中,選擇 View logs in CloudWatch (在 CloudWatch 中檢視日誌)。CloudWatch 主控台會在新索引標籤中開啟,並顯示函數的事件。從清單中,根據您推送遞交的時間,選取對應於此時間的日誌串流。您應該會看到類似下列的事件資料:
START RequestId: 70afdc9a-EXAMPLE Version: $LATEST 2015-11-10T18:18:28.689Z 70afdc9a-EXAMPLE References: [ 'refs/heads/main' ] 2015-11-10T18:18:29.814Z 70afdc9a-EXAMPLE Clone URL: https://git-codecommit.us-east-2.amazonaws.com/v1/repos/MyDemoRepoEND RequestId: 70afdc9a-EXAMPLE REPORT RequestId: 70afdc9a-EXAMPLE Duration: 1126.87 ms Billed Duration: 1200 ms Memory Size: 128 MB Max Memory Used: 14 MB