本文為英文版的機器翻譯版本,如內容有任何歧義或不一致之處,概以英文版為準。
使用叢集將 Node.js Express 應用程式部署至 Elastic Beanstalk
本教學課程會逐步解說如何使用 Elastic Beanstalk 命令列界面 (EB CLI),將範例應用程式部署至 Elastic Beanstalk,並解釋如何更新應用程式,以使用 Express
注意
此範例會建立您可能需要支付 AWS 的資源。如需 AWS 定價的詳細資訊,請參閱 https://aws.amazon.com/pricing/
先決條件
本教學課程需要下列先決條件:
-
Node.js 執行階段
-
預設的 Node.js 套件管理工具軟體 npm
-
Express 命令列產生器
-
Elastic Beanstalk 命令列界面 (EB CLI)
有關安裝所列出之前三個元件和設定本機開發環境的詳細資訊,請參閱 設定 Elastic Beanstalk 的 Node.js 開發環境。在本教學課程中,您不需要安裝適用於 Node.js 的 AWS SDK,這也在參考主題中提及。
有關安裝和設定 EB CLI 的詳細資訊,請參閱 使用設定指令碼安裝 EB CLI (建議) 和 設定 EB CLI。
建立 Elastic Beanstalk 環境
應用程式目錄
對於應用程式原始碼套件,本教學課程使用的是名為 nodejs-example-express-elasticache 的目錄。為本教學課程建立 nodejs-example-express-elasticache 目錄。
~$ mkdir nodejs-example-express-elasticache注意
本章中的每個教學課程皆會使用其自身的應用程式原始碼套件目錄。目錄名稱與教學課程所使用的範例應用程式名稱相符。
將您目前的工作目錄變更為 nodejs-example-express-elasticache。
~$ cd nodejs-example-express-elasticache現在,來設定執行 Node.js 平台和範例應用程式的 Elastic Beanstalk 環境。我們將會使用 Elastic Beanstalk 命令列介面 (EB CLI)。
設定應用程式的 EB CLI 儲存庫,並建立執行 Node.js 平台的 Elastic Beanstalk 環境
-
使用 eb init 命令建立一個儲存庫。
~/nodejs-example-express-elasticache$eb init --platformnode.js--region<region>此命令會在名為
.elasticbeanstalk的資料夾內建立組態檔案,其中會指定應用程式使用的環境設定,並以目前資料夾為名建立 Elastic Beanstalk 應用程式。 -
使用 eb create 命令建立執行範例應用程式的環境。
~/nodejs-example-express-elasticache$eb create --samplenodejs-example-express-elasticache本命令會使用 Node.js 平台的預設設定和下列資源,建立負載平衡的環境:
-
EC2 執行個體 ‒ Amazon Elastic Compute Cloud (Amazon EC2) 虛擬機器,已設為在您選擇的平台上執行 Web 應用程式。
每個平台會執行特定的一套軟體、設定檔和指令碼,來支援特定的語言版本、架構、Web 容器或其組合。大多數的平台使用會 Apache 或 NGINX 做為反向代理,此反向代理會在您 Web 應用程式的前景執行、轉傳遞交給此 Web 應用程式的請求、提供靜態資產,並產生存取和錯誤日誌。
-
執行個體安全群組 - Amazon EC2 安全群組,已設為允許從連接埠 80 傳入的流量。此資源可讓負載平衡器傳來的 HTTP 傳輸資料,到達執行您 Web 應用程式的 EC2 執行個體。在預設情況下,不允許傳輸資料從其他通訊埠傳送。
-
負載平衡器 - Elastic Load Balancing 負載平衡器,可設定將請求分配到執行您應用程式的執行個體。負載平衡器也讓您的執行個體不需直接連接到網際網路。
-
負載平衡器安全群組 - Amazon EC2 安全群組,設為允許從連接埠 80 傳入的流量。此資源可讓來自網際網路的 HTTP 傳輸資料到達負載平衡器。在預設情況下,不允許傳輸資料從其他通訊埠傳送。
-
Auto Scaling 群組 - Auto Scaling 群組,設為在執行個體終止或無法使用時,取代該執行個體。
-
Amazon S3 儲存貯體 - 儲存位置,用來儲存當您使用 Elastic Beanstalk 時所建立的原始程式碼、日誌和其他成品。
-
Amazon CloudWatch 警示 - 兩種 CloudWatch 警示,用來監控您環境中執行個體上的負載,會在負載過高或過低時觸發。當警示觸發時,您的 Auto Scaling 群組會擴展或縮減以進行回應。
-
AWS CloudFormation 堆疊 – Elastic Beanstalk 使用 AWS CloudFormation 啟動您環境中的資源並傳播組態變更。資源定義於範本中,您可在 AWS CloudFormation 主控台
中檢視此範本。 -
網域名稱 – 會路由到您 Web 應用程式的網域名稱,其格式為
subdomain.region.elasticbeanstalk.com。網域安全
為了增強 Elastic Beanstalk 應用程式的安全性,我們會在公共后缀列表 (PSL)
中註冊網域 elasticbeanstalk.com。 如果您需要在 Elastic Beanstalk 應用程式的預設網域名稱中設定敏感 Cookie,我們建議您使用字
__Host-首為 的 Cookie 來提高安全性。此做法會保護您的網域,防止跨網站請求偽造嘗試 (CSRF)。如需更多資訊,請參閱 Mozilla 開發人員網路中的設定 Cookie頁面。
-
-
環境建立完成後,請使用 eb open 命令,在預設瀏覽器中開啟環境 URL。
~/nodejs-example-express-elasticache$eb open
您現在已使用範例應用程式建立 Node.js Elastic Beanstalk 環境。您可以使用自己的應用程式對其進行更新。接下來,我們會更新範例應用程式,以使用 Express 架構。
更新應用程式以使用 Express
更新 Elastic Beanstalk 環境中的範例應用程式,以使用 Express 框架。
您可以從 nodejs-example-express-elasticache.zip 下載最終原始碼。
欲更新您的應用程式以使用 Express
使用範例應用程式建立環境後,您可使用自己的應用程式對其進行更新。在此程序中,我們先執行 express 和 npm install 命令,以便在應用程式目錄中設定 Express 架構。
-
執行
express命令。這會產生package.json、app.js以及幾個目錄。~/nodejs-example-express-elasticache$express當提示您是否要繼續時,請輸入
y。注意
如果 express 命令無法使用,您可能未依先前先決條件章節中的所述內容安裝 Express 命令列產生器。或者,您可能需要設定本機電腦的目錄路徑設定,才可執行 express 命令。如需有關設定開發環境的詳細步驟,請參閱先決條件章節,以繼續進行本教學課程。
-
設定本機依存項目。
~/nodejs-example-express-elasticache$npm install -
(選用) 確認 Web 應用程式伺服器已啟動。
~/nodejs-example-express-elasticache$npm start您應該會看到類似下列的輸出:
> nodejs@0.0.0 start /home/local/user/node-express
> node ./bin/www
依預設,伺服器將會在連接埠 3000 上執行。若要進行測試,請在另一部終端機上執行
curl http://localhost:3000,或在本機電腦開啟瀏覽器並輸入 URL 位址http://localhost:3000。按 Ctrl+C 來停止伺服器。
-
重新命名
nodejs-example-express-elasticache/app.js為nodejs-example-express-elasticache/express-app.js。~/nodejs-example-express-elasticache$mvapp.js express-app.js -
將
nodejs-example-express-elasticache/express-app.js中的var app = express();列更新為以下內容:var app = module.exports = express(); -
在您的本機電腦上,以下列程式碼建立名為
nodejs-example-express-elasticache/app.js的檔案。/** * Module dependencies. */ const express = require('express'), session = require('express-session'), bodyParser = require('body-parser'), methodOverride = require('method-override'), cookieParser = require('cookie-parser'), fs = require('fs'), filename = '/var/nodelist', app = express(); let MemcachedStore = require('connect-memcached')(session); function setup(cacheNodes) { app.use(bodyParser.raw()); app.use(methodOverride()); if (cacheNodes.length > 0) { app.use(cookieParser()); console.log('Using memcached store nodes:'); console.log(cacheNodes); app.use(session({ secret: 'your secret here', resave: false, saveUninitialized: false, store: new MemcachedStore({ 'hosts': cacheNodes }) })); } else { console.log('Not using memcached store.'); app.use(session({ resave: false, saveUninitialized: false, secret: 'your secret here' })); } app.get('/', function (req, resp) { if (req.session.views) { req.session.views++ resp.setHeader('Content-Type', 'text/html') resp.send(`You are session: ${req.session.id}. Views: ${req.session.views}`) } else { req.session.views = 1 resp.send(`You are session: ${req.session.id}. No views yet, refresh the page!`) } }); if (!module.parent) { console.log('Running express without cluster. Listening on port %d', process.env.PORT || 5000) app.listen(process.env.PORT || 5000) } } console.log("Reading elastic cache configuration") // Load elasticache configuration. fs.readFile(filename, 'UTF8', function (err, data) { if (err) throw err; let cacheNodes = [] if (data) { let lines = data.split('\n'); for (let i = 0; i < lines.length; i++) { if (lines[i].length > 0) { cacheNodes.push(lines[i]) } } } setup(cacheNodes) }); module.exports = app; -
將
nodejs-example-express-elasticache/bin/www檔案的內容取代為下列內容:#!/usr/bin/env node /** * Module dependencies. */ const app = require('../app'); const cluster = require('cluster'); const debug = require('debug')('nodejs-example-express-elasticache:server'); const http = require('http'); const workers = {}, count = require('os').cpus().length; function spawn() { const worker = cluster.fork(); workers[worker.pid] = worker; return worker; } /** * Get port from environment and store in Express. */ const port = normalizePort(process.env.PORT || '3000'); app.set('port', port); if (cluster.isMaster) { for (let i = 0; i < count; i++) { spawn(); } // If a worker dies, log it to the console and start another worker. cluster.on('exit', function (worker, code, signal) { console.log('Worker ' + worker.process.pid + ' died.'); cluster.fork(); }); // Log when a worker starts listening cluster.on('listening', function (worker, address) { console.log('Worker started with PID ' + worker.process.pid + '.'); }); } else { /** * Create HTTP server. */ let server = http.createServer(app); /** * Event listener for HTTP server "error" event. */ function onError(error) { if (error.syscall !== 'listen') { throw error; } const bind = typeof port === 'string' ? 'Pipe ' + port : 'Port ' + port; // handle specific listen errors with friendly messages switch (error.code) { case 'EACCES': console.error(bind + ' requires elevated privileges'); process.exit(1); break; case 'EADDRINUSE': console.error(bind + ' is already in use'); process.exit(1); break; default: throw error; } } /** * Event listener for HTTP server "listening" event. */ function onListening() { const addr = server.address(); const bind = typeof addr === 'string' ? 'pipe ' + addr : 'port ' + addr.port; debug('Listening on ' + bind); } /** * Listen on provided port, on all network interfaces. */ server.listen(port); server.on('error', onError); server.on('listening', onListening); } /** * Normalize a port into a number, string, or false. */ function normalizePort(val) { const port = parseInt(val, 10); if (isNaN(port)) { // named pipe return val; } if (port >= 0) { // port number return port; } return false; } -
使用 eb deploy 命令將變更部署至您的 Elastic Beanstalk 環境。
~/nodejs-example-express-elasticache$eb deploy -
您的環境將在幾分鐘後更新。一旦環境為綠色且就緒,請重新整理 URL,確認其正常運作。您應看到顯示「Welcome to Express」的網頁。
您可以存取執行應用程式之 EC2 執行個體的日誌。如需存取日誌的說明,請參閱 在 Elastic Beanstalk 環境中檢視 Amazon EC2 執行個體的日誌。
接著,我們將更新 Express 應用程式以使用 Amazon ElastiCache。
更新您的 Express 應用程式以使用 Amazon ElastiCache
-
在您本機電腦原始碼套件的最上層目錄建立
.ebextensions目錄。在此範例中,我們使用nodejs-example-express-elasticache/.ebextensions. -
使用以下程式碼片段建立組態檔案
nodejs-example-express-elasticache/.ebextensions/elasticache-iam-with-script.config。如需組態檔案的詳細資訊,請參閱 Node.js 組態命名空間。這會建立具有所需許可的 IAM 使用者,以探索 elasticache 節點並在快取變更時隨時進行寫入至檔案。您也可以從 nodejs-example-express-elasticache.zip 複製檔案。如需 ElastiCache 屬性的詳細資訊,請參閱 範例:ElastiCache。注意
YAML 憑藉一致的縮排。請在取代範例組態檔中的內容時,讓縮排層級一致,並確認您的文字編輯器使用空格而非定位字元進行縮排。
Resources: MyCacheSecurityGroup: Type: 'AWS::EC2::SecurityGroup' Properties: GroupDescription: "Lock cache down to webserver access only" SecurityGroupIngress: - IpProtocol: tcp FromPort: Fn::GetOptionSetting: OptionName: CachePort DefaultValue: 11211 ToPort: Fn::GetOptionSetting: OptionName: CachePort DefaultValue: 11211 SourceSecurityGroupName: Ref: AWSEBSecurityGroup MyElastiCache: Type: 'AWS::ElastiCache::CacheCluster' Properties: CacheNodeType: Fn::GetOptionSetting: OptionName: CacheNodeType DefaultValue: cache.t2.micro NumCacheNodes: Fn::GetOptionSetting: OptionName: NumCacheNodes DefaultValue: 1 Engine: Fn::GetOptionSetting: OptionName: Engine DefaultValue: redis VpcSecurityGroupIds: - Fn::GetAtt: - MyCacheSecurityGroup - GroupId AWSEBAutoScalingGroup : Metadata : ElastiCacheConfig : CacheName : Ref : MyElastiCache CacheSize : Fn::GetOptionSetting: OptionName : NumCacheNodes DefaultValue: 1 WebServerUser : Type : AWS::IAM::User Properties : Path : "/" Policies: - PolicyName: root PolicyDocument : Statement : - Effect : Allow Action : - cloudformation:DescribeStackResource - cloudformation:ListStackResources - elasticache:DescribeCacheClusters Resource : "*" WebServerKeys : Type : AWS::IAM::AccessKey Properties : UserName : Ref: WebServerUser Outputs: WebsiteURL: Description: sample output only here to show inline string function parsing Value: | http://`{ "Fn::GetAtt" : [ "AWSEBLoadBalancer", "DNSName" ] }` MyElastiCacheName: Description: Name of the elasticache Value: Ref : MyElastiCache NumCacheNodes: Description: Number of cache nodes in MyElastiCache Value: Fn::GetOptionSetting: OptionName : NumCacheNodes DefaultValue: 1 files: "/etc/cfn/cfn-credentials" : content : | AWSAccessKeyId=`{ "Ref" : "WebServerKeys" }` AWSSecretKey=`{ "Fn::GetAtt" : ["WebServerKeys", "SecretAccessKey"] }` mode : "000400" owner : root group : root "/etc/cfn/get-cache-nodes" : content : | # Define environment variables for command line tools export AWS_ELASTICACHE_HOME="/home/ec2-user/elasticache/$(ls /home/ec2-user/elasticache/)" export AWS_CLOUDFORMATION_HOME=/opt/aws/apitools/cfn export PATH=$AWS_CLOUDFORMATION_HOME/bin:$AWS_ELASTICACHE_HOME/bin:$PATH export AWS_CREDENTIAL_FILE=/etc/cfn/cfn-credentials export JAVA_HOME=/usr/lib/jvm/jre # Grab the Cache node names and configure the PHP page aws cloudformation list-stack-resources --stack `{ "Ref" : "AWS::StackName" }` --region `{ "Ref" : "AWS::Region" }` --output text | grep MyElastiCache | awk '{print $4}' | xargs -I {} aws elasticache describe-cache-clusters --cache-cluster-id {} --region `{ "Ref" : "AWS::Region" }` --show-cache-node-info --output text | grep '^ENDPOINT' | awk '{print $2 ":" $3}' > `{ "Fn::GetOptionSetting" : { "OptionName" : "NodeListPath", "DefaultValue" : "/var/www/html/nodelist" } }` mode : "000500" owner : root group : root "/etc/cfn/hooks.d/cfn-cache-change.conf" : "content": | [cfn-cache-size-change] triggers=post.update path=Resources.AWSEBAutoScalingGroup.Metadata.ElastiCacheConfig action=/etc/cfn/get-cache-nodes runas=root sources : "/home/ec2-user/elasticache" : "https://elasticache-downloads.s3.amazonaws.com/AmazonElastiCacheCli-latest.zip" commands: make-elasticache-executable: command: chmod -R ugo+x /home/ec2-user/elasticache/*/bin/* packages : "yum" : "aws-apitools-cfn" : [] container_commands: initial_cache_nodes: command: /etc/cfn/get-cache-nodes -
在您的本機電腦上,使用下列程式碼片段來建立組態檔案
nodejs-example-express-elasticache/.ebextensions/elasticache_settings.config以設定 ElastiCache。option_settings: "aws:elasticbeanstalk:customoption": CacheNodeType: cache.t2.micro NumCacheNodes: 1 Engine: memcached NodeListPath: /var/nodelist -
在您的本機電腦上使用以下程式碼片段取代
nodejs-example-express-elasticache/express-app.js。這個檔案會從磁碟 (/var/nodelist) 讀取節點清單,並設定 express 以使用memcached做為工作階段存放區 (若節點存在)。您的檔案看起來應該如下所示。/** * Module dependencies. */ var express = require('express'), session = require('express-session'), bodyParser = require('body-parser'), methodOverride = require('method-override'), cookieParser = require('cookie-parser'), fs = require('fs'), filename = '/var/nodelist', app = module.exports = express(); var MemcachedStore = require('connect-memcached')(session); function setup(cacheNodes) { app.use(bodyParser.raw()); app.use(methodOverride()); if (cacheNodes) { app.use(cookieParser()); console.log('Using memcached store nodes:'); console.log(cacheNodes); app.use(session({ secret: 'your secret here', resave: false, saveUninitialized: false, store: new MemcachedStore({'hosts': cacheNodes}) })); } else { console.log('Not using memcached store.'); app.use(cookieParser('your secret here')); app.use(session()); } app.get('/', function(req, resp){ if (req.session.views) { req.session.views++ resp.setHeader('Content-Type', 'text/html') resp.write('Views: ' + req.session.views) resp.end() } else { req.session.views = 1 resp.end('Refresh the page!') } }); if (!module.parent) { console.log('Running express without cluster.'); app.listen(process.env.PORT || 5000); } } // Load elasticache configuration. fs.readFile(filename, 'UTF8', function(err, data) { if (err) throw err; var cacheNodes = []; if (data) { var lines = data.split('\n'); for (var i = 0 ; i < lines.length ; i++) { if (lines[i].length > 0) { cacheNodes.push(lines[i]); } } } setup(cacheNodes); }); -
在本機電腦上,使用以下內容更新
package.json:"dependencies": { "cookie-parser": "~1.4.4", "debug": "~2.6.9", "express": "~4.16.1", "http-errors": "~1.6.3", "jade": "~1.11.0", "morgan": "~1.9.1", "connect-memcached": "*", "express-session": "*", "body-parser": "*", "method-override": "*" } -
執行 npm install。
~/nodejs-example-express-elasticache$npm install -
部署已更新的應用程式。
~/nodejs-example-express-elasticache$eb deploy -
您的環境將在幾分鐘後更新。您的環境為綠色且就緒後,請確認該程式碼正常運作。
-
查看 Amazon CloudWatch 主控台
來檢視您的 ElastiCache 指標。要查看您的 ElastiCache 指標,選取 Metrics (指標),然後在左側窗格中搜尋 CurrItems。選取 ElastiCache > Cache Node Metrics (ElastiCache > 快取節點指標),然後選取您的快取節點以檢視快取中的項目數量。 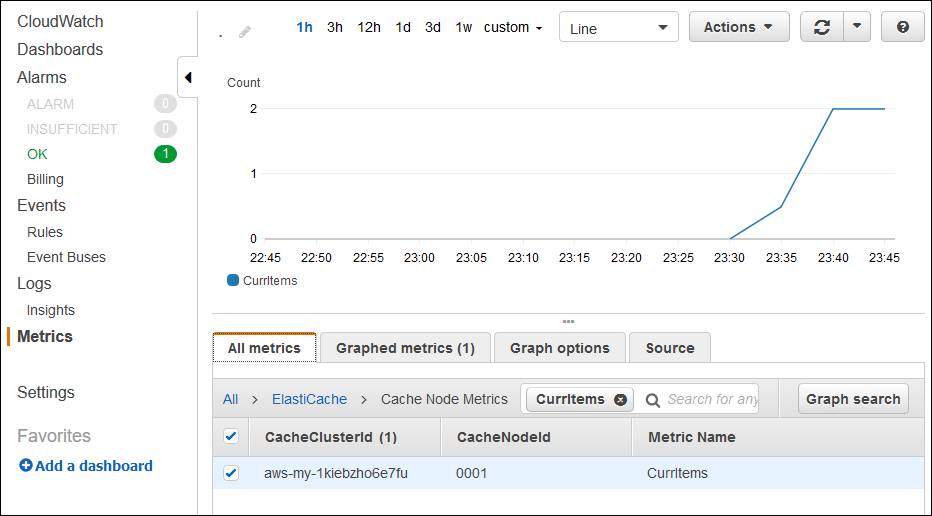
注意
請確認您查看的是應用程式所部署的相同區域。
若您複製應用程式 URL 並貼上至另一個 Web 瀏覽器,接著再重新整理該頁面,則應看到您的 CurrItem 計數在 5 分鐘後上升。
-
擷取您記錄日誌的快照。如需擷取日誌的詳細資訊,請參閱在 Elastic Beanstalk 環境中檢視 Amazon EC2 執行個體的日誌。
-
檢查日誌服務包中的檔案
/var/log/nodejs/nodejs.log。您應該會看到類似下列的內容:Using memcached store nodes: [ 'aws-my-1oys9co8zt1uo.1iwtrn.0001.use1.cache.amazonaws.com:11211' ]
-
清除
若您不想要再執行您的應用程式,可以終止您的環境並刪除您的應用程式來清除。
請使用 eb terminate 命令來終止您的環境,並使用 eb delete 命令來刪除您的應用程式。
終止環境
請從您建立本機存放庫的目錄中,執行 eb terminate。
$ eb terminate此程序需要幾分鐘的時間。Elastic Beanstalk 會在成功終止環境後顯示訊息。
