使用 IVS Android 廣播 SDK 發布和訂閱
本節將引導您完成使用 Android 應用程式發布和訂閱階段的相關步驟。
建立檢視
首先使用自動建立的 activity_main.xml 檔案,來建立應用程式的簡單配置。配置包含一個可新增權杖的 EditText、一個加入 Button、一個可顯示階段狀態的 TextView,以及一個可切換發布的 CheckBox。
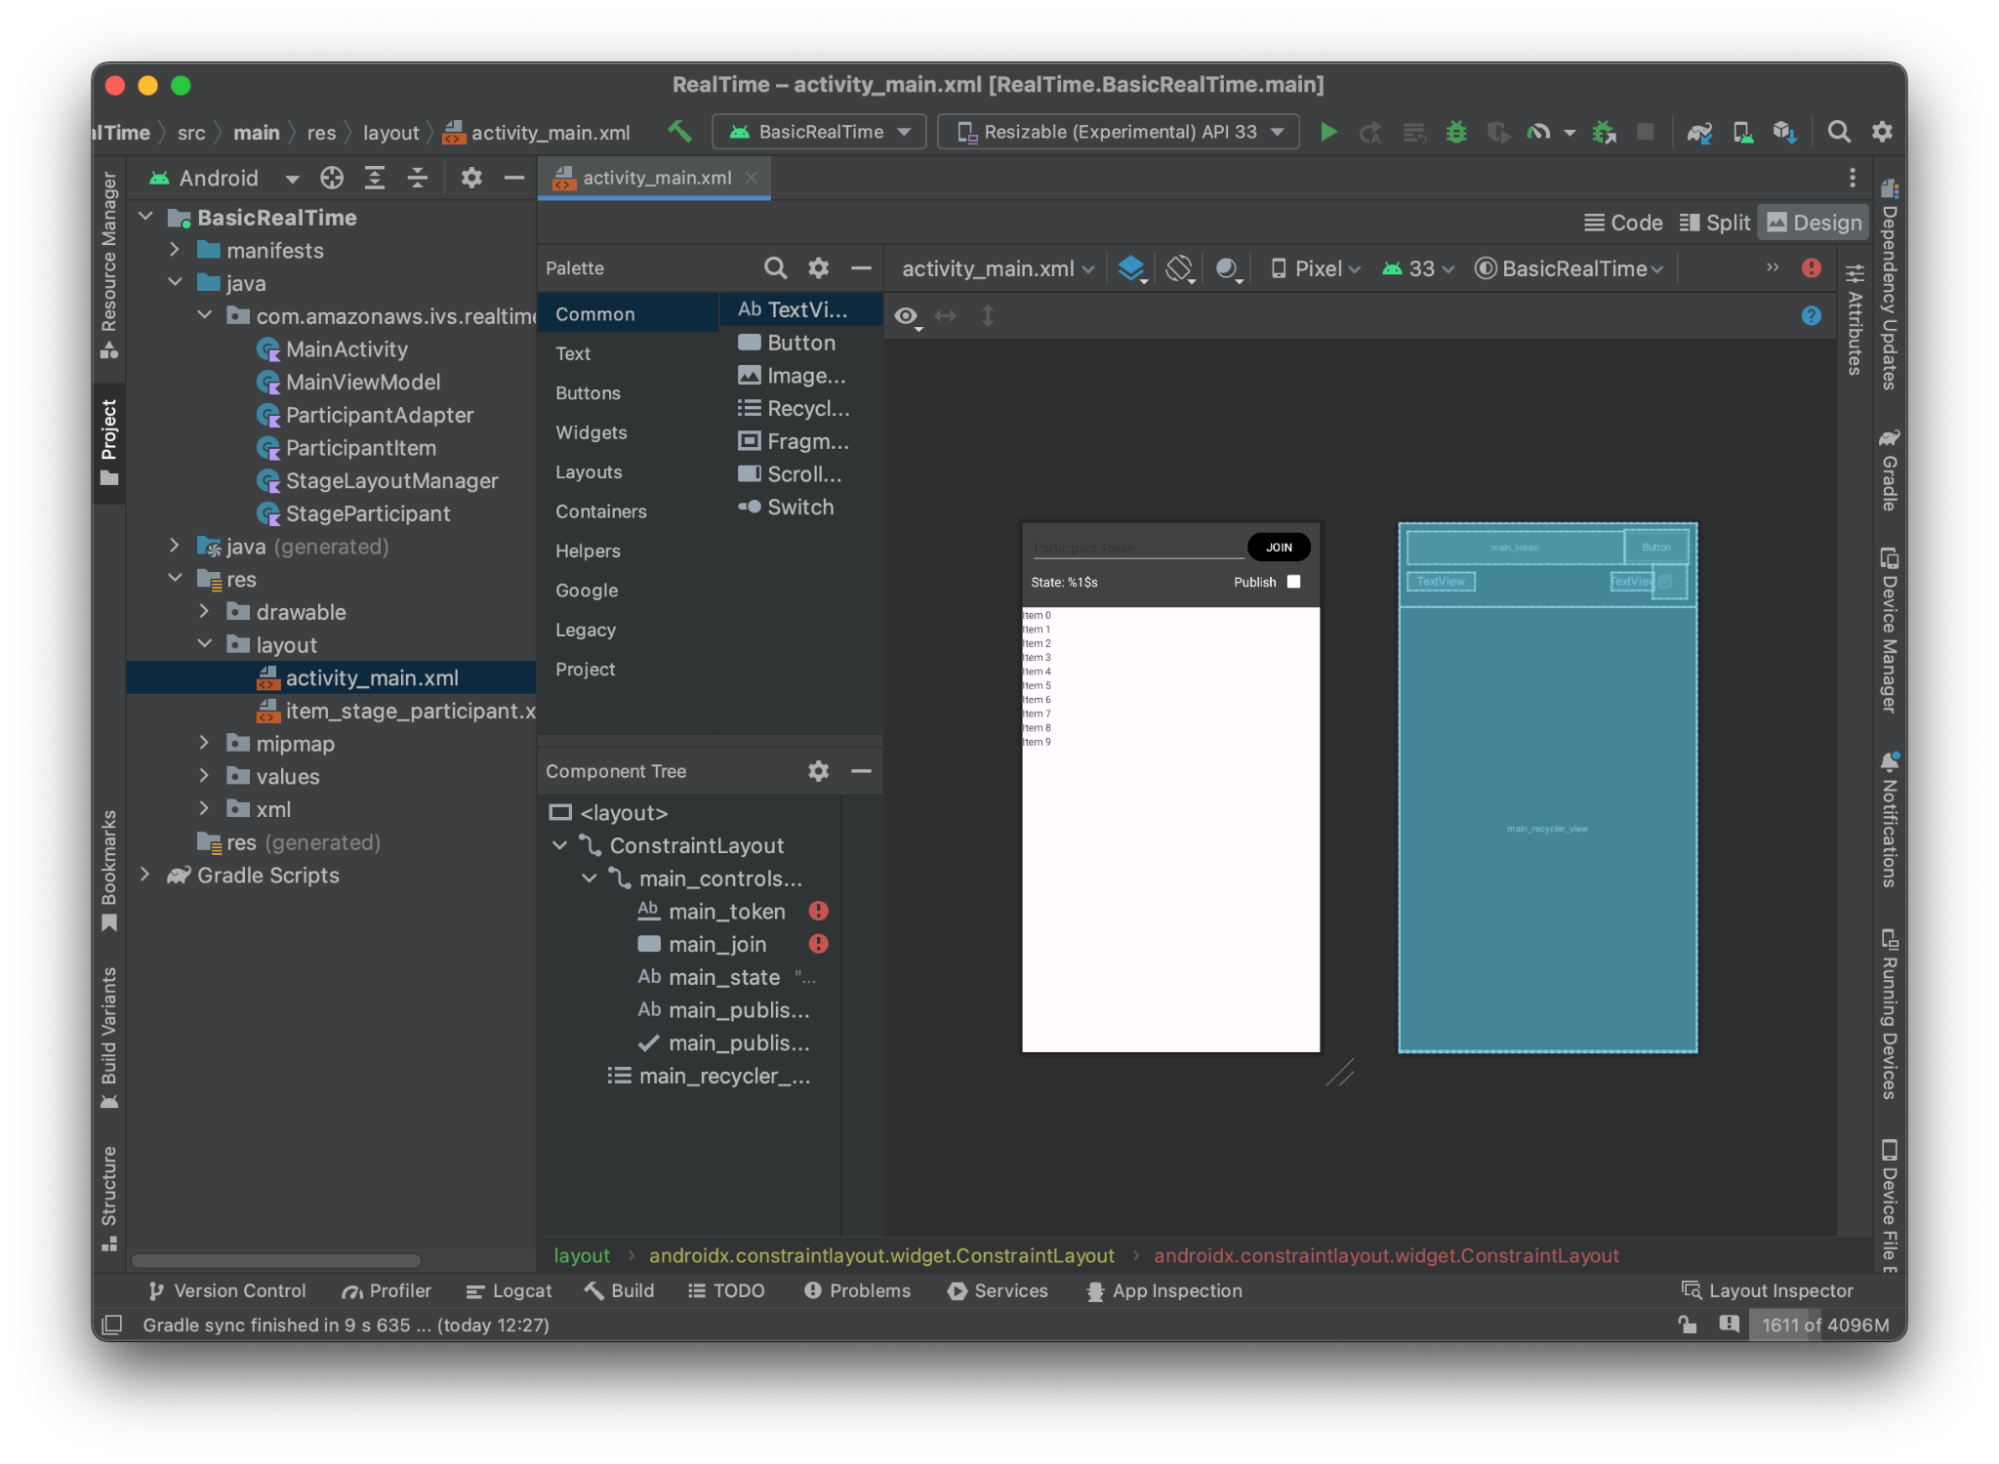
以下是檢視背後的 XML:
<?xml version="1.0" encoding="utf-8"?>
<layout xmlns:android="http://schemas.android.com/apk/res/android"
    xmlns:app="http://schemas.android.com/apk/res-auto"
    xmlns:tools="http://schemas.android.com/tools">

    <androidx.constraintlayout.widget.ConstraintLayout
        android:keepScreenOn="true"
        android:layout_width="match_parent"
        android:layout_height="match_parent"
        tools:context=".BasicActivity">

        <androidx.constraintlayout.widget.ConstraintLayout
            android:id="@+id/main_controls_container"
            android:layout_width="match_parent"
            android:layout_height="wrap_content"
            android:background="@color/cardview_dark_background"
            android:padding="12dp"
            app:layout_constraintTop_toTopOf="parent">

            <EditText
                android:id="@+id/main_token"
                android:layout_width="0dp"
                android:layout_height="wrap_content"
                android:autofillHints="@null"
                android:backgroundTint="@color/white"
                android:hint="@string/token"
                android:imeOptions="actionDone"
                android:inputType="text"
                android:textColor="@color/white"
                app:layout_constraintEnd_toStartOf="@id/main_join"
                app:layout_constraintStart_toStartOf="parent"
                app:layout_constraintTop_toTopOf="parent" />

            <Button
                android:id="@+id/main_join"
                android:layout_width="wrap_content"
                android:layout_height="wrap_content"
                android:backgroundTint="@color/black"
                android:text="@string/join"
                android:textAllCaps="true"
                android:textColor="@color/white"
                android:textSize="16sp"
                app:layout_constraintBottom_toBottomOf="@+id/main_token"
                app:layout_constraintEnd_toEndOf="parent"
                app:layout_constraintStart_toEndOf="@id/main_token" />

            <TextView
                android:id="@+id/main_state"
                android:layout_width="wrap_content"
                android:layout_height="wrap_content"
                android:text="@string/state"
                android:textColor="@color/white"
                android:textSize="18sp"
                app:layout_constraintBottom_toBottomOf="parent"
                app:layout_constraintStart_toStartOf="parent"
                app:layout_constraintTop_toBottomOf="@id/main_token" />

            <TextView
                android:id="@+id/main_publish_text"
                android:layout_width="wrap_content"
                android:layout_height="wrap_content"
                android:text="@string/publish"
                android:textColor="@color/white"
                android:textSize="18sp"
                app:layout_constraintBottom_toBottomOf="parent"
                app:layout_constraintEnd_toStartOf="@id/main_publish_checkbox"
                app:layout_constraintTop_toBottomOf="@id/main_token" />

            <CheckBox
                android:id="@+id/main_publish_checkbox"
                android:layout_width="wrap_content"
                android:layout_height="wrap_content"
                android:buttonTint="@color/white"
                android:checked="true"
                app:layout_constraintBottom_toBottomOf="@id/main_publish_text"
                app:layout_constraintEnd_toEndOf="parent"
                app:layout_constraintTop_toTopOf="@id/main_publish_text" />

        </androidx.constraintlayout.widget.ConstraintLayout>

        <androidx.recyclerview.widget.RecyclerView
            android:id="@+id/main_recycler_view"
            android:layout_width="match_parent"
            android:layout_height="0dp"
            app:layout_constraintTop_toBottomOf="@+id/main_controls_container"
            app:layout_constraintBottom_toBottomOf="parent" />

    </androidx.constraintlayout.widget.ConstraintLayout>
<layout>
我們在這裡引用了幾個字串 ID,因此,現在將建立整個 strings.xml 檔案:
<resources>
    <string name="app_name">BasicRealTime</string>
    <string name="join">Join</string>
    <string name="leave">Leave</string>
    <string name="token">Participant Token</string>
    <string name="publish">Publish</string>
    <string name="state">State: %1$s</string>
</resources>
將 XML 中的這些檢視連結至 MainActivity.kt:
import android.widget.Button
import android.widget.CheckBox
import android.widget.EditText
import android.widget.TextView
import androidx.recyclerview.widget.RecyclerView

private lateinit var checkboxPublish: CheckBox
private lateinit var recyclerView: RecyclerView
private lateinit var buttonJoin: Button
private lateinit var textViewState: TextView
private lateinit var editTextToken: EditText

override fun onCreate(savedInstanceState: Bundle?) {
    super.onCreate(savedInstanceState)
    setContentView(R.layout.activity_main)

    checkboxPublish = findViewById(R.id.main_publish_checkbox)
    recyclerView = findViewById(R.id.main_recycler_view)
    buttonJoin = findViewById(R.id.main_join)
    textViewState = findViewById(R.id.main_state)
    editTextToken = findViewById(R.id.main_token)
}
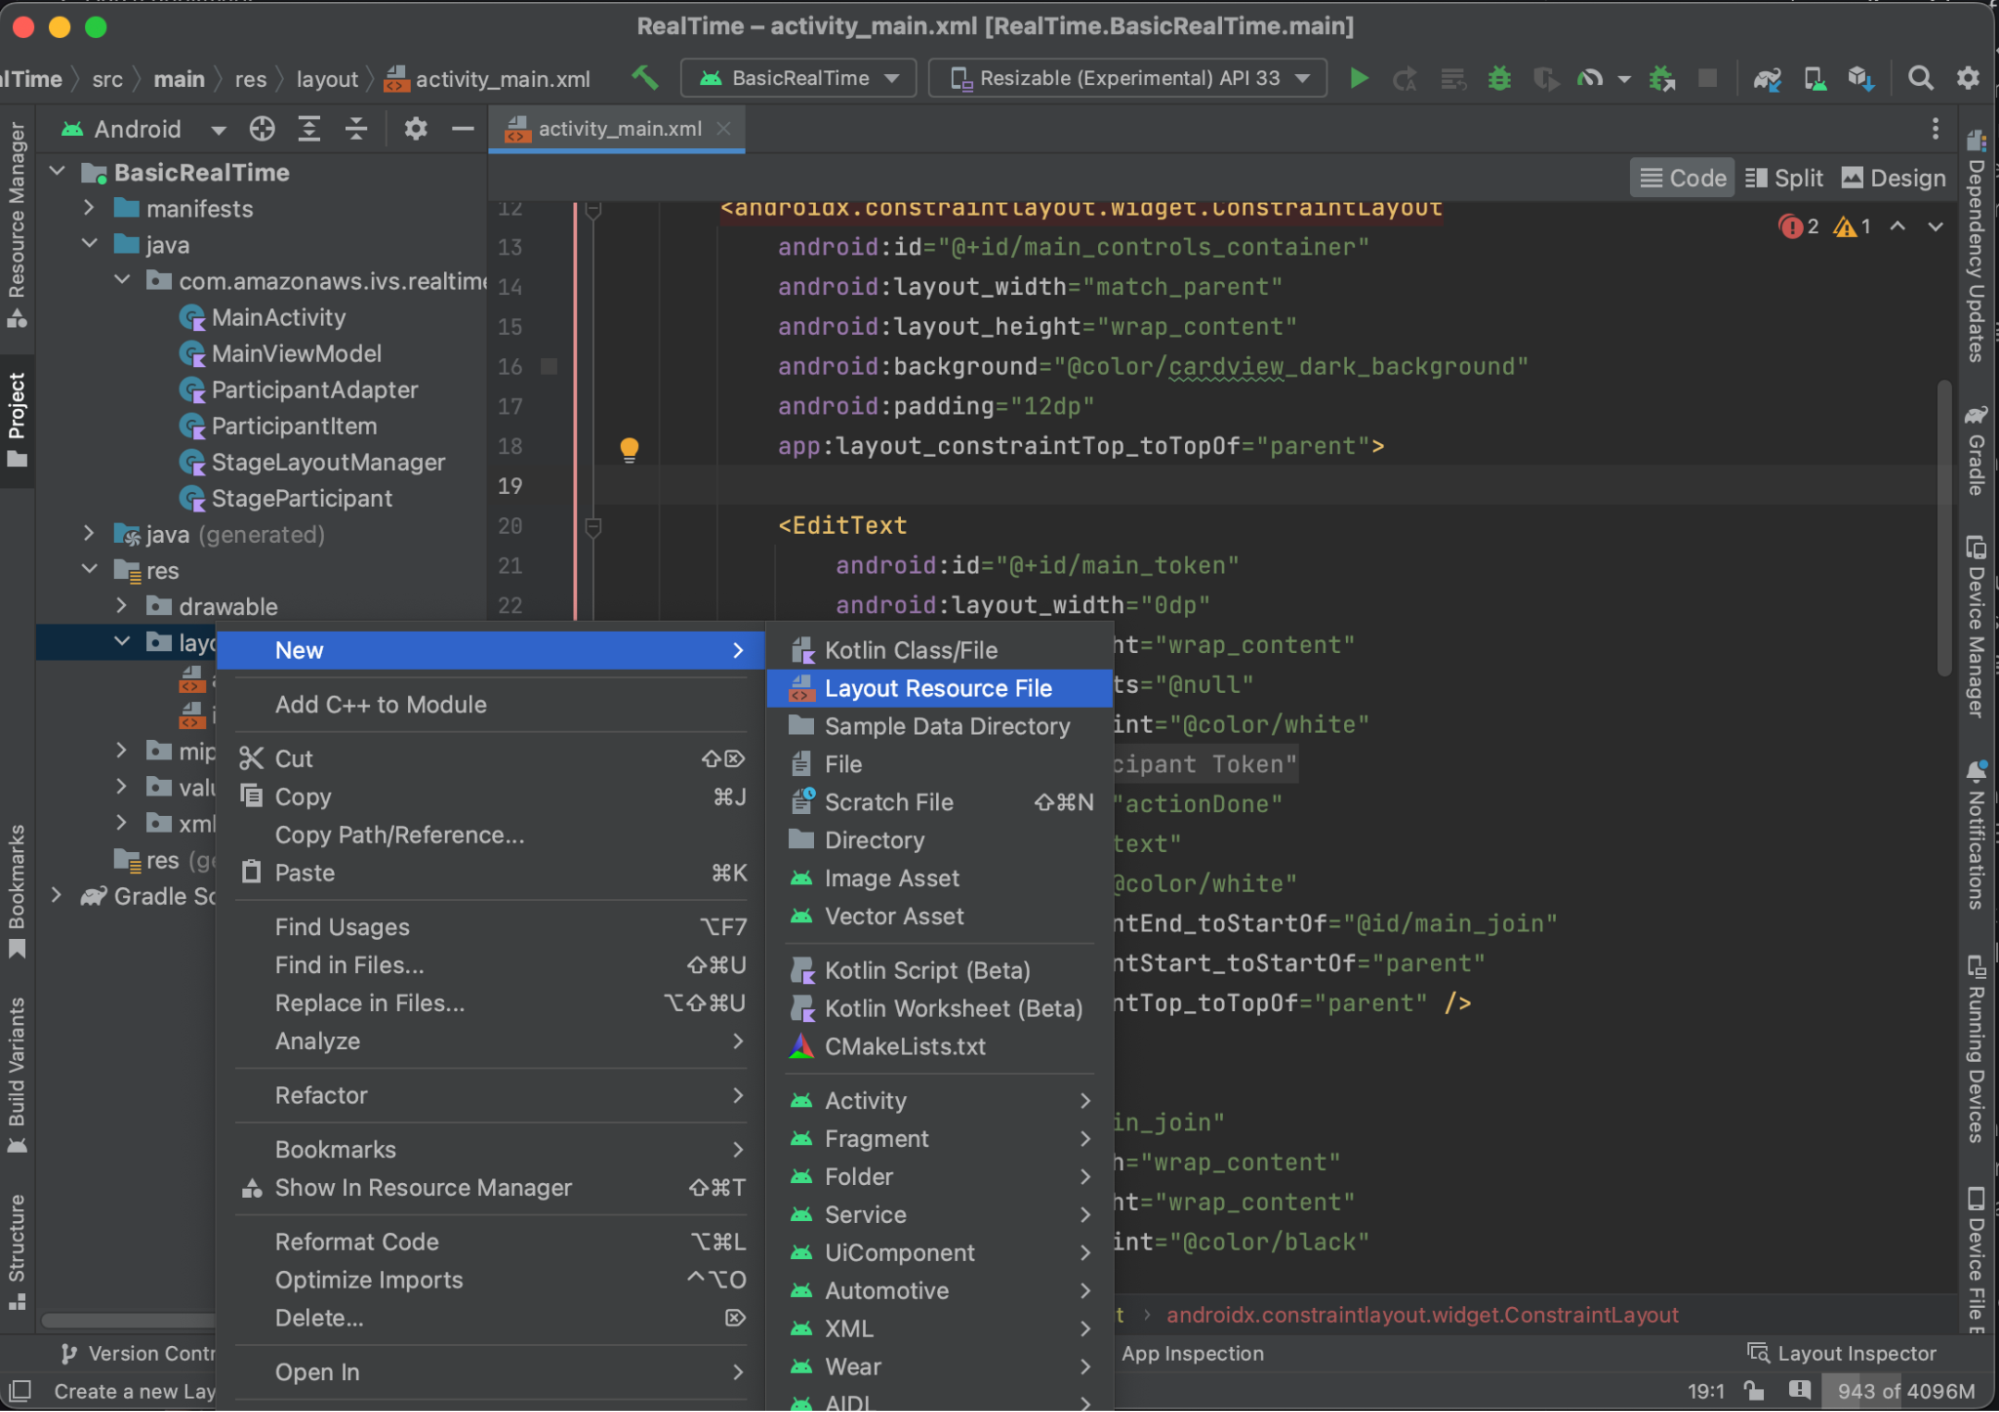
現在,將為 RecyclerView 建立項目檢視。若要執行此操作,在 res/layout 目錄上按一下滑鼠右鍵,然後選取新增 > 配置資源檔案。將此新檔案命名為 item_stage_participant.xml。
此項目的配置很簡單:包含一個用於轉譯參與者影片串流的檢視,以及一個用於顯示參與者資訊的標籤清單:
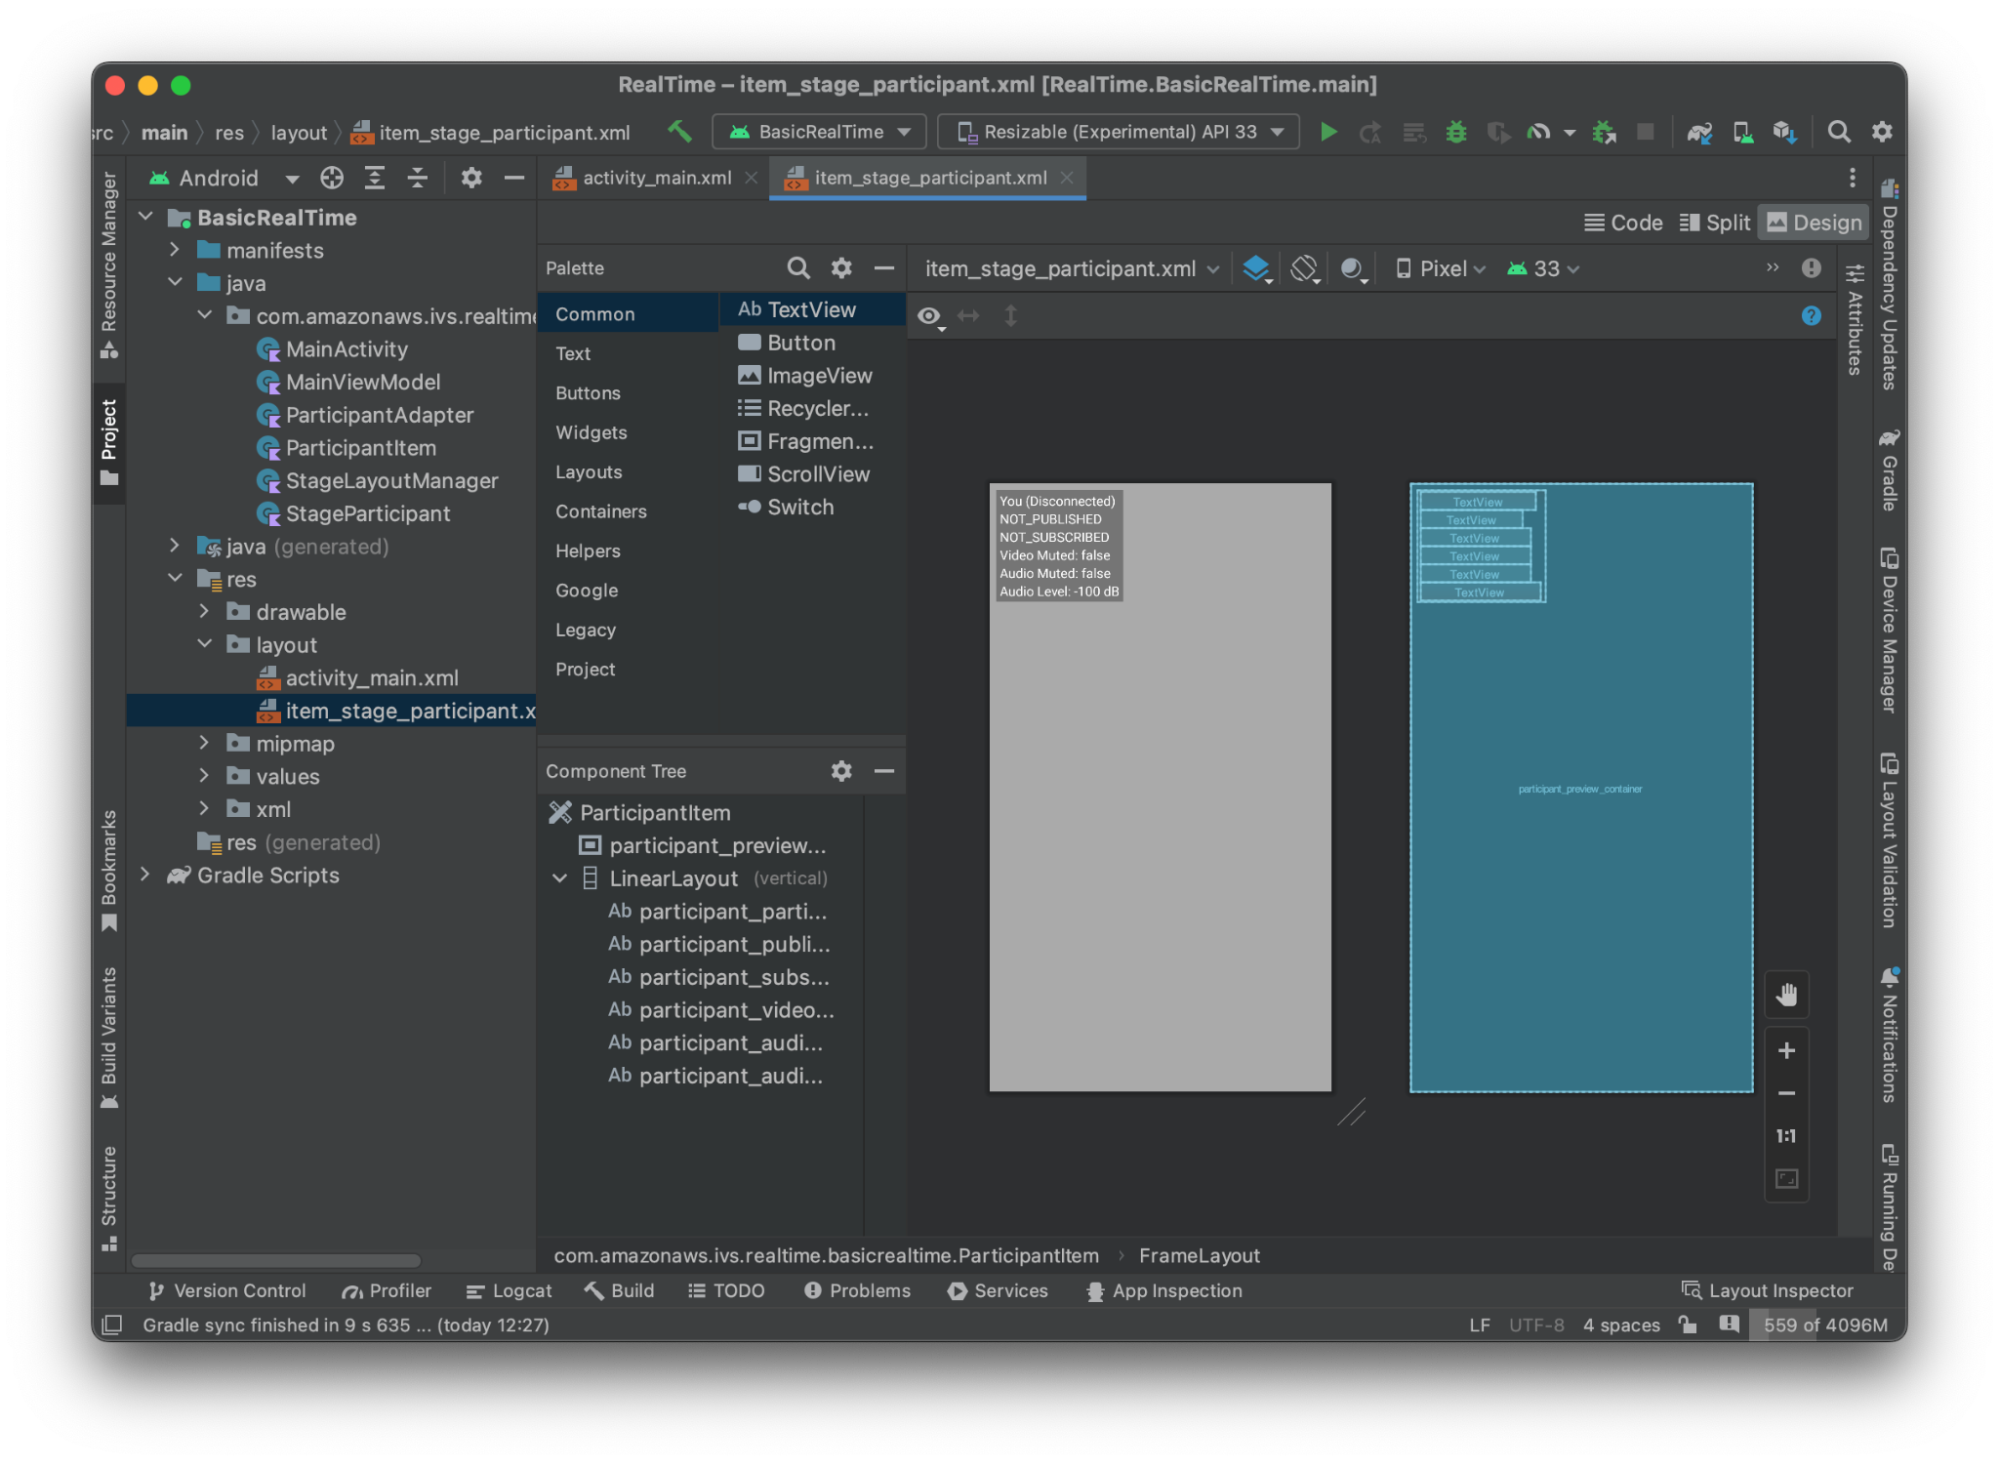
下面是 XML:
<?xml version="1.0" encoding="utf-8"?>
<com.amazonaws.ivs.realtime.basicrealtime.ParticipantItem xmlns:android="http://schemas.android.com/apk/res/android"
    xmlns:app="http://schemas.android.com/apk/res-auto"
    xmlns:tools="http://schemas.android.com/tools"
    android:layout_width="match_parent"
    android:layout_height="match_parent">

    <FrameLayout
        android:id="@+id/participant_preview_container"
        android:layout_width="match_parent"
        android:layout_height="match_parent"
        tools:background="@android:color/darker_gray" />

    <LinearLayout
        android:layout_width="wrap_content"
        android:layout_height="wrap_content"
        android:layout_marginStart="8dp"
        android:layout_marginTop="8dp"
        android:background="#50000000"
        android:orientation="vertical"
        android:paddingLeft="4dp"
        android:paddingTop="2dp"
        android:paddingRight="4dp"
        android:paddingBottom="2dp"
        app:layout_constraintStart_toStartOf="parent"
        app:layout_constraintTop_toTopOf="parent">

        <TextView
            android:id="@+id/participant_participant_id"
            android:layout_width="wrap_content"
            android:layout_height="wrap_content"
            android:textColor="@android:color/white"
            android:textSize="16sp"
            tools:text="You (Disconnected)" />

        <TextView
            android:id="@+id/participant_publishing"
            android:layout_width="wrap_content"
            android:layout_height="wrap_content"
            android:textColor="@android:color/white"
            android:textSize="16sp"
            tools:text="NOT_PUBLISHED" />

        <TextView
            android:id="@+id/participant_subscribed"
            android:layout_width="wrap_content"
            android:layout_height="wrap_content"
            android:textColor="@android:color/white"
            android:textSize="16sp"
            tools:text="NOT_SUBSCRIBED" />

        <TextView
            android:id="@+id/participant_video_muted"
            android:layout_width="wrap_content"
            android:layout_height="wrap_content"
            android:textColor="@android:color/white"
            android:textSize="16sp"
            tools:text="Video Muted: false" />

        <TextView
            android:id="@+id/participant_audio_muted"
            android:layout_width="wrap_content"
            android:layout_height="wrap_content"
            android:textColor="@android:color/white"
            android:textSize="16sp"
            tools:text="Audio Muted: false" />

        <TextView
            android:id="@+id/participant_audio_level"
            android:layout_width="wrap_content"
            android:layout_height="wrap_content"
            android:textColor="@android:color/white"
            android:textSize="16sp"
            tools:text="Audio Level: -100 dB" />

    </LinearLayout>

</com.amazonaws.ivs.realtime.basicrealtime.ParticipantItem>
此 XML 檔案擴充了尚未建立的類別 ParticipantItem。由於 XML 包括完整的命名空間,因此請務必將此 XML 檔案更新至您的命名空間。建立此類別並設定檢視,否則現在將其保留為空白。
建立一個新的 Kotlin 類別 ParticipantItem:
package com.amazonaws.ivs.realtime.basicrealtime

import android.content.Context
import android.util.AttributeSet
import android.widget.FrameLayout
import android.widget.TextView
import kotlin.math.roundToInt

class ParticipantItem @JvmOverloads constructor(
    context: Context,
    attrs: AttributeSet? = null,
    defStyleAttr: Int = 0,
    defStyleRes: Int = 0,
) : FrameLayout(context, attrs, defStyleAttr, defStyleRes) {

    private lateinit var previewContainer: FrameLayout
    private lateinit var textViewParticipantId: TextView
    private lateinit var textViewPublish: TextView
    private lateinit var textViewSubscribe: TextView
    private lateinit var textViewVideoMuted: TextView
    private lateinit var textViewAudioMuted: TextView
    private lateinit var textViewAudioLevel: TextView

    override fun onFinishInflate() {
        super.onFinishInflate()
        previewContainer = findViewById(R.id.participant_preview_container)
        textViewParticipantId = findViewById(R.id.participant_participant_id)
        textViewPublish = findViewById(R.id.participant_publishing)
        textViewSubscribe = findViewById(R.id.participant_subscribed)
        textViewVideoMuted = findViewById(R.id.participant_video_muted)
        textViewAudioMuted = findViewById(R.id.participant_audio_muted)
        textViewAudioLevel = findViewById(R.id.participant_audio_level)
    }
}
許可
若要使用攝影機和麥克風,您需要向使用者請求許可。我們對此遵循標準許可流程:
override fun onStart() {
    super.onStart()
    requestPermission()
}

private val requestPermissionLauncher =
    registerForActivityResult(ActivityResultContracts.RequestMultiplePermissions()) { permissions ->
        if (permissions[Manifest.permission.CAMERA] == true && permissions[Manifest.permission.RECORD_AUDIO] == true) {
            viewModel.permissionGranted() // we will add this later
        }
    }

private val permissions = listOf(
    Manifest.permission.CAMERA,
    Manifest.permission.RECORD_AUDIO,
)

private fun requestPermission() {
    when {
        this.hasPermissions(permissions) -> viewModel.permissionGranted() // we will add this later
        else -> requestPermissionLauncher.launch(permissions.toTypedArray())
    }
}

private fun Context.hasPermissions(permissions: List<String>): Boolean {
    return permissions.all {
        ContextCompat.checkSelfPermission(this, it) == PackageManager.PERMISSION_GRANTED
    }
}
應用程式狀態
我們的應用程式會在 MainViewModel.kt 中本機追蹤參與者,並且使用 Kotlin 的 StateFlowMainActivity。
建立一個新的 Kotlin 類別 MainViewModel:
package com.amazonaws.ivs.realtime.basicrealtime

import android.app.Application
import androidx.lifecycle.AndroidViewModel

class MainViewModel(application: Application) : AndroidViewModel(application), Stage.Strategy, StageRenderer {

}
將在 MainActivity.kt 中管理檢視模型:
import androidx.activity.viewModels

private val viewModel: MainViewModel by viewModels()
若要使用 AndroidViewModel 和這些 Kotlin ViewModel 延伸,您需要將以下內容新增至模組的 build.gradle 檔案:
implementation 'androidx.core:core-ktx:1.10.1'
implementation "androidx.activity:activity-ktx:1.7.2"
implementation 'androidx.appcompat:appcompat:1.6.1'
implementation 'com.google.android.material:material:1.10.0'
implementation "androidx.lifecycle:lifecycle-extensions:2.2.0"

def lifecycle_version = "2.6.1"
implementation "androidx.lifecycle:lifecycle-livedata-ktx:$lifecycle_version"
implementation "androidx.lifecycle:lifecycle-viewmodel-ktx:$lifecycle_version"
implementation 'androidx.constraintlayout:constraintlayout:2.1.4'
RecyclerView Adapter
我們將建立一個簡單的 RecyclerView.Adapter 子類別,以追蹤參與者並更新階段事件的 RecyclerView。首先,需要一個代表參與者的類別。建立一個新的 Kotlin 類別 StageParticipant:
package com.amazonaws.ivs.realtime.basicrealtime

import com.amazonaws.ivs.broadcast.Stage
import com.amazonaws.ivs.broadcast.StageStream

class StageParticipant(val isLocal: Boolean, var participantId: String?) {
    var publishState = Stage.PublishState.NOT_PUBLISHED
    var subscribeState = Stage.SubscribeState.NOT_SUBSCRIBED
    var streams = mutableListOf<StageStream>()

    val stableID: String
        get() {
            return if (isLocal) {
                "LocalUser"
            } else {
                requireNotNull(participantId)
            }
        }
}
我們將使用接下來會建立的 ParticipantAdapter 類別中的此類別。首先定義類別,並建立用於追蹤參與者的變數:
package com.amazonaws.ivs.realtime.basicrealtime

import android.view.LayoutInflater
import android.view.ViewGroup
import androidx.recyclerview.widget.RecyclerView

class ParticipantAdapter : RecyclerView.Adapter<ParticipantAdapter.ViewHolder>() {

    private val participants = mutableListOf<StageParticipant>()
此外還必須定義 RecyclerView.ViewHolder,再實作其餘的覆寫:
class ViewHolder(val participantItem: ParticipantItem) : RecyclerView.ViewHolder(participantItem)
使用此類別,可實作標準 RecyclerView.Adapter 覆寫:
override fun onCreateViewHolder(parent: ViewGroup, viewType: Int): ViewHolder {
    val item = LayoutInflater.from(parent.context)
        .inflate(R.layout.item_stage_participant, parent, false) as ParticipantItem
    return ViewHolder(item)
}

override fun getItemCount(): Int {
    return participants.size
}

override fun getItemId(position: Int): Long =
    participants[position]
        .stableID
        .hashCode()
        .toLong()

override fun onBindViewHolder(holder: ViewHolder, position: Int) {
    return holder.participantItem.bind(participants[position])
}

override fun onBindViewHolder(holder: ViewHolder, position: Int, payloads: MutableList<Any>) {
    val updates = payloads.filterIsInstance<StageParticipant>()
    if (updates.isNotEmpty()) {
        updates.forEach { holder.participantItem.bind(it) // implemented later }
    } else {
        super.onBindViewHolder(holder, position, payloads)
    }
}
最後,我們新增一些新的方法,當對參與者做出變更時,將會從 MainViewModel 中呼叫這些方法。這些方法是轉接器上的標準 CRUD 作業。
fun participantJoined(participant: StageParticipant) {
    participants.add(participant)
    notifyItemInserted(participants.size - 1)
}

fun participantLeft(participantId: String) {
    val index = participants.indexOfFirst { it.participantId == participantId }
    if (index != -1) {
        participants.removeAt(index)
        notifyItemRemoved(index)
    }
}

fun participantUpdated(participantId: String?, update: (participant: StageParticipant) -> Unit) {
    val index = participants.indexOfFirst { it.participantId == participantId }
    if (index != -1) {
        update(participants[index])
        notifyItemChanged(index, participants[index])
    }
}
回到 MainViewModel,我們需要建立並保留此轉接器的參考:
internal val participantAdapter = ParticipantAdapter()
階段狀態
還需要追蹤 MainViewModel 內的一些階段狀態。現在,我們來定義這些屬性:
private val _connectionState = MutableStateFlow(Stage.ConnectionState.DISCONNECTED)
val connectionState = _connectionState.asStateFlow()

private var publishEnabled: Boolean = false
    set(value) {
        field = value
        // Because the strategy returns the value of `checkboxPublish.isChecked`, just call `refreshStrategy`.
        stage?.refreshStrategy()
    }

private var deviceDiscovery: DeviceDiscovery? = null
private var stage: Stage? = null
private var streams = mutableListOf<LocalStageStream>()
若要在加入階段之前查看您自己的預覽,我們會立即建立本機參與者:
init {
    deviceDiscovery = DeviceDiscovery(application)

    // Create a local participant immediately to render our camera preview and microphone stats
    val localParticipant = StageParticipant(true, null)
    participantAdapter.participantJoined(localParticipant)
}
我們希望確保在清除 ViewModel 時也清除這些資源。我們會馬上覆寫 onCleared(),因此不要忘了清除這些資源。
override fun onCleared() {
    stage?.release()
    deviceDiscovery?.release()
    deviceDiscovery = null
    super.onCleared()
}
現在,一旦授予許可,我們會填充本機 streams,實作之前呼叫的 permissionsGranted 方法:
internal fun permissionGranted() {
    val deviceDiscovery = deviceDiscovery ?: return
    streams.clear()
    val devices = deviceDiscovery.listLocalDevices()
    // Camera
    devices
        .filter { it.descriptor.type == Device.Descriptor.DeviceType.CAMERA }
        .maxByOrNull { it.descriptor.position == Device.Descriptor.Position.FRONT }
        ?.let { streams.add(ImageLocalStageStream(it)) }
    // Microphone
    devices
        .filter { it.descriptor.type == Device.Descriptor.DeviceType.MICROPHONE }
        .maxByOrNull { it.descriptor.isDefault }
        ?.let { streams.add(AudioLocalStageStream(it)) }

    stage?.refreshStrategy()

    // Update our local participant with these new streams
    participantAdapter.participantUpdated(null) {
        it.streams.clear()
        it.streams.addAll(streams)
    }
}
實作階段 SDK
以下是三個以即時功能為基礎的核心概念:階段、策略和轉譯器。設計目標是盡可能減少打造工作產品所需的用戶端邏輯數量。
Stage.Strategy
Stage.Strategy 實作很簡單:
override fun stageStreamsToPublishForParticipant(
    stage: Stage,
    participantInfo: ParticipantInfo
): MutableList<LocalStageStream> {
    // Return the camera and microphone to be published.
    // This is only called if `shouldPublishFromParticipant` returns true.
    return streams
}

override fun shouldPublishFromParticipant(stage: Stage, participantInfo: ParticipantInfo): Boolean {
    return publishEnabled
}

override fun shouldSubscribeToParticipant(stage: Stage, participantInfo: ParticipantInfo): Stage.SubscribeType {
    // Subscribe to both audio and video for all publishing participants.
    return Stage.SubscribeType.AUDIO_VIDEO
}
總而言之,根據內部的 publishEnabled 狀態來發布,如果要發布,我們會發布之前收集的串流。最後,針對此範例,始終會訂閱其他參與者,同時接收其音訊和影片。
StageRenderer
StageRenderer 實作也非常簡單,但要考慮包含相當多程式碼的函數數量。當 SDK 通知我們有關參與者的變更時,此轉譯器中的一般方法是更新 ParticipantAdapter。在某些情況下,對於本機參與者的處理方式有所不同,因為我們已決定自行管理他們,以便在他們加入之前查看其攝影機預覽。
override fun onError(exception: BroadcastException) {
    Toast.makeText(getApplication(), "onError ${exception.localizedMessage}", Toast.LENGTH_LONG).show()
    Log.e("BasicRealTime", "onError $exception")
}

override fun onConnectionStateChanged(
    stage: Stage,
    connectionState: Stage.ConnectionState,
    exception: BroadcastException?
) {
    _connectionState.value = connectionState
}

override fun onParticipantJoined(stage: Stage, participantInfo: ParticipantInfo) {
    if (participantInfo.isLocal) {
        // If this is the local participant joining the stage, update the participant with a null ID because we
        // manually added that participant when setting up our preview
        participantAdapter.participantUpdated(null) {
            it.participantId = participantInfo.participantId
        }
    } else {
        // If they are not local, add them normally
        participantAdapter.participantJoined(
            StageParticipant(
                participantInfo.isLocal,
                participantInfo.participantId
            )
        )
    }
}

override fun onParticipantLeft(stage: Stage, participantInfo: ParticipantInfo) {
    if (participantInfo.isLocal) {
        // If this is the local participant leaving the stage, update the ID but keep it around because
        // we want to keep the camera preview active
        participantAdapter.participantUpdated(participantInfo.participantId) {
            it.participantId = null
        }
    } else {
        // If they are not local, have them leave normally
        participantAdapter.participantLeft(participantInfo.participantId)
    }
}

override fun onParticipantPublishStateChanged(
    stage: Stage,
    participantInfo: ParticipantInfo,
    publishState: Stage.PublishState
) {
    // Update the publishing state of this participant
    participantAdapter.participantUpdated(participantInfo.participantId) {
        it.publishState = publishState
    }
}

override fun onParticipantSubscribeStateChanged(
    stage: Stage,
    participantInfo: ParticipantInfo,
    subscribeState: Stage.SubscribeState
) {
    // Update the subscribe state of this participant
    participantAdapter.participantUpdated(participantInfo.participantId) {
        it.subscribeState = subscribeState
    }
}

override fun onStreamsAdded(stage: Stage, participantInfo: ParticipantInfo, streams: MutableList<StageStream>) {
    // We don't want to take any action for the local participant because we track those streams locally
    if (participantInfo.isLocal) {
        return
    }
    // For remote participants, add these new streams to that participant's streams array.
    participantAdapter.participantUpdated(participantInfo.participantId) {
        it.streams.addAll(streams)
    }
}

override fun onStreamsRemoved(stage: Stage, participantInfo: ParticipantInfo, streams: MutableList<StageStream>) {
    // We don't want to take any action for the local participant because we track those streams locally
    if (participantInfo.isLocal) {
        return
    }
    // For remote participants, remove these streams from that participant's streams array.
    participantAdapter.participantUpdated(participantInfo.participantId) {
        it.streams.removeAll(streams)
    }
}

override fun onStreamsMutedChanged(
    stage: Stage,
    participantInfo: ParticipantInfo,
    streams: MutableList<StageStream>
) {
    // We don't want to take any action for the local participant because we track those streams locally
    if (participantInfo.isLocal) {
        return
    }
    // For remote participants, notify the adapter that the participant has been updated. There is no need to modify
    // the `streams` property on the `StageParticipant` because it is the same `StageStream` instance. Just
    // query the `isMuted` property again.
    participantAdapter.participantUpdated(participantInfo.participantId) {}
}
實作自訂 RecyclerView LayoutManager
配置不同數量的參與者可能很複雜。您希望他們佔用整個父檢視的框架,但不想單獨處理每個參與者配置。為了簡化這一點,我們將逐步實作 RecyclerView.LayoutManager。
建立另一個新類別 StageLayoutManager,這應當會延伸 GridLayoutManager。設計此類別的目的是,根據以流程為基礎的資料列/資料欄配置中的參與者人數,來計算每個參與者的配置。每個資料列的高度與其他資料列相同,但每個資料列的寬度可能有所差異。請參閱 layouts 變數上方的程式碼註解,描述了如何自訂此行為。
package com.amazonaws.ivs.realtime.basicrealtime

import android.content.Context
import androidx.recyclerview.widget.GridLayoutManager
import androidx.recyclerview.widget.RecyclerView

class StageLayoutManager(context: Context?) : GridLayoutManager(context, 6) {

    companion object {
        /**
         * This 2D array contains the description of how the grid of participants should be rendered
         * The index of the 1st dimension is the number of participants needed to active that configuration
         * Meaning if there is 1 participant, index 0 will be used. If there are 5 participants, index 4 will be used.
         *
         * The 2nd dimension is a description of the layout. The length of the array is the number of rows that
         * will exist, and then each number within that array is the number of columns in each row.
         *
         * See the code comments next to each index for concrete examples.
         *
         * This can be customized to fit any layout configuration needed.
         */
        val layouts: List<List<Int>> = listOf(
            // 1 participant
            listOf(1), // 1 row, full width
            // 2 participants
            listOf(1, 1), // 2 rows, all columns are full width
            // 3 participants
            listOf(1, 2), // 2 rows, first row's column is full width then 2nd row's columns are 1/2 width
            // 4 participants
            listOf(2, 2), // 2 rows, all columns are 1/2 width
            // 5 participants
            listOf(1, 2, 2), // 3 rows, first row's column is full width, 2nd and 3rd row's columns are 1/2 width
            // 6 participants
            listOf(2, 2, 2), // 3 rows, all column are 1/2 width
            // 7 participants
            listOf(2, 2, 3), // 3 rows, 1st and 2nd row's columns are 1/2 width, 3rd row's columns are 1/3rd width
            // 8 participants
            listOf(2, 3, 3),
            // 9 participants
            listOf(3, 3, 3),
            // 10 participants
            listOf(2, 3, 2, 3),
            // 11 participants
            listOf(2, 3, 3, 3),
            // 12 participants
            listOf(3, 3, 3, 3),
        )
    }

    init {
        spanSizeLookup = object : SpanSizeLookup() {
            override fun getSpanSize(position: Int): Int {
                if (itemCount <= 0) {
                    return 1
                }
                // Calculate the row we're in
                val config = layouts[itemCount - 1]
                var row = 0
                var curPosition = position
                while (curPosition - config[row] >= 0) {
                    curPosition -= config[row]
                    row++
                }
                // spanCount == max spans, config[row] = number of columns we want
                // So spanCount / config[row] would be something like 6 / 3 if we want 3 columns.
                // So this will take up 2 spans, with a max of 6 is 1/3rd of the view.
                return spanCount / config[row]
            }
        }
    }

    override fun onLayoutChildren(recycler: RecyclerView.Recycler?, state: RecyclerView.State?) {
        if (itemCount <= 0 || state?.isPreLayout == true) return

        val parentHeight = height
        val itemHeight = parentHeight / layouts[itemCount - 1].size // height divided by number of rows.

        // Set the height of each view based on how many rows exist for the current participant count.
        for (i in 0 until childCount) {
            val child = getChildAt(i) ?: continue
            val layoutParams = child.layoutParams as RecyclerView.LayoutParams
            if (layoutParams.height != itemHeight) {
                layoutParams.height = itemHeight
                child.layoutParams = layoutParams
            }
        }
        // After we set the height for all our views, call super.
        // This works because our RecyclerView can not scroll and all views are always visible with stable IDs.
        super.onLayoutChildren(recycler, state)
    }

    override fun canScrollVertically(): Boolean = false
    override fun canScrollHorizontally(): Boolean = false
}
回到 MainActivity.kt,我們需要為 RecyclerView 設定轉接器和配置管理器:
// In onCreate after setting recyclerView.
recyclerView.layoutManager = StageLayoutManager(this)
recyclerView.adapter = viewModel.participantAdapter
掛接 UI 動作
即將結束;我們只需掛接幾個 UI 動作。
首先,讓 MainActivity 觀測 MainViewModel 中的 StateFlow 變更:
// At the end of your onCreate method
lifecycleScope.launch {
    repeatOnLifecycle(Lifecycle.State.CREATED) {
        viewModel.connectionState.collect { state ->
            buttonJoin.setText(if (state == ConnectionState.DISCONNECTED) R.string.join else R.string.leave)
            textViewState.text = getString(R.string.state, state.name)
        }
    }
}
接著,將接聽程式新增至加入按鈕和發布核取方塊:
buttonJoin.setOnClickListener {
    viewModel.joinStage(editTextToken.text.toString())
}
checkboxPublish.setOnCheckedChangeListener { _, isChecked ->
    viewModel.setPublishEnabled(isChecked)
}
上述兩個呼叫功能均位於 MainViewModel,現在將在此實作:
internal fun joinStage(token: String) {
    if (_connectionState.value != Stage.ConnectionState.DISCONNECTED) {
        // If we're already connected to a stage, leave it.
        stage?.leave()
    } else {
        if (token.isEmpty()) {
            Toast.makeText(getApplication(), "Empty Token", Toast.LENGTH_SHORT).show()
            return
        }
        try {
            // Destroy the old stage first before creating a new one.
            stage?.release()
            val stage = Stage(getApplication(), token, this)
            stage.addRenderer(this)
            stage.join()
            this.stage = stage
        } catch (e: BroadcastException) {
            Toast.makeText(getApplication(), "Failed to join stage ${e.localizedMessage}", Toast.LENGTH_LONG).show()
            e.printStackTrace()
        }
    }
}

internal fun setPublishEnabled(enabled: Boolean) {
    publishEnabled = enabled
}
轉譯參與者
最後,我們需要將從 SDK 接收的資料,轉譯到之前建立的參與者項目上。我們已經完成了 RecyclerView 邏輯,因此只需實作 ParticipantItem 中的 bind API。
從新增空函數開始,然後逐步實作:
fun bind(participant: StageParticipant) {

}
首先,將處理簡易狀態、參與者 ID、發布狀態和訂閱狀態。對於這些,只需直接更新 TextViews:
val participantId = if (participant.isLocal) {
    "You (${participant.participantId ?: "Disconnected"})"
} else {
    participant.participantId
}
textViewParticipantId.text = participantId
textViewPublish.text = participant.publishState.name
textViewSubscribe.text = participant.subscribeState.name
接著,將更新音訊和影片靜音狀態。為取得靜音狀態,需要從串流陣列中找到 ImageDevice 和 AudioDevice。為優化效能,我們會記住上次連接的裝置 ID。
// This belongs outside the `bind` API.
private var imageDeviceUrn: String? = null
private var audioDeviceUrn: String? = null

// This belongs inside the `bind` API.
val newImageStream = participant
    .streams
    .firstOrNull { it.device is ImageDevice }
textViewVideoMuted.text = if (newImageStream != null) {
    if (newImageStream.muted) "Video muted" else "Video not muted"
} else {
    "No video stream"
}

val newAudioStream = participant
    .streams
    .firstOrNull { it.device is AudioDevice }
textViewAudioMuted.text = if (newAudioStream != null) {
    if (newAudioStream.muted) "Audio muted" else "Audio not muted"
} else {
    "No audio stream"
}
最後,要轉譯 imageDevice 的預覽:
if (newImageStream?.device?.descriptor?.urn != imageDeviceUrn) {
    // If the device has changed, remove all subviews from the preview container
    previewContainer.removeAllViews()
    (newImageStream?.device as? ImageDevice)?.let {
        val preview = it.getPreviewView(BroadcastConfiguration.AspectMode.FIT)
        previewContainer.addView(preview)
        preview.layoutParams = FrameLayout.LayoutParams(
            FrameLayout.LayoutParams.MATCH_PARENT,
            FrameLayout.LayoutParams.MATCH_PARENT
        )
    }
}
imageDeviceUrn = newImageStream?.device?.descriptor?.urn
然後顯示 audioDevice 中的音訊統計資料:
if (newAudioStream?.device?.descriptor?.urn != audioDeviceUrn) {
    (newAudioStream?.device as? AudioDevice)?.let {
        it.setStatsCallback { _, rms ->
            textViewAudioLevel.text = "Audio Level: ${rms.roundToInt()} dB"
        }
    }
}
audioDeviceUrn = newAudioStream?.device?.descriptor?.urn
