本文為英文版的機器翻譯版本,如內容有任何歧義或不一致之處,概以英文版為準。
將 SSM Agent 設定為使用 Linux 節點上的代理
您可以透過建立覆寫組態檔案並將 http_proxy、 和 no_proxy設定新增至檔案https_proxy,來設定 AWS Systems Manager 客服人員 (SSM Agent) 透過 HTTP 代理進行通訊。如果您安裝較新或較舊版本的 SSM Agent,覆寫檔案也會保留代理設定。本節包括在 upstart 和 systemd 環境中建立覆寫檔案的程序。如果您打算使用 Session Manager,請注意不支援 HTTPS 代理伺服器。
將 SSM Agent設定為使用代理 (upstart)
使用下列程序可建立 upstart 環境的覆寫組態檔案。
設定 SSM Agent 以使用代理 (upstart)
-
連線至安裝 SSM Agent 所在的受管執行個體。
-
開啟諸如 VIM 的簡單編輯器,並根據使用的是 HTTP 代理伺服器或 HTTPS 代理伺服器,來新增下列其中一個組態。
對於 HTTP 代理伺服器:
env http_proxy=http://hostname:portenv https_proxy=http://hostname:portenv no_proxy=IP address for instance metadata services (IMDS)對於 HTTPS 代理伺服器:
env http_proxy=http://hostname:portenv https_proxy=https://hostname:portenv no_proxy=IP address for instance metadata services (IMDS)重要
將
no_proxy設定新增到檔案,並指定 IP 位址。no_proxy的 IP 位址是 Systems Manager 的執行個體中繼資料服務 (IMDS) 端點。如果未指定no_proxy,則對 Systems Manager 的呼叫會從代理服務取得身分 (如果啟用了 IMDSv1 備用),或對 Systems Manager 的呼叫失敗 (如果強制執行 IMDSv2)。-
針對 IPv4,請指定
no_proxy=169.254.169.254。 -
針對 IPv6,請指定
no_proxy=[fd00:ec2::254]。執行個體中繼資料服務的 IPv6 地址與 IMDSv2 命令相容。IPv6 位址只能在建置於 AWS Nitro 系統的執行個體上進行存取。如需詳細資訊,請參閱《Amazon EC2 使用者指南》中的 How Instance Metadata Service Version 2 works。
-
-
在下列位置使用名稱
amazon-ssm-agent.override儲存檔案:/etc/init/ -
使用下列命令停止和重新啟動 SSM Agent:
sudo service stop amazon-ssm-agent
sudo service start amazon-ssm-agent
注意
如需有關在 Upstart 環境中使用 .override 檔案的詳細資訊,請參閱 init:Upstart init 協助程式任務組態
將 SSM Agent設定為使用代理 (systemd)
使用以下程序來設定 SSM Agent,以使用 systemd 環境中的代理。
注意
此程序中的某些步驟包含 Ubuntu Server 執行個體的明確指示,以使用 Snap 安裝 SSM Agent。
-
連接到其中安裝 SSM Agent 的執行個體。
-
根據作業系統類型,執行以下其中一個命令。
-
在 Ubuntu Server 執行個體上,使用 Snap 安裝 SSM Agent︰
sudo systemctl edit snap.amazon-ssm-agent.amazon-ssm-agent在其他作業系統中:
sudo systemctl edit amazon-ssm-agent
-
-
開啟諸如 VIM 的簡單編輯器,並根據使用的是 HTTP 代理伺服器或 HTTPS 代理伺服器,來新增下列其中一個組態。
確保在「
### Lines below this comment will be discarded」的註解上方輸入資訊,如下圖所示。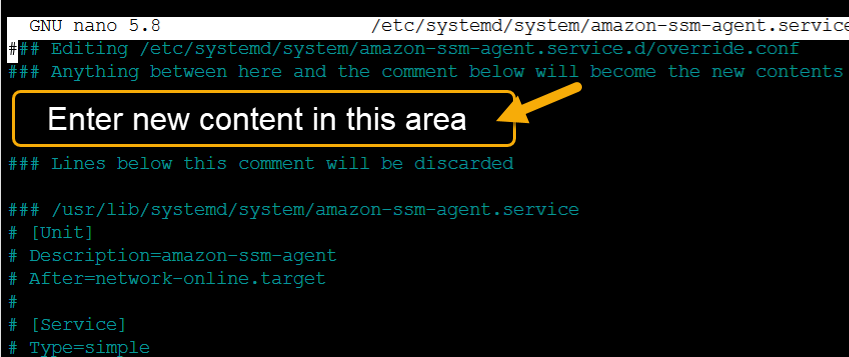
對於 HTTP 代理伺服器:
[Service]
Environment="http_proxy=http://hostname:port"
Environment="https_proxy=http://hostname:port"
Environment="no_proxy=IP address for instance metadata services (IMDS)"
對於 HTTPS 代理伺服器:
[Service]
Environment="http_proxy=http://hostname:port"
Environment="https_proxy=https://hostname:port"
Environment="no_proxy=IP address for instance metadata services (IMDS)"
重要
將
no_proxy設定新增到檔案,並指定 IP 位址。no_proxy的 IP 位址是 Systems Manager 的執行個體中繼資料服務 (IMDS) 端點。如果未指定no_proxy,則對 Systems Manager 的呼叫會從代理服務取得身分 (如果啟用了 IMDSv1 備用),或對 Systems Manager 的呼叫失敗 (如果強制執行 IMDSv2)。-
針對 IPv4,請指定
no_proxy=169.254.169.254。 -
針對 IPv6,請指定
no_proxy=[fd00:ec2::254]。執行個體中繼資料服務的 IPv6 地址與 IMDSv2 命令相容。IPv6 位址只能在建置於 AWS Nitro 系統的執行個體上進行存取。如需詳細資訊,請參閱《Amazon EC2 使用者指南》中的 How Instance Metadata Service Version 2 works。
-
-
儲存您的變更。根據作業系統類型,系統會自動建立下列其中一個檔案。
-
在 Ubuntu Server 執行個體上,使用 Snap 安裝 SSM Agent︰
/etc/systemd/system/snap.amazon-ssm-agent.amazon-ssm-agent.service.d/override.conf -
在 Amazon Linux 2 和 Amazon Linux 2023 執行個體上:
/etc/systemd/system/amazon-ssm-agent.service.d/override.conf -
在其他作業系統中:
/etc/systemd/system/amazon-ssm-agent.service.d/amazon-ssm-agent.override
-
-
根據作業系統類型,使用下列其中一個命令,重新啟動 SSM Agent。
-
在使用 Snap 安裝的 Ubuntu Server 執行個體上︰
sudo systemctl daemon-reload && sudo systemctl restart snap.amazon-ssm-agent.amazon-ssm-agent -
在其他作業系統中:
sudo systemctl daemon-reload && sudo systemctl restart amazon-ssm-agent
-
注意
如需有關在 systemd 環境中使用 .override 檔案的詳細資訊,請參閱 Red Hat Enterprise Linux 7 系統管理員指南中的修改現有單元檔案
