Updating stacks directly
When you want to quickly deploy updates to your stack, perform a direct update. With a direct update, you submit a template or input parameters that specify updates to the resources in the stack, and AWS CloudFormation immediately deploys them. If you want to use a template to make your updates, you can modify the current template and store it locally or in an Amazon S3 bucket.
For resource properties that don't support updates, you must keep the current values. To preview the changes that AWS CloudFormation will make to your stack before you update it, use change sets. For more information, see Updating stacks using change sets.
Note
When updating a stack, AWS CloudFormation might interrupt resources or replace updated resources, depending on which properties you update. For more information about resource update behaviors, see Update behaviors of stack resources.
To update a AWS CloudFormation stack (console)
-
Sign in to the AWS Management Console and open the AWS CloudFormation console at https://console.aws.amazon.com/cloudformation
. -
In the AWS CloudFormation console
, from the list of stacks, select the running stack that you want to update. -
In the stack details pane, choose Update.
-
If you haven't modified the stack template, select Use current template, and then choose Next.
If you have modified the template, select Replace current template and specify the location of the updated template in the Specify template section:
-
For a template stored locally on your computer, select Upload a template file. Choose Choose file to navigate to the file and select it, and then choose Next.
Note
If you upload a local template file, AWS CloudFormation uploads it to an Amazon Simple Storage Service (Amazon S3) bucket in your AWS account. If you don't already have an S3 bucket that was created by AWS CloudFormation, it creates a unique bucket for each Region in which you upload a template file. If you already have an S3 bucket that was created by AWS CloudFormation in your AWS account, AWS CloudFormation adds the template to that bucket.
Considerations to keep in mind about S3 buckets created by AWS CloudFormation
-
The buckets are accessible to anyone with Amazon S3 permissions in your AWS account.
-
AWS CloudFormation creates the buckets with server-side encryption enabled by default, thereby encrypting all objects stored in the bucket.
You can directly manage encryption options for buckets that AWS CloudFormation has created; for example, using the Amazon S3 console at https://console.aws.amazon.com/s3/
, or the AWS CLI. For more information, see Amazon S3 default encryption for S3 buckets in the Amazon Simple Storage Service User Guide. -
You can use your own bucket and manage its permissions by manually uploading templates to Amazon S3. When you create or update a stack, specify the Amazon S3 URL of a template file.
-
-
For a template stored in an Amazon S3 bucket, choose Amazon S3 URL. Enter or paste the URL for the template, and then choose Next.
If you have a template in a versioning-enabled bucket, you can specify a specific version of the template, such as
https://s3.amazonaws.com/templates/myTemplate.template?versionId=123ab1cdeKdOW5IH4GAcYbEngcpTJTDW. For more information, see Managing objects in a versioning-enabled bucket in the Amazon Simple Storage Service User Guide.
-
-
If your template contains parameters, on the Specify stack details page you can enter or modify the parameter values, and then choose Next.
AWS CloudFormation populates each parameter with the value that's currently set in the stack with the exception of parameters declared with the
NoEchoattribute; however, you can still use current values by checking Use existing value.For more information about using
NoEchoto mask sensitive information, in addition to using dynamic parameters to manage secrets, see the Do not embed credentials in your templates best practice.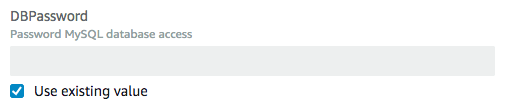
-
On the Configure stack options page, you can update the tags and permissions applied to the stack, and modify advanced options such as stack policy, rollback configuration, or update the Amazon SNS notification topic.
For more information about these options, see Setting AWS CloudFormation stack options.
Select Next.
-
Review the stack information and the changes that you submitted.
Check that you submitted the correct information, such as the correct parameter values or template URL. If your template contains IAM resources, select I acknowledge that this template may create IAM resources to specify that you want to use IAM resources in the template. For more information about using IAM resources in templates, see Controlling access with AWS Identity and Access Management.
In the Change set preview section, check that AWS CloudFormation will make all the changes that you expect. For example, you can check that AWS CloudFormation adds, removes, and modifies the resources that you intended to add, remove, or modify. AWS CloudFormation generates this preview by creating a change set for the stack. For more information, see Updating stacks using change sets.
-
When you are satisfied with your changes, choose Update stack.
Note
At this point, you also have the option to view the change set to review your proposed updates more thoroughly. To do so, choose View change set instead of Update stack. CloudFormation displays the change set generated based on your updates. When you are ready to perform the stack update, choose Execute.
CloudFormation displays the stack details page for your stack, with the Events pane selected. Your stack now has a status of UPDATE_IN_PROGRESS. After CloudFormation has successfully finished updating the stack, it sets the stack status to UPDATE_COMPLETE.
If the stack update fails, CloudFormation; automatically rolls back changes, and sets the stack status to UPDATE_ROLLBACK_COMPLETE.
Note
You can cancel an update while it's in the UPDATE_IN_PROGRESS state. For more information, see Canceling a stack update.
To update a AWS CloudFormation stack (AWS CLI)
-
Use the
aws cloudformation update-stackcommand to directly update a stack. You specify the stack, and parameter values and capabilities that you want to update, and, if you want use an updated template, the name of the template.The following example updates the template and input parameters for the
mystackstack:$aws cloudformation update-stack --stack-namemystack\ --template-url https://s3.amazonaws.com/sample/updated.template \ --parameters ParameterKey=VPCID,ParameterValue=SampleVPCID ParameterKey=SubnetIDs,ParameterValue=SampleSubnetID1\\,SampleSubnetID2The following example updates just the
SubnetIDsparameter values for themystackstack:$aws cloudformation update-stack --stack-namemystack\ --use-previous-template \ --parameters ParameterKey=VPCID,UsePreviousValue=true ParameterKey=SubnetIDs,ParameterValue=SampleSubnetID1\\,UpdatedSampleSubnetID2The following example adds two stack notification topics to the
mystackstack:$aws cloudformation update-stack --stack-namemystack\ --use-previous-template --notification-arns \ "arn:aws:sns:us-east-1:12345678912:mytopic" "arn:aws:sns:us-east-1:12345678912:mytopic2"The following example removes all stack notification topics from the
mystackstack:$aws cloudformation update-stack --stack-namemystack\ --use-previous-template --notification-arns []
