How Spot Instances work
To launch a Spot Instance, either you create a Spot Instance request, or Amazon EC2 creates a Spot Instance request on your behalf. The Spot Instance launches when the Spot Instance request is fulfilled.
You can launch a Spot Instance using several different services. For more information, see Getting Started with Amazon EC2
Spot Instances
-
You can create a Spot Instance request by using the launch instance wizard in the Amazon EC2 console or the run-instances command. For more information, see Manage your Spot Instances.
-
You can create an EC2 Fleet, in which you specify the desired number of Spot Instances. Amazon EC2 creates a Spot Instance request on your behalf for every Spot Instance that is specified in the EC2 Fleet. For more information, see Create an EC2 Fleet.
-
You can create a Spot Fleet request, in which you specify the desired number of Spot Instances. Amazon EC2 creates a Spot Instance request on your behalf for every Spot Instance that is specified in the Spot Fleet request. For more information, see Create a Spot Fleet.
Your Spot Instance launches if there is available capacity. Your Spot Instance runs until you stop or terminate it, or until Amazon EC2 interrupts it (known as a Spot Instance interruption). Amazon EC2 can stop, terminate, or hibernate a Spot Instance when it interrupts it.
When you use Spot Instances, you must be prepared for interruptions. Amazon EC2 can interrupt your Spot Instance when the demand for Spot Instances rises or when the supply of Spot Instances decreases. When Amazon EC2 interrupts a Spot Instance, it provides a Spot Instance interruption notice, which gives the instance a two-minute warning before Amazon EC2 interrupts it. You can't enable termination protection for Spot Instances. For more information, see Spot Instance interruptions.
Contents
Spot Instance request states
A Spot Instance request can be in one of the following states:
-
open– The request is waiting to be fulfilled. -
active– The request is fulfilled and has an associated Spot Instance. -
failed– The request has one or more bad parameters. -
closed– The Spot Instance was interrupted or terminated. -
disabled– You stopped the Spot Instance. -
cancelled– You canceled the request, or the request expired.
The following illustration represents the transitions between the request states. Notice that the transitions depend on the request type (one-time or persistent).
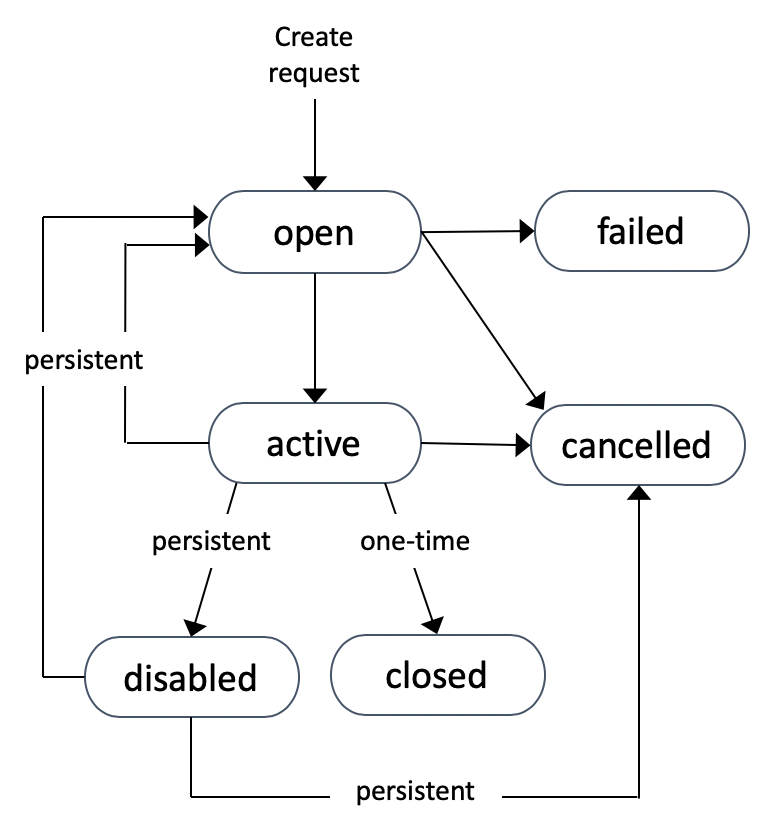
A one-time Spot Instance request remains active until Amazon EC2 launches the Spot Instance, the request expires, or you cancel the request. If capacity is not available, your Spot Instance is terminated and the Spot Instance request is closed.
A persistent Spot Instance request remains active until it expires or you cancel it, even if the request is fulfilled. If capacity is not available, your Spot Instance is interrupted. After your instance is interrupted, when capacity becomes available again, the Spot Instance is started if stopped or resumed if hibernated. You can stop a Spot Instance and start it again if capacity is available. If the Spot Instance is terminated (irrespective of whether the Spot Instance is in a stopped or running state), the Spot Instance request is opened again and Amazon EC2 launches a new Spot Instance. For more information, see Stop a Spot Instance, Start a Spot Instance, and Terminate a Spot Instance.
You can track the status of your Spot Instance requests, as well as the status of the Spot Instances launched, through the status. For more information, see Get the status of a Spot Instance request.
Launch Spot Instances in a launch group
Specify a launch group in your Spot Instance request to tell Amazon EC2 to launch a set of Spot Instances only if it can launch them all. In addition, if the Spot service must terminate one of the instances in a launch group, it must terminate them all. However, if you terminate one or more of the instances in a launch group, Amazon EC2 does not terminate the remaining instances in the launch group.
Although this option can be useful, adding this constraint can decrease the chances that your Spot Instance request is fulfilled and increase the chances that your Spot Instances are terminated. For example, your launch group includes instances in multiple Availability Zones. If capacity in one of these Availability Zones decreases and is no longer available, then Amazon EC2 terminates all instances for the launch group.
If you create another successful Spot Instance request that specifies the same (existing) launch group as an earlier successful request, then the new instances are added to the launch group. Subsequently, if an instance in this launch group is terminated, all instances in the launch group are terminated, which includes instances launched by the first and second requests.
Launch Spot Instances in an Availability Zone group
Specify an Availability Zone group in your Spot Instance request to tell Amazon EC2 to launch a set of Spot Instances in the same Availability Zone. Amazon EC2 need not interrupt all instances in an Availability Zone group at the same time. If Amazon EC2 must interrupt one of the instances in an Availability Zone group, the others remain running.
Although this option can be useful, adding this constraint can lower the chances that your Spot Instance request is fulfilled.
If you specify an Availability Zone group but don't specify an Availability Zone in the Spot Instance request, the result depends on the network you specified.
Default VPC
Amazon EC2 uses the Availability Zone for the specified subnet. If you don't specify a subnet, it selects an Availability Zone and its default subnet, but not necessarily the lowest-priced zone. If you deleted the default subnet for an Availability Zone, then you must specify a different subnet.
Nondefault VPC
Amazon EC2 uses the Availability Zone for the specified subnet.
Launch Spot Instances in a VPC
You specify a subnet for your Spot Instances the same way that you specify a subnet for your On-Demand Instances.
-
[Default VPC] If you want your Spot Instance launched in a specific low-priced Availability Zone, you must specify the corresponding subnet in your Spot Instance request. If you do not specify a subnet, Amazon EC2 selects one for you, and the Availability Zone for this subnet might not have the lowest Spot price.
-
[Nondefault VPC] You must specify the subnet for your Spot Instance.
Launch burstable performance instances
The T instance types are burstable performance instances. If you launch your Spot Instances using a burstable performance instance type, and if you plan to use your burstable performance Spot Instances immediately and for a short duration, with no idle time for accruing CPU credits, we recommend that you launch them in Standard mode to avoid paying higher costs. If you launch burstable performance Spot Instances in Unlimited mode and burst CPU immediately, you'll spend surplus credits for bursting. If you use the instance for a short duration, the instance doesn't have time to accrue CPU credits to pay down the surplus credits, and you are charged for the surplus credits when you terminate the instance.
Unlimited mode is suitable for burstable performance Spot Instances only if the instance runs long enough to accrue CPU credits for bursting. Otherwise, paying for surplus credits makes burstable performance Spot Instances more expensive than using other instances. For more information, see When to use unlimited mode versus fixed CPU.
T2 instances, when configured in Standard mode, get launch credits. T2 instances are the only burstable performance instances that get launch credits. Launch credits are meant to provide a productive initial launch experience for T2 instances by providing sufficient compute resources to configure the instance. Repeated launches of T2 instances to access new launch credits is not permitted. If you require sustained CPU, you can earn credits (by idling over some period), use Unlimited mode for T2 Spot Instances, or use an instance type with dedicated CPU.
Launch on single-tenant hardware
You can run a Spot Instance on single-tenant hardware. Dedicated Spot Instances are physically
isolated from instances that belong to other AWS accounts. For more information, see
Amazon EC2 Dedicated Instances and the
Amazon EC2 Dedicated Instances
To run a Dedicated Spot Instance, do one of the following:
-
Specify a tenancy of
dedicatedwhen you create the Spot Instance request. For more information, see Manage your Spot Instances. -
Request a Spot Instance in a VPC with an instance tenancy of
dedicated. For more information, see Launch Dedicated Instances into a VPC with default tenancy. You can't request a Spot Instance with a tenancy ofdefaultif you request it in a VPC with an instance tenancy ofdedicated.
All instance families support Dedicated Spot Instances except T instances. For each supported instance family, only the largest instance size or metal size supports Dedicated Spot Instances.
