Creating and connecting to a PostgreSQL DB instance
This tutorial creates an EC2 instance and an RDS for PostgreSQL DB instance. The tutorial shows you how to access the DB instance from the EC2 instance using a standard PostgreSQL client. As a best practice, this tutorial creates a private DB instance in a virtual private cloud (VPC). In most cases, other resources in the same VPC, such as EC2 instances, can access the DB instance, but resources outside of the VPC can't access it.
After you complete the tutorial, there is a public and private subnet in each Availability Zone in your VPC. In one Availability Zone, the EC2 instance is in the public subnet, and the DB instance is in the private subnet.
Important
There's no charge for creating an AWS account. However, by completing this tutorial, you might incur costs for the AWS resources you use. You can delete these resources after you complete the tutorial if they are no longer needed.
The following diagram shows the configuration when the tutorial is complete.

This tutorial allows you to create your resources by using one of the following methods:
-
Use the AWS Management Console ‐ Create an EC2 instance and Create a PostgreSQL DB instance
-
Use CloudFormation to create the database instance and EC2 instance ‐ (Optional) Create VPC, EC2 instance, and PostgreSQL instance using CloudFormation
The first method uses Easy create to create a private PostgreSQL DB instance with the AWS Management Console. Here, you specify only the DB engine type, DB instance size, and DB instance identifier. Easy create uses the default settings for the other configuration options.
When you use Standard create instead, you can specify more configuration options when you create a DB instance. These options include settings for availability, security, backups, and maintenance. To create a public DB instance, you must use Standard create. For information, see Creating an Amazon RDS DB instance.
Topics
Prerequisites
Before you begin, complete the steps in the following sections:
Create an EC2 instance
Create an Amazon EC2 instance that you will use to connect to your database.
To create an EC2 instance
Sign in to the AWS Management Console and open the Amazon EC2 console at https://console.aws.amazon.com/ec2/
. -
In the upper-right corner of the AWS Management Console, choose the AWS Region in which you want to create the EC2 instance.
-
Choose EC2 Dashboard, and then choose Launch instance, as shown in the following image.

The Launch an instance page opens.
-
Choose the following settings on the Launch an instance page.
-
Under Name and tags, for Name, enter
ec2-database-connect. -
Under Application and OS Images (Amazon Machine Image), choose Amazon Linux, and then choose the Amazon Linux 2023 AMI. Keep the default selections for the other choices.

-
Under Instance type, choose t2.micro.
-
Under Key pair (login), choose a Key pair name to use an existing key pair. To create a new key pair for the Amazon EC2 instance, choose Create new key pair and then use the Create key pair window to create it.
For more information about creating a new key pair, see Create a key pair in the Amazon EC2 User Guide.
-
For Allow SSH traffic in Network settings, choose the source of SSH connections to the EC2 instance.
You can choose My IP if the displayed IP address is correct for SSH connections. Otherwise, you can determine the IP address to use to connect to EC2 instances in your VPC using Secure Shell (SSH). To determine your public IP address, in a different browser window or tab, you can use the service at https://checkip.amazonaws.com
. An example of an IP address is 192.0.2.1/32. In many cases, you might connect through an internet service provider (ISP) or from behind your firewall without a static IP address. If so, make sure to determine the range of IP addresses used by client computers.
Warning
If you use
0.0.0.0/0for SSH access, you make it possible for all IP addresses to access your public EC2 instances using SSH. This approach is acceptable for a short time in a test environment, but it's unsafe for production environments. In production, authorize only a specific IP address or range of addresses to access your EC2 instances using SSH.The following image shows an example of the Network settings section.
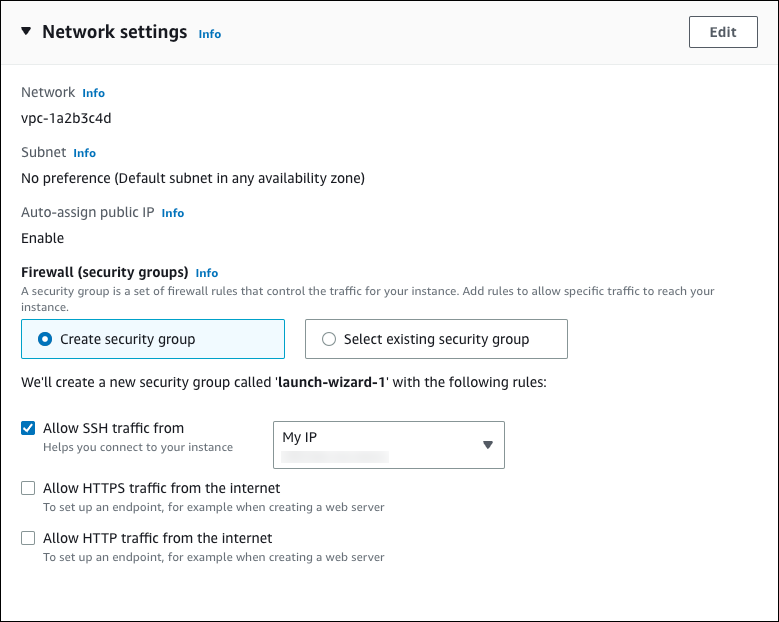
-
Leave the default values for the remaining sections.
-
Review a summary of your EC2 instance configuration in the Summary panel, and when you're ready, choose Launch instance.
-
-
On the Launch Status page, note the identifier for your new EC2 instance, for example:
i-1234567890abcdef0.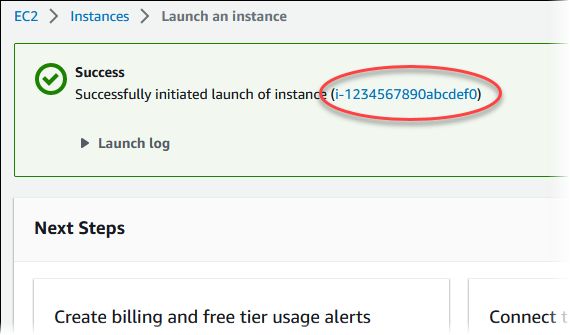
-
Choose the EC2 instance identifier to open the list of EC2 instances, and then select your EC2 instance.
-
In the Details tab, note the following values, which you need when you connect using SSH:
-
In Instance summary, note the value for Public IPv4 DNS.

-
In Instance details, note the value for Key pair name.

-
-
Wait until the Instance state for your EC2 instance has a status of Running before continuing.
Create a PostgreSQL DB instance
The basic building block of Amazon RDS is the DB instance. This environment is where you run your PostgreSQL databases.
In this example, you use Easy create to create a DB instance running the PostgreSQL database engine with a db.t3.micro DB instance class.
To create a PostgreSQL DB instance with Easy create
-
Sign in to the AWS Management Console and open the Amazon RDS console at https://console.aws.amazon.com/rds/
. In the upper-right corner of the Amazon RDS console, choose the AWS Region in which you want to create the DB instance.
-
In the navigation pane, choose Databases.
-
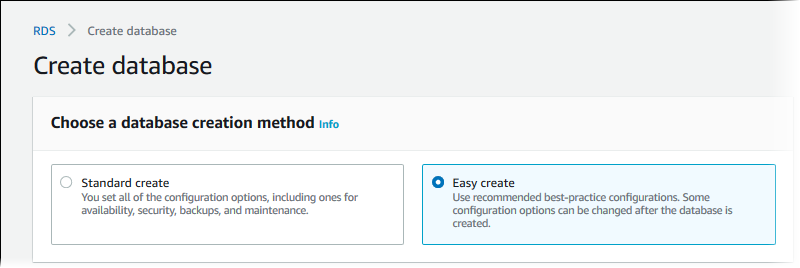
Choose Create database and make sure that Easy create is chosen.
-
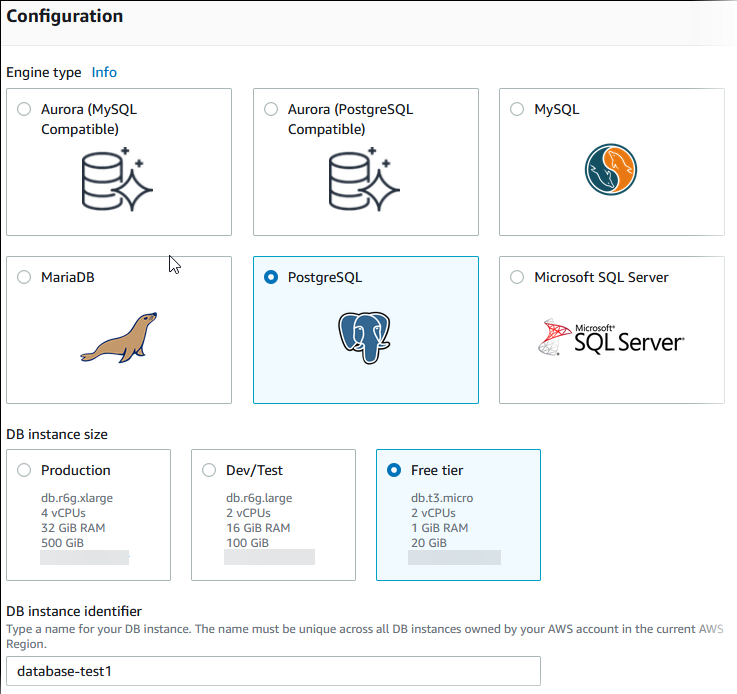
In Configuration, choose PostgreSQL.
-
For DB instance size, choose Free tier. Free tier appears for free plan accounts. Sandbox appears for paid plan accounts.
-
For DB instance identifier, enter
database-test1. -
For Master username, enter a name for the master user, or keep the default name (
postgres).The Create database page should look similar to the following image. For free plan accounts, Free tier appears. For paid plan accounts, Sandbox appears.
-
To use an automatically generated master password for the DB instance, select Auto generate a password.
To enter your master password, make sure Auto generate a password is cleared, and then enter the same password in Master password and Confirm password.
-
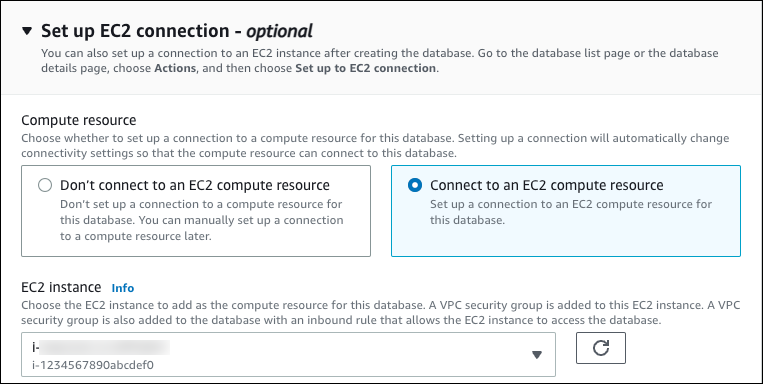
To set up a connection with the EC2 instance you created previously, open Set up EC2 connection - optional.
Select Connect to an EC2 compute resource. Choose the EC2 instance you created previously.
-
Open View default settings for Easy create.

You can examine the default settings used with Easy create. The Editable after database is created column shows which options you can change after you create the database.
-
If a setting has No in that column, and you want a different setting, you can use Standard create to create the DB instance.
-
If a setting has Yes in that column, and you want a different setting, you can either use Standard create to create the DB instance, or modify the DB instance after you create it to change the setting.
-
-
Choose Create database.
To view the master username and password for the DB instance, choose View credential details.
You can use the username and password that appears to connect to the DB instance as the master user.
Important
You can't view the master user password again. If you don't record it, you might have to change it.
If you need to change the master user password after the DB instance is available, you can modify the DB instance to do so. For more information about modifying a DB instance, see Modifying an Amazon RDS DB instance.
-
In the Databases list, choose the name of the new PostgreSQL DB instance to show its details.
The DB instance has a status of Creating until it is ready to use.
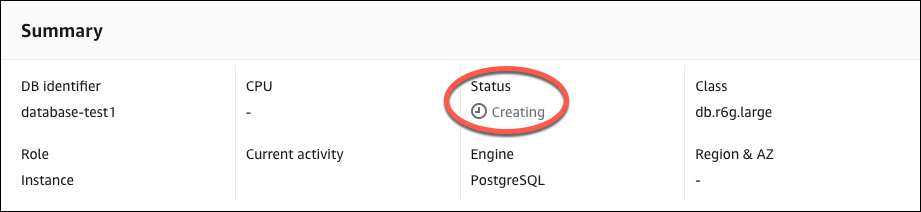
When the status changes to Available, you can connect to the DB instance. Depending on the DB instance class and the amount of storage, it can take up to 20 minutes before the new instance is available.
(Optional) Create VPC, EC2 instance, and PostgreSQL instance using CloudFormation
Instead of using the console to create your VPC, EC2 instance, and PostgreSQL instance, you can use CloudFormation to provision AWS resources by treating infrastructure as code. To help you organize your AWS resources into smaller and more manageable units, you can use the CloudFormation nested stack functionality. For more information, see Creating a stack on the CloudFormation console and Working with nested stacks.
Important
CloudFormation is free, but the resources that CloudFormation creates are live. You incur the standard
usage fees for these resources until you terminate them. For more information, see
RDS for PostgreSQL
pricing
To create your resources using the CloudFormation console, complete the following steps:
-
Download the CloudFormation template
-
Configure your resources using CloudFormation
Download the CloudFormation template
A CloudFormation template is a JSON or YAML text file that contains the configuration information about the resources you want to create in the stack. This template also creates a VPC and a bastion host for you along with the RDS instance.
To download the template file, open the following link, PostgreSQL CloudFormation template
In the Github page, click the Download raw file button to save the template YAML file.
Configure your resources using CloudFormation
Note
Before starting this process, make sure you have a Key pair for an EC2 instance in your AWS account. For more information, see Amazon EC2 key pairs and Linux instances.
When you use the CloudFormation template, you must select the correct parameters to make sure your resources are created properly. Follow the steps below:
-
Sign in to the AWS Management Console and open the CloudFormation console at https://console.aws.amazon.com/cloudformation
. -
Choose Create Stack.
-
In the Specify template section, select Upload a template file from your computer, and then choose Next.
-
In the Specify stack details page, set the following parameters:
-
Set Stack name to PostgreSQLTestStack.
-
Under Parameters, set Availability Zones by selecting three availability zones.
-
Under Linux Bastion Host configuration, for Key Name, select a key pair to login to your EC2 instance.
-
In Linux Bastion Host configuration settings, set the Permitted IP range to your IP address. To connect to EC2 instances in your VPC using Secure Shell (SSH), determine your public IP address using the service at https://checkip.amazonaws.com
. An example of an IP address is 192.0.2.1/32. Warning
If you use
0.0.0.0/0for SSH access, you make it possible for all IP addresses to access your public EC2 instances using SSH. This approach is acceptable for a short time in a test environment, but it's unsafe for production environments. In production, authorize only a specific IP address or range of addresses to access your EC2 instances using SSH. -
Under Database General configuration, set Database instance class to db.t3.micro.
-
Set Database name to
database-test1. -
For Database master username, enter a name for the master user.
-
Set Manage DB master user password with Secrets Manager to
falsefor this tutorial. -
For Database password, set a password of your choice. Remember this password for further steps in the tutorial.
-
Under Database Storage configuration, set Database storage type to gp2.
-
Under Database Monitoring configuration, set Enable RDS Performance Insights to false.
-
Leave all other settings as the default values. Click Next to continue.
-
-
In the Configure stack options page, leave all the default options. Click Next to continue.
-
In the Review stack page, select Submit after checking the database and Linux bastion host options.
After the stack creation process completes, view the stacks with names BastionStack and RDSNS to note the information you need to connect to the database. For more information, see Viewing CloudFormation stack data and resources on the AWS Management Console.
Connect to a PostgreSQL DB instance
You can connect to the DB instance using pgadmin or psql. This example explains how to connect to a PostgreSQL DB instance using the psql command-line client.
To connect to a PostgreSQL DB instance using psql
-
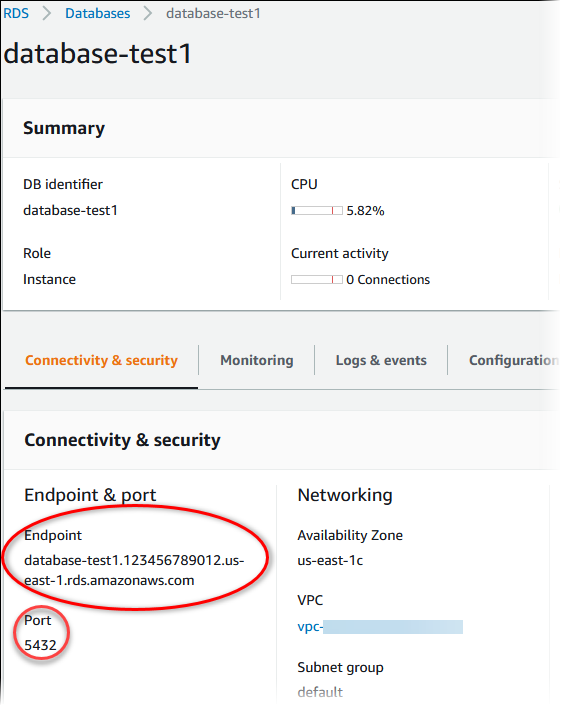
Find the endpoint (DNS name) and port number for your DB instance.
Sign in to the AWS Management Console and open the Amazon RDS console at https://console.aws.amazon.com/rds/
. -
In the upper-right corner of the Amazon RDS console, choose the AWS Region for the DB instance.
-
In the navigation pane, choose Databases.
-
Choose the PostgreSQL DB instance name to display its details.
-
On the Connectivity & security tab, copy the endpoint. Also note the port number. You need both the endpoint and the port number to connect to the DB instance.
-
Connect to the EC2 instance that you created earlier by following the steps in Connect to your Linux instance in the Amazon EC2 User Guide.
We recommend that you connect to your EC2 instance using SSH. If the SSH client utility is installed on Windows, Linux, or Mac, you can connect to the instance using the following command format:
ssh -ilocation_of_pem_fileec2-user@ec2-instance-public-dns-nameFor example, assume that
ec2-database-connect-key-pair.pemis stored in/dir1on Linux, and the public IPv4 DNS for your EC2 instance isec2-12-345-678-90.compute-1.amazonaws.com. Your SSH command would look as follows:ssh -i /dir1/ec2-database-connect-key-pair.pem ec2-user@ec2-12-345-678-90.compute-1.amazonaws.com -
Get the latest bug fixes and security updates by updating the software on your EC2 instance. To do this, use the following command.
Note
The
-yoption installs the updates without asking for confirmation. To examine updates before installing, omit this option.sudo dnf update -y -
To install the psql command-line client from PostgreSQL on Amazon Linux 2023, run the following command:
sudo dnf install postgresql15 -
Connect to the PostgreSQL DB instance. For example, enter the following command at a command prompt on a client computer. This action lets you connect to the PostgreSQL DB instance using the psql client.
Substitute the DB instance endpoint (DNS name) for
endpoint--dbnamethat you want to connect to forpostgrespostgrespsql --host=endpoint--port=5432 --dbname=postgres--username=postgresAfter you enter the password for the user, you should see output similar to the following:
psql (14.3, server 14.6)
SSL connection (protocol: TLSv1.2, cipher: ECDHE-RSA-AES256-GCM-SHA384, bits: 256, compression: off)
Type "help" for help.

postgres=>
For more information on connecting to a PostgreSQL DB instance, see Connecting to a DB instance running the PostgreSQL database engine. If you can't connect to your DB instance, see Troubleshooting connections to your RDS for PostgreSQL instance.
For security, it is a best practice to use encrypted connections. Only use an unencrypted PostgreSQL connection when the client and server are in the same VPC and the network is trusted. For information about using encrypted connections, see Connecting to a PostgreSQL DB instance over SSL.
-
Run SQL commands.
For example, the following SQL command shows the current date and time:
SELECT CURRENT_TIMESTAMP;
Delete the EC2 instance and DB instance
After you connect to and explore the sample EC2 instance and DB instance that you created, delete them so you're no longer charged for them.
If you used CloudFormation to create resources, skip this step and go to the next step.
To delete the EC2 instance
Sign in to the AWS Management Console and open the Amazon EC2 console at https://console.aws.amazon.com/ec2/
. -
In the navigation pane, choose Instances.
-
Select the EC2 instance, and choose Instance state, Terminate instance.
-
Choose Terminate when prompted for confirmation.
For more information about deleting an EC2 instance, see Terminate your instance in the Amazon EC2 User Guide.
To delete a DB instance with no final DB snapshot
Sign in to the AWS Management Console and open the Amazon RDS console at https://console.aws.amazon.com/rds/
. -
In the navigation pane, choose Databases.
-
Choose the DB instance that you want to delete.
-
For Actions, choose Delete.
-
Clear Create final snapshot? and Retain automated backups.
-
Complete the acknowledgement and choose Delete.
(Optional) Delete the EC2 instance and DB instance created with CloudFormation
If you used CloudFormation to create resources, delete the CloudFormation stack after you connect to and explore the sample EC2 instance and DB instance, so you're no longer charged for them.
To delete the CloudFormation resources
-
Open the CloudFormation console.
-
On the Stacks page in the CloudFormationconsole, select the root stack (the stack without the name VPCStack, BastionStack or RDSNS).
-
Choose Delete.
-
Select Delete stack when prompted for confirmation.
For more information about deleting a stack in CloudFormation, see Deleting a stack on the CloudFormation console in the AWS CloudFormation User Guide.
(Optional) Connect your DB instance to a Lambda function
You can also connect your RDS for PostgreSQL DB instance to a Lambda serverless compute resource. Lambda functions allow you to run code without provisioning or managing infrastructure. A Lambda function also allows you to automatically respond to code execution requests at any scale, from a dozen events a day to hundreds of per second. For more information, see Automatically connecting a Lambda function and a DB instance.
