Using automatic scaling with a custom policy for instance groups in Amazon EMR
Automatic scaling with a custom policy in Amazon EMR releases 4.0 and higher allows you to programmatically scale out and scale in core nodes and task nodes based on a CloudWatch metric and other parameters that you specify in a scaling policy. Automatic scaling with a custom policy is available with the instance groups configuration and is not available when you use instance fleets. For more information about instance groups and instance fleets, see Create an Amazon EMR cluster with instance fleets or uniform instance groups.
Note
To use the automatic scaling with a custom policy feature in Amazon EMR, you must set
true for the VisibleToAllUsers parameter when you
create a cluster. For more information, see SetVisibleToAllUsers.
The scaling policy is part of an instance group configuration. You can specify a policy during initial configuration of an instance group, or by modifying an instance group in an existing cluster, even when that instance group is active. Each instance group in a cluster, except the primary instance group, can have its own scaling policy, which consists of scale-out and scale-in rules. Scale-out and scale-in rules can be configured independently, with different parameters for each rule.
You can configure scaling policies with the AWS Management Console, the AWS CLI, or the Amazon EMR API. When you use the AWS CLI or Amazon EMR API, you specify the scaling policy in JSON format. In addition, when with the AWS CLI or the Amazon EMR API, you can specify custom CloudWatch metrics. Custom metrics are not available for selection with the AWS Management Console. When you initially create a scaling policy with the console, a default policy suitable for many applications is pre-configured to help you get started. You can delete or modify the default rules.
Even though automatic scaling allows you to adjust EMR cluster capacity on-the-fly, you should still consider baseline workload requirements and plan your node and instance group configurations. For more information, see Cluster configuration guidelines.
Note
For most workloads, setting up both scale-in and scale-out rules is desirable to optimize resource utilization. Setting either rule without the other means that you need to manually resize the instance count after a scaling activity. In other words, this sets up a "one-way" automatic scale-out or scale-in policy with a manual reset.
Creating the IAM role for automatic scaling
Automatic scaling in Amazon EMR requires an IAM role with permissions to add and
terminate instances when scaling activities are triggered. A default role configured
with the appropriate role policy and trust policy,
EMR_AutoScaling_DefaultRole, is available for this purpose. When
you create a cluster with a scaling policy for the first time with the AWS Management Console,
Amazon EMR creates the default role and attaches the default managed policy for
permissions, AmazonElasticMapReduceforAutoScalingRole.
When you create a cluster with an automatic scaling policy with the AWS CLI, you
must first ensure that either the default IAM role exists, or that you have a
custom IAM role with a policy attached that provides the appropriate permissions.
To create the default role, you can run the create-default-roles
command before you create a cluster. You can then specify --auto-scaling-role
EMR_AutoScaling_DefaultRole option when you create a cluster.
Alternatively, you can create a custom automatic scaling role and then specify it
when you create a cluster, for example --auto-scaling-role
. If you create a
customized automatic scaling role for Amazon EMR, we recommend that you base permissions
policies for your custom role based on the managed policy. For more information, see
Configure IAM service roles for Amazon EMR permissions to AWS
services and resources.MyEMRAutoScalingRole
Understanding automatic scaling rules
When a scale-out rule triggers a scaling activity for an instance group, Amazon EC2
instances are added to the instance group according to your rules. New nodes can be
used by applications such as Apache Spark, Apache Hive, and Presto as soon as the
Amazon EC2 instance enters the InService state. You can also set up a
scale-in rule that terminates instances and removes nodes. For more information
about the lifecycle of Amazon EC2 instances that scale automatically, see Auto Scaling lifecycle
in the Amazon EC2 Auto Scaling User Guide.
You can configure how a cluster terminates Amazon EC2 instances. You can choose to either terminate at the Amazon EC2 instance-hour boundary for billing, or upon task completion. This setting applies both to automatic scaling and to manual resizing operations. For more information about this configuration, see Cluster scale-down options for Amazon EMR clusters.
The following parameters for each rule in a policy determine automatic scaling behavior.
Note
The parameters listed here are based on the AWS Management Console for Amazon EMR. When you use the AWS CLI or Amazon EMR API, additional advanced configuration options are available. For more information about advanced options, see SimpleScalingPolicyConfiguration in the Amazon EMR API Reference.
-
Maximum instances and minimum instances. The Maximum instances constraint specifies the maximum number of Amazon EC2 instances that can be in the instance group, and applies to all scale-out rules. Similarly, the Minimum instances constraint specifies the minimum number of Amazon EC2 instances and applies to all scale-in rules.
-
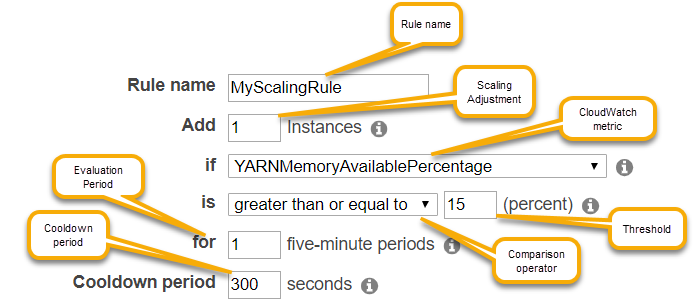
The Rule name, which must be unique within the policy.
-
The scaling adjustment, which determines the number of EC2 instances to add (for scale-out rules) or terminate (for scale-in rules) during the scaling activity triggered by the rule.
-
The CloudWatch metric, which is watched for an alarm condition.
-
A comparison operator, which is used to compare the CloudWatch metric to the Threshold value and determine a trigger condition.
-
An evaluation period, in five-minute increments, for which the CloudWatch metric must be in a trigger condition before scaling activity is triggered.
-
A Cooldown period, in seconds, which determines the amount of time that must elapse between a scaling activity started by a rule and the start of the next scaling activity, regardless of the rule that triggers it. When an instance group has finished a scaling activity and reached its post-scale state, the cooldown period provides an opportunity for the CloudWatch metrics that might trigger subsequent scaling activities to stabilize. For more information, see Auto Scaling cooldowns in the Amazon EC2 Auto Scaling User Guide.
Considerations and limitations
-
Amazon CloudWatch metrics are critical for Amazon EMR automatic scaling to operate. We recommend that you closely monitor Amazon CloudWatch metrics to make sure data is not missing. For more information about how you can configure Amazon CloudWatch alarms to detect missing metrics, see Using Amazon CloudWatch alarms.
-
Over-utilization of EBS volumes can cause Managed Scaling issues. We recommend that you monitor EBS volume usage closely to make sure EBS volume is below 90% utilization. See Instance storage for information on specifying additional EBS volumes.
-
Automatic scaling with a custom policy in Amazon EMR releases 5.18 to 5.28 may experience scaling failure caused by data intermittently missing in Amazon CloudWatch metrics. We recommend that you use the most recent Amazon EMR versions for improved autoscaling. You can also contact AWS Support
for a patch if you need to use an Amazon EMR release between 5.18 and 5.28.
Using the AWS Management Console to configure automatic scaling
When you create a cluster, you configure a scaling policy for instance groups with the advanced cluster configuration options. You can also create or modify a scaling policy for an instance group in-service by modifying instance groups in the Hardware settings of an existing cluster.
Navigate to the new Amazon EMR console and select Switch to the old console from the side navigation. For more information on what to expect when you switch to the old console, see Using the old console.
-
If you are creating a cluster, in the Amazon EMR console, select Create Cluster, select Go to advanced options, choose options for Step 1: Software and Steps, and then go to Step 2: Hardware Configuration.
- or -
If you are modifying an instance group in a running cluster, select your cluster from the cluster list, and then expand the Hardware section.
-
In Cluster scaling and provisioning option section, select Enable cluster scaling. Then select Create a custom automatic scaling policy.
In the table of Custom automatic scaling policies, click the pencil icon that appears in the row of the instance group you want to configure. The Auto Scaling Rules screen opens.
-
Type the Maximum instances you want the instance group to contain after it scales out, and type the Minimum instances you want the instance group to contain after it scales in.
-
Click the pencil to edit rule parameters, click the X to remove a rule from the policy, and click Add rule to add additional rules.
-
Choose rule parameters as described earlier in this topic. For descriptions of available CloudWatch metrics for Amazon EMR, see Amazon EMR metrics and dimensions in the Amazon CloudWatch User Guide.
Using the AWS CLI to configure automatic scaling
You can use AWS CLI commands for Amazon EMR to configure automatic scaling when you create a cluster and when you create an instance group. You can use a shorthand syntax, specifying the JSON configuration inline within the relevant commands, or you can reference a file containing the configuration JSON. You can also apply an automatic scaling policy to an existing instance group and remove an automatic scaling policy that was previously applied. In addition, you can retrieve details of a scaling policy configuration from a running cluster.
Important
When you create a cluster that has an automatic scaling policy, you must use
the --auto-scaling-role
command to specify the
IAM role for automatic scaling. The default role is
MyAutoScalingRoleEMR_AutoScaling_DefaultRolecreate-default-roles command. The role can
only be added when the cluster is created, and cannot be added to an existing
cluster.
For a detailed description of the parameters available when configuring an automatic scaling policy, see PutAutoScalingPolicy in Amazon EMR API Reference.
Creating a cluster with an automatic scaling policy applied to an instance group
You can specify an automatic scaling configuration within the
--instance-groups option of the aws emr
create-cluster command. The following example illustrates a
create-cluster command where an automatic scaling policy for the core instance
group is provided inline. The command creates a scaling configuration equivalent
to the default scale-out policy that appears when you create an automatic
scaling policy with the AWS Management Console for Amazon EMR. For brevity, a scale-in policy is
not shown. We do not recommend creating a scale-out rule without a scale-in
rule.
aws emr create-cluster --release-labelemr-5.2.0--service-role EMR_DefaultRole --ec2-attributes InstanceProfile=EMR_EC2_DefaultRole --auto-scaling-role EMR_AutoScaling_DefaultRole --instance-groups Name=MyMasterIG,InstanceGroupType=MASTER,InstanceType=m5.xlarge,InstanceCount=1 'Name=MyCoreIG,InstanceGroupType=CORE,InstanceType=m5.xlarge,InstanceCount=2,AutoScalingPolicy={Constraints={MinCapacity=2,MaxCapacity=10},Rules=[{Name=Default-scale-out,Description=Replicates the default scale-out rule in the console.,Action={SimpleScalingPolicyConfiguration={AdjustmentType=CHANGE_IN_CAPACITY,ScalingAdjustment=1,CoolDown=300}},Trigger={CloudWatchAlarmDefinition={ComparisonOperator=LESS_THAN,EvaluationPeriods=1,MetricName=YARNMemoryAvailablePercentage,Namespace=AWS/ElasticMapReduce,Period=300,Statistic=AVERAGE,Threshold=15,Unit=PERCENT,Dimensions=[{Key=JobFlowId,Value="${emr.clusterId}"}]}}}]}'
The following command illustrates how to use the command line to provide the
automatic scaling policy definition as part of an instance group configuration
file named
instancegroupconfig.json
aws emr create-cluster --release-labelemr-5.2.0--service-role EMR_DefaultRole --ec2-attributes InstanceProfile=EMR_EC2_DefaultRole --instance-groups file://your/path/to/instancegroupconfig.json--auto-scaling-role EMR_AutoScaling_DefaultRole
With the contents of the configuration file as follows:
[
{
  "InstanceCount": 1,
  "Name": "MyMasterIG",
  "InstanceGroupType": "MASTER",
  "InstanceType": "m5.xlarge"
},
{
  "InstanceCount": 2,
  "Name": "MyCoreIG",
  "InstanceGroupType": "CORE",
  "InstanceType": "m5.xlarge",
  "AutoScalingPolicy":
    {
     "Constraints":
      {
       "MinCapacity": 2,
       "MaxCapacity": 10
      },
     "Rules":
     [
      {
       "Name": "Default-scale-out",
       "Description": "Replicates the default scale-out rule in the console for YARN memory.",
       "Action":{
        "SimpleScalingPolicyConfiguration":{
          "AdjustmentType": "CHANGE_IN_CAPACITY",
          "ScalingAdjustment": 1,
          "CoolDown": 300
        }
       },
       "Trigger":{
        "CloudWatchAlarmDefinition":{
          "ComparisonOperator": "LESS_THAN",
          "EvaluationPeriods": 1,
          "MetricName": "YARNMemoryAvailablePercentage",
          "Namespace": "AWS/ElasticMapReduce",
          "Period": 300,
          "Threshold": 15,
          "Statistic": "AVERAGE",
          "Unit": "PERCENT",
          "Dimensions":[
             {
               "Key" : "JobFlowId",
               "Value" : "${emr.clusterId}"
             }
          ]
        }
       }
      }
     ]
   }
}
]
Adding an instance group with an automatic scaling policy to a cluster
You can specify a scaling policy configuration with the
--instance-groups option with the
add-instance-groups command in the same way you can when you
use create-cluster. The following example uses a reference to a
JSON file, instancegroupconfig.json
aws emr add-instance-groups --cluster-idj-1EKZ3TYEVF1S2--instance-groups file://your/path/to/instancegroupconfig.json
Applying an automatic scaling policy to an existing instance group or modifying an applied policy
Use the aws emr put-auto-scaling-policy command to apply an
automatic scaling policy to an existing instance group. The instance group must
be part of a cluster that uses the automatic scaling IAM role. The following
example uses a reference to a JSON file,
autoscaleconfig.json
aws emr put-auto-scaling-policy --cluster-idj-1EKZ3TYEVF1S2--instance-group-idig-3PLUZBA6WLS07--auto-scaling-policyfile://your/path/to/autoscaleconfig.json
The contents of the autoscaleconfig.json file, which defines the
same scale-out rule as shown in the previous example, is shown below.
{
          "Constraints": {
                  "MaxCapacity": 10,
                  "MinCapacity": 2
          },
          "Rules": [{
                  "Action": {
                          "SimpleScalingPolicyConfiguration": {
                                  "AdjustmentType": "CHANGE_IN_CAPACITY",
                                  "CoolDown": 300,
                                  "ScalingAdjustment": 1
                          }
                  },
                  "Description": "Replicates the default scale-out rule in the console for YARN memory",
                  "Name": "Default-scale-out",
                  "Trigger": {
                          "CloudWatchAlarmDefinition": {
                                  "ComparisonOperator": "LESS_THAN",
                                  "Dimensions": [{
                                          "Key": "JobFlowId",
                                          "Value": "${emr.clusterID}"
                                  }],
                                  "EvaluationPeriods": 1,
                                  "MetricName": "YARNMemoryAvailablePercentage",
                                  "Namespace": "AWS/ElasticMapReduce",
                                  "Period": 300,
                                  "Statistic": "AVERAGE",
                                  "Threshold": 15,
                                  "Unit": "PERCENT"
                          }
                  }
          }]
  }
Removing an automatic scaling policy from an instance group
aws emr remove-auto-scaling-policy --cluster-idj-1EKZ3TYEVF1S2--instance-group-idig-3PLUZBA6WLS07
Retrieving an automatic scaling policy configuration
The describe-cluster command retrieves the policy configuration
in the InstanceGroup block. For example, the following command retrieves the
configuration for the cluster with a cluster ID of
j-1CWOHP4PI30VJ.
aws emr describe-cluster --cluster-id j-1CWOHP4PI30VJ
The command produces the following example output.
{
    "Cluster": {
        "Configurations": [],
        "Id": "j-1CWOHP4PI30VJ",
        "NormalizedInstanceHours": 48,
        "Name": "Auto Scaling Cluster",
        "ReleaseLabel": "emr-5.2.0",
        "ServiceRole": "EMR_DefaultRole",
        "AutoTerminate": false,
        "TerminationProtected": true,
        "MasterPublicDnsName": "ec2-54-167-31-38.compute-1.amazonaws.com",
        "LogUri": "s3n://aws-logs-232939870606-us-east-1/elasticmapreduce/",
        "Ec2InstanceAttributes": {
            "Ec2KeyName": "performance",
            "AdditionalMasterSecurityGroups": [],
            "AdditionalSlaveSecurityGroups": [],
            "EmrManagedSlaveSecurityGroup": "sg-09fc9362",
            "Ec2AvailabilityZone": "us-east-1d",
            "EmrManagedMasterSecurityGroup": "sg-0bfc9360",
            "IamInstanceProfile": "EMR_EC2_DefaultRole"
        },
        "Applications": [
            {
                "Name": "Hadoop",
                "Version": "2.7.3"
            }
        ],
        "InstanceGroups": [
            {
                "AutoScalingPolicy": {
                    "Status": {
                        "State": "ATTACHED",
                        "StateChangeReason": {
                            "Message": ""
                        }
                    },
                    "Constraints": {
                        "MaxCapacity": 10,
                        "MinCapacity": 2
                    },
                    "Rules": [
                        {
                            "Name": "Default-scale-out",
                            "Trigger": {
                                "CloudWatchAlarmDefinition": {
                                    "MetricName": "YARNMemoryAvailablePercentage",
                                    "Unit": "PERCENT",
                                    "Namespace": "AWS/ElasticMapReduce",
                                    "Threshold": 15,
                                    "Dimensions": [
                                        {
                                            "Key": "JobFlowId",
                                            "Value": "j-1CWOHP4PI30VJ"
                                        }
                                    ],
                                    "EvaluationPeriods": 1,
                                    "Period": 300,
                                    "ComparisonOperator": "LESS_THAN",
                                    "Statistic": "AVERAGE"
                                }
                            },
                            "Description": "",
                            "Action": {
                                "SimpleScalingPolicyConfiguration": {
                                    "CoolDown": 300,
                                    "AdjustmentType": "CHANGE_IN_CAPACITY",
                                    "ScalingAdjustment": 1
                                }
                            }
                        },
                        {
                            "Name": "Default-scale-in",
                            "Trigger": {
                                "CloudWatchAlarmDefinition": {
                                    "MetricName": "YARNMemoryAvailablePercentage",
                                    "Unit": "PERCENT",
                                    "Namespace": "AWS/ElasticMapReduce",
                                    "Threshold": 75,
                                    "Dimensions": [
                                        {
                                            "Key": "JobFlowId",
                                            "Value": "j-1CWOHP4PI30VJ"
                                        }
                                    ],
                                    "EvaluationPeriods": 1,
                                    "Period": 300,
                                    "ComparisonOperator": "GREATER_THAN",
                                    "Statistic": "AVERAGE"
                                }
                            },
                            "Description": "",
                            "Action": {
                                "SimpleScalingPolicyConfiguration": {
                                    "CoolDown": 300,
                                    "AdjustmentType": "CHANGE_IN_CAPACITY",
                                    "ScalingAdjustment": -1
                                }
                            }
                        }
                    ]
                },
                "Configurations": [],
                "InstanceType": "m5.xlarge",
                "Market": "ON_DEMAND",
                "Name": "Core - 2",
                "ShrinkPolicy": {},
                "Status": {
                    "Timeline": {
                        "CreationDateTime": 1479413437.342,
                        "ReadyDateTime": 1479413864.615
                    },
                    "State": "RUNNING",
                    "StateChangeReason": {
                        "Message": ""
                    }
                },
                "RunningInstanceCount": 2,
                "Id": "ig-3M16XBE8C3PH1",
                "InstanceGroupType": "CORE",
                "RequestedInstanceCount": 2,
                "EbsBlockDevices": []
            },
            {
                "Configurations": [],
                "Id": "ig-OP62I28NSE8M",
                "InstanceGroupType": "MASTER",
                "InstanceType": "m5.xlarge",
                "Market": "ON_DEMAND",
                "Name": "Master - 1",
                "ShrinkPolicy": {},
                "EbsBlockDevices": [],
                "RequestedInstanceCount": 1,
                "Status": {
                    "Timeline": {
                        "CreationDateTime": 1479413437.342,
                        "ReadyDateTime": 1479413752.088
                    },
                    "State": "RUNNING",
                    "StateChangeReason": {
                        "Message": ""
                    }
                },
                "RunningInstanceCount": 1
            }
        ],
        "AutoScalingRole": "EMR_AutoScaling_DefaultRole",
        "Tags": [],
        "BootstrapActions": [],
        "Status": {
            "Timeline": {
                "CreationDateTime": 1479413437.339,
                "ReadyDateTime": 1479413863.666
            },
            "State": "WAITING",
            "StateChangeReason": {
                "Message": "Cluster ready after last step completed."
            }
        }
    }
}
