Create and add a custom action in CodePipeline
AWS CodePipeline includes a number of actions that help you configure build, test, and deploy resources for your automated release process. If your release process includes activities that are not included in the default actions, such as an internally developed build process or a test suite, you can create a custom action for that purpose and include it in your pipeline. You can use the AWS CLI to create custom actions in pipelines associated with your AWS account.
You can create custom actions for the following AWS CodePipeline action categories:
-
A custom build action that builds or transforms the items
-
A custom deploy action that deploys items to one or more servers, websites, or repositories
-
A custom test action that configures and runs automated tests
-
A custom invoke action that runs functions
When you create a custom action, you must also create a job worker that will poll CodePipeline for job requests for this custom action, execute the job, and return the status result to CodePipeline. This job worker can be located on any computer or resource as long as it has access to the public endpoint for CodePipeline. To easily manage access and security, consider hosting your job worker on an Amazon EC2 instance.
The following diagram shows a high-level view of a pipeline that includes a custom build action:
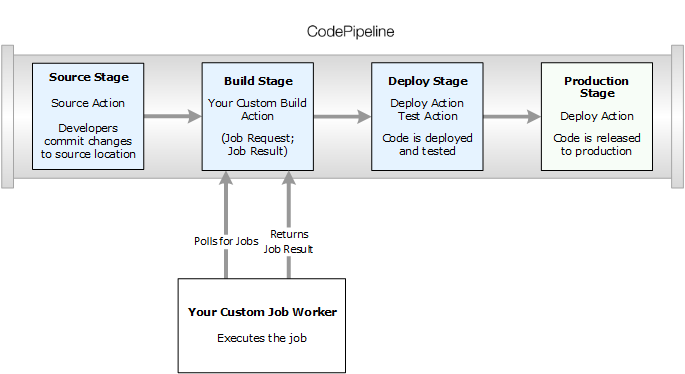
When a pipeline includes a custom action as part of a stage, the pipeline will create a job request. A custom job worker detects that request and performs that job (in this example, a custom process using third-party build software). When the action is complete, the job worker returns either a success result or a failure result. If a success result is received, the pipeline will provide the revision and its artifacts to the next action. If a failure is returned, the pipeline will not provide the revision to the next action in the pipeline.
Note
These instructions assume that you have already completed the steps in Getting started with CodePipeline.
Topics
Create a custom action
To create a custom action with the AWS CLI
-
Open a text editor and create a JSON file for your custom action that includes the action category, the action provider, and any settings required by your custom action. For example, to create a custom build action that requires only one property, your JSON file might look like this:
{ "category": "Build", "provider": "My-Build-Provider-Name", "version": "1", "settings": { "entityUrlTemplate": "https://my-build-instance/job/{Config:ProjectName}/", "executionUrlTemplate": "https://my-build-instance/job/{Config:ProjectName}/lastSuccessfulBuild/{ExternalExecutionId}/" }, "configurationProperties": [{ "name": "ProjectName", "required": true, "key": true, "secret": false, "queryable": false, "description": "The name of the build project must be provided when this action is added to the pipeline.", "type": "String" }], "inputArtifactDetails": { "maximumCount":integer, "minimumCount":integer}, "outputArtifactDetails": { "maximumCount":integer, "minimumCount":integer}, "tags": [{ "key": "Project", "value": "ProjectA" }] }This example adds tagging to the custom action by including the
Projecttag key andProjectAvalue on the custom action. For more information about tagging resources in CodePipeline, see Tagging resources.There are two properties included in the JSON file,
entityUrlTemplateandexecutionUrlTemplate. You can refer to a name in the configuration properties of the custom action within the URL templates by following the format of{Config:, as long as the configuration property is both required and not secret. For example, in the sample above, thename}entityUrlTemplatevalue refers to the configuration propertyProjectName.-
entityUrlTemplate: the static link that provides information about the service provider for the action. In the example, the build system includes a static link to each build project. The link format will vary, depending on your build provider (or, if you are creating a different action type, such as test, other service provider). You must provide this link format so that when the custom action is added, the user can choose this link to open a browser to a page on your website that provides the specifics for the build project (or test environment). -
executionUrlTemplate: the dynamic link that will be updated with information about the current or most recent run of the action. When your custom job worker updates the status of a job (for example, success, failure, or in progress), it will also provide anexternalExecutionIdthat will be used to complete the link. This link can be used to provide details about the run of an action.
For example, when you view the action in the pipeline, you see the following two links:
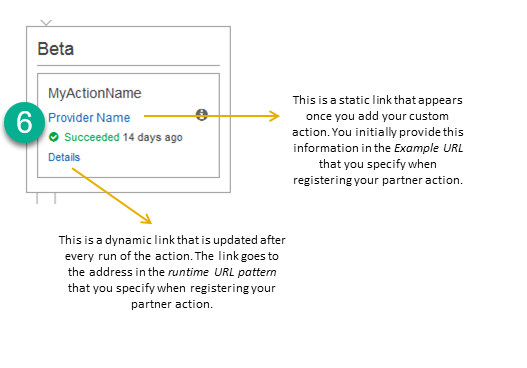
 This static link appears after you add your custom action
and points to the address in
This static link appears after you add your custom action
and points to the address in entityUrlTemplate, which you specify when you create your custom action. This dynamic link is updated after every run of the action
and points to the address in
This dynamic link is updated after every run of the action
and points to the address in executionUrlTemplate, which you specify when you create your custom action.For more information about these link types, as well as
RevisionURLTemplateandThirdPartyURL, see ActionTypeSettings and CreateCustomActionType in the CodePipeline API Reference. For more information about action structure requirements and how to create an action, see CodePipeline pipeline structure reference. -
-
Save the JSON file and give it a name you can easily remember (for example,
MyCustomAction.json). -
Open a terminal session (Linux, OS X, Unix) or command prompt (Windows) on a computer where you have installed the AWS CLI.
-
Use the AWS CLI to run the aws codepipeline create-custom-action-type command, specifying the name of the JSON file you just created.
For example, to create a build custom action:
Important
Be sure to include
file://before the file name. It is required in this command.aws codepipeline create-custom-action-type --cli-input-json file://MyCustomAction.json -
This command returns the entire structure of the custom action you created, as well as the
JobListaction configuration property, which is added for you. When you add the custom action to a pipeline, you can useJobListto specify which projects from the provider you can poll for jobs. If you do not configure this, all available jobs will be returned when your custom job worker polls for jobs.For example, the preceding command might return a structure similar to the following:
{
    "actionType": {
        "inputArtifactDetails": {
            "maximumCount": 1,
            "minimumCount": 1
       },
       "actionConfigurationProperties": [
            {
                "secret": false,
                "required": true,
                "name": "ProjectName",
                "key": true,
                "description": "The name of the build project must be provided when this action is added to the pipeline."
            }
        ],
        "outputArtifactDetails": {
            "maximumCount": 0,
            "minimumCount": 0
        },
        "id": {
            "category": "Build",
            "owner": "Custom",
            "version": "1",
            "provider": "My-Build-Provider-Name"
        },
        "settings": {
            "entityUrlTemplate": "https://my-build-instance/job/{Config:ProjectName}/",
            "executionUrlTemplate": "https://my-build-instance/job/mybuildjob/lastSuccessfulBuild/{ExternalExecutionId}/"
        }
    }
}
Note
As part of the output of the create-custom-action-type command, the
idsection includes"owner": "Custom". CodePipeline automatically assignsCustomas the owner of custom action types. This value can't be assigned or changed when you use the create-custom-action-type command or the update-pipeline command.
Create a job worker for your custom action
Custom actions require a job worker that will poll CodePipeline for job requests for the custom action, execute the job, and return the status result to CodePipeline. The job worker can be located on any computer or resource as long as it has access to the public endpoint for CodePipeline.
There are many ways to design your job worker. The following sections provide some practical guidance for developing your custom job worker for CodePipeline.
Topics
Choose and configure a permissions management strategy for your job worker
To develop a custom job worker for your custom action in CodePipeline, you will need a strategy for the integration of user and permission management.
The simplest strategy is to add the infrastructure you need for your custom job worker by creating Amazon EC2 instances with an IAM instance role, which allow you to easily scale up the resources you need for your integration. You can use the built-in integration with AWS to simplify the interaction between your custom job worker and CodePipeline.
To set up Amazon EC2 instances
-
Learn more about Amazon EC2 and determine whether it is the right choice for your integration. For information, see Amazon EC2 - Virtual Server Hosting
. -
Get started creating your Amazon EC2 instances. For information, see Getting Started with Amazon EC2 Linux Instances.
Another strategy to consider is using identity federation with IAM to integrate your existing identity provider system and resources. This strategy is particularly useful if you already have a corporate identity provider or are already configured to support users using web identity providers. Identity federation allows you to grant secure access to AWS resources, including CodePipeline, without having to create or manage IAM users. You can use features and policies for password security requirements and credential rotation. You can use sample applications as templates for your own design.
To set up identity federation
-
Learn more about IAM identity federation. For information, see Manage Federation
. -
Review the examples in Scenarios for Granting Temporary Access to identify the scenario for temporary access that best fits the needs of your custom action.
-
Review code examples of identity federation relevant to your infrastructure, such as:
-
Get started configuring identity federation. For information, see Identity Providers and Federation in IAM User Guide.
Ceate one of the following to use under your AWS account when running your custom action and job worker.
Users need programmatic access if they want to interact with AWS outside of the AWS Management Console. The way to grant programmatic access depends on the type of user that's accessing AWS.
To grant users programmatic access, choose one of the following options.
| Which user needs programmatic access? | To | By |
|---|---|---|
| IAM | (Recommended) Use console credentials as temporary credentials to sign programmatic requests to the AWS CLI, AWS SDKs, or AWS APIs. |
Following the instructions for the interface that you want to use.
|
|
Workforce identity (Users managed in IAM Identity Center) |
Use temporary credentials to sign programmatic requests to the AWS CLI, AWS SDKs, or AWS APIs. |
Following the instructions for the interface that you want to use.
|
| IAM | Use temporary credentials to sign programmatic requests to the AWS CLI, AWS SDKs, or AWS APIs. | Following the instructions in Using temporary credentials with AWS resources in the IAM User Guide. |
| IAM | (Not recommended) Use long-term credentials to sign programmatic requests to the AWS CLI, AWS SDKs, or AWS APIs. |
Following the instructions for the interface that you want to use.
|
The following is an example policy you might create for use with your custom job worker. This policy is meant as an example only and is provided as-is.
Note
Consider using the AWSCodePipelineCustomActionAccess managed
policy.
Develop a job worker for your custom action
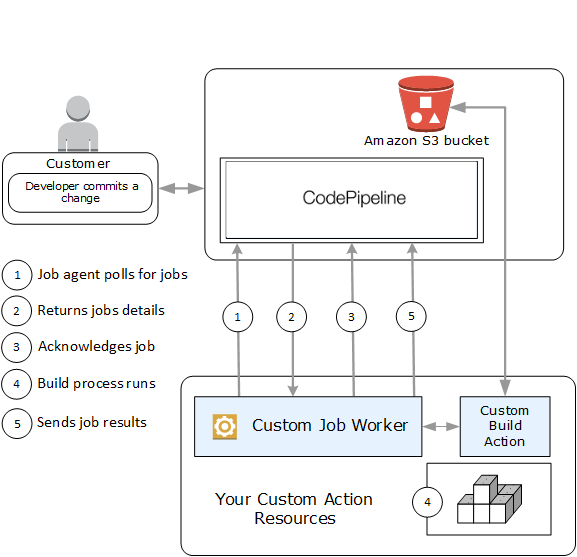
After you've chosen your permissions management strategy, you should consider how your job worker will interact with CodePipeline. The following high-level diagram shows the workflow of a custom action and job worker for a build process.
-
Your job worker polls CodePipeline for jobs using
PollForJobs. -
When a pipeline is triggered by a change in its source stage (for example, when a developer commits a change), the automated release process begins. The process continues until the stage at which your custom action has been configured. When it reaches your action in this stage, CodePipeline queues a job. This job will appear if your job worker calls
PollForJobsagain to get status. Take the job detail fromPollForJobsand pass it back to your job worker. -
The job worker calls
AcknowledgeJobto send CodePipeline a job acknowledgment. CodePipeline returns an acknowledgment that indicates the job worker should continue the job (InProgress), or, if you have more than one job worker polling for jobs and another job worker has already claimed the job, anInvalidNonceExceptionerror response will be returned. After theInProgressacknowledgment, CodePipeline waits for results to be returned. -
The job worker initiates your custom action on the revision, and then your action runs. Along with any other actions, your custom action returns a result to the job worker. In the example of a build custom action, the action pulls artifacts from the Amazon S3 bucket, builds them, and pushes successfully built artifacts back to the Amazon S3 bucket.
-
While the action is running, the job worker can call
PutJobSuccessResultwith a continuation token (the serialization of the state of the job generated by the job worker, for example a build identifier in JSON format, or an Amazon S3 object key), as well as theExternalExecutionIdinformation that will be used to populate the link inexecutionUrlTemplate. This will update the console view of the pipeline with a working link to specific action details while it is in progress. Although not required, it is a best practice because it enables users to view the status of your custom action while it runs.Once
PutJobSuccessResultis called, the job is considered complete. A new job is created in CodePipeline that includes the continuation token. This job will appear if your job worker callsPollForJobsagain. This new job can be used to check on the state of the action, and either returns with a continuation token, or returns without a continuation token once the action is complete.Note
If your job worker performs all the work for a custom action, you should consider breaking your job worker processing into at least two steps. The first step establishes the details page for your action. Once you have created the details page, you can serialize the state of the job worker and return it as a continuation token, subject to size limits (see Quotas in AWS CodePipeline). For example, you could write the state of the action into the string you use as the continuation token. The second step (and subsequent steps) of your job worker processing perform the actual work of the action. The final step returns success or failure to CodePipeline, with no continuation token on the final step.
For more information about using the continuation token, see the specifications for
PutJobSuccessResultin the CodePipeline API Reference. -
Once the custom action completes, the job worker returns the result of the custom action to CodePipeline by calling one of two APIs:
-
PutJobSuccessResultwithout a continuation token, which indicates the custom action ran successfully -
PutJobFailureResult, which indicates the custom action did not run successfully
Depending on the result, the pipeline will either continue on to the next action (success) or stop (failure).
-
Custom job worker architecture and examples
After you have mapped out your high-level workflow, you can create your job worker. Although the specifics of your custom action will ultimately determine what is needed for your job worker, most job workers for custom actions include the following functionality:
-
Polling for jobs from CodePipeline using
PollForJobs. -
Acknowledging jobs and returning results to CodePipeline using
AcknowledgeJob,PutJobSuccessResult, andPutJobFailureResult. -
Retrieving artifacts from and/or putting artifacts into the Amazon S3 bucket for the pipeline. To download artifacts from the Amazon S3 bucket, you must create an Amazon S3 client that uses Signature Version 4 signing (Sig V4). Sig V4 is required for AWS KMS.
To upload artifacts to the Amazon S3 bucket, you must additionally configure the Amazon S3
PutObjectrequest to use encryption. Currently only AWS Key Management Service (AWS KMS) is supported for encryption. AWS KMS uses AWS KMS keys. In order to know whether to use an AWS managed key or a customer managed key to upload artifacts, your custom job worker must look at the job data and check the encryption key property. If the property is set, you should use that customer managed key ID when configuring AWS KMS. If the key property is null, you use the AWS managed key. CodePipeline uses the AWS managed key unless otherwise configured.For an example that shows how to create the AWS KMS parameters in Java or .NET, see Specifying the AWS Key Management Service in Amazon S3 Using the AWS SDKs. For more information about the Amazon S3 bucket for CodePipeline, see CodePipeline concepts.
A more complex example of a custom job worker is available on GitHub. This sample is open source and provided as-is.
-
Sample Job Worker for CodePipeline
: Download the sample from the GitHub repository.
Add a custom action to a pipeline
After you have a job worker, you can add your custom action to a pipeline by creating a new one and choosing it when you use the Create Pipeline wizard, by editing an existing pipeline and adding the custom action, or by using the AWS CLI, the SDKs, or the APIs.
Note
You can create a pipeline in the Create Pipeline wizard that includes a custom action if it is a build or deploy action. If your custom action is in the test category, you must add it by editing an existing pipeline.
Add a custom action to an existing pipeline (CLI)
You can use the AWS CLI to add a custom action to an existing pipeline.
-
Open a terminal session (Linux, macOS, or Unix) or command prompt (Windows) and run the get-pipeline command to copy the pipeline structure you want to edit into a JSON file. For example, for a pipeline named
MyFirstPipeline, you would type the following command:aws codepipeline get-pipeline --nameMyFirstPipeline>pipeline.jsonThis command returns nothing, but the file you created should appear in the directory where you ran the command.
-
Open the JSON file in any text editor and modify the structure of the file to add your custom action to an existing stage.
Note
If you want your action to run in parallel with another action in that stage, make sure you assign it the same
runOrdervalue as that action.For example, to modify the structure of a pipeline to add a stage named Build and to add a build custom action to that stage, you might modify the JSON to add the Build stage before a deployment stage as follows:
, { "name": "MyBuildStage", "actions": [ { "inputArtifacts": [ { "name": "MyApp" } ], "name": "MyBuildCustomAction", "actionTypeId": { "category": "Build", "owner": "Custom", "version": "1", "provider": "My-Build-Provider-Name" }, "outputArtifacts": [ { "name": "MyBuiltApp" } ], "configuration": { "ProjectName": "MyBuildProject" }, "runOrder": 1 } ] }, { "name": "Staging", "actions": [ { "inputArtifacts": [ { "name": "MyBuiltApp" } ], "name": "Deploy-CodeDeploy-Application", "actionTypeId": { "category": "Deploy", "owner": "AWS", "version": "1", "provider": "CodeDeploy" }, "outputArtifacts": [], "configuration": { "ApplicationName": "CodePipelineDemoApplication", "DeploymentGroupName": "CodePipelineDemoFleet" }, "runOrder": 1 } ] } -
To apply your changes, run the update-pipeline command, specifying the pipeline JSON file, similar to the following:
Important
Be sure to include
file://before the file name. It is required in this command.aws codepipeline update-pipeline --cli-input-json file://pipeline.jsonThis command returns the entire structure of the edited pipeline.
-
Open the CodePipeline console and choose the name of the pipeline you just edited.
The pipeline shows your changes. The next time you make a change to the source location, the pipeline will run that revision through the revised structure of the pipeline.
